

Sean,
Yep the horizontal grey is a little on the darker side, as I used the Model Master enamels on this bird, match as close as possible to the Ttamiya paints listed on the instruction sheet and using the decals as per the box top artwork.
I should have some progress pix up by tomorrow.
Air Campaigns
Want to start or join a group build? This is where to start.
Want to start or join a group build? This is where to start.
Hosted by Frederick Boucher, Michael Satin
OFFICIAL: Hangar Queen Campaign

29Foxtrot

Joined: September 19, 2003
KitMaker: 708 posts
AeroScale: 674 posts

Posted: Saturday, September 03, 2011 - 12:42 AM UTC


Delbert

#073

Joined: October 05, 2002
KitMaker: 2,659 posts
AeroScale: 209 posts
Posted: Saturday, September 03, 2011 - 08:35 AM UTC
Quoted Text
@ Delbert: Nice Wildcat! Regarding the invisible thread: where can I get this?
Thanks ... as said before the thread is sewing product.. around here you get it at a craft or fabric supply store. I use the clear stuff.. it takes superglue pretty good too.
laters
29Foxtrot
Joined: September 19, 2003
KitMaker: 708 posts
AeroScale: 674 posts
Posted: Saturday, September 03, 2011 - 05:05 PM UTC
Made some progress on this F16cj Block 50, sadly the kit decals silvered, in places, [maybe down the track I'll strip it back to plastic and start again with a new paint scheme and decals], but for this campaign it's the boxart markings.


Just a touch up on the kit seat and a little light weathering and another few coats of Dull Coat too go.
Just a touch up on the kit seat and a little light weathering and another few coats of Dull Coat too go.

Jessie_C


Joined: September 03, 2009
KitMaker: 6,965 posts
AeroScale: 6,247 posts

Posted: Saturday, September 03, 2011 - 05:13 PM UTC
Quoted Text
Thanks ... as said before the thread is sewing product.. around here you get it at a craft or fabric supply store. I use the clear stuff.. it takes superglue pretty good too.
I have spools of both clear and "smoke" coloured thread. The "smoke" looks a little more evident on the model than the clear does, which can help sometimes when your base colour is very light.
SGTJKJ
#041

Joined: July 20, 2006
KitMaker: 10,069 posts
AeroScale: 3,788 posts

Posted: Sunday, September 04, 2011 - 04:43 PM UTC
I have made some progress on my ME 262.
I got the undercarriage done and let it dry overnight. When I tested it the next day I of course had a tail sitter even though I had already added lead in the nose of the Me 262.
No problem, I thought. I just added more smaller parts of lead to the nose dropping them through a crack with the undercarriage. However, even thoguh the undercarriage had dried overnight it gave way under the extra weight. Well, nothing to do that fix the undercarriage again. So far it is holding.
This Me 262 is continuing to fight me. One of the toughest kits I have ever made.
More to follow


I got the undercarriage done and let it dry overnight. When I tested it the next day I of course had a tail sitter even though I had already added lead in the nose of the Me 262.
No problem, I thought. I just added more smaller parts of lead to the nose dropping them through a crack with the undercarriage. However, even thoguh the undercarriage had dried overnight it gave way under the extra weight.
Well, nothing to do that fix the undercarriage again. So far it is holding. This Me 262 is continuing to fight me. One of the toughest kits I have ever made.
More to follow

SGTJKJ
#041
Joined: July 20, 2006
KitMaker: 10,069 posts
AeroScale: 3,788 posts
Posted: Monday, September 05, 2011 - 05:00 AM UTC
I have added the camouflage to the Me 262.
I allowed myself a little artistic license and went with a camouflage I think look cool instead of building a specific aircraft. A more genric Me 262 in 1945 being the result.
More to follow soon

I allowed myself a little artistic license and went with a camouflage I think look cool instead of building a specific aircraft. A more genric Me 262 in 1945 being the result.
More to follow soon
29Foxtrot
Joined: September 19, 2003
KitMaker: 708 posts
AeroScale: 674 posts
Posted: Monday, September 05, 2011 - 07:00 AM UTC
Jesper,
Looking good so far on the 262.
Using the kit decals on the F16cj, they silvered in places and the pitot tube on the radadome I've made from brass tube and wire, {not installed as yet}.
I have been thinking of striping the decals and repainting, the upper surface in a different tone of Grey and decal this bird, in a different livery.
29Foxtrot
Joined: September 19, 2003
KitMaker: 708 posts
AeroScale: 674 posts
Posted: Monday, September 05, 2011 - 03:17 PM UTC
The kit decals that still needed to be applied, have been put aside. As I stripped this bird back to bare plastic and repainted a new tri scheme, as I can use the decals from the same kit that I intend to build on another campaign build shortly, so the second kit decal sheet of the 2001 'Tiger Meet' markings can be used for this repainted bird.

The repaint as it is now and the 'walk way' line was painted in the under side light Grey and covered with 1mm masking tape, prior to painting the Darker Grey on the upper surfaces.
More to follow later.
The repaint as it is now and the 'walk way' line was painted in the under side light Grey and covered with 1mm masking tape, prior to painting the Darker Grey on the upper surfaces.
More to follow later.

windysean
Joined: September 11, 2009
KitMaker: 1,917 posts
AeroScale: 563 posts
Posted: Monday, September 05, 2011 - 03:35 PM UTC
Rob, the speed, vigor, and quality with which you build kits are outstanding!
10 of us have posted final photos to the gallery-- also outstanding!
Still quite a bit of time left for those not finished yet.
thanks again,
Sean H.
10 of us have posted final photos to the gallery-- also outstanding!
Still quite a bit of time left for those not finished yet.
thanks again,
Sean H.
Delbert
#073
Joined: October 05, 2002
KitMaker: 2,659 posts
AeroScale: 209 posts
Posted: Tuesday, September 06, 2011 - 01:54 PM UTC
Howdy everyone...
Just finished up a few more things on the Wildcat. its almost finished..
did some weathering, one thing I need to learn better for aircraft.. did the flatcoat and painted the "clear" invisible thread with tamiya light gunmetal I decanted from a spary can. have a couple more things to do, but I'm sure i'll finish this one..
29Foxtrot
Joined: September 19, 2003
KitMaker: 708 posts
AeroScale: 674 posts
Posted: Tuesday, September 06, 2011 - 03:19 PM UTC
Delbert,
Excellent workmanship on you're Wildcat, I assume it's the old Tamiya kit ?, as I looked at the new Hobby Boss Wildcat the other day, when in the LHS.
Got the second 'kit' decals on the F16, hopefully these won't silver up, as I have [2x of the After burner sheets I can pick a subject from], 3x other F16 kits in the stash. One of the wing tank pylons broke when I removed them and repaired it by drilling out the locating pins and replacing them with some Evergreen rod.
I changed the HUD to the upgraded Block 52, {just to make a little difference in appearance with the other F16's in the display case.


The repaired wing pylon:
Just a clean up around the intake and paint the radadome, refit all the weapons, remove the masking tape from the 'pipe'.
More later.
Excellent workmanship on you're Wildcat, I assume it's the old Tamiya kit ?, as I looked at the new Hobby Boss Wildcat the other day, when in the LHS.
Got the second 'kit' decals on the F16, hopefully these won't silver up, as I have [2x of the After burner sheets I can pick a subject from], 3x other F16 kits in the stash. One of the wing tank pylons broke when I removed them and repaired it by drilling out the locating pins and replacing them with some Evergreen rod.
I changed the HUD to the upgraded Block 52, {just to make a little difference in appearance with the other F16's in the display case.
The repaired wing pylon:
Just a clean up around the intake and paint the radadome, refit all the weapons, remove the masking tape from the 'pipe'.
More later.
Rebilda
#057

Joined: May 11, 2010
KitMaker: 248 posts
AeroScale: 123 posts

Posted: Tuesday, September 06, 2011 - 07:41 PM UTC
Great work guys!!! Love the Tiger, Rob!
Here's were I am after finally having decalled even the ordnance:
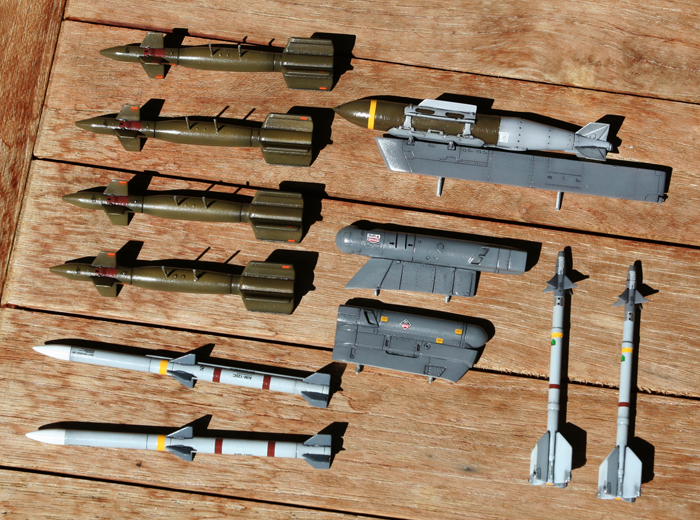
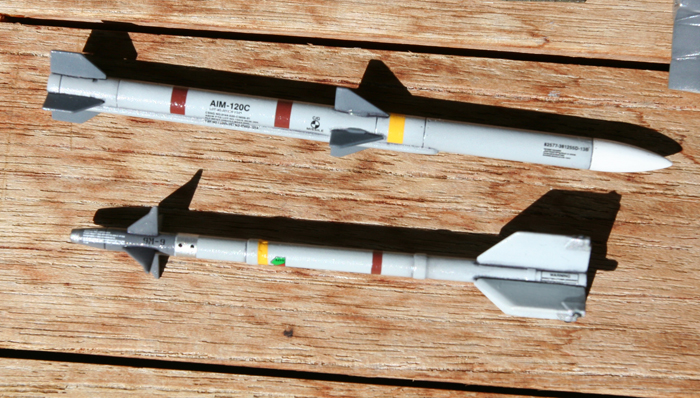
This is shean hull's JDAM, a real beauty:
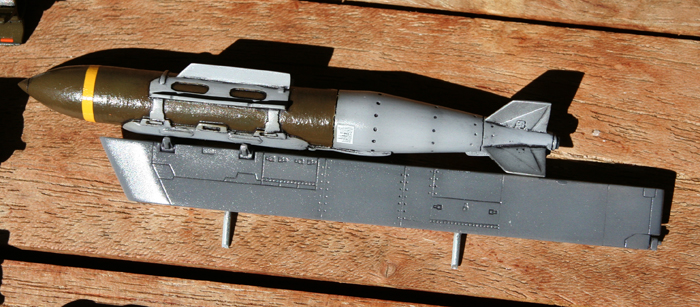
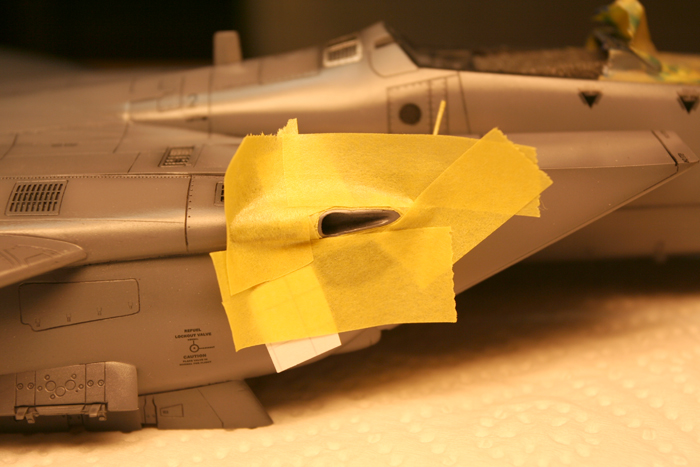
This is me being stupid and having to mask the gun-through AFTER decalling:
More tales of my merry mishaps soon to follow: messed up the gloss coat, yeehhaahhh!
Here's were I am after finally having decalled even the ordnance:
This is shean hull's JDAM, a real beauty:
This is me being stupid and having to mask the gun-through AFTER decalling:
More tales of my merry mishaps soon to follow: messed up the gloss coat, yeehhaahhh!

SGTJKJ
#041
Joined: July 20, 2006
KitMaker: 10,069 posts
AeroScale: 3,788 posts
Posted: Wednesday, September 07, 2011 - 02:01 AM UTC
Looking good, Delbert. Please share more pictures when it is completely finished.
Beautiful ordnance, Leo. Small models in themselves. Looking forward to see your finished build with a nice gloss coat
I have now finished my MPM 1/72 scale Me 262. The worst kit I have ever build. Serious fit problems in almost all areas. Very nice PE details mixed in with chunk like "details" on the plastic parts. Really not recommended.
The final insult from this kit were the decals that do not like water(!) The decals split up in a thousand pieces with the slightest touch. I had to go through the spares box and make up some markings on my own.
Well, it is finished now. Not the most enjoyable build, but great satisfaction in finishing it since it went back to the spares bx twice only to be brought back to the working table out of sheer stubborness on my part.


Beautiful ordnance, Leo. Small models in themselves. Looking forward to see your finished build with a nice gloss coat
I have now finished my MPM 1/72 scale Me 262. The worst kit I have ever build. Serious fit problems in almost all areas. Very nice PE details mixed in with chunk like "details" on the plastic parts. Really not recommended.
The final insult from this kit were the decals that do not like water(!)
The decals split up in a thousand pieces with the slightest touch. I had to go through the spares box and make up some markings on my own. Well, it is finished now. Not the most enjoyable build, but great satisfaction in finishing it since it went back to the spares bx twice only to be brought back to the working table out of sheer stubborness on my part.
29Foxtrot
Joined: September 19, 2003
KitMaker: 708 posts
AeroScale: 674 posts
Posted: Wednesday, September 07, 2011 - 02:23 AM UTC
Jesper,
Great job on finishing the Me 262.
I've got the weapons pylons fixed to the hard points on the F16 and no silvering decals so far. Undecided as to how to do the burner, maybe just coat it with some burnt blue and mix some titanium and light gun metal over it, from the Tamiya 'weathering sets'. Then on to the Dullcoat and fitting the weapons.


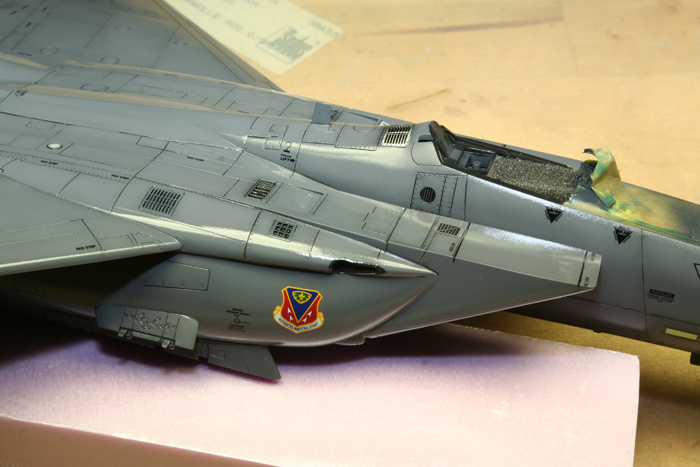
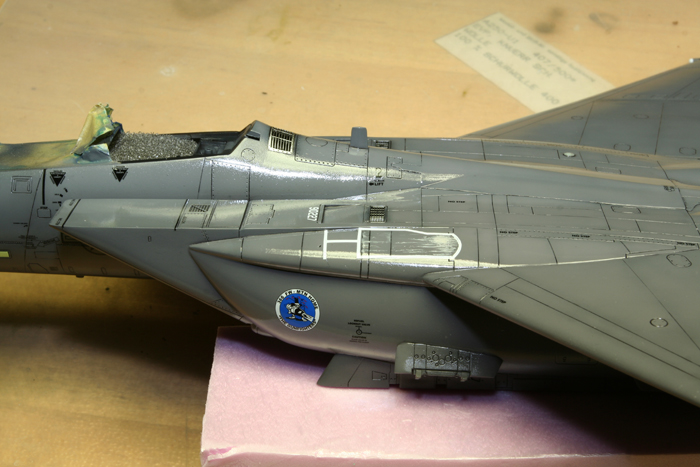
A close up of the 'Tiger'
The decal softner had an effect on the paint work, but with an overall wash of Smoke it'll remove the blemish.
Great job on finishing the Me 262.
I've got the weapons pylons fixed to the hard points on the F16 and no silvering decals so far. Undecided as to how to do the burner, maybe just coat it with some burnt blue and mix some titanium and light gun metal over it, from the Tamiya 'weathering sets'. Then on to the Dullcoat and fitting the weapons.
A close up of the 'Tiger'
The decal softner had an effect on the paint work, but with an overall wash of Smoke it'll remove the blemish.

mykroft
Joined: November 14, 2009
KitMaker: 270 posts
AeroScale: 264 posts

Posted: Wednesday, September 07, 2011 - 03:40 AM UTC
Got a few minutes this morning to put the finishing touches on. The RY-3/Liberator C.IX is now done.

Revell Liberator C.IX 1/72 by mawz_models, on Flickr

Revell Liberator C.IX 1/72 by mawz_models, on Flickr

Revell Liberator C.IX 1/72 by mawz_models, on Flickr
Revell Liberator C.IX 1/72 by mawz_models, on Flickr
Revell Liberator C.IX 1/72 by mawz_models, on Flickr
Revell Liberator C.IX 1/72 by mawz_models, on Flickr
windysean
Joined: September 11, 2009
KitMaker: 1,917 posts
AeroScale: 563 posts
Posted: Wednesday, September 07, 2011 - 04:19 AM UTC
Whoa! This quiet campaign is roaring now!
Delbert excellent job-- that subtle pre-shading really does the trick!
29Foxtrot nice second paint job and decalling. Always nice work-- and so quick!
Rebilda You've shown tenacity and it's really paid off! Those are really nice. ...and careful with that masking tape around the decals (I know, I've pulled off my share.)
SGTJKJ You made a silk purse out of a sow's ear. Your finished Messerschmidt doesn't hint at what a dog of a kit you used. Great job.
mykroft That's a big beauty there. ...and I see the celebratory Labatt's Blue in the background. (Curious-- the props are only black on the leading edges. Is that deicing boots on each one?)
Cheers!
-Sean.
Delbert excellent job-- that subtle pre-shading really does the trick!
29Foxtrot nice second paint job and decalling. Always nice work-- and so quick!
Rebilda You've shown tenacity and it's really paid off! Those are really nice. ...and careful with that masking tape around the decals (I know, I've pulled off my share.)
SGTJKJ You made a silk purse out of a sow's ear. Your finished Messerschmidt doesn't hint at what a dog of a kit you used. Great job.
mykroft That's a big beauty there. ...and I see the celebratory Labatt's Blue in the background.
(Curious-- the props are only black on the leading edges. Is that deicing boots on each one?)Cheers!
-Sean.
mykroft
Joined: November 14, 2009
KitMaker: 270 posts
AeroScale: 264 posts
Posted: Wednesday, September 07, 2011 - 04:29 AM UTC
Sean, I believe so. I suspect the aircraft in question actually had normal props but the booted props are probably a legacy of the original RCAF marking option, which was the Rockcliffe Ice Wagon, a deicing research aircraft. I went with the kit callouts despite this.
Rebilda
#057
Joined: May 11, 2010
KitMaker: 248 posts
AeroScale: 123 posts
Posted: Wednesday, September 07, 2011 - 04:47 AM UTC
Thanks for the kind words!
@Adam: what on earth did you use for that awesome metal finish?
Here's after deacaling and with gloss coat:
Looks ok, right? Just wait for the cold hard truth of close ups...
@Adam: what on earth did you use for that awesome metal finish?
Here's after deacaling and with gloss coat:
Looks ok, right? Just wait for the cold hard truth of close ups...

md72

#439
Joined: November 05, 2005
KitMaker: 4,950 posts
AeroScale: 3,192 posts

Posted: Wednesday, September 07, 2011 - 06:46 AM UTC
Well Adam, looks like my PB4Y-2 will stay in the stash a LOT longer. At least til everyone forgets how well you did on that one..
Great work folks!
Great work folks!

29Foxtrot
Joined: September 19, 2003
KitMaker: 708 posts
AeroScale: 674 posts
Posted: Wednesday, September 07, 2011 - 08:15 AM UTC
Almost finished this F16cj.


mykroft
Joined: November 14, 2009
KitMaker: 270 posts
AeroScale: 264 posts
Posted: Wednesday, September 07, 2011 - 10:54 AM UTC
Leo, that's Polyscale Flat Aluminum.
Unfortunately the finish itself is awful from close up but that's mostly due to my unfortunate attempt to sand Vallejo's Polyurethane Primer (which peels rather than sands). I may have to try the Polyscale again with a better primer, the tone is dead on for well used Aluminum.
Unfortunately the finish itself is awful from close up but that's mostly due to my unfortunate attempt to sand Vallejo's Polyurethane Primer (which peels rather than sands). I may have to try the Polyscale again with a better primer, the tone is dead on for well used Aluminum.
mykroft
Joined: November 14, 2009
KitMaker: 270 posts
AeroScale: 264 posts
Posted: Wednesday, September 07, 2011 - 10:55 AM UTC
Mark, Go ahead and build your PB4Y-2, mine may look good from 5 feet, but sadly it's not all that great from close in. The finish itself is quite rough (mostly due to primer and fit issues).
SGTJKJ
#041
Joined: July 20, 2006
KitMaker: 10,069 posts
AeroScale: 3,788 posts
Posted: Wednesday, September 07, 2011 - 02:54 PM UTC
Thanks for the comments on my Me 262. I appreciate it. It was worht the struggle, but a struggle none the less.
Very nice Liberator, Adam. Realistic metal finish. Not the shinning silver finish often seen on models and rarely on "in action" aircraft. Great job!
Leo, you are right. It looks fine in the photos - will you provide close ups? It looks like a great build so far. Looking forward to see more.
Very nice Liberator, Adam. Realistic metal finish. Not the shinning silver finish often seen on models and rarely on "in action" aircraft. Great job!
Leo, you are right. It looks fine in the photos - will you provide close ups? It looks like a great build so far. Looking forward to see more.
Rebilda
#057
Joined: May 11, 2010
KitMaker: 248 posts
AeroScale: 123 posts
Posted: Wednesday, September 07, 2011 - 09:11 PM UTC
Thanks for that headsup, Adam. The reason why I didn't buy the primer a few months ago is because somewhere on kitmaker you warned me off!!!
Well Jesper, looks good five feet away. BUT this is what happened:
when almost done with the glosscoat I spilled some of my airgun's content on my fingers. To wipe that off I sprazzed some IPA on a tissue. That I did with a little too much verve and some (speak: A LOT) of drops sprinkled on my freshly glossed Eagle.
As Pink Floyd put it: see you on the dark side of the MOON:

See that near the inspection hatches? The upper side and some of the left forward fuselage was evenly pitted....
AAAAAAAAAAAAAARRRRRRRRRRRRGGGGGGGGHHHHHH!!!!!!!!!!!!

Well Jesper, looks good five feet away. BUT this is what happened:
when almost done with the glosscoat I spilled some of my airgun's content on my fingers. To wipe that off I sprazzed some IPA on a tissue. That I did with a little too much verve and some (speak: A LOT) of drops sprinkled on my freshly glossed Eagle.
As Pink Floyd put it: see you on the dark side of the MOON:
See that near the inspection hatches? The upper side and some of the left forward fuselage was evenly pitted....
AAAAAAAAAAAAAARRRRRRRRRRRRGGGGGGGGHHHHHH!!!!!!!!!!!!
29Foxtrot
Joined: September 19, 2003
KitMaker: 708 posts
AeroScale: 674 posts
Posted: Wednesday, September 07, 2011 - 10:38 PM UTC
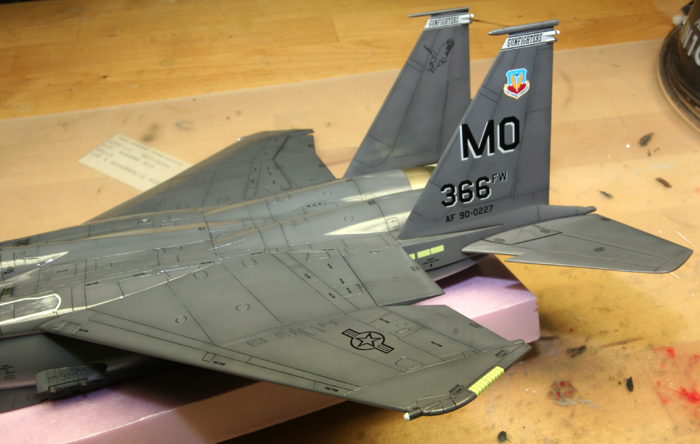
My F16cj is now finished.


 |

WEB HOSTING BY


Copyright ©2021 AeroScale and Kitmaker Network, a subsidiary of Silver Star Enterprises
All Rights Reserved. Please read our Conditions of Use and Privacy Policy.
All Rights Reserved. Please read our Conditions of Use and Privacy Policy.