Air Campaigns
Want to start or join a group build? This is where to start.
OFFICIAL: Hangar Queen Campaign
windysean
_VISITCOMMUNITY
Wisconsin, United States
Joined: September 11, 2009
KitMaker: 1,917 posts
AeroScale: 563 posts
Posted: Friday, August 26, 2011 - 01:18 AM UTC
That's a beauty, Rebilda! Don't worry about time-- when you finish you'll get a ribbon (especially if you finish on time before the 15th ).

I hadn't heard of those decal softeners, but I'll watch for them now. I've been getting along with Solvaset in this bottle...
DecalsTime-20110704-2140.jpg
I think that's from Microscale, right? I bought it years ago off a LHS shelf.

thanks for posting.
-Sean H.
windysean
_VISITCOMMUNITY
Wisconsin, United States
Joined: September 11, 2009
KitMaker: 1,917 posts
AeroScale: 563 posts
Posted: Friday, August 26, 2011 - 02:36 AM UTC
Rebilda, according to Daco's website , "Once you've used DACO Products Decalsetting, you'll never use Microscale's Sol & Set ever again ..."
I like that challenge.
...now, how many Euros do I have? It's 5 per bottle or all three for 12.50, plus 11 for worldwide shipping... ... what's that Euro conversion?... ...The dollar is tanked...
Anyway, I'll take your word for it!
That really is a sharp looking metal F-15 though-- perfect panel lines, etcetera.
thanks again,
-Sean.
SellSword
_VISITCOMMUNITY
Indiana, United States
Joined: February 15, 2010
KitMaker: 167 posts
AeroScale: 141 posts
Posted: Friday, August 26, 2011 - 11:42 AM UTC
I need some of that Daco stuff! I just spent 15$ on decals to replace the ones I destroyed... grrr! They finally arrived, but I've been sick all week and haven't had any bench time. Maybe tomorrow... I've got some lawn work and a batch of beer to bottle, but after that I think I should be able to get an hour or two in.

I love the huge builds Sebastian and Jessie are doing! It takes a lot of guts to do those and some commitment to get em done. I've got 1/24 B-24 and B-17 in the stash that I'll look into the boxes sometimes, but I haven't gotten the courage to actually start em... and Rebilda, your metal looks awesome! I've got plans to skin one of my P-51s in aluminum that I get from work...

Anyhoo, don't lose hope! we're on the home stretch of the campaign and I'll see you all at the finish.
Rebilda
#057
_VISITCOMMUNITY
Bayern, Germany
Joined: May 11, 2010
KitMaker: 248 posts
AeroScale: 123 posts
Posted: Saturday, August 27, 2011 - 11:18 AM UTC
Evening, guys.

Well in my oppinion you just need the red one(strong), for everything else maybe Solvaset or your preferred kind's enough. And unless you knock over the jar (now look who's talking...hrrm) you will have a LOT of decalling before you need a new one. Been using mine for over two years now...or is it three? Anywho, money well spent.
Hope I'll make it. Just spent a few hours on decalling bombs for Pete's sake. And I haven't really begun on the bird yet...

Well then, greetings and
Good night..
29Foxtrot
_VISITCOMMUNITY
Victoria, Australia
Joined: September 19, 2003
KitMaker: 708 posts
AeroScale: 674 posts
Posted: Saturday, August 27, 2011 - 12:35 PM UTC
Hi All,

Some great builds on this Campaign and seeing as I'm a late starter in this one, with my Italeri A20g Havoc / Boston V.

What was to be per the RAAF decal option, but the {Pale Green} color Italeri called for was not a good choice, for a faded Foliage Green choice, once it was applied to the model subject.


mykroft
_VISITCOMMUNITY
Ontario, Canada
Joined: November 14, 2009
KitMaker: 270 posts
AeroScale: 264 posts
Posted: Saturday, August 27, 2011 - 02:20 PM UTC
Solvaset's a Walthers product (the train guys), Microscale makes Microsol and Microset. I personally use Solvaset for most things but it's a LOT hotter than the Microscale products. I really should get Microsol and Microset one of these days (or maybe the Daco products).

And now on to the RY-3, or more properly the Liberator C.IX as it's in RAF markings. It's almost done, I need to seal the decals, add a couple clear bits and an aerial and spray the anti-glare panel. The finish here is not up to my usual standards as I was trying out Vallejo's Grey Acrylic/Urethane primer. Not impressed, it peels when sanded. Which left me with the option of stripping and refinishing or just getting on with the build. I did the latter and experimented a bit. Polyscale Flat Aluminum was used for the finish (Not really impressed by that either, the Tamiya stuff is better) and I hand painted a few bits I normally don't as practice. This left the props a little rough, I have to admire anybody who can produce a good finish with a hairy stick because I sure can't.


Revell Liberator C.IX 1/72 by mawz_models, on Flickr
Jessie_C
_VISITCOMMUNITY
British Columbia, Canada
Joined: September 03, 2009
KitMaker: 6,965 posts
AeroScale: 6,247 posts
Posted: Saturday, August 27, 2011 - 04:28 PM UTC
Adam, did the Revel box include markings for the RCAF's "Rockliffe Ice Wagon"? I missed building that one back in the ancient days of Matchbox...
SGTJKJ
#041
_VISITCOMMUNITY
Kobenhavn, Denmark
Joined: July 20, 2006
KitMaker: 10,069 posts
AeroScale: 3,788 posts
Posted: Saturday, August 27, 2011 - 05:03 PM UTC
Looks good, Rob. This is the 1/48 scale kit, right?

I have that in my stash. Does this kit goe together well - and has it been so long since you started it you cannot remember?

I will probably join with an old limited run Me 262 in 1/72. Just need to make sure all the parts are still there. Pictures to follow later.

Looking forward to see more.
Middle_Franconian
_VISITCOMMUNITY
Bayern, Germany
Joined: January 02, 2011
KitMaker: 279 posts
AeroScale: 239 posts
Posted: Saturday, August 27, 2011 - 11:16 PM UTC
@ Delbert: Nice Wildcat! Regarding the invisible thread: where can I get this?

@ Leo: Auf gehts!

@ Jessie: Excellent Cub! Captures the look of the real one very well. I have a soft spot for this Eastern Block stuff...

@ Ray: thanks for your encouraging words. I must say that without that forums´ support the Atlantic´s progress would not be that far. Everyday I must overcome temptations like starting another kit (Hasegawa/Tamiya shake-n-bake) and give the Atlantic some rest.

@ Adam & Rob: welcome!!

Regarding the decal softener discussion: I prefer Revell´s decal softener, works on most of decals. Or Micro Scale Micro Sol. I once used Gunze´s Mr Mark Softener (was that the name?) until it attacked the surface of a finished model in a not tolerable way .
29Foxtrot
_VISITCOMMUNITY
Victoria, Australia
Joined: September 19, 2003
KitMaker: 708 posts
AeroScale: 674 posts
Posted: Sunday, August 28, 2011 - 02:09 AM UTC
Sebastian,

Thanks for the welcome. I also use the 'Invsi Thread' on my model subjects, I usually buy it from a fabric store, it is available in black or smoke.

Jesper,

Yes this is the 48 scale kit, {old AMT tooling}, it went together ok, but I added some 'L' shaped pieces inside the nacelles to support the engines and moved the main under carriage legs 1/4 forward, from the kit marked location points.

I painted the upper surface in Gunze acrylic RAF Dark Green {a semi gloss finish}, after masking the AEAF bands and the scollop demarcation lines.


Made up the 4x .50 cal guns from brass tube, with Evergreen rod {for a more realistic appearance}.


Using a clothes peg as a guide {for width of the cockpit entry floor}, I made a raft from tissue, using diluted PVA glue, {colored with a few drops of Gunze acrylic RAF Dark Earth}, followed by using Model Master RLM 04, when touch dry.


Now to let it sit for a day or so before adding the decals.
SellSword
_VISITCOMMUNITY
Indiana, United States
Joined: February 15, 2010
KitMaker: 167 posts
AeroScale: 141 posts
Posted: Sunday, August 28, 2011 - 07:46 AM UTC
Okay! Another ribbon for me! Yippee!

Here she is:


SGTJKJ
#041
_VISITCOMMUNITY
Kobenhavn, Denmark
Joined: July 20, 2006
KitMaker: 10,069 posts
AeroScale: 3,788 posts
Posted: Sunday, August 28, 2011 - 08:02 AM UTC
Thanks for the insights, Rob. Good to have in mind when I get around to building mine.

Very nice Bf 109, Ray. The camouflage and finish is very nice.

I have now looked through my entry for this campaign. The old mixed media MPM 1/72 Me 262. It looks like all the parts are there. Looking at it I can see where I went wrong with all that very think plastic and thin PE. It will be a challenge, but I will get it flying

windysean
_VISITCOMMUNITY
Wisconsin, United States
Joined: September 11, 2009
KitMaker: 1,917 posts
AeroScale: 563 posts
Posted: Sunday, August 28, 2011 - 09:51 AM UTC
Ah ha! This campaign is getting exciting as we near the end! Of course the whole purpose of this campaign is dedicated to procrastinators.

29Foxtrot/ Rob - I was excited to see your name on the list originally, because you've done such good work on other campaigns. Glad to see you've gotten to this one, and it looks like you're up to your own usual standards.
Besides that, thanks for the what and where for "invisible thread". Also, how did you get that scalloping demarkation line so uniform for the entire length of the plane?
Mycroft/ Adam - That RAF Liberator is really working out well! Don't be afraid of brushes! (Says the guy who hasn't worked up to an airbrush yet). Nice to see that nearly complete.
Jessie_C - no answer from Mycroft about the RCAF Liberator decal option...
SGTJKJ/ Jesper - Nice choice of an ME262. That was a wicked plane from what I've read and seen in documentaries. I agree that kit looks like a challenge, so I'll enjoy watching you tame it.
finally, Sellsword/ Ray - Well done. She's a beaut!

(And I have to say again that I'm not learning a LOT from everyone in this campaign-- ha ha, leading a campaign sure doesn't mean I know more than any other campaigner!)
thanks again!
-Sean H.
mykroft
_VISITCOMMUNITY
Ontario, Canada
Joined: November 14, 2009
KitMaker: 270 posts
AeroScale: 264 posts
Posted: Sunday, August 28, 2011 - 01:17 PM UTC
@Jessie_C: The Revell boxing gets RAF markings (mistakenly billed as RCAF) rather than the Rockcliff Ice Wagon. You'd have to find the old Matchbox boxing to get those markings.
windysean
_VISITCOMMUNITY
Wisconsin, United States
Joined: September 11, 2009
KitMaker: 1,917 posts
AeroScale: 563 posts
Posted: Sunday, August 28, 2011 - 02:15 PM UTC

Quoted Text

...(And I have to say again that I'm not learning a LOT from everyone in this campaign-- ha ha, leading a campaign sure doesn't mean I know more than any other campaigner!)
thanks again!
-Sean H.


Whoops! Meant to say that I AM learning a LOT here.
-Sean.
29Foxtrot
_VISITCOMMUNITY
Victoria, Australia
Joined: September 19, 2003
KitMaker: 708 posts
AeroScale: 674 posts
Posted: Monday, August 29, 2011 - 12:56 AM UTC
Sean,

Thanks for the kind words. If you can't find the 'Invisi Thread let me know.

The scollop demarcation line was a length of masking tape, then I applied some Humbrol Maskol, using a 'Q' tip to get the arched line as neat as possible. When touch dry the Maskol and tape was removed and using the tape, as a means of removing any excess Maskol and / or any peeling paint. Simply by pressing on the surface with the tape and lifting off the flaked paintwork.

As I guessed the width of the AEAF Bands, for both the wings and fuselage, I used 2 of the white backing discs {from a Tamiya 48 Spitfire kit}, as a base for the main wing roundels, over the AEAF Bands, some of the original kit decals {such as the wing walk outlines} and some other decals from the 'spares box' along with a fictional mission tally and nose art to finish this bird.

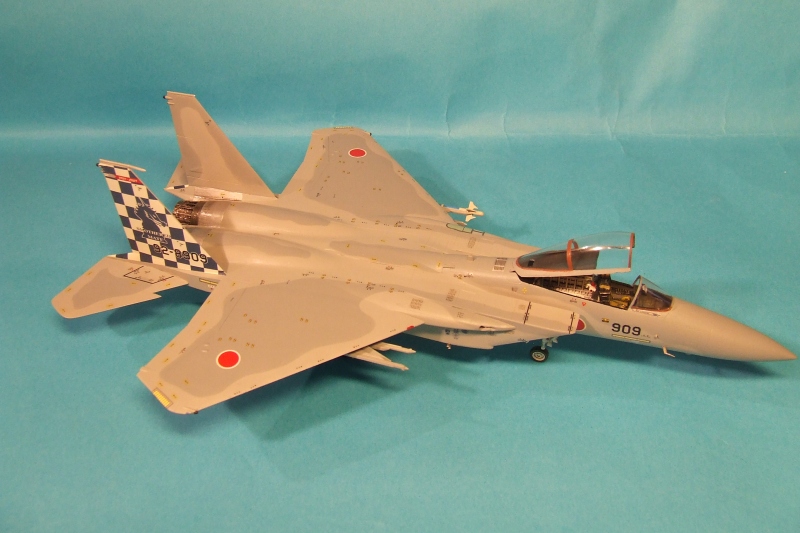
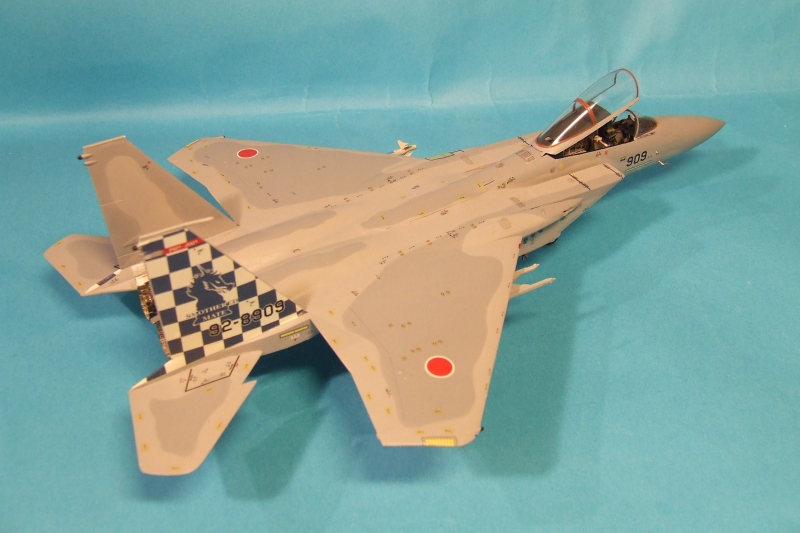
The trailing antenia is 2 pices of 'Invisi Thread', the pitot tube on the top of the rudder post is a scratch built addition, {the kit instructions show this part, but do not supply it in the kit} and drilled out the holes from the canopy roof prior to gluing it in place, with the aide of 2 small pieces of brass wire.

The panel lines are highlighted using a 50/50 mix of Tamiya Smoke and Flatt Black, mixed as a 15 {thinner} - 1{paint} ratio and airbrushed free hand over the model, in several applications, other weathering effects are a mix of Pastels and the Tamiya 'Weathering Sets'


So i can now call this as finished.

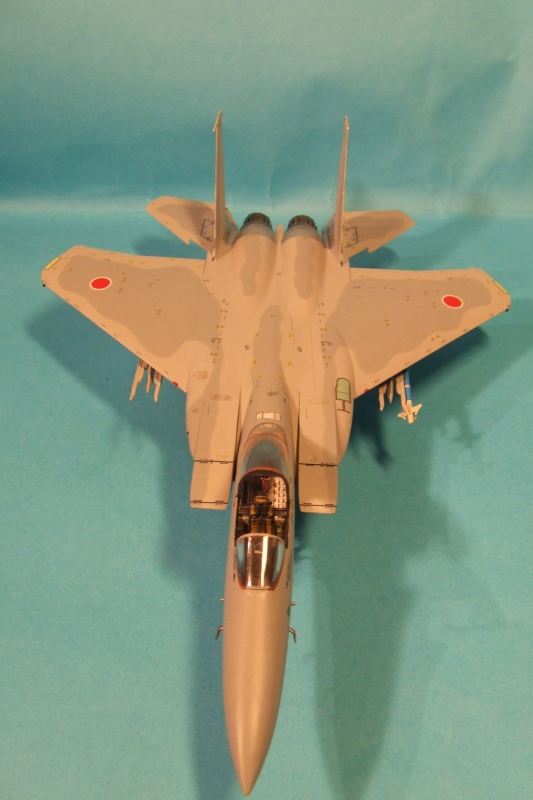
Note: The wing tip nav lights are clear parts taken from the 'left over' P-39 Airacobra kit, I painted the locating pin stems in either a clear red or blue and drilled a hole into the centre of the marked area of the kit detail, slightly bigger than the lense locating pin of the clear part.
For a little extra realism.
windysean
_VISITCOMMUNITY
Wisconsin, United States
Joined: September 11, 2009
KitMaker: 1,917 posts
AeroScale: 563 posts
Posted: Monday, August 29, 2011 - 02:01 AM UTC
Thanks, Rob and Ray, and go ahead and post final photos to the gallery at Hangar Queen Gallery or photos/Aeroscale/Aeroscale Campaigns/ 2010 Campaigns/ Hangar Queen.
Isn't it satisfying to have those lingering half-builds proudly on the display shelf now?
-Sean H.

edit: ARGHH! I've made a scrambled mess of the hotlink, so I've redone it to the standard style. Regardless, it should work now!

another edit: Delbert and MLD, post your final photos too! Thanks much.
Tomcat31
#042
_VISITCOMMUNITY
England - North East, United Kingdom
Joined: November 18, 2006
KitMaker: 2,828 posts
AeroScale: 1,720 posts
Posted: Monday, August 29, 2011 - 09:47 AM UTC

Quoted Text

edit: ARGHH! I've made a scrambled mess of the hotlink, so I've redone it to the standard style. Regardless, it should work now! .

Fixed it for you
29Foxtrot
_VISITCOMMUNITY
Victoria, Australia
Joined: September 19, 2003
KitMaker: 708 posts
AeroScale: 674 posts
Posted: Monday, August 29, 2011 - 12:26 PM UTC
Hi All,

Another build that was started a few years ago, but missing both it's canopy, {until now} and the kit decals, it's the Revell boxing of the Hasegawa tooled Hurricane IIc.


I acquired this kit for the total sum of $5 sight unseen.


The decals i put on this are from an old AeroMaster sheet, the AEAF bands added a different appearance to the under surface of the subject, both the fuselage fighter band, spinner and Allied fighter ID yellow leading edges on the outer main wing have all, been painted weathering and staining is all Pastels.

So another is now finished.
RedwingNev
_VISITCOMMUNITY
England - East Midlands, United Kingdom
Joined: February 07, 2004
KitMaker: 911 posts
AeroScale: 415 posts
Posted: Tuesday, August 30, 2011 - 07:57 AM UTC
Well, my F-15J is finished, originally a participant in the Great Checkerboard Campaign. Hasegawa 1/72 kit, built as a plane from 303 Squadron, specially marked for the 2007 fighter meet.


Lots of little mistakes that could do with touching up, but from a distance (or a fuzzy digicam pic) only I know 
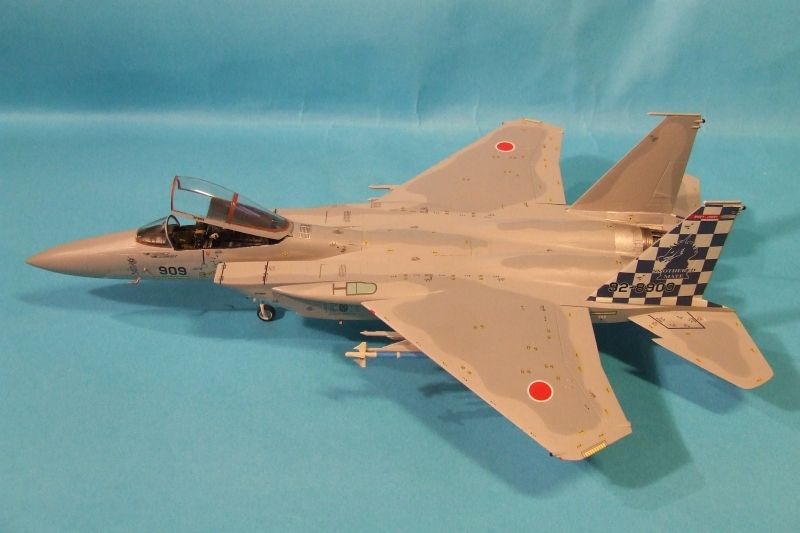
so I'm calling this one done. Thanks for letting me play y'all.
windysean
_VISITCOMMUNITY
Wisconsin, United States
Joined: September 11, 2009
KitMaker: 1,917 posts
AeroScale: 563 posts
Posted: Tuesday, August 30, 2011 - 12:42 PM UTC
Thanks much, Allen, and well done to Rob again and Neil!
I certainly don't see the mistakes that you say are there.
And I see that Sellsword and Redwing both put their builds into the gallery! It's shaping up! Two pages of complete builds there ...so far.
-thanks,
Sean.
SGTJKJ
#041
_VISITCOMMUNITY
Kobenhavn, Denmark
Joined: July 20, 2006
KitMaker: 10,069 posts
AeroScale: 3,788 posts
Posted: Wednesday, August 31, 2011 - 03:56 AM UTC
Beautiful build, Neil. That is one great looking Eagle.

Rob, a very nice result from the Italeri kit. I hope I will be able to do the same with mine. I really like your weathering.

I must confess I have now found out why my kit was unfinished in the first place. There are some major surgery needed on the fuselage and wing section. I got that fixed although a lot of filling and sanding would still be needed.

I am moving forward determined to get something that looks like a Me 262 from this kit.


Things are going well at this point. However, I notice I have the make major surgery on the wing.


Surgery done. It looks OK although there are some major filling and sanding left to get a decent wing.

29Foxtrot
_VISITCOMMUNITY
Victoria, Australia
Joined: September 19, 2003
KitMaker: 708 posts
AeroScale: 674 posts
Posted: Thursday, September 01, 2011 - 10:28 AM UTC
Here is another that was put aside for a few years, {due to too many contract and consignment builds or other things in life}, that I can finish for this campaign.
All the parts and decals where still in the box, so I don't need to search for any parts.


This is where the build progress was ended, before it was put back in it's box.
SGTJKJ
#041
_VISITCOMMUNITY
Kobenhavn, Denmark
Joined: July 20, 2006
KitMaker: 10,069 posts
AeroScale: 3,788 posts
Posted: Friday, September 02, 2011 - 02:50 AM UTC
A little more progress on my Me 262. It is tough going, but I am determined to get this one done. The overall fit is very bad, so I have used plastic card to fill most large gaps. Then I will trim the excess plastic and hit it with milliput and/or superglue for the rest.

More to follow

windysean
_VISITCOMMUNITY
Wisconsin, United States
Joined: September 11, 2009
KitMaker: 1,917 posts
AeroScale: 563 posts
Posted: Friday, September 02, 2011 - 02:56 AM UTC
Rob- That certainly qualifies too. (The gray on the horizontal surfaces looks dark to me, is that right? I'm certainly no expert, ha ha.)
Jesper- Stay with it. You're doing fine work!
thanks for posting!
-Sean.