OFFICIAL: Hangar Queen Campaign
Wisconsin, United States
Joined: September 11, 2009
KitMaker: 1,917 posts
AeroScale: 563 posts
Posted: Tuesday, May 10, 2011 - 02:03 AM UTC
I told you I'd get around to my own build! (I've over-committed on campaigns and I have two starting on May 15th!)
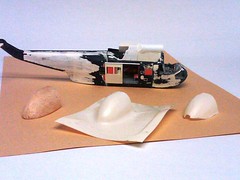
I keep looking at this thing, and I don't have a good plan for creating the engine housing and rotorhead. I let myself get sidetracked with other stuff (and TV), but I started gluing on basic shapes and building it up.
Here's her new hat for Kentucky Derby Day...
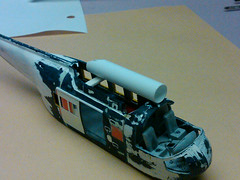
then I keep adding more...
eventually adding smaller and smaller filler pieces to the mash-up-- then LOTS of putty.
I have no current plans to scribe panel lines or that much detail, but there are some guys here doing fantastic finishes on their queens. You're all inspiring me.

thanks,
Sean.

Current: model railroad layout
Stalled a while ago:
. 1950's Chrome, WW II Twins
Last completed: Police Car
Wisconsin, United States
Joined: September 11, 2009
KitMaker: 1,917 posts
AeroScale: 563 posts
Posted: Friday, May 13, 2011 - 01:29 AM UTC
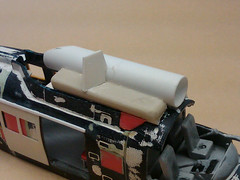
More plastic...
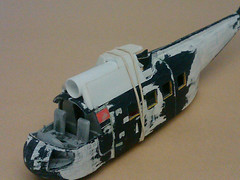
and now, using a round rear shape I formed from balsa (maybe 6 years ago?) and formed on an old Mattel Vacu-Form toy that might be 50 years old.
I know a bunch of you might be thinking "Sean's off his rocker", but actually it's going as well as I thought it would.

thanks for looking,
Sean.

Current: model railroad layout
Stalled a while ago:
. 1950's Chrome, WW II Twins
Last completed: Police Car

#439
Washington, United States
Joined: November 05, 2005
KitMaker: 4,950 posts
AeroScale: 3,192 posts
Posted: Friday, May 13, 2011 - 05:46 AM UTC
Yep, you're off your rocker. Coming along great anyway.

Hanger Queens in Waiting:
Monogram 1/72 F8F-1
Corsair the Sky Pirate - 1/72 Ace A-7D
Century Series - Airfix 1/72 F-105G
Anti Shipping - Academy 1/72 PBJ-1D
Academy 1/72 F-84E
Dublin, Ireland
Joined: November 11, 2004
KitMaker: 388 posts
AeroScale: 225 posts
Posted: Friday, May 13, 2011 - 06:17 AM UTC
I'd like to enlist with my A-37B Dragonfly that was entered into the Close Air Support Campaign but didn't make the deadline. Here's a few shots of the aircraft.


Wisconsin, United States
Joined: September 11, 2009
KitMaker: 1,917 posts
AeroScale: 563 posts
Posted: Friday, May 13, 2011 - 07:11 AM UTC
Vertigo,
Sounds great. Welcome aboard. I put you on my list (probably like Santa's, but only 45 of us). You're the only A-37 on the list.
Actually, yours doesn't look too far from complete-- you probably could have gotten an extension for yourself in the previous campaign-- but we're happy to have you here anyway!
-Sean.
Current: model railroad layout
Stalled a while ago:
. 1950's Chrome, WW II Twins
Last completed: Police Car
Wisconsin, United States
Joined: September 11, 2009
KitMaker: 1,917 posts
AeroScale: 563 posts
Posted: Wednesday, May 25, 2011 - 06:37 AM UTC
A biweekly bump, just to show a pulse over here. Under 4 months remaining. Anyone getting nervous?
Here's progress on the HH-52A,
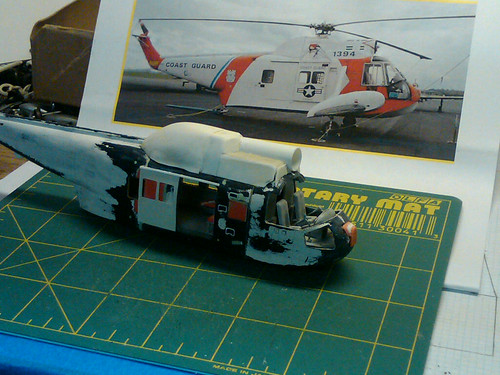
I have filled with green putty and sanded since then. I'm taking time between work, yardwork, and kids' homework, etc. to cut and install windows, so I can mask and start painting her.
Grayghost666, are you thinking of rejoining this campaign? Is your own Hangar Queen sitting dusty in a corner yet? I still show you as enlisted, but no photos.

Cheers!

-Sean.
Current: model railroad layout
Stalled a while ago:
. 1950's Chrome, WW II Twins
Last completed: Police Car
Wisconsin, United States
Joined: September 11, 2009
KitMaker: 1,917 posts
AeroScale: 563 posts
Posted: Thursday, May 26, 2011 - 08:22 AM UTC
Cut back the kit canopy and polished out the original frame demarkations, then layers of Future Floor Polish, then painted Testors transparent green from a spray can. I had widened the other side windows, so all are clear styrene cut (mostly) to shape, then glued and gaps filled with Micro Kristal Klear.
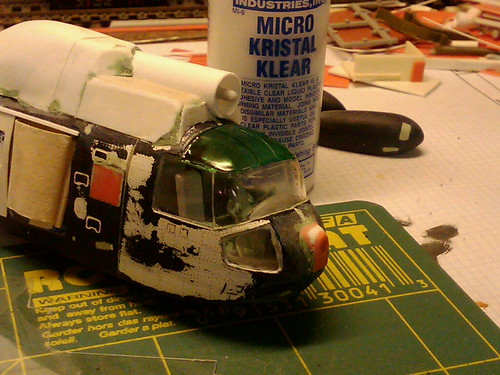
This was the last step that I was worried about. Now I can go great guns and wrap this build up. I know when she's primed, she'll look beautiful (fingers crossed!).
-Sean.
Current: model railroad layout
Stalled a while ago:
. 1950's Chrome, WW II Twins
Last completed: Police Car
British Columbia, Canada
Joined: September 03, 2009
KitMaker: 6,965 posts
AeroScale: 6,247 posts
Posted: Friday, May 27, 2011 - 08:00 AM UTC
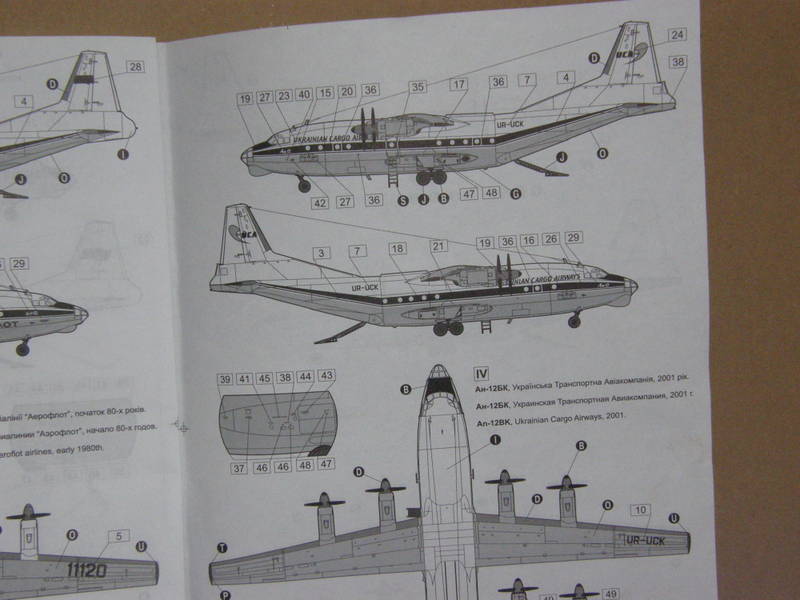
Here's my hangar queen. Roden's AN-12 Cub
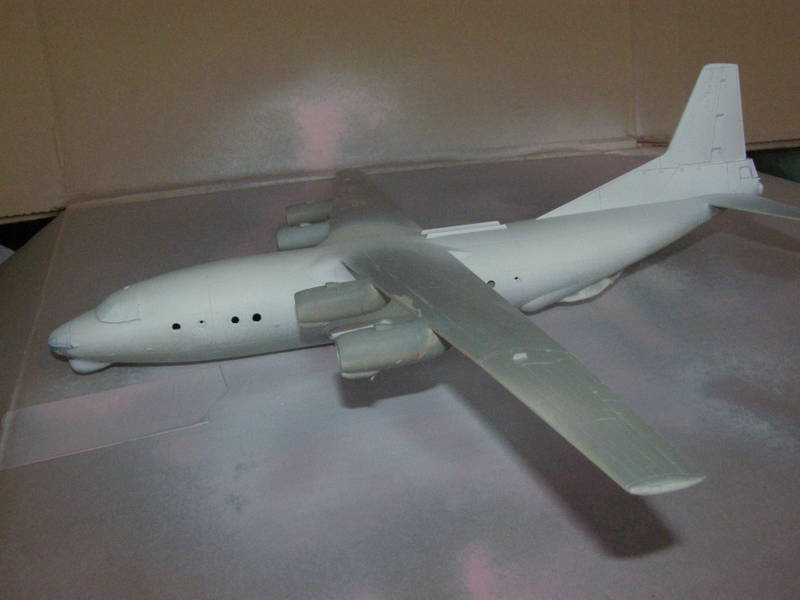
I intend to finish it in a scheme robbed from the Civil Cub boxing:
Here's a picture of the real thing borrowed from Airliners.net

When once you have tasted flight you will walk the Earth with your eyes turned skyward.
For there you have been, and there you will always long to return.
-Leonardo Da Vinci
Dublin, Ireland
Joined: November 11, 2004
KitMaker: 388 posts
AeroScale: 225 posts
Posted: Friday, May 27, 2011 - 08:34 AM UTC
Ah the Cub, it's a lovely transport plane. Looking forward to seeing it finished.
Wisconsin, United States
Joined: September 11, 2009
KitMaker: 1,917 posts
AeroScale: 563 posts
Posted: Friday, May 27, 2011 - 08:35 AM UTC
I'm not familiar with the Cub, but it looks like a fine choice. The civil one isn't far from the military one, is it? I see the nose glass-- was that a bombadier position? How old is the prototype, and how old is your queen kit?
Jessie, you're one of the folks that signed up long ago, and it's nice to finally hear you speak up! (29Foxtrot, Bigskip, grayghost, jaypee, others, are you ready to dive in?)

thanks,
Sean.
Current: model railroad layout
Stalled a while ago:
. 1950's Chrome, WW II Twins
Last completed: Police Car
British Columbia, Canada
Joined: September 03, 2009
KitMaker: 6,965 posts
AeroScale: 6,247 posts
Posted: Friday, May 27, 2011 - 08:48 AM UTC
Quoted Text
I'm not familiar with the Cub, but it looks like a fine choice. The civil one isn't far from the military one, is it? I see the nose glass-- was that a bombadier position? How old is the prototype, and how old is your queen kit?
Jessie, you're one of the folks that signed up long ago, and it's nice to finally hear you speak up! (29Foxtrot, Bigskip, grayghost, jaypee, others, are you ready to dive in?)
thanks,
Sean.
The nose station in Tupolevs and Antonovs was where the Navigator (lucky person!) sat. I could wish for such a view in my office. The Cub first flew in 1957 and has been going strong ever since. All throughout the Cold War and on into the 21st Century, the Cub has been the Eastern Bloc equivalent of the Lockheed Hercules, doing the same kind of jobs in the same kind of conditions. It's one of those rare airplanes that really has no replacement except another one. I bought my kit when it first came out in 2002, and got it to its present condition very rapidly. Then a shortage of round tuits and a conspiracy by the world kept it unfinished.
The basic difference between a civil and military cub is the paint job and who pays the crew
Some civil cubs were built without the tail turret, and some were converted from military aircraft by simply removing the guns. UR-UCK is one such; the gun openings were blocked off and that's about it.
When once you have tasted flight you will walk the Earth with your eyes turned skyward.
For there you have been, and there you will always long to return.
-Leonardo Da Vinci
South Australia, Australia
Joined: August 14, 2007
KitMaker: 5,926 posts
AeroScale: 2,201 posts
Posted: Friday, May 27, 2011 - 09:39 AM UTC
Hi Jessie.
I have one of those in my stash, Will be watching your progress very closely. We used to get them landing at RAAF Base Richmond all the time after the USSR broke up. The An-124 was also a frequent visiotr. They were picking up stuff to take overseas.
Cheers
Warren
You may be right, I may be crazy.
British Columbia, Canada
Joined: September 03, 2009
KitMaker: 6,965 posts
AeroScale: 6,247 posts
Posted: Friday, May 27, 2011 - 11:07 AM UTC
I had a little trouble keeping the upper fuselage join even. The worst part is over the wing cary-through box; the starboard side sunk relative to the port side, leaving me a huge hole to fill. I think that perhaps my kit was a bit warped, or perhaps the builder was... I'm going to put re-enforcing tabs on my next one in a similar manner to what one would do with a vacuform.
The plastic is very soft so watch out for cutting too much off when you're trimming the parts off the sprue. There's a fair bit of flash in the wing attacment slots but the soft plastic means that it's very easy to clean out. I've read that the main gear are a trifle fiddly to attach properly (haven't got that far with mine yet), and that some people have had trouble with the engine nacelles. Put a fair bit of weight between the cockpit and cargo bay bulkheads. Luckily there's lots of room in there.
The decals are those typical early Roden decals. They like to rip apart and are impervious to almost all known softening solutions, but with care they can be coaxed into position.
J
When once you have tasted flight you will walk the Earth with your eyes turned skyward.
For there you have been, and there you will always long to return.
-Leonardo Da Vinci
Wisconsin, United States
Joined: September 11, 2009
KitMaker: 1,917 posts
AeroScale: 563 posts
Posted: Tuesday, May 31, 2011 - 03:38 PM UTC
I'm kind of embarrassed to put mine on here much more. She's "good from afar but far from good."
Here I've painted the overall white, but it was quickly apparent that my filler wasn't up to the task-- chunky and troublesome. Maybe 10 years on one tube is too long.

Anyway, I went ahead, finish line in sight far in the distance, and masked and painted the orange and the blue "racing" stripe. I hand-painted the black anti-glare on the pontoons/sponsons and not seen here, the exhaust area on the port side.
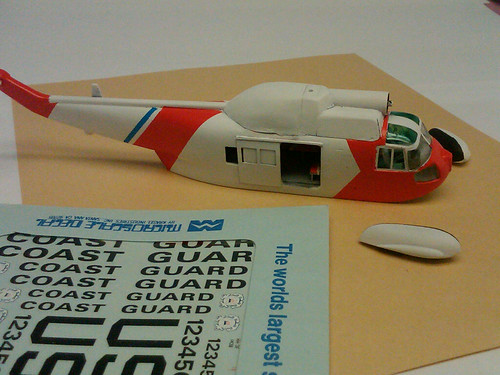
(Maybe if I keep my photos small enough, you won't see how rough everything is looking.) Just look at the pretty colors
.
Finally pulled out the decals I bought maybe 20 years ago for this project-- and they're well over-sized. Microscale made them for an HH-3, a C-130, or an Albatros. I'll have to copy the sheet half-sized onto blank decal paper, then pick and choose what works. "COAST GUARD" is supposed to fit in that white space on the tail boom.
cheers!
Sean
Current: model railroad layout
Stalled a while ago:
. 1950's Chrome, WW II Twins
Last completed: Police Car
British Columbia, Canada
Joined: September 03, 2009
KitMaker: 6,965 posts
AeroScale: 6,247 posts
Posted: Tuesday, May 31, 2011 - 05:57 PM UTC
Quoted Text
I'm kind of embarrassed to put mine on here much more. She's "good from afar but far from good."
I suppose it's too late to point
this out? Maybe they'll sell you the decals seperately?
When once you have tasted flight you will walk the Earth with your eyes turned skyward.
For there you have been, and there you will always long to return.
-Leonardo Da Vinci
Wisconsin, United States
Joined: September 11, 2009
KitMaker: 1,917 posts
AeroScale: 563 posts
Posted: Wednesday, June 01, 2011 - 02:12 AM UTC
Quoted Text
Quoted Text
I'm kind of embarrassed to put mine on here much more. She's "good from afar but far from good."
I suppose it's too late to point this out? Maybe they'll sell you the decals seperately?
Thanks much, Jessie. That's true. I could go that way, but now I'm thinking I'll finish this up and just get on to the next one, hopefully not spending anymore money before then. The bad shapes of my conversion from a longer, swoopier Sea King are really bugging me.
That IS an attractive kit, but they don't show the decals or completed model.
I'll try to polish this up. The rivet-counters have stopped watching this build a long time ago.
-Sean.
Current: model railroad layout
Stalled a while ago:
. 1950's Chrome, WW II Twins
Last completed: Police Car
South Australia, Australia
Joined: August 14, 2007
KitMaker: 5,926 posts
AeroScale: 2,201 posts
Posted: Wednesday, June 01, 2011 - 05:19 AM UTC
I am far from a rivet counter Sean and I applaud your tenacity and drive to do this conversion. Keep up the great work.
You may be right, I may be crazy.
#439
Washington, United States
Joined: November 05, 2005
KitMaker: 4,950 posts
AeroScale: 3,192 posts
Posted: Wednesday, June 01, 2011 - 09:07 AM UTC
I agree. No pain, no gain. I tried a bunch of stuff on my SBD and A4D-1 that I'd never done before. Some worked out got, other's not so much. I knew that given where I started from (in terms of kits and skills) these were not contest winners. I scratch built an interior on the SBD, cobbled together a pair of machine guns and faked a mount on a pivoting rear seat. I had to scrounge up decals to replace the shattered ones in the kit and rebuilt the antenna 3 times.
Not as much trouble on the A4D-1. But, it had no cockpit, the canopy was oversized, see through fuselage spindly leading gear, gear doors that didn't fit and the fuel tank pylons had huge chunks of the wing molded on. I learned a LOT about painting gloss white, polishing clear plastic, filling seams, adding stock to fill gaps and a bit about masking (the intake lips and the fuel tank stripes were paint, not decals).
A wise man told me model building was about problem solving. these two kits proved him right.

Hanger Queens in Waiting:
Monogram 1/72 F8F-1
Corsair the Sky Pirate - 1/72 Ace A-7D
Century Series - Airfix 1/72 F-105G
Anti Shipping - Academy 1/72 PBJ-1D
Academy 1/72 F-84E
Bayern, Germany
Joined: January 02, 2011
KitMaker: 279 posts
AeroScale: 239 posts
Posted: Thursday, June 02, 2011 - 06:30 AM UTC
Hello!
I am in with my 1:72 Revell Breguet Atlantic.
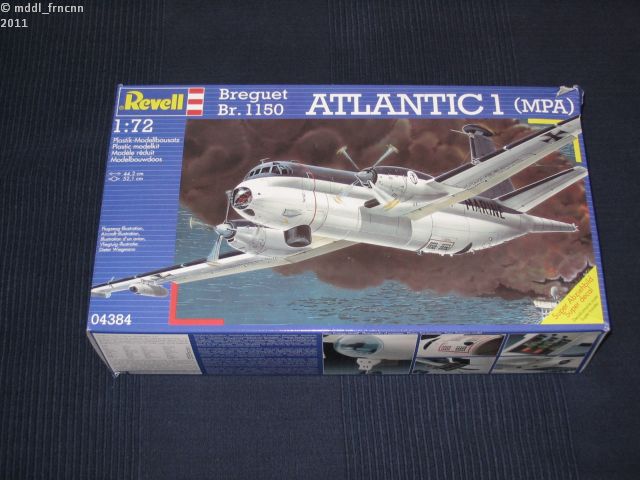
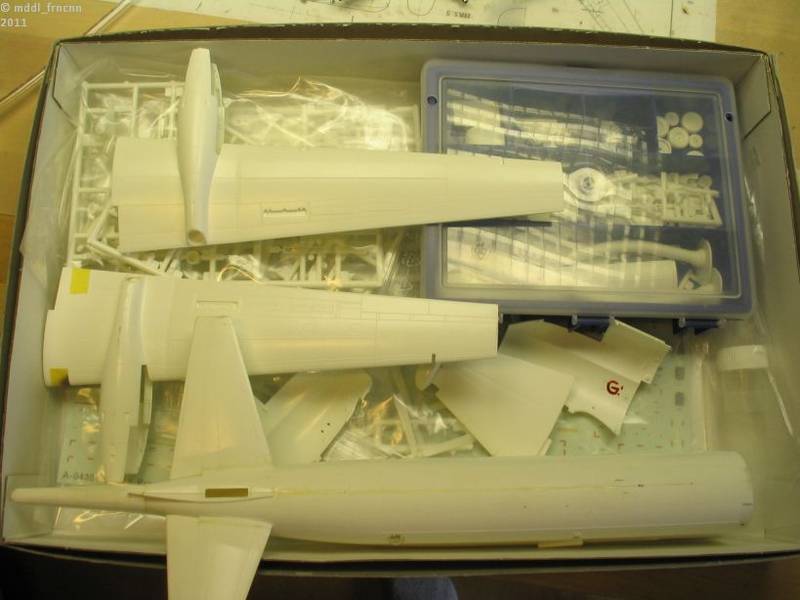
I bought this kit in 2004, started it with enthusiasm (planned to put a lot of details in the cockpit, weapons bay and aft crew entry) but I lost the appetite somehow. I put the sprues and the already glued parts in an old Hasegawa box and put it back on my stack.
A nice DVD "Flugzeuge der Bundeswehr" from
http://www.breucom.de brought back my interest. So I give this kit a new chance. In the meantime Revell has reissued this kit with another set of decals...
Hope I can finish this big thing
.
Servus,
Sebastian
LtCol Henry Blake: "Radar, whatever it is: sign it, cancel it or order five more!"
Wisconsin, United States
Joined: September 11, 2009
KitMaker: 1,917 posts
AeroScale: 563 posts
Posted: Thursday, June 02, 2011 - 06:59 AM UTC
Jess, Warren, and Mark-- thanks for the encouragement!

Sebastian-- you've come to the right place! That's just the thing we're looking for here. Nice, neat work so far. I for one look forward to seeing you finish her up.
Thanks,
Sean.

Current: model railroad layout
Stalled a while ago:
. 1950's Chrome, WW II Twins
Last completed: Police Car
Bayern, Germany
Joined: January 02, 2011
KitMaker: 279 posts
AeroScale: 239 posts
Posted: Friday, June 03, 2011 - 08:15 PM UTC
Sean,
thanks for encouragement! I do not have any idea where to put it when it is finished, but this should not keep me off from building... That Atlantic is a "Mordstrumm" (as someone here in Bavaria would say, a "monster"). Yesterday during the soccer game Austria-Germany I took care of the wings. There is a plenty to do... Pictures will follow!
BTW: I read very often in modelling articles that some modelers only need minor or no putty to finish a plane. For me, I manage it somehow that I need a reasonable amount of putty.

And that is regardless of any effort I put in to glue the parts together properly, aargh!
Servus,
Sebastian
LtCol Henry Blake: "Radar, whatever it is: sign it, cancel it or order five more!"
Wisconsin, United States
Joined: September 11, 2009
KitMaker: 1,917 posts
AeroScale: 563 posts
Posted: Saturday, June 04, 2011 - 05:47 AM UTC
Sebastian- very true!
Thanks,
-Sean.
Current: model railroad layout
Stalled a while ago:
. 1950's Chrome, WW II Twins
Last completed: Police Car
Dublin, Ireland
Joined: November 11, 2004
KitMaker: 388 posts
AeroScale: 225 posts
Posted: Saturday, June 04, 2011 - 06:04 AM UTC
That Atlantic should finish up nice and lovely.
I'm in the process of decaling the Dragonfly, she's very close to finished. Not entirely happy with the new formula Klear though.
Wisconsin, United States
Joined: September 11, 2009
KitMaker: 1,917 posts
AeroScale: 563 posts
Posted: Saturday, June 04, 2011 - 08:18 AM UTC
Vertigo, what's the story with new formula Klear? is there older stock in the back of the shelf of some smaller store that you could find? Here in the U.S. I use Future floor polish-- that's the same product, but European, right? I bought my bottle 10 years ago though-- modeling doesn't use as much as a kitchen floor.
So any changes to the formula are news to me.
Either way, I'm glad to hear of your progress and eager to see some pics.
thanks,
Sean.
Current: model railroad layout
Stalled a while ago:
. 1950's Chrome, WW II Twins
Last completed: Police Car
British Columbia, Canada
Joined: September 03, 2009
KitMaker: 6,965 posts
AeroScale: 6,247 posts
Posted: Monday, June 06, 2011 - 03:25 PM UTC
BASIC Bondo adventures!
10 Tape off the area you want to fill, apply the Bondo and allow it to dry.
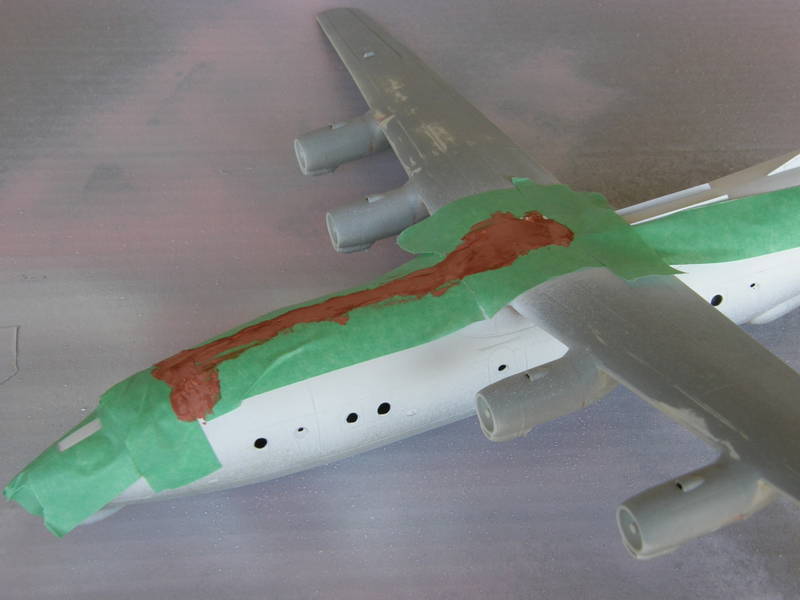
20 Remove the tape.

30 Sand.
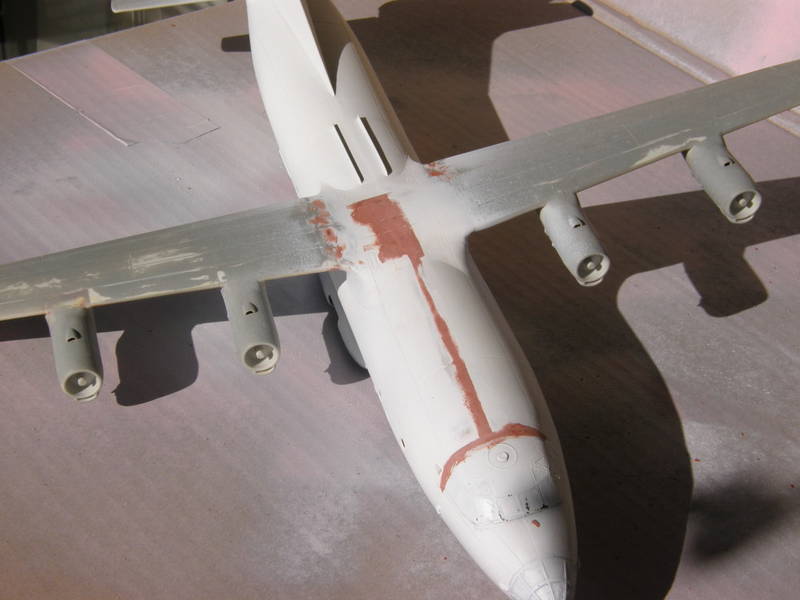
40 Prime and check for divots, holes, edges and other areas of poor finish
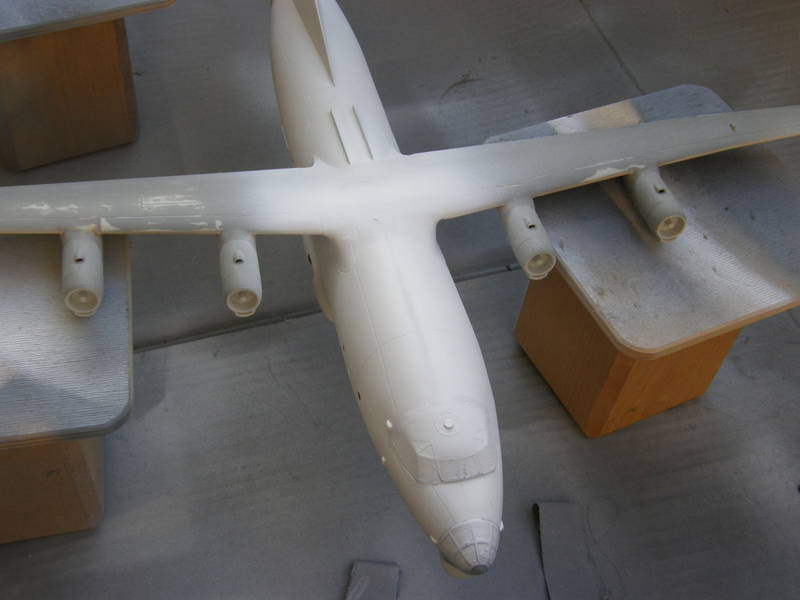
Goto 10 until no more errors are visible.
This may take a while...
When once you have tasted flight you will walk the Earth with your eyes turned skyward.
For there you have been, and there you will always long to return.
-Leonardo Da Vinci


