Air Campaigns
Want to start or join a group build? This is where to start.
Fighters Under The Midnight Sun
Clanky44
_VISITCOMMUNITY
Ontario, Canada
Joined: September 15, 2005
KitMaker: 1,901 posts
AeroScale: 133 posts
Posted: Saturday, December 23, 2006 - 12:19 PM UTC
Well,... better late than never!

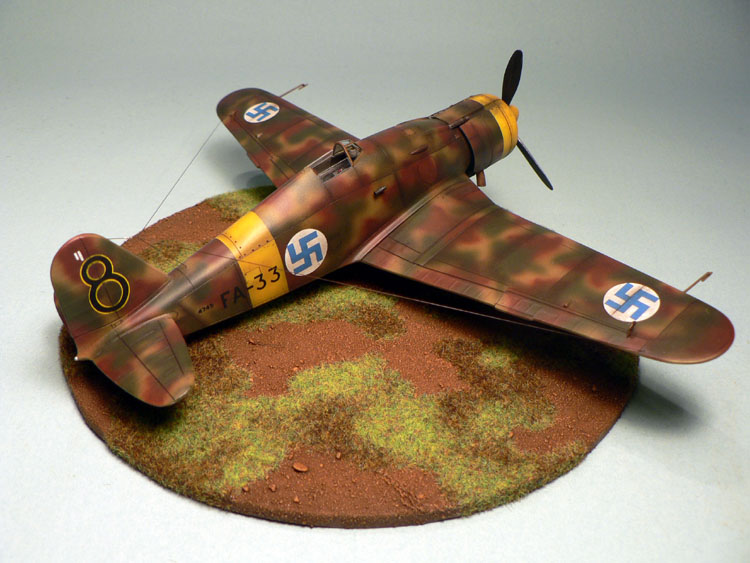
Having this week off from my hectic work schedule, I've decided to attempt a few of the Campaigns. With no Finnish aircraft lying about in my stash, I decided to head to my LHS and pick up anything with Finnish markings,.... this is what I brought home...


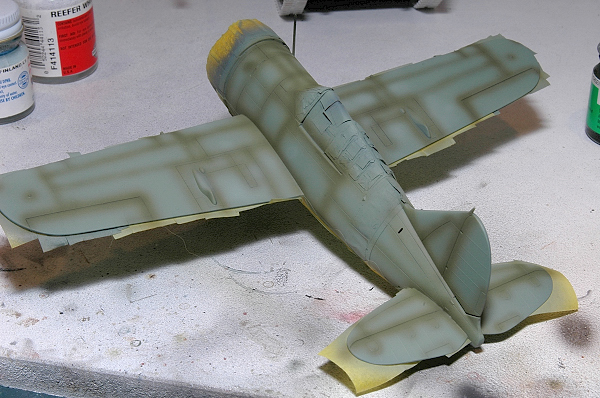
Not having followed the group build (again, due to my not being home over the last few months) I was oblivious to the headaches Fred had acquired due to this Classic Airframes gem. I opened up the model today and started with what I always do first, checking the wing root fit with both the fuselage and the wings taped up. Not bad,.. that is until you start to dry fit all the interior bits. This is where it got nasty! I quickly tossed aside the instruction sequence, and concentrated on the fuselage halves and the wing /undercaridge., figuring that if I get by this , all else should fall into place. This model allows you to build the interior/cockpit seperately from the fuselage, and then once completely painted, insert it through the assembled fuselage. If you follow the building sequence, it will shorten your lifespan (just ask Fred!)

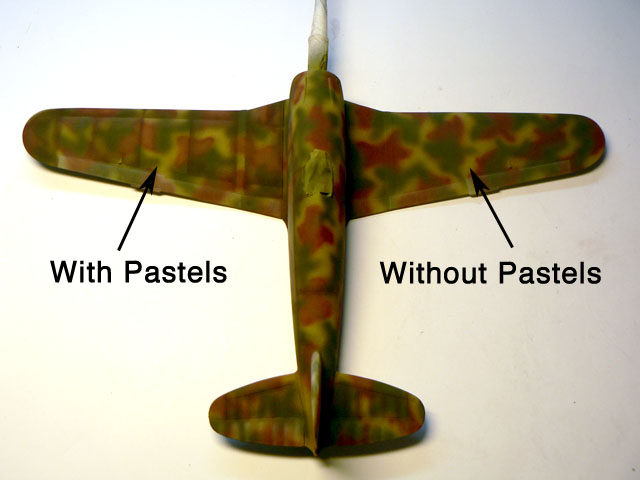
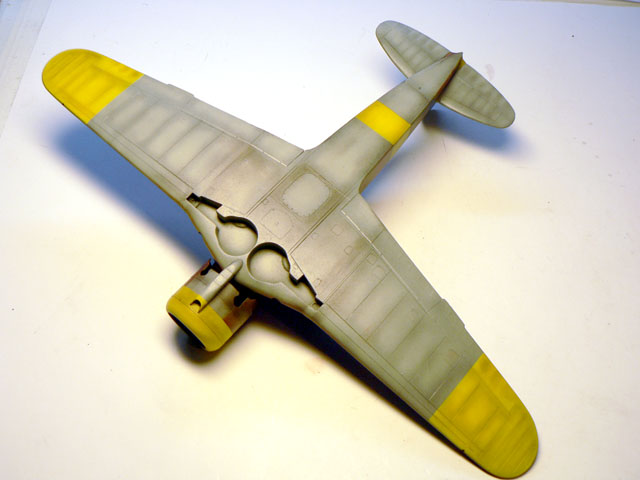
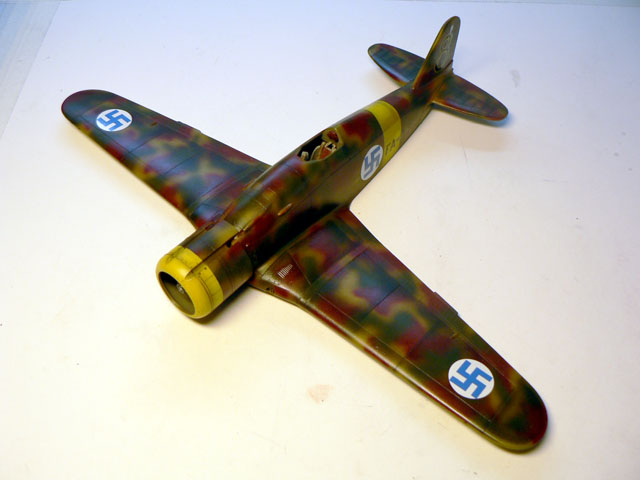
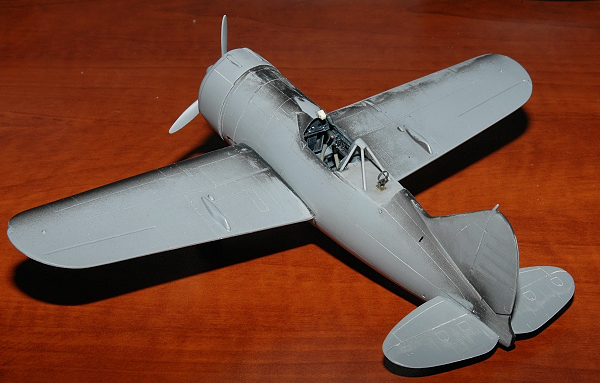
Here are some additional photos of my first day back at the office...


I haven't given any thought one which markings I'll use, I figure I've got bigger issues to deal with over the next few days.

Frank
Emeritus
_VISITCOMMUNITY
Uusimaa, Finland
Joined: March 30, 2004
KitMaker: 2,845 posts
AeroScale: 1,564 posts
Posted: Saturday, December 23, 2006 - 02:52 PM UTC
Great-looking brewsters we have here.
VonCuda, are those decals from CA's sheet? If it is, and if there's any spares, I would add a black 3 over the green one, it's hardly visible in the pics, and those codes were painted on real planes so that green numbers went over black and black numbers over other colors (I remember that one bomber type, perhaps Junkers 88 had white code letters and numbers). Single letters and numbers were multi-colored, if they went over both black and a lighter color.

Clanky44, thanks for the heads-up about the building sequence. The instructions insist on assembling the wing, then the cockpit and adding the other fuselage half. Looked overly complicated and like it could comprimise the fit of both the fuselage halves and the components between them. I'll follow your example when I build mine.

My two 1:72 builds are coming along nicely.
I added decals to MT-476's underside yesterday. These are a compination of tehcmod (national insignias and registry codes) and academy (stencils). To my surprise, the stencils are actually working okay! They still require a healthy dose of micro sol to snuggle down, but they seem to do it without too much silvering. Amazing!


Amazing because all academy decals I've used before have been stiff and silvered quite badly, resulting
in a touch-up fest.


My LaGG-3 is about ready for priming. I checked the major seams decided to apply a coat of mr. surfacer 500. After sanding, they're smooth and ready for painting. I also test-fitted and shaped the openings for the rear-view windows so they should fit in after painting. The main canopy fits almost flawlessly, no hassling involved there.


I also filled the camera port on the rear fuselage. It's presence wasn't mentioned in my references and no pictures showed that area, so I attacked the opening with styrene sheet, superglue, and kicker (just how have I managed to live without that stuff before? Great stuff!). A little filing and sanding made the surface smooth again.
That landing gear actually fits nicely. Seems like the legs are not supposed to fit to anything, it's the gear doors that attach to the well.
More pics coming soon.

And one more thing, Merry Christmas everyone, whether involved in FUMS or not!
TedMamere
_VISITCOMMUNITY
Moselle, France
Joined: May 15, 2005
KitMaker: 5,653 posts
AeroScale: 4,347 posts
Posted: Saturday, December 23, 2006 - 05:49 PM UTC
Hi all!

Wow! The sky over Finland is very busy... by the way did someone already built a Russian plane so the Fins have something to shoot at?

Anyway, here are some more pics of my G.50. I found the camouflage too "flat" so I played with pastels to make the structures of the plane appear a little more. Below you can see the result...


Then I sprayed some Klir (the French Future) and added the yellow markings. The colors are a little bit too dark I think. I must learn to work with lighter colors because the glossy coat of Klir darkens everything...


Next step is decalling! That's what I like most!

Joyeux Noël à tous!

Jean-Luc
Lucky13
_VISITCOMMUNITY
Scotland, United Kingdom
Joined: June 01, 2006
KitMaker: 1,707 posts
AeroScale: 1,119 posts
Posted: Saturday, December 23, 2006 - 07:55 PM UTC
Looking awesome Jean-Luc!
Clanky44
_VISITCOMMUNITY
Ontario, Canada
Joined: September 15, 2005
KitMaker: 1,901 posts
AeroScale: 133 posts
Posted: Saturday, December 23, 2006 - 10:14 PM UTC
Hi Jean-Luc

Great looking G-50 you have there! I wouldn't worry too much about the darkended nature due to the gloss coat. If you spray it with a dull coat after the decals, it should lighten up significantly.

I've been doing some additional building this morning on my Buffalo, but have put it all away for the next two days, which will be spent entertaining the family, so no further progress until the 26th. Six days to finish 3 models. One Finnish Buffalo, One Italian Co-belligerant Macchi 202 and possibly a Yak 3 to be offered to a few Axis pilots which have been airbourne for a while searching the skies for an adversary!

Merry Christmas to you all,

Frank
JPTRR
Staff MemberManaging Editor
RAILROAD MODELING
#051
_VISITCOMMUNITY
Tennessee, United States
Joined: December 21, 2002
KitMaker: 7,772 posts
AeroScale: 3,175 posts
Posted: Sunday, December 24, 2006 - 06:53 AM UTC

Quoted Text

Well,... better late than never!


Welcome Clanky! I completely agree! Perhaps I'll finish my B.239 and Duel! T-bolt in time to enter Bombs Away!

I think Wind's blue-tailed plane is good looking.
ThomasB
_VISITCOMMUNITY
Skåne, Sweden
Joined: May 17, 2002
KitMaker: 762 posts
AeroScale: 141 posts
Posted: Sunday, December 24, 2006 - 06:53 PM UTC
Time fore a progres report, or perhaps I should call it a lack of progres report. Because building has been really slow since last post, so I'm affraid to say that none of the projects will be finished in time. So I think it's time for me to stop trying to participate in campaigns, because something always comes up that stops the progres...
JPTRR
Staff MemberManaging Editor
RAILROAD MODELING
#051
_VISITCOMMUNITY
Tennessee, United States
Joined: December 21, 2002
KitMaker: 7,772 posts
AeroScale: 3,175 posts
Posted: Sunday, December 24, 2006 - 09:22 PM UTC

Quoted Text

Clanky44, thanks for the heads-up about the building sequence. I'll follow your example when I build mine.

And one more thing, Merry Christmas everyone, whether involved in FUMS or not!


Yes, Merry Christmas everyone!

I will be writing up a build-revieve of CA's B.239 ASAP.
lampie
#029
_VISITCOMMUNITY
England - East Midlands, United Kingdom
Joined: December 23, 2005
KitMaker: 6,249 posts
AeroScale: 3,270 posts
Posted: Sunday, December 24, 2006 - 09:53 PM UTC
Hi All.
All the entries are looking superb!
In fact,I dont think Ive seen a Campaign where the overall standard of entries has been so high.
Eetu...if you have enough space it would be great to see a photo of all your completed entries together!
Great looking ribbon Fred,,cant wait to see it on "my account" page.
Happy Christmas to you all.
Nige
JollyRoger
_VISITCOMMUNITY
Istanbul, Turkey / Türkçe
Joined: December 22, 2004
KitMaker: 1,241 posts
AeroScale: 616 posts
Posted: Monday, December 25, 2006 - 09:42 PM UTC
Guys I am terribly sorry but I think I won't be able to acomplish my duty on this campaigne. My school and work (ok and new girlfriend) do notleve me much time. I have to sacrifice some of the projects. Thus I haven't started it yet I probably won't be able to acomplish it. So I apologise from all of you again.
Emeritus
_VISITCOMMUNITY
Uusimaa, Finland
Joined: March 30, 2004
KitMaker: 2,845 posts
AeroScale: 1,564 posts
Posted: Wednesday, December 27, 2006 - 07:21 PM UTC
Here's how my LG-3 looks now, painted and with one coat of future on:

Masking that splinter camo scheme would have taken ages, so I tried a new method. I printed out the drawings from that site I came across, then used a photocopier for making enlarged copies of the right size, which I then used as templates for cutting masking tape to required shapes.
I think that scale black (1 part vallejo german grey, 2 parts black) looks pretty good now, what you think?
TedMamere
_VISITCOMMUNITY
Moselle, France
Joined: May 15, 2005
KitMaker: 5,653 posts
AeroScale: 4,347 posts
Posted: Thursday, December 28, 2006 - 01:03 AM UTC

Quoted Text

looks pretty good now, what you think?


Hi Eettu!

Yes it looks good. The colors seem to be a close match to the real ones. But it's strange to see a Russian plane with a German splinter camouflage in Finnish markings!

Here are some more pics of my G.50 with the aftermarket decals. They worked quite well...


The underside is finished (panel lines)


Meanwhile I glued the undercarriage, the aerial wire ( ), the propeller and the forward canopy. I still have to glue the gear doors, pitot tubes, the venturi and the side windows...

I think I will be finished tomorrow.

Jean-Luc
Clanky44
_VISITCOMMUNITY
Ontario, Canada
Joined: September 15, 2005
KitMaker: 1,901 posts
AeroScale: 133 posts
Posted: Thursday, December 28, 2006 - 10:26 AM UTC
Good looking Lagg-3 Eetu! Great addition to your Finnish collection. Nice clean G-50 Jean-Luc, a typical perfect model from you...... you're so predictable!

I'm going to need some advice from you, Eetu, regarding my selection of markings for my 239. I want to paint my 239 in the post maintenance underside light blue scheme. If I do the BW-364 with the tail orange 4, (of which I have photo reference in Dec. 1942) can I assume that it would have been given the upgrade coat of blue?,... or did the Finns lose this plane before the upgrade?

Here are some updated photos of my entry. After the headaches of trying to fit the interior bulkheads within the fuselage, the exterior went together quite nicely. No putty needed, just some reinforcing beads of CA glue to help quicken the curing time. I had to rescribe some of the panel lines around the fuselage/wing root area, but nothing too severe. I've futured my canopy, and will start painting tomorrow.

Frank


Emeritus
_VISITCOMMUNITY
Uusimaa, Finland
Joined: March 30, 2004
KitMaker: 2,845 posts
AeroScale: 1,564 posts
Posted: Thursday, December 28, 2006 - 02:18 PM UTC
Looking good, both of you!

About BW-364.
Quickly checking, Osprey's Finnish aces book doesn't mention BW-364 being lost, and since it has photos of it from 1943 and 1944, I think it's likely that it recieved a light blue underside. (although the orders for painting the undersides light blue was given the 7th of May 1942, many planes got painted later when they were overhauled)
But when, I can't tell without further reference. With my 1:72 model, I went for the light grey, as in Hasegawa's and InScale decal sheet's instructions. CA's instructions say aluminium, though.
From the illustration in the Osprey book (Suulajärvi, December 1942), looks like it's either light blue or grey...

I think it's okay to go with the light blue.
TedMamere
_VISITCOMMUNITY
Moselle, France
Joined: May 15, 2005
KitMaker: 5,653 posts
AeroScale: 4,347 posts
Posted: Thursday, December 28, 2006 - 11:23 PM UTC

Quoted Text

Nice clean G-50 Jean-Luc


Hi Frank!

My G.50 is not that clean... look at the underside and the cowling...

Anyway, thanks for the kind words. I appreciate them as they come from a member of the Guelph Plastic Modellers Group I encourage everyone to take a look at their website: thesprue.com !

Back to topic, I'm happy to report that my entry is finished...


Good luck to those who are still building for this Campaign... Tic...Tic...Tic... :-)

Jean-Luc
Removed by original poster on 10/31/07 - 19:20:38 (GMT).
alpha_tango
_VISITCOMMUNITY
Germany
Joined: September 07, 2005
KitMaker: 5,609 posts
AeroScale: 5,231 posts
Posted: Friday, December 29, 2006 - 03:08 AM UTC

Quoted Text

Gentlemen,

For those of you who complete the campaign, you can look forward to adorning your 'salad garden' with this:


Hi Fred

nice ribbon .. which I maybe won't get .. still, I am slowly progressing with my CA Buffalo ... maybe a nightshift on 31st will make it happen.....

One question to spare myself some research: Which landing light has to be filled? Starboard form above or seen from below .. do you have a pic for a dummy (ME) ..Many thanks!

cheers

Steffen

Emeritus
_VISITCOMMUNITY
Uusimaa, Finland
Joined: March 30, 2004
KitMaker: 2,845 posts
AeroScale: 1,564 posts
Posted: Friday, December 29, 2006 - 06:28 PM UTC
No need for further reference, it's all pointed out in CA's instructions, step 19. The landing light goes to the left wing (red navigation light). If the clear parts fit well, just glue in the other landing light as well and blend in with putty.
alpha_tango
_VISITCOMMUNITY
Germany
Joined: September 07, 2005
KitMaker: 5,609 posts
AeroScale: 5,231 posts
Posted: Friday, December 29, 2006 - 07:02 PM UTC
Hello Eetu

many thanks ... so you see how stupid I am .. .to my excuse: I build several models parallel and have to think around some corners to make construction as quick as possible (and I do not look in the instructions often enough)

I am curious if i can make it, but it does not look good at the moment .. we'll see

best wishes

Steffen
Clanky44
_VISITCOMMUNITY
Ontario, Canada
Joined: September 15, 2005
KitMaker: 1,901 posts
AeroScale: 133 posts
Posted: Friday, December 29, 2006 - 09:34 PM UTC
I too am struggling to get this CA 239 completed, it's a nice model but definitely not one of the Tamiyagawa shake 'n' bake types. I've gotten most of the painting completed, just posting some update photos here while I give the light green top coat a chance to dry.

Steffen, your inquiry on the landing lights came a few days too late for me! I too do not read the instructions the way I should! oh, well! it will have to be taken care of once the masking tape comes off.


bf443
_VISITCOMMUNITY
Idaho, United States
Joined: May 16, 2003
KitMaker: 895 posts
AeroScale: 457 posts
Posted: Friday, December 29, 2006 - 10:17 PM UTC
Hello everyone,

Jean-Luc, very nice G-50 your use of an airbrush is exceptional. Clanky, I recall seeing a P-36 not long ago that was in a similar stage of painting as your Buffalo. I have no doubt yours will be exceptional as well.

I have to admit this has been one of the best builds I have had the pleasure of taking part! The theme with the variety of aircraft and talent displayed has been exceptional and served as great inspiration. I have to admit I have an unbuilt Lagg 3, G-50 and I-153 sitting on my shelf now. LOL :-)

Sincerely,
Brian
Clanky44
_VISITCOMMUNITY
Ontario, Canada
Joined: September 15, 2005
KitMaker: 1,901 posts
AeroScale: 133 posts
Posted: Saturday, December 30, 2006 - 03:30 AM UTC
A few more progress photos, I'll apply a coat of gloss over the decal areas tonight. Decal and hand paint some of the finer details and complete the kit with a wash tomorrow...hopefully!


VonCuda
_VISITCOMMUNITY
North Carolina, United States
Joined: November 28, 2005
KitMaker: 2,216 posts
AeroScale: 1,080 posts
Posted: Saturday, December 30, 2006 - 10:26 AM UTC
Hi everyone

I've finally managed to complete my FUMS entry. I'll admitt it's not exactly beautiful or accurate but I'm quite pleased with how she turned out.
This started out as the CA 239 Buffalo kit but due to time constraints and personal matters I switched to the Tamiya 339 kit. I used as many of the 239 parts as possible including the cowling, tail section, prop, etc.
During the building process I lost a few pieces from the CA kit. This is why my Buffalo has the life raft container behind the cockpit seat and also the prop isn't exactly accurate. I did however use the decals from the CA kit and they were beautiful to work with.
Paints were a mixture of Tamiya acrylic and MM enamel. Lots of Future in between paint coats finished off with a coat of MM acrylic satin clear coat.
My only regret other than not having enough time to make this kit as great as it could be is not having enough decals left to build at least 2 other versions of this Finnish Buffalo. These have to be the coolest camo schemes I've seen yet. And here are some pics of my finished product.


Lucky13
_VISITCOMMUNITY
Scotland, United Kingdom
Joined: June 01, 2006
KitMaker: 1,707 posts
AeroScale: 1,119 posts
Posted: Saturday, December 30, 2006 - 11:39 AM UTC
Fantastic!
ThomasB
_VISITCOMMUNITY
Skåne, Sweden
Joined: May 17, 2002
KitMaker: 762 posts
AeroScale: 141 posts
Posted: Saturday, December 30, 2006 - 03:31 PM UTC
Have made some progres, but as things look it's what progres there will be since my fiance have gone into labor, and I don't know when we will be going to the hospital.