Air Campaigns
Want to start or join a group build? This is where to start.
Fighters Under The Midnight Sun
Emeritus
_VISITCOMMUNITY
Uusimaa, Finland
Joined: March 30, 2004
KitMaker: 2,845 posts
AeroScale: 1,564 posts
Posted: Thursday, December 14, 2006 - 02:33 PM UTC
I've been working on that LaGG and a another 109, now in 1:72.

With the LaGG, I got the cockpit painted and glued the fuselage halves together. Fit wasn't that bad with the fuselage parts, but the cockpit floor and radio deck were too wide and needed some surgery to fit right.
This is one of those kits that need some TLC, although it looks like this slips on the elbow grease department at least on the wing-to-fuselage joint.


I added those plates of white styrene behind the exhaust opening so I can attach the pipes after painting.

This one was quite the opposite when talking about fit.

The only problem I've had so far has been the upper cowling part that took some light sanding to blend it in the fuselage a little better.
SGTJKJ
#041
_VISITCOMMUNITY
Kobenhavn, Denmark
Joined: July 20, 2006
KitMaker: 10,069 posts
AeroScale: 3,788 posts
Posted: Thursday, December 14, 2006 - 02:43 PM UTC
Hi Eetu

You are very productive. The BF-109 is just fantastic. It turned out okay with the exhust stribes IMO.

There are some serious gaps in that LaGG. That will be difficult to rectify withour losing detail.

Great work - thanks for sharing!
Emeritus
_VISITCOMMUNITY
Uusimaa, Finland
Joined: March 30, 2004
KitMaker: 2,845 posts
AeroScale: 1,564 posts
Posted: Thursday, December 14, 2006 - 06:50 PM UTC
Thanks.

I'll set up a backdrop and take some pictures of the Messerschmitt and Fokker for the campaign gallery.

I puttied the seams on the fuselage:


Since LaGG-3 was mainly made of wood, it's pretty much devoid of surface detail like panel lines and such so I could apply the putty generously and without worrying about filling panel lines and other details. The great majority of the engraved detail is concentrated on the nose and the upper cowling, which is a separate part and fits nicely.

And if you're wondering about the different tone of the pics in the earlier post, I was experimenting with my dad's camera's settings. Pics in this post were taken using the artificial light setting, the earlier with automatic.
TedMamere
_VISITCOMMUNITY
Moselle, France
Joined: May 15, 2005
KitMaker: 5,653 posts
AeroScale: 4,347 posts
Posted: Thursday, December 14, 2006 - 11:25 PM UTC
Hi Eetu!

The second batch of pictures looks better I think.

I'm looking forward to see that LaGG finished as we don't see that many. What kind of putty are you using? Is that Green Stuff?

Jean-Luc
Emeritus
_VISITCOMMUNITY
Uusimaa, Finland
Joined: March 30, 2004
KitMaker: 2,845 posts
AeroScale: 1,564 posts
Posted: Friday, December 15, 2006 - 01:34 AM UTC

Quoted Text


The second batch of pictures looks better I think.

I'm looking forward to see that LaGG finished as we don't see that many. What kind of putty are you using? Is that Green Stuff?


Yes the colors look more natural on the 2nd set.
Strange, I've been trying to get good pics using several lamps with a backdrop, but the pics always end up slightly grainy, blurred and dull-looking. Next I'll try to use one lamp with a regular light bulb instead of the lamps with fluorescence tubes I've used before. Or could be because of the white background I have been using. I've heard that light blue works the best.

That's squadron's green putty. Been using that for several years now. Good stuff.
Emeritus
_VISITCOMMUNITY
Uusimaa, Finland
Joined: March 30, 2004
KitMaker: 2,845 posts
AeroScale: 1,564 posts
Posted: Saturday, December 16, 2006 - 03:23 AM UTC
I got that backdrop set up and took some decent pics of my Fokker and Bf-109. I'll start with the fokker, which I photographed yesterday.


I'll post re-sized pics of the 109 in the morning. I posted larger one for this month's MOM.
Take a peek at the MOM thread.
alpha_tango
_VISITCOMMUNITY
Germany
Joined: September 07, 2005
KitMaker: 5,609 posts
AeroScale: 5,231 posts
Posted: Saturday, December 16, 2006 - 03:46 AM UTC
Hi Eetu

you shoud be awarded the Mannerheim Cross for modelling !!!

... man, I am struggling to get one model finished and you shoot them out like it is nothing ... amazing

great work

cheers

Steffen
Lucky13
_VISITCOMMUNITY
Scotland, United Kingdom
Joined: June 01, 2006
KitMaker: 1,707 posts
AeroScale: 1,119 posts
Posted: Saturday, December 16, 2006 - 04:39 AM UTC
Eetu and Co.

Great looking builds fellas, just super! All this makes we wanna run and buy a Gloster Gladiator, build it in F-19 colors when I should save my money for an airbrush+compressor.
Shame on you people, when you know how eaily led astray I am.....
:-)
Emeritus
_VISITCOMMUNITY
Uusimaa, Finland
Joined: March 30, 2004
KitMaker: 2,845 posts
AeroScale: 1,564 posts
Posted: Saturday, December 16, 2006 - 07:33 PM UTC
Here's the pics of my Bf-109 G2 (I uploaded these to the FUMS gallery as well).


Emeritus
_VISITCOMMUNITY
Uusimaa, Finland
Joined: March 30, 2004
KitMaker: 2,845 posts
AeroScale: 1,564 posts
Posted: Sunday, December 17, 2006 - 12:25 PM UTC
I think the biggest work with the LaGG is done now. The wing-to-fuselage joint wasn't so bad after some work. There here almost no gaps to speak of, but the parts didn't line up perfectly, so putty and sanding was necessary. The seams at the front and under the front of the wing were pretty hefty, so I first filled the seams with styrene sheet, then did the final filling with putty.

Here's both the Bf-109 and LaGG-3, 109 being ready for priming. Because the canopy frames will be RLM66 on the inside, I masked the entire canopy. Note the different amounts of putty used in each. Fortunately LaGG-3 was mainly made of wood, resulting in quite minimal amounts of surface detail other than on the nose. What I still have to do with that wing-fuselage seam is to srcibe a panel line between the two.

And here's the 109 after priming with masking removed.
TedMamere
_VISITCOMMUNITY
Moselle, France
Joined: May 15, 2005
KitMaker: 5,653 posts
AeroScale: 4,347 posts
Posted: Sunday, December 17, 2006 - 10:22 PM UTC
Hi Eetu!

Nice pair of fighters!

Here's another primed model... this way yours won't feel too lonely!


I even managed to paint the underside of the G.50. Next step will be to paint the upper camouflage!

Do you think you will finish both models before the deadline?

Jean-Luc
Emeritus
_VISITCOMMUNITY
Uusimaa, Finland
Joined: March 30, 2004
KitMaker: 2,845 posts
AeroScale: 1,564 posts
Posted: Monday, December 18, 2006 - 02:11 AM UTC
A nice-looking G.50 you got there!

Yes, I think I should be able to finish both before the deadline.
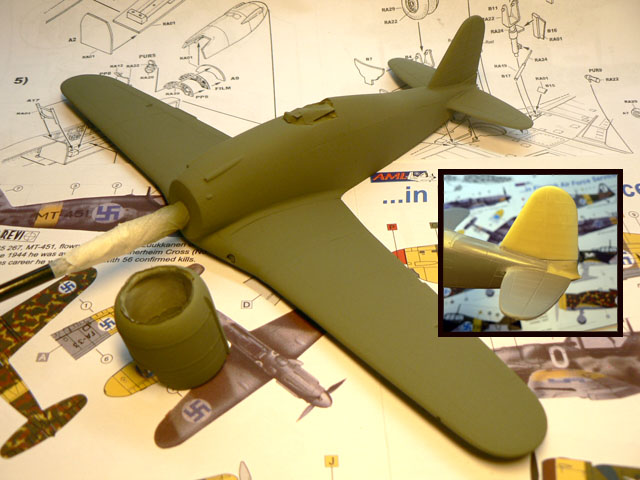
The Bf-109 shouldn't much trouble, except for the camouflage perhaps. And those landing gears should also be fixed. The axels are attached to the gear legs at an angle so the wheels end up at a right angle to the ground. That shouldn't be too hard to fix.
It's the LaGG that has more of an issue with it's landing gear. While parts are nicely detailed and fit right, someone must have messed up with the gear wells. The gear legs have a typical pin at the end. One would think that it attaches to corresponding holes in the wheel well. Wrong! What you find in the wells, are rectangular openings about 2mm wide.
Guess I'll just have to glue in some styrene and drill two holes for the gear legs.
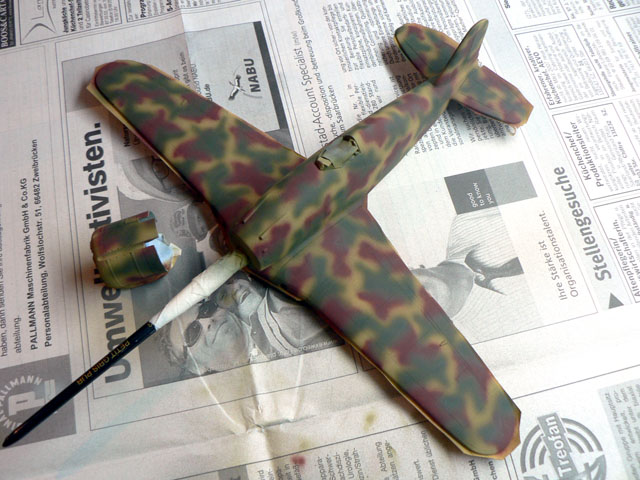
Contrasting the trickier build, painting it will be much simpler. Back to the black/green Finnish camo, but to add a twist, captured planes had a cool splinter scheme. One site had great four-view drawings and I got the idea of re-sizing them in photoshop, then just printing them out and cutting the masks.
But... Apparently, re-sizing the pics has to be done through trial and error, since the dimensions of the pic don't match the print's. No matter if you change the print size or the actual dimension of the file, it's all guesswork. You can set the dimension in centimeters, pixels or parsecs (or something), but it's no use if I can't set the physical print size I want...

Of course, using a photocopier to take suitably sized copies of the prints is will work just as well, but would have been so convenient to just set the required size and hit the print button in photoshop.
JPTRR
Staff MemberManaging Editor
RAILROAD MODELING
#051
_VISITCOMMUNITY
Tennessee, United States
Joined: December 21, 2002
KitMaker: 7,772 posts
AeroScale: 3,175 posts
Posted: Monday, December 18, 2006 - 07:33 AM UTC
Greetings Squadron,

Progress report:

My Sky Pearl is painted, decaled and weathered. Obvious must-do's = canopy, prop, antenna and post, and landing gear (oh, and fill that pesky superfluous starboard landing light).


The decals are the best I can recall using! Thin, tough, don't curl, and loosen from the backing in seconds.


Now, can you find the really obvious boo-boos?
ThomasB
_VISITCOMMUNITY
Skåne, Sweden
Joined: May 17, 2002
KitMaker: 762 posts
AeroScale: 141 posts
Posted: Monday, December 18, 2006 - 09:56 AM UTC
Have finally managed to start my C.A Buffalo, but as already stated, it's not an easy build, so I'm in a little bit of doubt that I will have the time to finish it in time. But as back up I'm at the same time building Rodens 1/72 LaGG-3 with finnish markings and Hasegawas 1/72 MS.406.

Emeritus
_VISITCOMMUNITY
Uusimaa, Finland
Joined: March 30, 2004
KitMaker: 2,845 posts
AeroScale: 1,564 posts
Posted: Monday, December 18, 2006 - 02:22 PM UTC
Just superb, JPTRR! That paint chipping looks great.
I can't spot any major boo-boos, but the registry numbers behind the fuselage swastikas appear to be a little too low. If you already varnished your model, I would just leave them that way.
Don't worry, I made the same mistake with my Mörkö-Morane.

ThomasB:
Yeah, please post some pics. I'm curious about your LaGG-3. My sample looked like the molds are starting to get old. There was some flash and wing-to-fuselage joint wasn't the greatest one possible.
You have the 35th series kit?
I got that one and the instructions could be better. While you get a 35th series following the instructions, the marking guide is inadequate as it only has a left side view, leaving the right for the imagination. (note that altough the instructions show reversed swastikas on the fuselage, the decals are correct however, but the blue is a bit too dark, and registry number and letters are all black)
Also, the kit comes with decals for LG-1, which was a 4th series plane. The good news is that it can be built from the kit as well.

While searching for reference, I found this great site that has a kit review, with information on which parts to use for certain versions, and articles of both LG-1 and LG-3, with comprehensive profile drawings of the camoflage pattern, photos and information about the modifications made by Finns.
Here's the links:
Kit review
LG-1
LG-3
TedMamere
_VISITCOMMUNITY
Moselle, France
Joined: May 15, 2005
KitMaker: 5,653 posts
AeroScale: 4,347 posts
Posted: Wednesday, December 20, 2006 - 02:13 AM UTC
Hi all!

Fred, sorry I couldn't spot any "boo-boos"... maybe you forgot to mask the canopy and you painted the transparent part in camouflage color?

Anyway, here's my G.50 in summer dress...


I'm still confident I will get it finished in time. Thanksfully we will have our 2 weeks Christmas holidays so I will have plenty of time after the 25th I should receive some new Mark58 airfield bases as well and I think I'll do a simple diorama base for the plane a little later.

Jean-Luc
JPTRR
Staff MemberManaging Editor
RAILROAD MODELING
#051
_VISITCOMMUNITY
Tennessee, United States
Joined: December 21, 2002
KitMaker: 7,772 posts
AeroScale: 3,175 posts
Posted: Wednesday, December 20, 2006 - 08:33 AM UTC

Quoted Text

Now, can you find the really obvious boo-boos?


Greetings Squadron,

Thanks for the compliments

I forgot to paint the walks along the wingroots! Then the salt-chipping looked so good I couldn't bring myself to redo them

I certainly hope that is my only boo-boo! The canopy mask comes off...maybe while you are reading this!

I did not preshade but tried another idea. I masked (and freehanded) a shadowing across main panels. I think it worked on some, not on others.

The black is a mix of Floquil-Polly Scale Tarnished Black and Grimy Black. The green is Pactra Marine Green, which I chose because it is one number off from the FS code for the olive.

This aerocraft will be a 'triple-role' model: FUMS as well as a review of the kit, and also a prominent role in my feature of paint chipping.
JPTRR
Staff MemberManaging Editor
RAILROAD MODELING
#051
_VISITCOMMUNITY
Tennessee, United States
Joined: December 21, 2002
KitMaker: 7,772 posts
AeroScale: 3,175 posts
Posted: Wednesday, December 20, 2006 - 08:34 AM UTC
Jean-Luc,

that camo is looking great!
Emeritus
_VISITCOMMUNITY
Uusimaa, Finland
Joined: March 30, 2004
KitMaker: 2,845 posts
AeroScale: 1,564 posts
Posted: Wednesday, December 20, 2006 - 01:54 PM UTC
Jean-luc:
That camo looks just great!
Btw, what paints did you use?
I've been reading good reviews of Lifecolor acrylics and been thinking about ordering a bunch for my G.50, as they have Italian camo colors in their range.

JPTRR:
What was that green color's FS number? When searching for paints, there was one paint from Vallejo air range claiming to be FS:34096, but it was very dark, almost black green.

Here's what I finished airbrushing 2.30 AM today (I always seem to get these "flow" experiences late in the evening. I guess I'm king of a creature of the night, when it comes to modelling)
Anyway, here's my Messerschmitt with the camoflage done. The pattern in the wings is not 100% right because I did it free-hand, using blue-tac sausage technique only with RLM75 on the wings, to better see the areas to be painted with RLM74. Also, I think I need more practise with the mottling, they're a little too large here and there. But for a 1:72 model (an my second with mottling), I'm happy with the results. Before a coating future and decaling, I still have to paint the number 7 to the rudder, as I didn't have suitable spares. That can be sprayed with a mask cut from tape, but the tiny hand-painted "476" behind the cockpit can be trickier.

JPTRR
Staff MemberManaging Editor
RAILROAD MODELING
#051
_VISITCOMMUNITY
Tennessee, United States
Joined: December 21, 2002
KitMaker: 7,772 posts
AeroScale: 3,175 posts
Posted: Friday, December 22, 2006 - 09:57 PM UTC
Gentlemen,

For those of you who complete the campaign, you can look forward to adorning your 'salad garden' with this:

JPTRR
Staff MemberManaging Editor
RAILROAD MODELING
#051
_VISITCOMMUNITY
Tennessee, United States
Joined: December 21, 2002
KitMaker: 7,772 posts
AeroScale: 3,175 posts
Posted: Friday, December 22, 2006 - 10:19 PM UTC

Quoted Text

What was that green color's FS number? When searching for paints, there was one paint from Vallejo air range claiming to be FS:34096, but it was very dark, almost black green.


Emeritus,

FS 34097. Pactra calls it Marine Green. I thought about adding a smidge of brown to 'olive' it up, but decided to let it be, for scale effect and weathering.


Quoted Text

I think I need more practise with the mottling, they're a little too large here and there. But for a 1:72 model (an my second with mottling), I'm happy with the results.


I think the mottling is well done. Some of the 109s I see in my Finnish Aces book look about right for your's. It looks like many had the tail mottled with just circular patches of uniform size. I forget how many were in Luftwaffe scheme, and how many were repainted.

Looking good
VonCuda
_VISITCOMMUNITY
North Carolina, United States
Joined: November 28, 2005
KitMaker: 2,216 posts
AeroScale: 1,080 posts
Posted: Friday, December 22, 2006 - 10:44 PM UTC
Hi Fred and everyone

I've been out of action for nearly 3 months now due to 2 deaths in my family and loads of work in between. So, I ask all of you to pardon my absence in this campaign. I was really looking forward to keeping up with this campaign thread and enjoying the fun but it hasn't worked out that way so far. I have 4 days of vacation starting today so I'm hoping to get my FUMS Buffalo off the ground and in the air. Here is an update on where she stands right now. Still some minor paint touch-ups and a few bits and pieces to glue on but she's starting to look better by the hour.


Hope this is OK Fred. I realize I haven't been a contributing member on this campaign thus far and I don't have any "in progress" pictures. If this is unacceptable just PM me. Hopefully If you run another campaign in the future I'll get enough time to join up and do it right.
Thanks
Emeritus
_VISITCOMMUNITY
Uusimaa, Finland
Joined: March 30, 2004
KitMaker: 2,845 posts
AeroScale: 1,564 posts
Posted: Friday, December 22, 2006 - 11:23 PM UTC
Looking very nice VonCuda.
Is that CA's kit? Just remember to add the missing registry number.
Also, you seem to have the round life raft container behind the seat installed. These (as well as other navy equipment) were removed from Finnish B-239's.
VonCuda
_VISITCOMMUNITY
North Carolina, United States
Joined: November 28, 2005
KitMaker: 2,216 posts
AeroScale: 1,080 posts
Posted: Saturday, December 23, 2006 - 08:26 AM UTC


Hi Eetu,
You are right about the life raft container! :-) I should probably confess how this happened.
I started out with the CA kit but time and frustration kept me from doing the kit justice. I ended up actually building the Tamiya 339 kit and using the prop, cowling, tail section, and various other parts from the CA kit to try and make an authentic Finnish B-239. I ended up loosing the parts that went behind the cockpit seat and had to put in the American lifeboat container.
By missing registry number are you talking about the 3 as in B-393? If so, it is actually there. On the decal sheet the B-39 is black and the last 3 is grey and doesn't show up well on the dark green camo.
All in all this kit turned out reasonably well with the limited time I had to spend on it. I'm almost done at this point and hope to have some finished pictures here by Monday.
JPTRR
Staff MemberManaging Editor
RAILROAD MODELING
#051
_VISITCOMMUNITY
Tennessee, United States
Joined: December 21, 2002
KitMaker: 7,772 posts
AeroScale: 3,175 posts
Posted: Saturday, December 23, 2006 - 10:05 AM UTC

Quoted Text

Hope this is OK Fred. I realize I haven't been a contributing member on this campaign thus far and I don't have any "in progress" pictures.


Hi Hermon,

Quit alright, you are most welcome to participate! I look forward to your entry, "in progress" pictures or no.