

Early Aviation
Discuss World War I and the early years of aviation thru 1934.
Discuss World War I and the early years of aviation thru 1934.
Hosted by Jim Starkweather
A right Royal Fokker!

JackFlash

Joined: January 25, 2004
KitMaker: 11,669 posts
AeroScale: 11,011 posts
Posted: Thursday, June 15, 2006 - 07:30 AM UTC
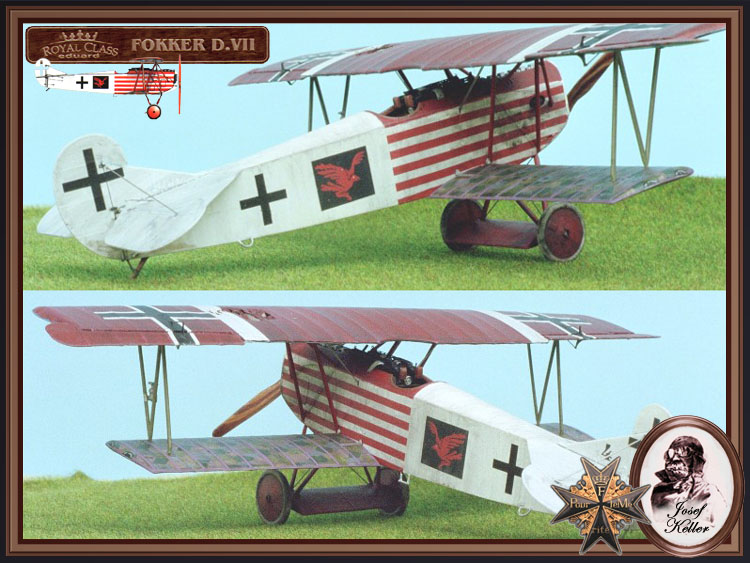
Here is another concerning the Jasta 43 build.
JackFlash
Joined: January 25, 2004
KitMaker: 11,669 posts
AeroScale: 11,011 posts
Posted: Thursday, June 15, 2006 - 07:33 AM UTC
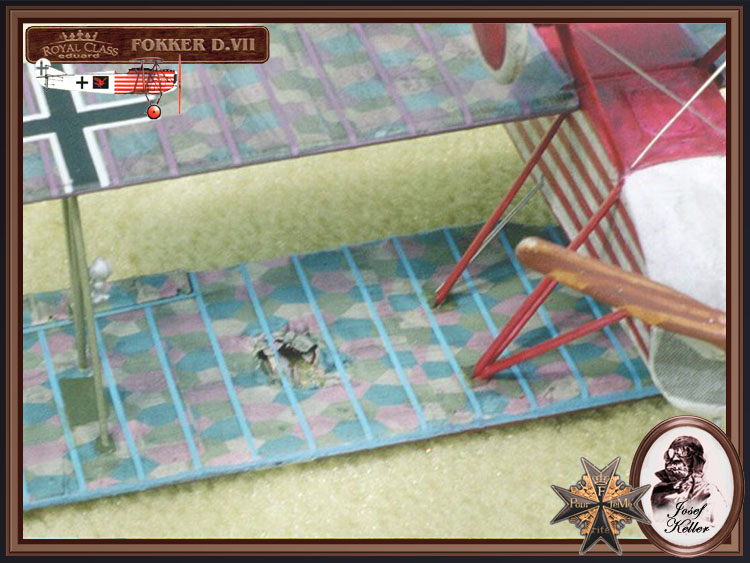
The last of the images for Jasta 43.
Holdfast

#056

Joined: September 30, 2002
KitMaker: 8,581 posts
AeroScale: 4,913 posts

Posted: Saturday, June 17, 2006 - 01:42 AM UTC
Wow Stephen, you've been practising  wonderful stuff.
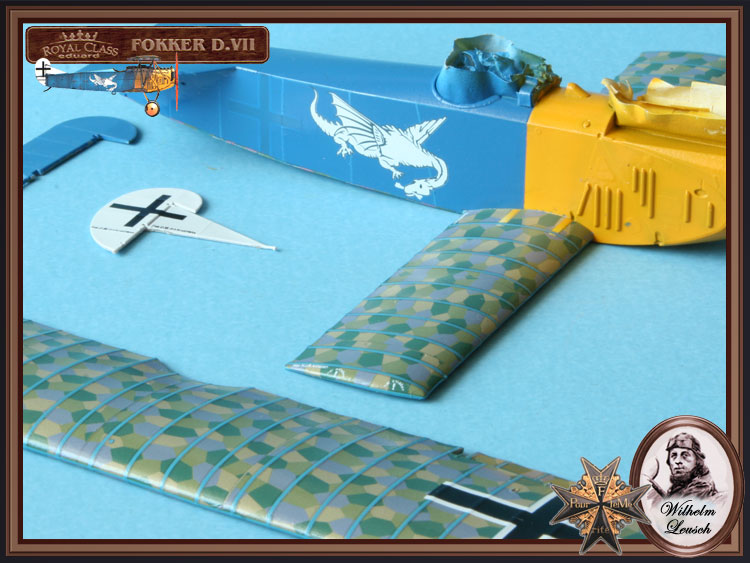
Just a couple of pics to show that I have been making progress. All the decalling, apart from that on the struts is done and it all went on very easily. I was unable to remove the wing edge tape decals from the ailerons, so I repaired them (after trying to get them off) and decided to live with them
I am hoping to get this into the spray booth tomorrow but my daughter did find a car today so we are going back for a test drive tomorrow.

I have also started getting the guns sorted and found rolling the jackets to be pretty easy
Because Im a bit behind I will add a few thoughts about this kit here, rather than wait until I have finished, so as not to delay the final write up.
I am not behind through any fault of the kit, far from it the kit is actually very easy to build. Well it has been so far but I dont expect any real dramas with the final assembly, the main reason for me lagging behind is all the lozenge and rib tape decals. They go on very well, there are just a lot of them and they have to go on square, so I did a few at a time. I also used the spare decal supplied to apply tape decals to the wing lozenge leading and trailing edge joints. There are no decals supplied for this but the spare ones are just enough. I would be interested to know the reason that Eduard left these off the instructions, possibly because of the difficulty applying them? Having the ear of Stephen allowed me to find out about the edge tapes, but if I hadnt I was going to use the spare ones for the underside of the tail plane, which I found out, again from Stephen, that they werent applied there. I did make the mistake of applying edge tapes to the ailerons, when I found out I tried to remove them. They didnt want to come off, so I re-applied where I had damaged them and will happily live with it (looks kinda cool). I found the decals to be superb, they released, from the backing, very quickly and could be floated into position, if necessary, on a pool of water, setting solutions are totally unnecessary and they are very tenacious once in position. The Crosses with white outlines showed a little misalignment, at the tips. This was easily remedied by simply cutting the tips square, and they look good when on.
If there is any other fault at all with this kit it must be with the instructions. Dont get me wrong they are direct prints off a 3D CAD program and are the best instructions I have ever seen, there are a couple of omissions though. The edge decals not being mentioned could be considered one, depending on the reason Eduard left them off the decal sheet. I think though, as a novice WW I builder I would have liked to know about it. There are also a couple of struts missing in the drawings on page 12. The real problem with these not being shown is the confusion caused when working out the strut location on the next page, or it was confusing to me. All became clear when I realised the omission, so no harm done. It may just be me but I found it difficult to know exactly where the aileron cables entered the fuselage, Stephen, once again, coming to the rescue.
The kit is very well engineered, with finely moulded parts and I havent been able to fault either the plastic or the colour etch. For the first time builder of a WW I aircraft this would be a very good start. In fact I think Im hooked, as Im definitely planning more WW I aircraft, for this Im unsure whether to thank Eduard or curse them. Definitely a big thank you, I just love this newfound WW I modelling.
Mal
wonderful stuff.Just a couple of pics to show that I have been making progress. All the decalling, apart from that on the struts is done and it all went on very easily. I was unable to remove the wing edge tape decals from the ailerons, so I repaired them (after trying to get them off) and decided to live with them
I am hoping to get this into the spray booth tomorrow but my daughter did find a car today so we are going back for a test drive tomorrow.
I have also started getting the guns sorted and found rolling the jackets to be pretty easy
Because Im a bit behind I will add a few thoughts about this kit here, rather than wait until I have finished, so as not to delay the final write up.
I am not behind through any fault of the kit, far from it the kit is actually very easy to build. Well it has been so far but I dont expect any real dramas with the final assembly, the main reason for me lagging behind is all the lozenge and rib tape decals. They go on very well, there are just a lot of them and they have to go on square, so I did a few at a time. I also used the spare decal supplied to apply tape decals to the wing lozenge leading and trailing edge joints. There are no decals supplied for this but the spare ones are just enough. I would be interested to know the reason that Eduard left these off the instructions, possibly because of the difficulty applying them? Having the ear of Stephen allowed me to find out about the edge tapes, but if I hadnt I was going to use the spare ones for the underside of the tail plane, which I found out, again from Stephen, that they werent applied there. I did make the mistake of applying edge tapes to the ailerons, when I found out I tried to remove them. They didnt want to come off, so I re-applied where I had damaged them and will happily live with it (looks kinda cool). I found the decals to be superb, they released, from the backing, very quickly and could be floated into position, if necessary, on a pool of water, setting solutions are totally unnecessary and they are very tenacious once in position. The Crosses with white outlines showed a little misalignment, at the tips. This was easily remedied by simply cutting the tips square, and they look good when on.
If there is any other fault at all with this kit it must be with the instructions. Dont get me wrong they are direct prints off a 3D CAD program and are the best instructions I have ever seen, there are a couple of omissions though. The edge decals not being mentioned could be considered one, depending on the reason Eduard left them off the decal sheet. I think though, as a novice WW I builder I would have liked to know about it. There are also a couple of struts missing in the drawings on page 12. The real problem with these not being shown is the confusion caused when working out the strut location on the next page, or it was confusing to me. All became clear when I realised the omission, so no harm done. It may just be me but I found it difficult to know exactly where the aileron cables entered the fuselage, Stephen, once again, coming to the rescue.
The kit is very well engineered, with finely moulded parts and I havent been able to fault either the plastic or the colour etch. For the first time builder of a WW I aircraft this would be a very good start. In fact I think Im hooked, as Im definitely planning more WW I aircraft, for this Im unsure whether to thank Eduard or curse them. Definitely a big thank you, I just love this newfound WW I modelling.
Mal


TedMamere

Joined: May 15, 2005
KitMaker: 5,653 posts
AeroScale: 4,347 posts

Posted: Saturday, June 17, 2006 - 02:34 AM UTC
Hi Mal and Stephen!
Your Fokkers look superb... and yours Mal will look even better when finished for sure!
As for the conclusion you wrote, I totally agree with what you said! The kit is perfect but the instructions are the "weak" point in the Royal Class box. Personaly I prefer the traditional drawings than the 3D graphics. And as I said in my conclusion, it's sometimes hard to figure out were the optional parts belong to. So rather than giving the kit a 100% rating I would "only" give it a 95%... Still enough to get "hooked" by WWI models I think!
Jean-Luc

JackFlash
Joined: January 25, 2004
KitMaker: 11,669 posts
AeroScale: 11,011 posts
Posted: Saturday, June 17, 2006 - 08:07 AM UTC
Mal and Jean-Luc, you gents are the tops! I'll fly with you two any day! Mal looks good so far. Can't hardly wait to see the completed build.

Lucky13

Joined: June 01, 2006
KitMaker: 1,707 posts
AeroScale: 1,119 posts

Posted: Saturday, June 17, 2006 - 11:28 AM UTC
WOW!!
Your work is really inspirational, superb to say the least! I can't wait to get my own Royal Fokkers.... Just returning back to modelbuilding after quite a few blue moons of absence.
Your work is really inspirational, superb to say the least! I can't wait to get my own Royal Fokkers.... Just returning back to modelbuilding after quite a few blue moons of absence.
TedMamere
Joined: May 15, 2005
KitMaker: 5,653 posts
AeroScale: 4,347 posts
Posted: Saturday, June 17, 2006 - 11:55 AM UTC
Quoted Text
Just returning back to modelbuilding after quite a few blue moons of absence.
Hi Jan!
Welcome to Armorama, welcome back to modelling and thanks for your kind words
And most important, have fun with your Fokkers! Jean-Luc
Holdfast
#056
Joined: September 30, 2002
KitMaker: 8,581 posts
AeroScale: 4,913 posts
Posted: Saturday, June 17, 2006 - 03:25 PM UTC
Thanks Jean-Luc
I actually prefer the 3d graphics, the pictures actually look like the parts, but I'm happy with well drawn draditional diagrams and Edurd instructions done this way are also very good. You have to applaud Eduard for trying out the 3D graphic approach though, they seam to be constantly looking to "raise the bar". It's unlikely that there will ever be a perfect kit, well one that is perfect for every taste, but Eduard are certainly getting close
Thanks Stephen It's been an enjoyable ride  I'm at the point where I seem to dally over finishing and I'm trying to get on. It's a little more difficult with this, as it's my first WW I model and I'm having to think things through before doing anything, so that I don't really cock it up. For example I need to apply another coat of Klear, over the decals, to protect them from the weathering that's to come. Before doing that however I need to touch up a couple of places, which I did this morning. Of course they need to dry before I can apply the Klear, then that has to dry. I'm also trying to get the guns finished so that when I can get it into the spray booth I can do the weathering spray, paint the dark green elements, plates, control horns etc and paint the guns and the black band on my Me163 I also have to aim off for taking my daughter back to test drive the car we found
Hi Jan, welcome to Armorama and welcome back to modelling
Mal
Quoted Text
Personaly I prefer the traditional drawings than the 3D graphics.
I actually prefer the 3d graphics, the pictures actually look like the parts, but I'm happy with well drawn draditional diagrams and Edurd instructions done this way are also very good. You have to applaud Eduard for trying out the 3D graphic approach though, they seam to be constantly looking to "raise the bar". It's unlikely that there will ever be a perfect kit, well one that is perfect for every taste, but Eduard are certainly getting close
Thanks Stephen
It's been an enjoyable ride I'm at the point where I seem to dally over finishing and I'm trying to get on. It's a little more difficult with this, as it's my first WW I model and I'm having to think things through before doing anything, so that I don't really cock it up. For example I need to apply another coat of Klear, over the decals, to protect them from the weathering that's to come. Before doing that however I need to touch up a couple of places, which I did this morning. Of course they need to dry before I can apply the Klear, then that has to dry. I'm also trying to get the guns finished so that when I can get it into the spray booth I can do the weathering spray, paint the dark green elements, plates, control horns etc and paint the guns and the black band on my Me163 I also have to aim off for taking my daughter back to test drive the car we found Hi Jan, welcome to Armorama and welcome back to modelling Mal
Holdfast
#056
Joined: September 30, 2002
KitMaker: 8,581 posts
AeroScale: 4,913 posts
Posted: Monday, June 19, 2006 - 02:55 AM UTC
Due to test driving cars, other daughter and boyfriend, then brother and sister in law turning up out of the blue I didn't manage to get much done, but final coat of Klear is on. So of course I didn't manage to get in to the spray booth. Family can be so inconsiderate
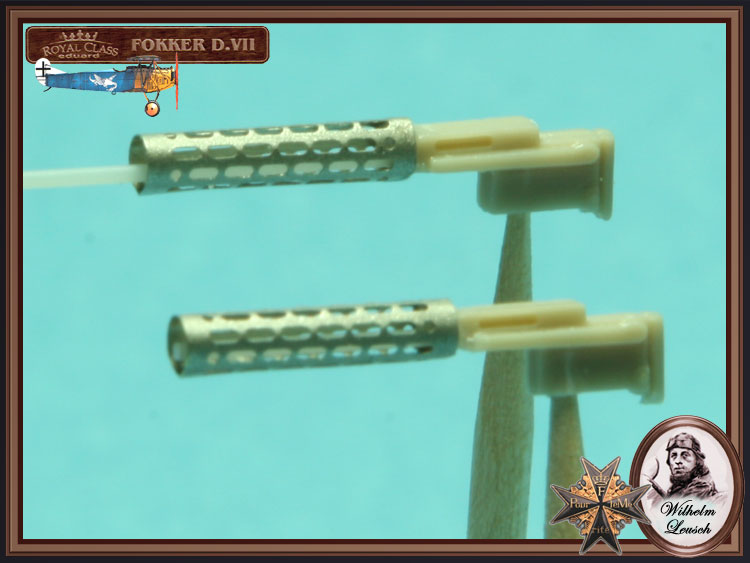
This evening though I have started on the guns and I have included a few pics to illustrate how I am going. This is because this is the first time I have actually rolled etch parts and, although I knew the theory, the practice seemed slightly daunting. It proved to be straight forward but for those in a similar position here's what I did.
1. I took a relatively large shanked drill, about 2mm and rolled this over the etched gun jackets on several pieces of paper. (Actually the instruction booklet for my AM B-25 ) This put a slight curve in the etch.
2. Using the same drill I rolled over the jacket again but on something with more room to give. In my case a mouse mat with a hard(ish) cover. This put more of curve into the jackets.
3. I then used a smaller drill, again on the mouse mat. Putting in more curve.
4. I then used that same drill rolling over a soft piece of neoprene rubber with a fabric cover. I finised off with a smaller drill and again rolled the jackets on the soft neoprene. It is probable that you could go straight to this stage, but I preferred the careful approach this first time.
5. I then slid the 2 jackets onto a piece of steel tube, just slightly bigger than the internal diameter of the jackets, so that I could exert some pressure on the parts to finally shape them.

6. I cut the plastic guns in half and left the muzzle end on the sprue. This enable me to drill out and shape the flare of the flash hider before it is cut off.
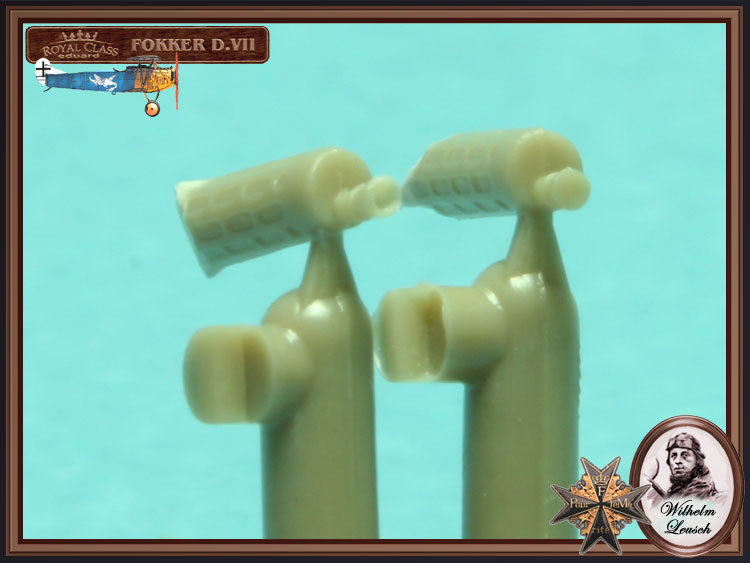
7. I cleaned up the breach end and cut down what was left of the plastic barrel jacket, to about 1mm. I drilled this, low down near the bottom edge, to take a plastic rod barrel. I also drill a hole in the underside of the breach housing to take a cocktail stick.
8. I then trimmed away enough of the 1mm of plastic barrel jacket, so that the etched jacket would fit over it. I added the plastic rod barrel, using liquid cement (if you tried to drill a hole for this, after trimming the 1mm stub, there wouldn't be enough material for the drill to gain purchase, in fact the hole is now half a hole).
9. The etched jacket was then slid in position and CA'd onto the plastic jacket stub. The protruding barrel is then cut off flush with the front jacket opening.
Mal
This evening though I have started on the guns and I have included a few pics to illustrate how I am going. This is because this is the first time I have actually rolled etch parts and, although I knew the theory, the practice seemed slightly daunting. It proved to be straight forward but for those in a similar position here's what I did.
1. I took a relatively large shanked drill, about 2mm and rolled this over the etched gun jackets on several pieces of paper. (Actually the instruction booklet for my AM B-25
) This put a slight curve in the etch.2. Using the same drill I rolled over the jacket again but on something with more room to give. In my case a mouse mat with a hard(ish) cover. This put more of curve into the jackets.
3. I then used a smaller drill, again on the mouse mat. Putting in more curve.
4. I then used that same drill rolling over a soft piece of neoprene rubber with a fabric cover. I finised off with a smaller drill and again rolled the jackets on the soft neoprene. It is probable that you could go straight to this stage, but I preferred the careful approach this first time.
5. I then slid the 2 jackets onto a piece of steel tube, just slightly bigger than the internal diameter of the jackets, so that I could exert some pressure on the parts to finally shape them.
6. I cut the plastic guns in half and left the muzzle end on the sprue. This enable me to drill out and shape the flare of the flash hider before it is cut off.
7. I cleaned up the breach end and cut down what was left of the plastic barrel jacket, to about 1mm. I drilled this, low down near the bottom edge, to take a plastic rod barrel. I also drill a hole in the underside of the breach housing to take a cocktail stick.
8. I then trimmed away enough of the 1mm of plastic barrel jacket, so that the etched jacket would fit over it. I added the plastic rod barrel, using liquid cement (if you tried to drill a hole for this, after trimming the 1mm stub, there wouldn't be enough material for the drill to gain purchase, in fact the hole is now half a hole).
9. The etched jacket was then slid in position and CA'd onto the plastic jacket stub. The protruding barrel is then cut off flush with the front jacket opening.
Mal
JackFlash
Joined: January 25, 2004
KitMaker: 11,669 posts
AeroScale: 11,011 posts
Posted: Tuesday, June 20, 2006 - 09:18 PM UTC
Greetings all;
I have had some inquiries on my website concerning this build and will attempt to answer them here.
"Hey Stephen, I really liked the inprogress build you guys did over on Armorama ...why is there so much written on the Fokker D.VII. . .Jim Baker?"
The Fokker D.VII became Germanys main production fighter in 1918. Usually matched with the Mercedes D.IIIaü 180 hp or the D.IIIav 200hp engines. It was the variant with the BMW IIIa 185 hp motor that pilots prized ultimately. With few idiosyncracies it was not temperamental and a novice with a little nerve could do well. Contemporary construction using welded metal tubing for the fuselage and wooden wing structures was typical. The secret appeared to be in the Cantilever boxed wing spars and the simple design that eliminated the need for multiple exposed rigging wires.
Much of this led to the fact that this was on of the last mass produced single-seat fighter of the German Fliegertruppe. Mentioned specifically in the terms of the Armistice as the one machine that without exceptionthat was to be handed over to the allies. The lack of external rigging was the common factor, also preliminary flight reports of captured examples were very promising. In the US both NACA and McCook field had done flight characteristics reports. Soon the type yielded up its secrets and examples served on even after WWI in fledgling air arms in many smaller nations. Thus marked the end of its military career. Yet it was to be seen in Hollywood aviation films up through 1929. (There were over 400 films in the aviation genre made between 1919-1931in the USA alone.)
During this period you could see aviation in almost every type of film.
JackFlash
Joined: January 25, 2004
KitMaker: 11,669 posts
AeroScale: 11,011 posts
Posted: Thursday, June 22, 2006 - 03:12 PM UTC
Question posted offline from Michael Reilly '...Aren't the Axial propellers used on the Fokker Dr.I the same as the ones used on the Fokker D.VII?'
No, the Axial propellers and all other prop companies used their own paddle profile as a company trademark. Yet the length and pitch varied. One type for the the rotary engined Fok. Dr.I and a longer one with a different pitch for the inlined engined Fokker D.VII. Also each aircraft came to the front with its own cache of spare parts. Per Dan San Abbott these spares were often maintained at the Armee flug park / depot level.
The over all length of the 1/48 Fokker D.VII Axial should be about 3/32 of an inch longer than a 1/48 scale Axial for the Fokker Dr.I.
Holdfast
#056
Joined: September 30, 2002
KitMaker: 8,581 posts
AeroScale: 4,913 posts
Posted: Friday, June 23, 2006 - 12:49 AM UTC
Thanks for the info Stephen.
Just a quick update: I had the Fokker and parts in the spray booth this afternoon so I will post pics tomorrow......................unless I've fouled it up Mind you Im deffinately pleased with the guns and I think the weathering spray went on OK, fingers crossed 
Mal
Just a quick update: I had the Fokker and parts in the spray booth this afternoon so I will post pics tomorrow......................unless I've fouled it up
Mind you Im deffinately pleased with the guns and I think the weathering spray went on OK, fingers crossed Mal
Holdfast
#056
Joined: September 30, 2002
KitMaker: 8,581 posts
AeroScale: 4,913 posts
Posted: Friday, June 23, 2006 - 09:39 PM UTC
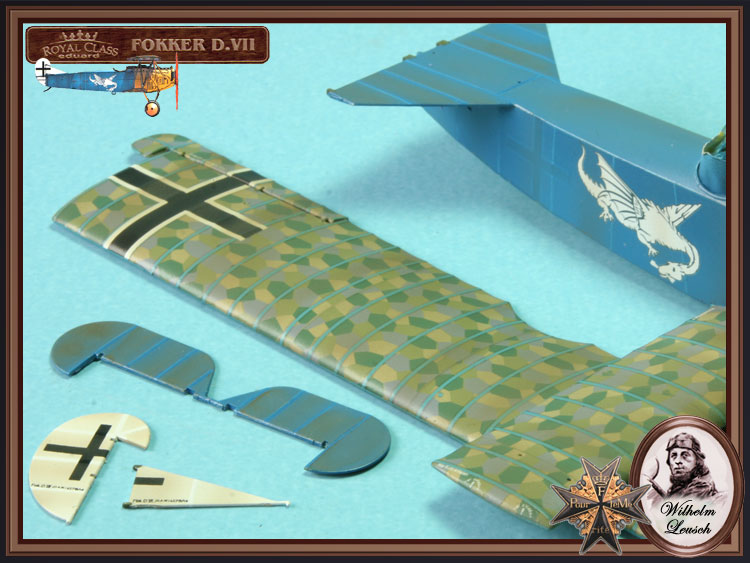
I finally got my Fokker into the spray booth. I used, heavily thinned White Ensign Models RAF Dark Earth, and sprayed, at low pressure, aiming between the ribs on top and below the wings and under fuselage. For the white fin and rudder and the blue tail plane I, again, used thin strips of Tamiya tape to mask off the ribs, which had been previously highlighted, and sprayed between these. I sprayed freehand on the fuselage sides, taking care not to paint over the highlighted fuselage formers.

In places I sprayed a little heavier than others, particularly around the strut fixing points on the wings, The effect is quite pleasing, toning down the lozenge decals and at the same time dirtying up the aircraft. I also sprayed some of the mixture on top of the shelf on the forward fuselage, below where the exhaust will go, to start the weathering process for that are.
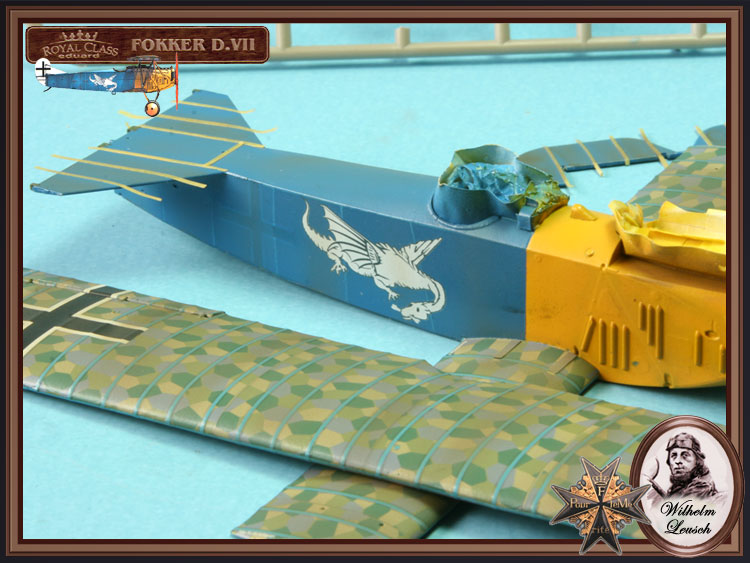
The masked areas look a little stark with the masking removed but there is more to come, which will, hopefully, remedy that. I didnt spray the mixture on the forward fuselage, apart from the place already mention as I intended to use a wash here and the same goes for the wheels and wheel wing. However what I should have done is to apply the wash to these areas first, because the wheels and wheel wing also ought to have the Dark Earth mixture sprayed on them as well. I will have to remedy this soonest, which means another trip into the spray booth meaning more delay Doh!
I had completed the guns so these received their semi gloss black coat and Im really pleased with the way they look.

Mal
In places I sprayed a little heavier than others, particularly around the strut fixing points on the wings, The effect is quite pleasing, toning down the lozenge decals and at the same time dirtying up the aircraft. I also sprayed some of the mixture on top of the shelf on the forward fuselage, below where the exhaust will go, to start the weathering process for that are.
The masked areas look a little stark with the masking removed but there is more to come, which will, hopefully, remedy that. I didnt spray the mixture on the forward fuselage, apart from the place already mention as I intended to use a wash here and the same goes for the wheels and wheel wing. However what I should have done is to apply the wash to these areas first, because the wheels and wheel wing also ought to have the Dark Earth mixture sprayed on them as well. I will have to remedy this soonest, which means another trip into the spray booth meaning more delay Doh!
I had completed the guns so these received their semi gloss black coat and Im really pleased with the way they look.
Mal
JackFlash
Joined: January 25, 2004
KitMaker: 11,669 posts
AeroScale: 11,011 posts
Posted: Saturday, June 24, 2006 - 07:55 AM UTC
Very nice Mal! I like the texturing and weathering effects. Will there be much more of that added to the cowling areas?
TedMamere
Joined: May 15, 2005
KitMaker: 5,653 posts
AeroScale: 4,347 posts
Posted: Saturday, June 24, 2006 - 12:09 PM UTC
Hi Mal!
Excellent work!
You are almost to the point of adding the upper wing! Good luck for the final stages of the build. But I'm not anxious! :-)
I noticed the Royal Frame of your last picture was offset!
Stephen, I forgot to send you the spare decals! I will do that as soon as possible. Sorry I just forgot about that and seeing Mal's Fokker made me remember again!
Jean-Luc
Excellent work!
You are almost to the point of adding the upper wing!
Good luck for the final stages of the build. But I'm not anxious! :-) I noticed the Royal Frame of your last picture was offset!
Stephen, I forgot to send you the spare decals!
I will do that as soon as possible. Sorry I just forgot about that and seeing Mal's Fokker made me remember again!Jean-Luc
Holdfast
#056
Joined: September 30, 2002
KitMaker: 8,581 posts
AeroScale: 4,913 posts
Posted: Saturday, June 24, 2006 - 09:15 PM UTC
Quoted Text
Very nice Mal! I like the texturing and weathering effects. Will there be much more of that added to the cowling areas?
Yep, as I say I got this all a bit mucked up and I have to apply some spray to the struts and wheels, but I'm about to get that done.
Quoted Text
You are almost to the point of adding the upper wing!
Yes, I have to add the control horns and drill the fuselage for the aileron cables (I keep forgetting to do that), then it's time for the wing. I was unsure about how to position the struts on the undercarriage. I know you had them in place before fitting the whole assembly to the lower fuselage, but I was certain that I liked that idea. However I needant have worried they are position almost perfectly and apart from one, are held nicely in place . the stray one was given a dab of white glue. Now I reckon I will be able to position and glue the struts to the fuselage, then adgust them so that the wheels are square, then glue them in position. I will then tackle the wing
Quoted Text
Good luck for the final stages of the build. But I'm not anxious!
I'm glad someone isn't
Back to the spray booth
Mal
Holdfast
#056
Joined: September 30, 2002
KitMaker: 8,581 posts
AeroScale: 4,913 posts
Posted: Wednesday, June 28, 2006 - 12:54 AM UTC
Just so that you don't think I'm slacking I have add some weathering, using Davey Grey artis oil paint, applied neat and "dragged out to simulate dirt and oils and fuel stains. I'm a bit apprehensive that I've gone a bit overboard witht he weathering but I'm quite happy with the way it's looking. The learning curve is flattening more as I realised that, before I add the top wing I really ought to spary the final matt coat. That means I have to finish a few things before doing that. I have added the control horns this evening, loosing only one to the carpet monster  I have another small fopar to report and that is that I left off the radiator filler pipe to be added at final assembly (I classed it as a "dangly bit" something that will get knocked off). I ment to paint it yellow, with the rest of the forward fuselage but forgot. Now that the forward fuselage is weathered it is to late to paint it yellow and blend it in. Stephen help I'm assuming that it was probably made out of copper and that the glycol or possibly alcohol that was used in the radiator, as antifreeze, would have a detremental effect on the paint. I have, therefore painted it copper and will give it a liitle bit of yellow around it's base, which will be easier to blend in, I hope
  I still haven't drilled the forward fuselage for the aileron cables DOH! I kanow that I have said this before, but I hope to have the Fokker finished this weekend, as now my daughter has a car and is driving to and from work. So apart from marrying off both my daughters all my worries are over. Any rich modellers out there like an english rose or 2
Mal
I have another small fopar to report and that is that I left off the radiator filler pipe to be added at final assembly (I classed it as a "dangly bit" something that will get knocked off). I ment to paint it yellow, with the rest of the forward fuselage but forgot. Now that the forward fuselage is weathered it is to late to paint it yellow and blend it in. Stephen help I'm assuming that it was probably made out of copper and that the glycol or possibly alcohol that was used in the radiator, as antifreeze, would have a detremental effect on the paint. I have, therefore painted it copper and will give it a liitle bit of yellow around it's base, which will be easier to blend in, I hope I still haven't drilled the forward fuselage for the aileron cables DOH! I kanow that I have said this before, but I hope to have the Fokker finished this weekend, as now my daughter has a car and is driving to and from work. So apart from marrying off both my daughters all my worries are over. Any rich modellers out there like an english rose or 2 Mal
JackFlash
Joined: January 25, 2004
KitMaker: 11,669 posts
AeroScale: 11,011 posts
Posted: Wednesday, June 28, 2006 - 04:36 AM UTC
Greetings Mal,
The Fokker D.VII radiator was I think the original metal was brass and double dipped in solder. The blending won't be a problem in this scale. I always go with a Metal Master aluminum. (laquer based) then when dry hit it with a flat coat(laquer based) and paint over it as needed. Coloured hobby enamels or acrylics scratch and chip nicely and leave that aluminum colour underneath.
The Fokker D.VII radiator was I think the original metal was brass and double dipped in solder. The blending won't be a problem in this scale. I always go with a Metal Master aluminum. (laquer based) then when dry hit it with a flat coat(laquer based) and paint over it as needed. Coloured hobby enamels or acrylics scratch and chip nicely and leave that aluminum colour underneath.
TedMamere
Joined: May 15, 2005
KitMaker: 5,653 posts
AeroScale: 4,347 posts
Posted: Wednesday, June 28, 2006 - 10:05 AM UTC
Quoted Text
So apart from marrying off both my daughters all my worries are over. Any rich modellers out there like an english rose
Hi Mal!
In such cases I would say "can you post some pictures so we can see what we are talking about!"
Anyway, I got married myself last Saturday and I'm not rich... :-)
Jean-Luc
Lucky13
Joined: June 01, 2006
KitMaker: 1,707 posts
AeroScale: 1,119 posts
Posted: Wednesday, June 28, 2006 - 07:48 PM UTC
Quoted Text
Quoted TextSo apart from marrying off both my daughters all my worries are over. Any rich modellers out there like an english rose
Hi Mal!
In such cases I would say "can you post some pictures so we can see what we are talking about!"
Anyway, I got married myself last Saturday and I'm not rich... :-)
Jean-Luc
Congratulations Jean-Luc!!! I wish you the very best for the future.....
TedMamere
Joined: May 15, 2005
KitMaker: 5,653 posts
AeroScale: 4,347 posts
Posted: Wednesday, June 28, 2006 - 09:21 PM UTC
Quoted Text
Congratulations Jean-Luc!!! I wish you the very best for the future.....
Thanks Jan...
:-)8 Jean-Luc
Holdfast
#056
Joined: September 30, 2002
KitMaker: 8,581 posts
AeroScale: 4,913 posts
Posted: Thursday, June 29, 2006 - 12:54 AM UTC
Congratulations jean-Luc
I'll see if I can sneak a picture, if my daughters find out about this I'm dead
Mal
I'll see if I can sneak a picture, if my daughters find out about this I'm dead
Mal
JackFlash
Joined: January 25, 2004
KitMaker: 11,669 posts
AeroScale: 11,011 posts
Posted: Thursday, June 29, 2006 - 02:56 PM UTC
Quoted Text
Hi Mal! ...Anyway, I got married myself last Saturday and I'm not rich... :-) Jean-Luc
Jean-Luc,
Please let an old married guy pass on a bit of modeling wisdom concerning marriage:
If mama is not happy...no one will be happy!

Holdfast
#056
Joined: September 30, 2002
KitMaker: 8,581 posts
AeroScale: 4,913 posts
Posted: Friday, June 30, 2006 - 12:17 AM UTC
My Fokker had it's matt coat last night and this afternoon, when I got home from work (I finish early on Fridays ), I painted the tyres and exhaust. I'm quite pleased how it's looking but I now know how I could do better, which is what it's all about, and I will explain when I post my final series of pics. I have the MOM voting to tot up and tomorrow I'm off to a local model show so I won't be able to do any more to it until, probably, tomorrow afternoon. If all goes well I will post pics either Sunday night or early next week. The biggest hold up, now, will be the propeller. I have painted a light wood colour, with oils, over an enamel sand base. When it dried, about a week I added a couple of coats of Klear, it's looking quite good, but I've been trying to mask it off to do the dark wood areas and have not had much success, yet. I will have to paint it soon or I will be waiting a while for it to dry 
Sorry about this dely in finishing but I'm almost there.
How's the SWMBO Jean-Luc?
Mal
), I painted the tyres and exhaust. I'm quite pleased how it's looking but I now know how I could do better, which is what it's all about, and I will explain when I post my final series of pics. I have the MOM voting to tot up and tomorrow I'm off to a local model show so I won't be able to do any more to it until, probably, tomorrow afternoon. If all goes well I will post pics either Sunday night or early next week. The biggest hold up, now, will be the propeller. I have painted a light wood colour, with oils, over an enamel sand base. When it dried, about a week I added a couple of coats of Klear, it's looking quite good, but I've been trying to mask it off to do the dark wood areas and have not had much success, yet. I will have to paint it soon or I will be waiting a while for it to dry Sorry about this dely in finishing but I'm almost there.
How's the SWMBO Jean-Luc?
Mal
TedMamere
Joined: May 15, 2005
KitMaker: 5,653 posts
AeroScale: 4,347 posts
Posted: Friday, June 30, 2006 - 01:21 AM UTC
Hi all!
Thank you for your kind comments and words of wisdom. I will try to make good use of them!
SWMBO is going fine... thanks for asking Mal! SWMBO... I guess I must get used to this word now!
Jean-Luc :-)8
Thank you for your kind comments and words of wisdom. I will try to make good use of them!
SWMBO is going fine... thanks for asking Mal! SWMBO... I guess I must get used to this word now!
Jean-Luc
:-)8  |

WEB HOSTING BY


Copyright ©2021 AeroScale and Kitmaker Network, a subsidiary of Silver Star Enterprises
All Rights Reserved. Please read our Conditions of Use and Privacy Policy.
All Rights Reserved. Please read our Conditions of Use and Privacy Policy.