_GOTOBOTTOM
World War II
Discuss WWII and the era directly before and after the war from 1935-1949.
Hosted by Rowan Baylis
Kawasaki Ki-45 Toryu
TedMamere
_VISITCOMMUNITY
Moselle, France
Joined: May 15, 2005
KitMaker: 5,653 posts
AeroScale: 4,347 posts
Posted: Friday, January 04, 2008 - 11:13 AM UTC
Hi all!

I've decided to make a start on Hasegawa's new Kawasaki Ki-45 Toryu (see review here). It will be an "out of the box" project and I expect the build to be fast. So far I have assembled the various sub-assemblies prior to painting: cockpit, sidewalls, wings, gear bays, nose cone, tyres, intakes, exhausts etc...


So far nothing special to report, everything falls together without any problem. I think I will be able to apply the basic colors tomorrow.

Jean-Luc
TedMamere
_VISITCOMMUNITY
Moselle, France
Joined: May 15, 2005
KitMaker: 5,653 posts
AeroScale: 4,347 posts
Posted: Saturday, January 05, 2008 - 07:54 AM UTC
Hi all!

Just a small update with pictures of the sub-assemblies with their respective colors: cockpit, gear bays, gear bays covers, inside of engine cowlings, etc... painted in Tamiya XF-51 Khaki Drab...


Propeller and hub painted in XF-10 Flat Brown, Tyres in Dark Grey, landing gear struts in SatinBlack and Silver, oil cooler ring in Dark Copper, engine in Silver, armament in Steel etc...


Next I will paint the details, drybrush and apply a wash. Then I will assemble everything together.

Jean-Luc
CMOT70
_VISITCOMMUNITY
Victoria, Australia
Joined: August 23, 2007
KitMaker: 629 posts
AeroScale: 539 posts
Posted: Saturday, January 05, 2008 - 03:16 PM UTC
It looks good Jean-Luc.

It's interesting that you seem to build in exactly the same method as me...prepare the entire kit into sub-assemblies until you can paint all the base colours at once -i do it in one large spray session, just hot swapping the already prepared colour jars- not even cleaning the airbrush inbetween colours!. Then detail paint, then assemble.

Most people i know assemble and paint the cockpit/interior stuff first, then assemble the airframe, then build and paint the remainder of the kit as the build sequence gets there. But it takes so much longer that way!

Andrew
TedMamere
_VISITCOMMUNITY
Moselle, France
Joined: May 15, 2005
KitMaker: 5,653 posts
AeroScale: 4,347 posts
Posted: Sunday, January 06, 2008 - 12:30 AM UTC

Quoted Text

It's interesting that you seem to build in exactly the same method as me...prepare the entire kit into sub-assemblies until you can paint all the base colours at once -i do it in one large spray session, just hot swapping the already prepared colour jars- not even cleaning the airbrush inbetween colours!. Then detail paint, then assemble.


Hi Andrew!

Yes, that's exactly my method as well, including the "not even cleaning the airbrush inbetween colours" part!
It is how it works best for me. The next time I will have to use the airbrush will be when the model is assembled and ready for the camouflage.

Jean-Luc
TedMamere
_VISITCOMMUNITY
Moselle, France
Joined: May 15, 2005
KitMaker: 5,653 posts
AeroScale: 4,347 posts
Posted: Monday, January 07, 2008 - 07:35 AM UTC
Hi all!

Some progress to report.

The cockpit is finished. I drybrushed and washed the interior and added some colors here and there but not too much. On the few photos I could find on the web, I couldn't see more than some black, red and silver details. The seatbelts are from Eduard. I don't know if they are accurate for this aircraft but I used the ones labelled "Kawasaki" in the set...


The engines are also ready to start. As I said in the review of the kit, the representation of the radial powerplant is pretty basic but once the cowlings are over the sub-assembly, not much can be seen of it, and even less when the propeller is fitted! So don't lose too much time to detail the engines as it is really a waste of time...


The fuselage halves have been glued together. The fit was so good that I didn't had to use any cement to keep the cockpit assembly inside. I also positioned the belly of the aircraft as well as the nose cone.
Here's the current status of the model...


So far everything is going on smoothly, let's hope it will continue like that with the wings and the tailplanes.

Jean-Luc
CaptainA
_VISITCOMMUNITY
Indiana, United States
Joined: May 14, 2007
KitMaker: 3,117 posts
AeroScale: 2,270 posts
Posted: Monday, January 07, 2008 - 10:38 AM UTC
I like to try to get all the parts sprayed on the sprue, then get the sub-assemblies together, major assemblies and final paint. I find each build is different though.

Nice twin spinner.
TedMamere
_VISITCOMMUNITY
Moselle, France
Joined: May 15, 2005
KitMaker: 5,653 posts
AeroScale: 4,347 posts
Posted: Tuesday, January 08, 2008 - 09:22 AM UTC
Hi Carl!

Yes the Toryu is a nice looking twin spinner and it is surprisingly not very big. The Ki-45 is about the size of the single engined B5N Kate.

I glued the wings to the fuselage today. The left wing fitted perfectly but not the right one. No matter what I tried, the result was always a 1/2 mm step where the wing was supposed to meet the Karman. I decided to use my dremel to cut away some plastic from the two locators of the wing and adjusted the thickness of it with thin stripes of plasticard. I also reduced the lenght of the fuselage spars because somehow I felt they where in the way. The fit was much better then...


Note that two seams will have to be filled because they don't follow the natural contours of the flaps. Finally with some care, a good wing to fuselage fit can be achieved and the use of putty is very limited.


That's all for today...

Jean-Luc
SGTJKJ
#041
_VISITCOMMUNITY
Kobenhavn, Denmark
Joined: July 20, 2006
KitMaker: 10,069 posts
AeroScale: 3,788 posts
Posted: Tuesday, January 08, 2008 - 11:40 PM UTC
Looks good, Jean-Luc. As usual a very informative build. You will easily make the deadline for the campaign with this build.

Looking forward to see more
TedMamere
_VISITCOMMUNITY
Moselle, France
Joined: May 15, 2005
KitMaker: 5,653 posts
AeroScale: 4,347 posts
Posted: Wednesday, January 09, 2008 - 06:56 AM UTC

Quoted Text

You will easily make the deadline for the campaign with this build.


Hi Jesper!

I hope you are right.
I didn't progressed much today. I sanded the seam smooth and applied Mr Surfacer 1000 with a brush on the wing root and the fuselage although it is only a preventive measure in this case, since the overall fit of the kit is very good...


I hope I will be able to apply a coat of silver in the next couple of days and then start the camouflage painting.

Jean-Luc
leon
_VISITCOMMUNITY
Noord-Brabant, Netherlands
Joined: January 13, 2006
KitMaker: 65 posts
AeroScale: 37 posts
Posted: Wednesday, January 09, 2008 - 10:33 AM UTC
She Really Looks amazing Jean Luc, how do you paint the Cockpit with so much detail, i seen other people do this aswell. and i would love to do it myself. but it never get my instrument panel painted with so much detail. can you tell us how you do it?

Greetings Léon
butchm
Joined: September 06, 2007
KitMaker: 7 posts
AeroScale: 6 posts
Posted: Wednesday, January 09, 2008 - 11:35 AM UTC
Hi Jean,

Awesome build, I love the way you painted the cockpit. While I am not a Japanese AC fan your build is making me want to do one!

I have a question, what paint do you use for the overall silver? I have tried tamiya flat aluminum in acrylic before and was unimpressed with the result.

Thanks,
Butch

TedMamere
_VISITCOMMUNITY
Moselle, France
Joined: May 15, 2005
KitMaker: 5,653 posts
AeroScale: 4,347 posts
Posted: Friday, January 11, 2008 - 09:18 AM UTC
Hi all!


Quoted Text

how do you paint the Cockpit with so much detail, i seen other people do this aswell. and i would love to do it myself. but it never get my instrument panel painted with so much detail. can you tell us how you do it?


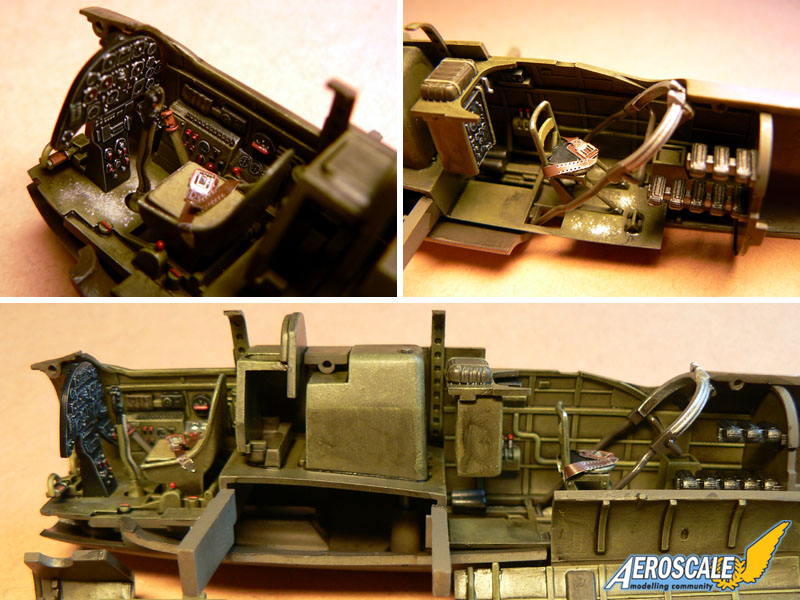
Léon, I always use the same methode. First I apply a basic color (Tamiya acrylics, always flat), next I drybrush with Prince August paint (excellent and very fine stuff), then I paint the details and finally I apply a wash (tinted Klir/Future). I'm now comfortable with this technique and it always works ok for me. Next time I will shoot more pictures about the process...


Quoted Text

I have a question, what paint do you use for the overall silver?


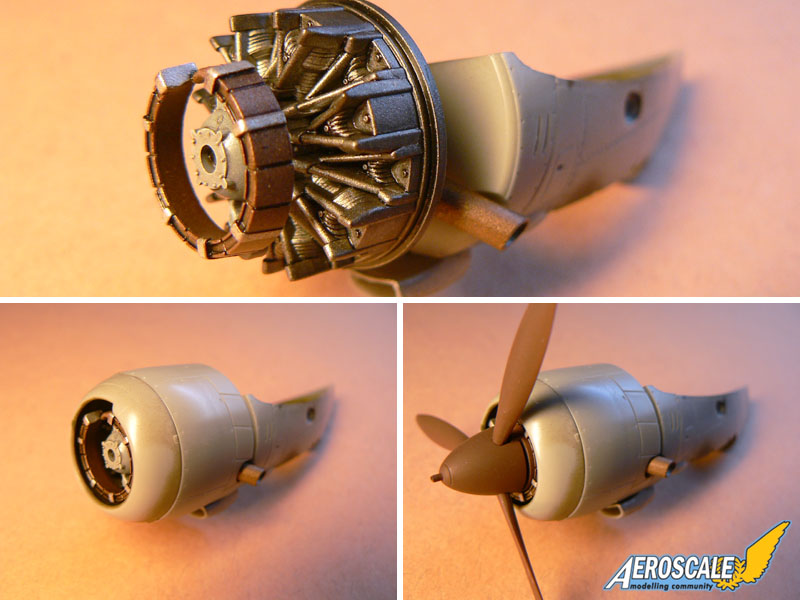
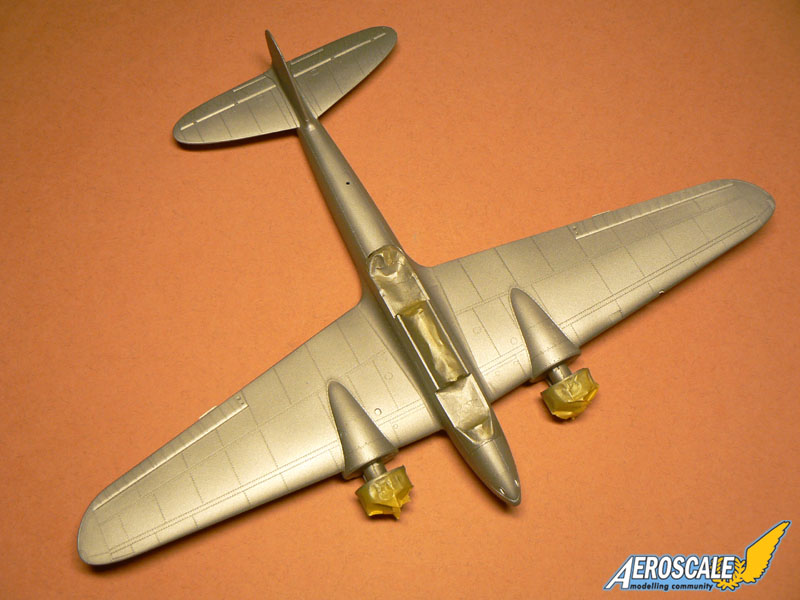
It depends Butch. I did use Tamiya aluminium in the past but for this project I'm using an old can of Humbrol 56. For a basic aluminium coat, to do some weathering later, a perfect and shiny finish isn't that important. For Bare Metal finishes, I think Nigel Julian (Lampie) is more an expert than me. I've never used Alcad for example...

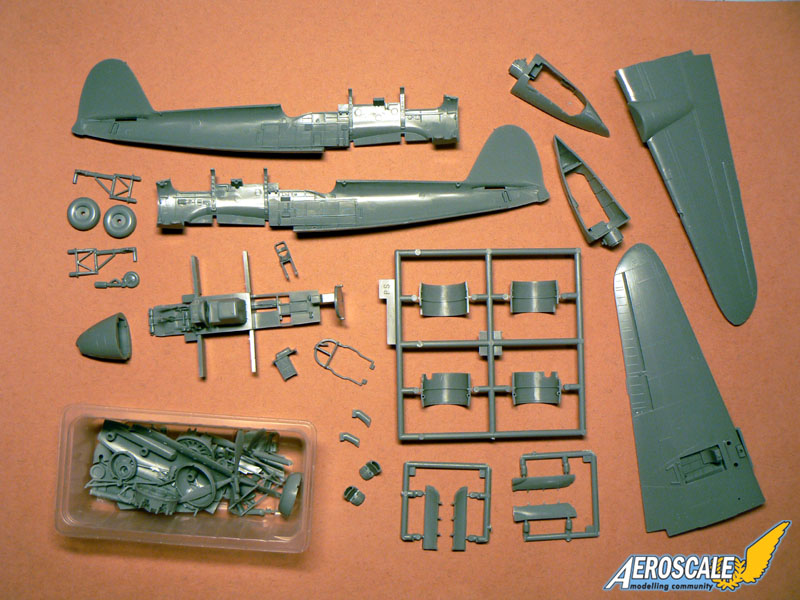
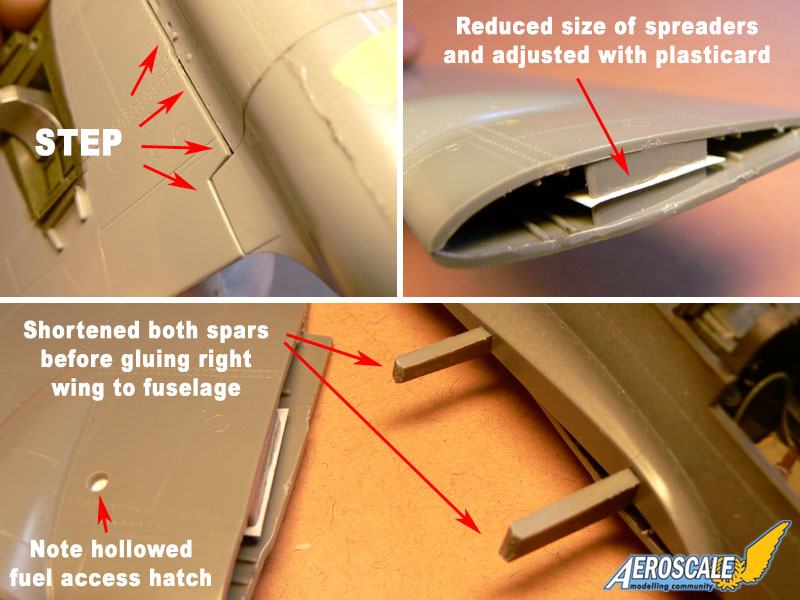
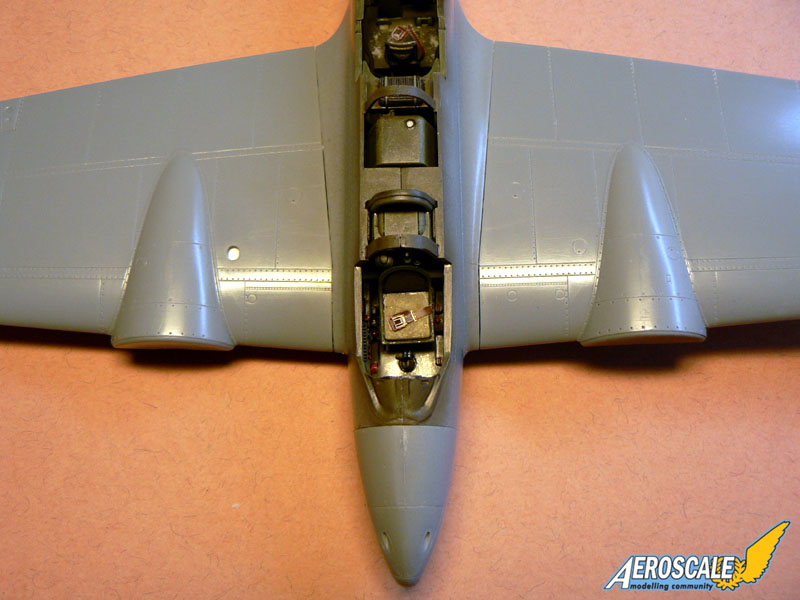
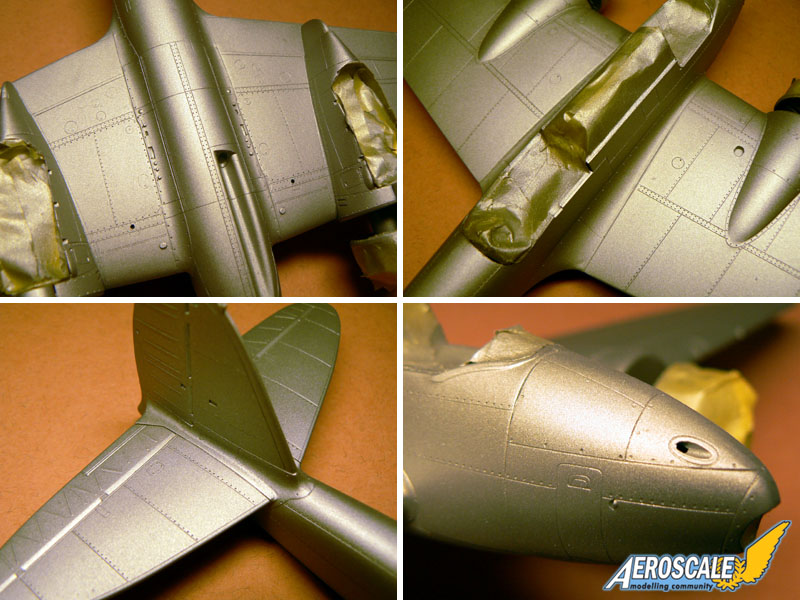
I've made some progress today. The "Mr Surfacer technique" to fill the wing root seams worked very well... but as I said previously the seams are very limited on this model. For the engine nacelles I didn't even had to use filler since the fit was perfect...


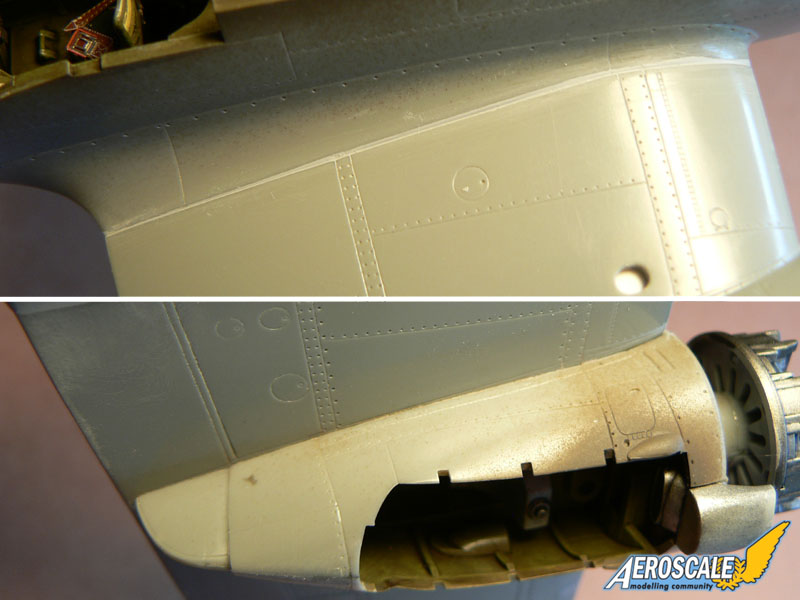
Despite the fact that Hasegawa made the kit with optional parts (to do other variants in the future), I found no real problems with the assembly so far. If you work carefully, you won't loose any surface detail of the kit. Under a coat of aluminium paint, everything is clean and smooth.


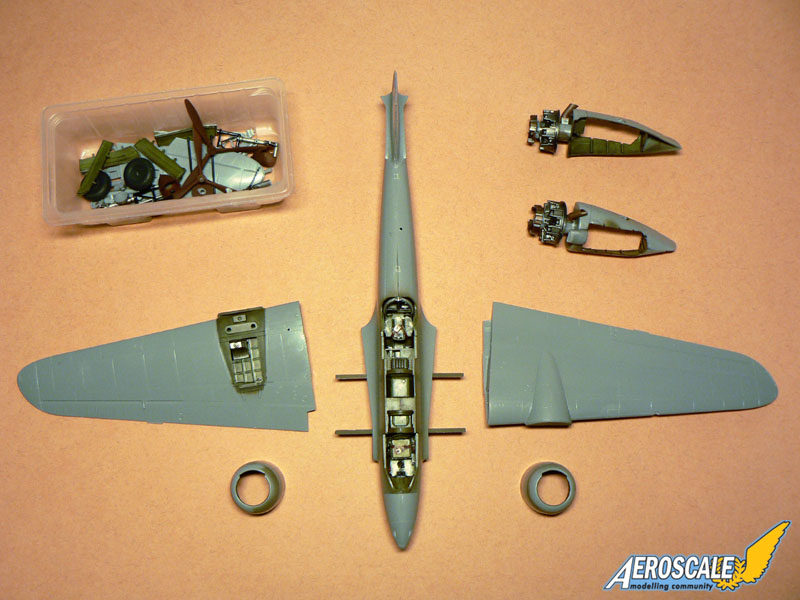
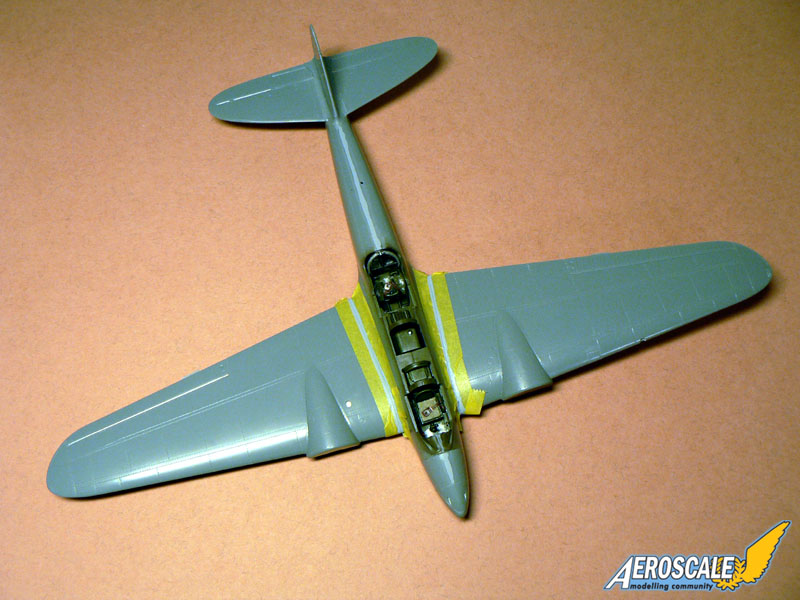
This is how the Ki-45 model looks like now. I think I will wait at least 24 hours to let the aluminium paint cure before applying the camouflage...


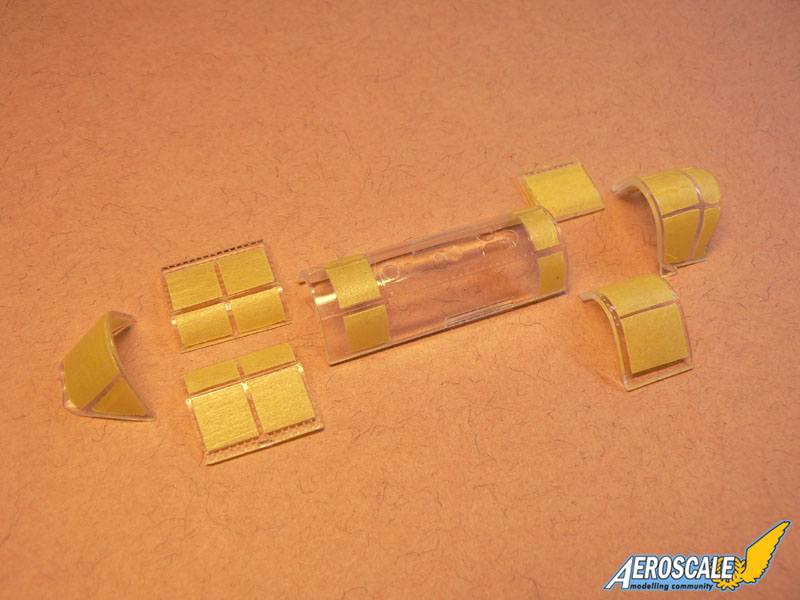
I also masked the transparent canopy parts with Tamiya tape cut to shape with an X-Acto knife. Of course I've used a new blade...


I will be away tomorrow, so don't expect an update until Sunday... thanks for watching!

Jean-Luc
SGTJKJ
#041
_VISITCOMMUNITY
Kobenhavn, Denmark
Joined: July 20, 2006
KitMaker: 10,069 posts
AeroScale: 3,788 posts
Posted: Friday, January 11, 2008 - 10:25 PM UTC
Nice progress, Jean-Luc.

Looking forward to see more
TedMamere
_VISITCOMMUNITY
Moselle, France
Joined: May 15, 2005
KitMaker: 5,653 posts
AeroScale: 4,347 posts
Posted: Saturday, January 12, 2008 - 10:07 AM UTC

Quoted Text

Looking forward to see more


Me too!

Thanks Jesper...

Jean-Luc
TedMamere
_VISITCOMMUNITY
Moselle, France
Joined: May 15, 2005
KitMaker: 5,653 posts
AeroScale: 4,347 posts
Posted: Sunday, January 13, 2008 - 02:32 AM UTC
Hi all!

Some more progress to report. On the underside, I've applied the basic IJA Grey (XF 14) color over the pre shaded panel lines. Here is how I did: I first applied dark grey/green (in fact Tamiya's German Field Grey XF 65 ), then I filled the panels with XF 14 and finally sprayed another coat of heavily diluted paint to blend everything together...


I didn't pre-shaded the upperside of the model since I believe the heavy mottling will make it almost invisible. I will rather add some post-shading if necessary. But I applied some maskol with an old brush on the wing roots to simulate paint chipping...


I first wanted to do the paintscheme of the box but today I found another one in a French magazine (Avions n°124) which I prefer. I already asked Mal (Holdfast) to cut me some hinomarus out of his http://www.freewebs.com/miraclemasks/" TARGET="_blank">Miracle Masks because I don't want to use decals this time for the decorations...


Tomorrow I will apply the green spots. I don't know yet what technique I will use: Maskol, Blu Tac, freehand or something else... but it's not going to be easy!

Jean-Luc
alpha_tango
_VISITCOMMUNITY
Germany
Joined: September 07, 2005
KitMaker: 5,609 posts
AeroScale: 5,231 posts
Posted: Sunday, January 13, 2008 - 03:25 AM UTC
Hi Jean-Luc

I am still ill, but I can concentrate for a few moments again. I watched your progres with great interest, but I think you are going to make a mistake. IMHO the a/c is green camo over bare metal! ....

Love your model .. especially the speed with which you build it.

Due to flu very little progress on my own projects .. seems I will fail a few dead lines.

best wishes

Steffen

Merlin
Staff MemberSenior Editor
AEROSCALE
#017
_VISITCOMMUNITY
United Kingdom
Joined: June 11, 2003
KitMaker: 17,582 posts
AeroScale: 12,795 posts
Posted: Sunday, January 13, 2008 - 05:36 AM UTC
Nice one Jean-Luc!

It's looking great! Thanks to your great review and this build, I've broken the habit of a lifetime and haven't even bothered to open the bags of my kit to do a test-fit yet! It does look a real beauty and I'm looking forward to tackling it one day.

All the best

Rowan
chukw1
_VISITCOMMUNITY
California, United States
Joined: November 28, 2007
KitMaker: 817 posts
AeroScale: 729 posts
Posted: Sunday, January 13, 2008 - 07:06 AM UTC
Looking great, Jean-Luc- this is a very informative thread. You've also picked a fantastic scheme for this sleek little dragon. Cheers!
falcon04
_VISITCOMMUNITY
North Carolina, United States
Joined: January 13, 2008
KitMaker: 25 posts
AeroScale: 24 posts
Posted: Sunday, January 13, 2008 - 08:05 AM UTC
I beg to differ - the prototype and early Ki-45 kai's were delivered in overall grey-green with disruptive green patches applied after the fact and this particular aircraft - that of Isamu Kashiide of the 4th Hiko Sentai, a "Bukosho" awardee on 8 May, 1945, and with 7 claimed B-29's - is accurately rendered in the artwork shown.

The dark green patches appear in photographs of this aircraft to have been brush applied.

There IS one Ki-45 which was photographed which was NMF over black, but that is the only one I have been able to find.

BTW, I like your choice of markings, and the interior color - looking forward to following your build.

Have fun with the 4th Sentai tail flash - there is a useable rendition on the old Superscale decal sheet 48-303, if you can find it.

alpha_tango
_VISITCOMMUNITY
Germany
Joined: September 07, 2005
KitMaker: 5,609 posts
AeroScale: 5,231 posts
Posted: Sunday, January 13, 2008 - 08:38 AM UTC
Hi Petec

many thanks for clearing this point ... exactly the plane I want to represent, so J-Ls build is a super instruction for me.

cheers

Steffen
falcon04
_VISITCOMMUNITY
North Carolina, United States
Joined: January 13, 2008
KitMaker: 25 posts
AeroScale: 24 posts
Posted: Sunday, January 13, 2008 - 09:12 AM UTC
You are welcome.

Many IJAAF fighters were delivered NMF at some time in their production run ( some with grey-green fabric surfaces, but not all ) - these include the Ki-43, Ki-44, Ki-61, and Ki-84 - but the Ki-45 seems to have been delivered for most of it's life in grey-green, "possibly" with dark green added at the factory. Very late aircraft were seen in solid dark colors.

Many Ki-45 Kai's, like the Kai Koh ( " Kai_a) featured in the kit, appear to have had the dark green added after the final finish of the aircraft, with stencils, hinomaru, and wing leading edge yellow carefully avoided with the overspray of dark green ( sometimes the stencils were masked over ), but with the regulation white ring surround to the fuselage hinomaru applied last. The upper wing hinomarus did not have a white surround.

Some "veined" finishes, like Kashiide's, were sprayed, but his appears to have been brush painted as the edges of the green patches are very sharp and the overall finish is fairly glossy in the photo's I have.

All the "bandaged" Home Defense schemes are spectacular - in June, Hasegawa will release the Kai Tei ( Kai_c) - Kit JT95 or HSG09095 - which will enable builds of those most colorful "Nicks".
alpha_tango
_VISITCOMMUNITY
Germany
Joined: September 07, 2005
KitMaker: 5,609 posts
AeroScale: 5,231 posts
Posted: Sunday, January 13, 2008 - 10:33 AM UTC
Hi again

could you point me to some published pictures of Kashiides aircraft? .. I like to have some photo refs when I build my models. ... Initially I Wanted to build Ito's dk. green mount ... but I think this is not the proper kit for that a/c

@ J-L: just got my Modelkasten Japanese pilots ... some interesting poses possible and the figures built for the box pictures are really nice ... IMO the modeller is a true artist

best wishes

Steffen
falcon04
_VISITCOMMUNITY
North Carolina, United States
Joined: January 13, 2008
KitMaker: 25 posts
AeroScale: 24 posts
Posted: Sunday, January 13, 2008 - 12:52 PM UTC


TedMamere
_VISITCOMMUNITY
Moselle, France
Joined: May 15, 2005
KitMaker: 5,653 posts
AeroScale: 4,347 posts
Posted: Sunday, January 13, 2008 - 11:11 PM UTC
Hi all!

Wow, it seems the camouflage of the Ki-45 is an interesting subject...

Thanks to you falcon04 for the additional infos. I was like Steffen and thought the camouflage was green over bare metal as well. I was surprised to see in the instruction that it was dark green over grey/green in fact. This was confirmed by some refs I found on the web and the Isamu Kashiide article in Avions n°124.

The pictures in the article are the same as the one you've posted above. I'm not sure if the green was brush painted though. The green patches are sharp but they look to me as they were sprayed... but I'm really not a specialist of these kind of things. I think I will apply them with the airbrush in any case. To me it also looks like two different painters were at work on this plane as the patches seem to be different on both wings. This was also something very common on german WW2 aircraft. The camouflage was often different on both sides of the fuselage.

I still do not know what technique I should use...

Jean-Luc

P.S. Welcome to Aeroscale falcon04! Will we see some of your work soon?
falcon04
_VISITCOMMUNITY
North Carolina, United States
Joined: January 13, 2008
KitMaker: 25 posts
AeroScale: 24 posts
Posted: Monday, January 14, 2008 - 02:41 AM UTC
I've re-scanned 2 sections of the side view in higher res - and it does look sprayed, albeit very finely so as to put a sharp-edged "spot" with the gun held close - an expert painter, no doubt !


The Nichimo kit was built in 1974 or 1975, when it was first released - I still like the exterior colors, but forget the interior. This was the first kit I built with engraved detail, and I know I was the first to "discover" washing in my area - controversial still !

 _GOTOTOP