

Also note what appear to be light-colored "tubes" over the 12.7mm guns in the nose - perhaps crude flash hiders since Kashiide had some of his claims in this aircraft at night ??
BTW, Kashiide claimed more than 20 B-29's - he is credited with 7 in recent sources.
World War II
Discuss WWII and the era directly before and after the war from 1935-1949.
Discuss WWII and the era directly before and after the war from 1935-1949.
Hosted by Rowan Baylis
Kawasaki Ki-45 Toryu

falcon04

Joined: January 13, 2008
KitMaker: 25 posts
AeroScale: 24 posts
Posted: Monday, January 14, 2008 - 02:52 AM UTC

TedMamere

Joined: May 15, 2005
KitMaker: 5,653 posts
AeroScale: 4,347 posts

Posted: Monday, January 14, 2008 - 03:59 AM UTC
Hi falcon04!
Wow! Fantastic model! If this model was built in the 70' I can only imagine what kind of models you build today. And thanks for the extra info about the painting and the gun tubes.
For my Ki-45 I cheated and chose to use the Maskol technique...
I hope it will give a satisfying result in the end...
Jean-Luc
Wow! Fantastic model!
If this model was built in the 70' I can only imagine what kind of models you build today. And thanks for the extra info about the painting and the gun tubes. For my Ki-45 I cheated and chose to use the Maskol technique...
I hope it will give a satisfying result in the end...
Jean-Luc

TedMamere
Joined: May 15, 2005
KitMaker: 5,653 posts
AeroScale: 4,347 posts
Posted: Monday, January 14, 2008 - 07:25 AM UTC
Hi all!
That's the result of the maskol technique...
Tell me what you think. Does this look realistic? Maybe it's too sharp...
Jean-Luc
That's the result of the maskol technique...
Tell me what you think. Does this look realistic? Maybe it's too sharp...
Jean-Luc
falcon04
Joined: January 13, 2008
KitMaker: 25 posts
AeroScale: 24 posts
Posted: Monday, January 14, 2008 - 08:29 AM UTC
Looks good to me - very difficult and time consuming to do it any other way.
If you have infinate patience, a very fine over-thinned spray of grey-green applied along the "veins" might cut the sharpness somewhat, but would probably take forever !
( On second look - when I look at your close up with the Maskol still applied, it appears that you may have already achieved this - looks like you used the Maskol more as a guide rather than solidly overspraying the dark green - is that correct ? )
What about the 3 command / combat rings aft of the fuselage "bandage" - will you use decals, or spray over ?
TedMamere
Joined: May 15, 2005
KitMaker: 5,653 posts
AeroScale: 4,347 posts
Posted: Tuesday, January 15, 2008 - 09:17 AM UTC
Quoted Text
What about the 3 command / combat rings aft of the fuselage "bandage" - will you use decals, or spray over ?
Hi all!
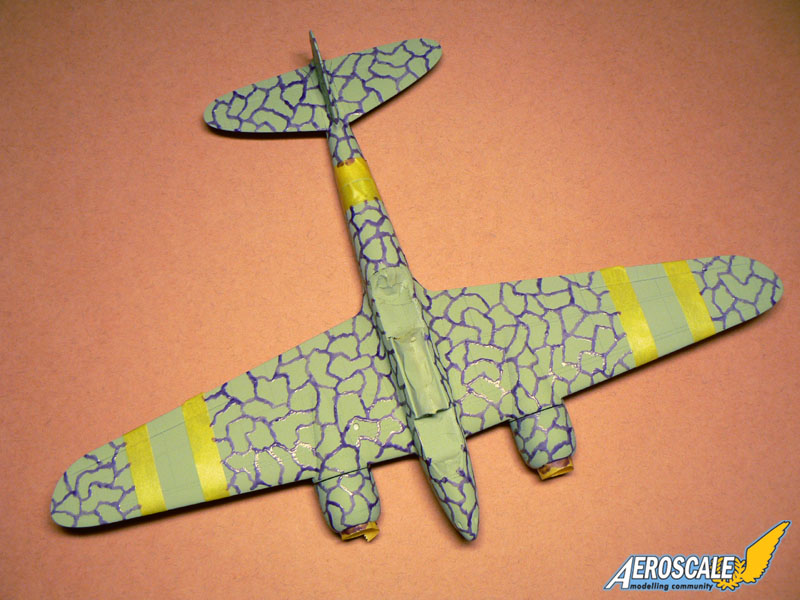
I will try to spray as much as possible since I always had difficulties with Hasegawa decals in the past. I've decided to keep the camouflage as it is. Maybe the post shading and weathering will make the patches look less artificial in the end.
I didn't wanted to work on the model today because I had a busy day but I made an effort. I masked the white areas with Tamiya and Cammet tape and then sprayed Tamiya XF2 on them...
Tomorrow I will spray the yellow wing bands and the Hinomarus. I received Mal's Miracle Masks roundels today. Perfect Timing!

Jean-Luc
falcon04
Joined: January 13, 2008
KitMaker: 25 posts
AeroScale: 24 posts
Posted: Tuesday, January 15, 2008 - 02:05 PM UTC
Ah - now I understand your painting sequence - I like the pre-shading underneath the bandages.
The only thing I see that pops out is that the width of the grey-green veins is a bit uniform - perhaps that's what you are terming "artificial" ??
I wouldn't worry - I think the end result will be spectacular, based on your other builds.
The only thing I see that pops out is that the width of the grey-green veins is a bit uniform - perhaps that's what you are terming "artificial" ??
I wouldn't worry - I think the end result will be spectacular, based on your other builds.
TedMamere
Joined: May 15, 2005
KitMaker: 5,653 posts
AeroScale: 4,347 posts
Posted: Wednesday, January 16, 2008 - 04:41 AM UTC
Quoted Text
The only thing I see that pops out is that the width of the grey-green veins is a bit uniform - perhaps that's what you are terming "artificial" ??
Hi all!
Yes, that's it. The camouflage is too uniform... oh well, as you said, it will be spectacular then!
I've painted the Hinomarus today with Mal's Miracle Masks. Well, "miracle" is a word one must use with precaution, but if you want to paint your markings rather than use decals, then yes, this product is miraculous indeed. Here's how it works:
1 - carefully read the instructions
2 - weed the decal sheet (remove what's not needed)
3 - to transfer the mask, join the separate pieces with the rectangular pieces provided
4 - locate the masks on model (I used a ruler and the panel lines as guides)
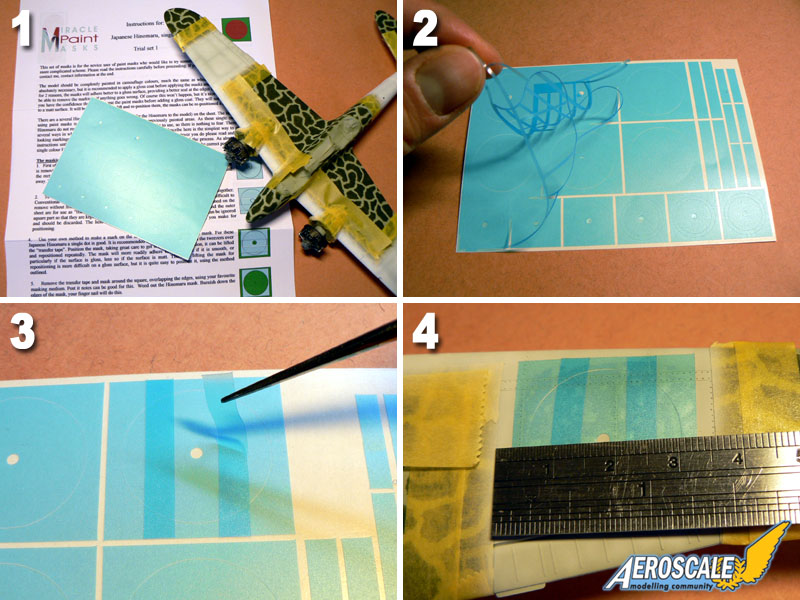
5 - take away the centre roundel and mask the outside
6 - the model is ready for painting
7 - when the paint is dry, carefully remove the mask with tweezers
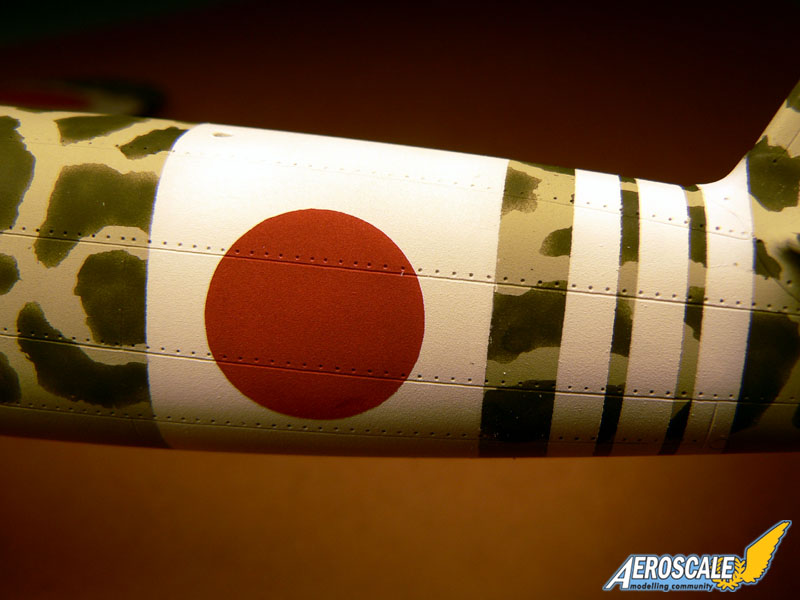
8 - the result, a clean and sharp Hinomaru!

Below is a close up showing the fuselage roundel...
This is how the model looks like now...

I will do some weathering next I think.
Jean-Luc

DCJnr123
Joined: May 07, 2007
KitMaker: 51 posts
AeroScale: 1 posts
Posted: Wednesday, January 16, 2008 - 05:15 AM UTC
WOW amazing work!
DCJnr
DCJnr
falcon04
Joined: January 13, 2008
KitMaker: 25 posts
AeroScale: 24 posts
Posted: Wednesday, January 16, 2008 - 06:48 AM UTC
Looks very very nice. Those Hinomaru masks are great ! I like your masking sequence very much.
A suggestion - rubbing the edges of each dark green patch with a Q-tip before you seal the finish for washing / weathering might soften some of the "sharpness" left by the Maskol by removing the slight "ridge" at the edge of each patch.
I've sometimes done this with an old cotton T-shirt - it glosses the paint slightly and must be done very lightly, but can be very effective.
I'm enjoying following your build.
Holdfast

#056

Joined: September 30, 2002
KitMaker: 8,581 posts
AeroScale: 4,913 posts

Posted: Wednesday, January 16, 2008 - 08:46 AM UTC
So the masks arrived OK Jean-Luc What do you think, better than decals?
I love this scheme, I'm gonna have to get this kit
Available from Miracle Paint Masks and Kitmaker Network members can get a trial set of Hinomaru at £1.10 by quoting MM247 Trial sets
Jean-Luc can I have some pictures for my site when this wonderful beast is complete please
Mal
What do you think, better than decals?I love this scheme, I'm gonna have to get this kit
Quoted Text
Looks very very nice. Those Hinomaru masks are great !
Available from Miracle Paint Masks and Kitmaker Network members can get a trial set of Hinomaru at £1.10 by quoting MM247 Trial sets
Jean-Luc can I have some pictures for my site when this wonderful beast is complete please
Mal

TedMamere
Joined: May 15, 2005
KitMaker: 5,653 posts
AeroScale: 4,347 posts
Posted: Wednesday, January 16, 2008 - 11:01 PM UTC
Quoted Text
A suggestion - rubbing the edges of each dark green patch with a Q-tip before you seal the finish for washing / weathering might soften some of the "sharpness" left by the Maskol by removing the slight "ridge" at the edge of each patch.
Hi all!
Thanks for your kind comments...
I will try the Q-tip method or something similar to soften the patches. I'm not happy with the result now...

Mal, your Miracle Masks are excellent! I think you have a new customer.
Jean-Luc
Holdfast
#056
Joined: September 30, 2002
KitMaker: 8,581 posts
AeroScale: 4,913 posts
Posted: Thursday, January 17, 2008 - 10:24 AM UTC
Great Jean-Luc, I'm honoured
Don't wait for me to produce something that you might want to use, just ask and, with decent references I will produce the masks. That goes for anybody reading this, but please be aware that it does take a little time to draw markings accurately It can take longer though to work out how to make the masks so that they are usable, and to write the instructions.
Mal
Don't wait for me to produce something that you might want to use, just ask and, with decent references I will produce the masks. That goes for anybody reading this, but please be aware that it does take a little time to draw markings accurately
It can take longer though to work out how to make the masks so that they are usable, and to write the instructions.Mal
TedMamere
Joined: May 15, 2005
KitMaker: 5,653 posts
AeroScale: 4,347 posts
Posted: Thursday, January 17, 2008 - 11:44 AM UTC
Quoted Text
Don't wait for me to produce something that you might want to use, just ask and, with decent references I will produce the masks.
Hi Mal!
I hope you won't regret what you've said one day!

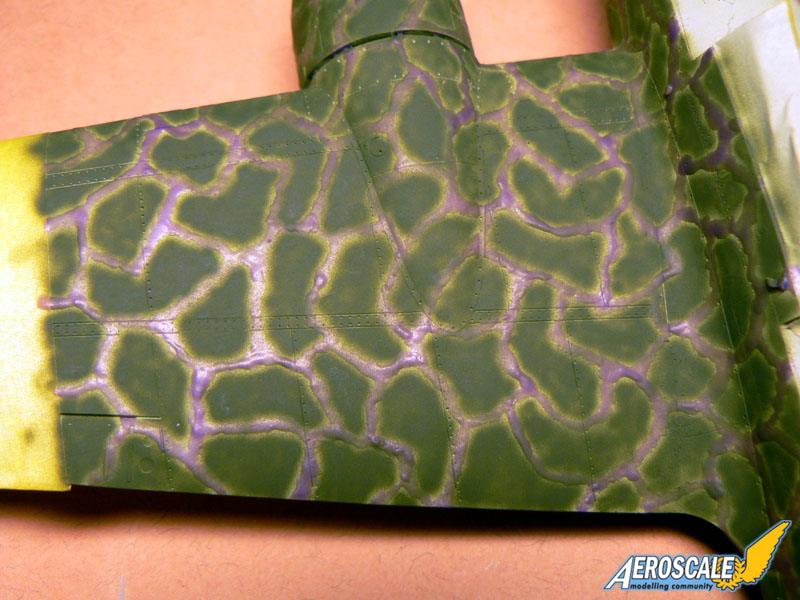
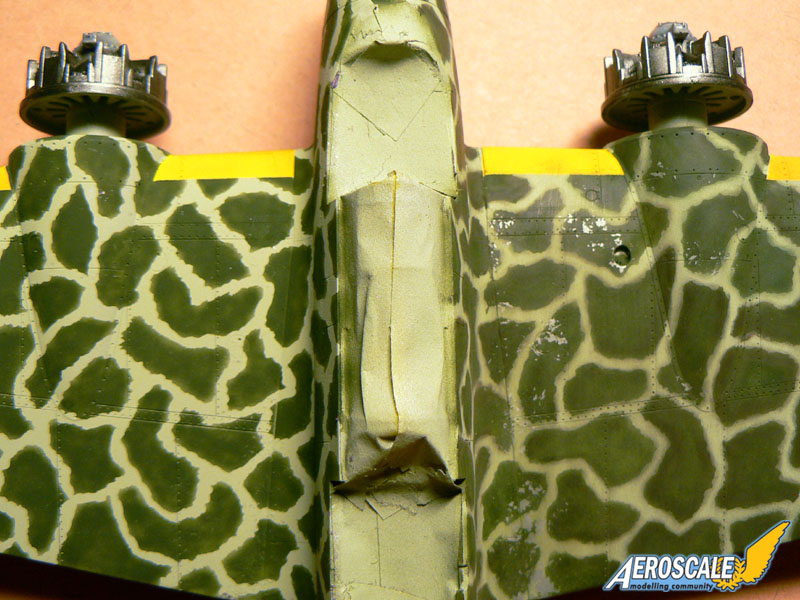
I followed falcon04's advice and found a method to "blur" the green patches. I first tried with a Q-tip but it didn't worked. I then tried the same technique but moistened the cotton end with Tamiya Thinner. It didn't worked neither because it was too aggresive and washed away the green patches... hmmm. I was about to give up but tried one last thing and... (drum roll)... it worked!
In fact I used a brush which does not have any more hair and applied some pastel powder on the patches. The result was a nice blur effect. Not quite the exact replica of the original sheme but much more realistic in my opinion...
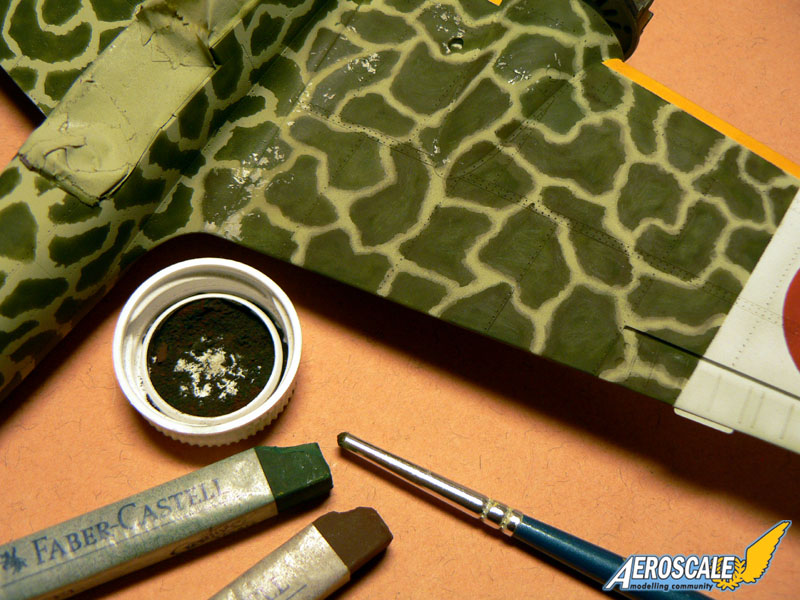
Here is a picture which clearly shows the difference between the new and the old camouflage. Note that the old brush did eliminate the residus of Maskol as well...
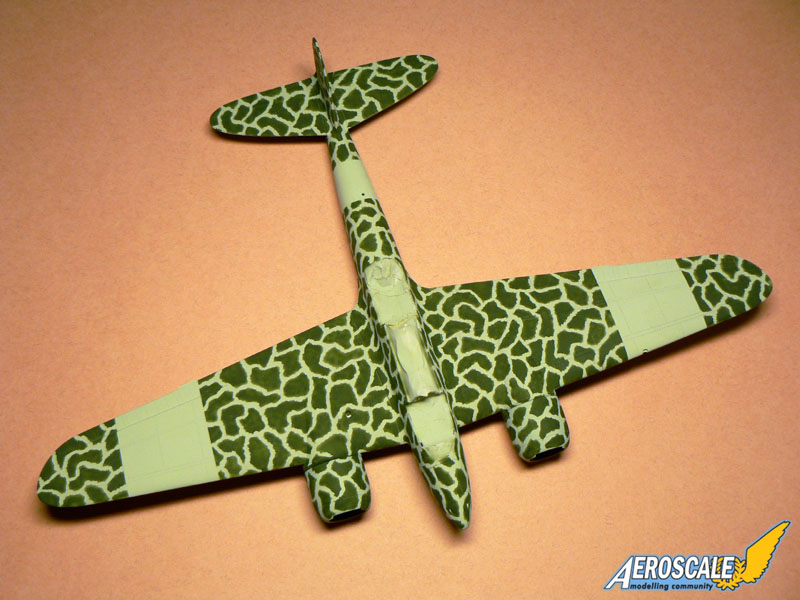
Here's how much I managed to do today: half the model. It took me about 1 hour but I think it was worth it...

Tomorrow I'll do the rest. I will also need to find a solution for the 4th Sentai tail flash: home made decal or painting?

Jean-Luc

guitarlute101
Joined: December 18, 2006
KitMaker: 1,121 posts
AeroScale: 1,063 posts
Posted: Thursday, January 17, 2008 - 12:14 PM UTC
Jean-Luc,
Excellent work. Thanks for showing how it's done.
-Mark
Excellent work. Thanks for showing how it's done.
-Mark
TedMamere
Joined: May 15, 2005
KitMaker: 5,653 posts
AeroScale: 4,347 posts
Posted: Friday, January 18, 2008 - 12:54 AM UTC
Quoted Text
Thanks for showing how it's done.
Hi Mark!
Your welcome. That's why modelling forums are made for. Maybe someone will benefit from this technique as well...
By the way, I've probably learned more techniques in your Grigorovich M-5 Flying Boat thread.
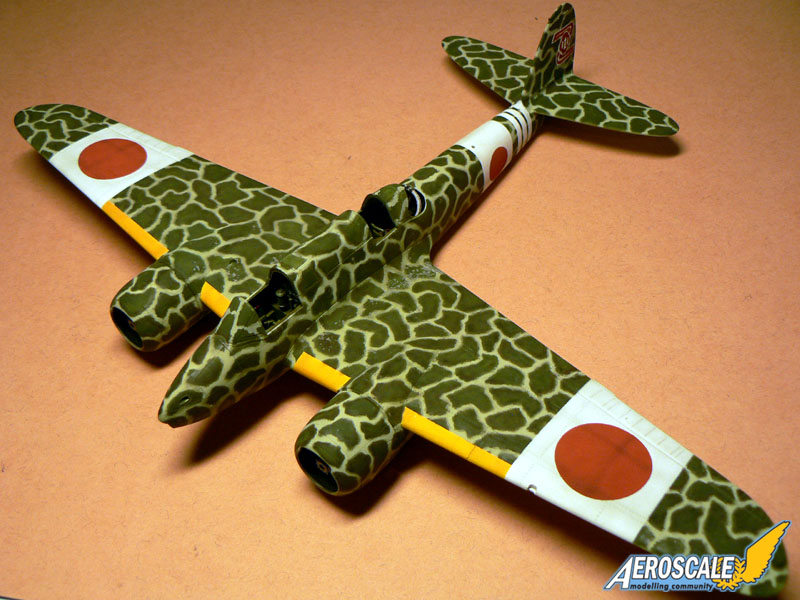
Meanwhile, I've finished to blur all the patches on my Ki-45. I will try to do the tail flash today...
Jean-Luc
Holdfast
#056
Joined: September 30, 2002
KitMaker: 8,581 posts
AeroScale: 4,913 posts
Posted: Friday, January 18, 2008 - 06:24 AM UTC
Quoted Text
I hope you won't regret what you've said one day!
Maybe, but I am serious, if it's wanted and I can produce the masks I will. I was going to ask if you wanted a mask for the tail markings, but figured that you had it covered. If you can get me a good scan I can have a go
That camo does look better, well done
Mal
TedMamere
Joined: May 15, 2005
KitMaker: 5,653 posts
AeroScale: 4,347 posts
Posted: Friday, January 18, 2008 - 09:32 AM UTC
Quoted Text
I was going to ask if you wanted a mask for the tail markings, but figured that you had it covered. If you can get me a good scan I can have a go
Hi Mal!
Too late...

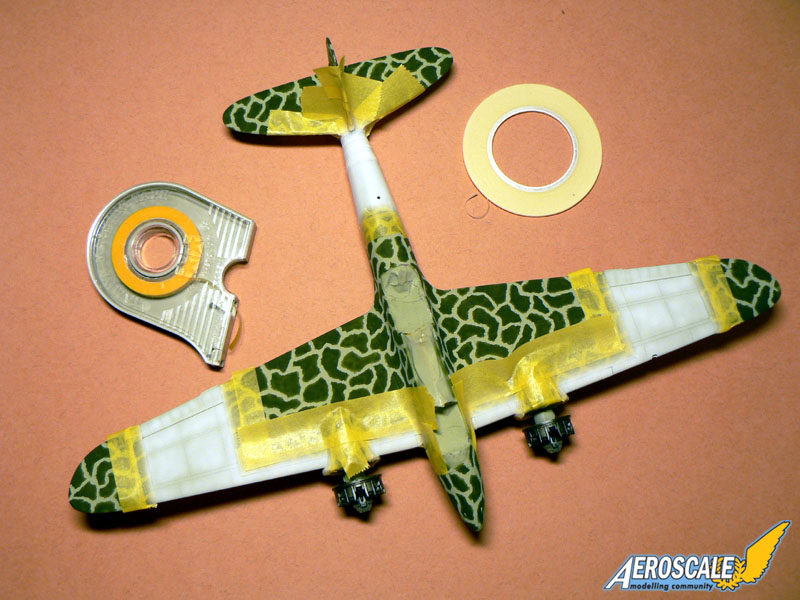
I've done the tail markings today. I first masked the white and then applied the red with a fine brush using the picture of the original aircraft as a guide. It's not perfect but with some weathering I think it will be alright...
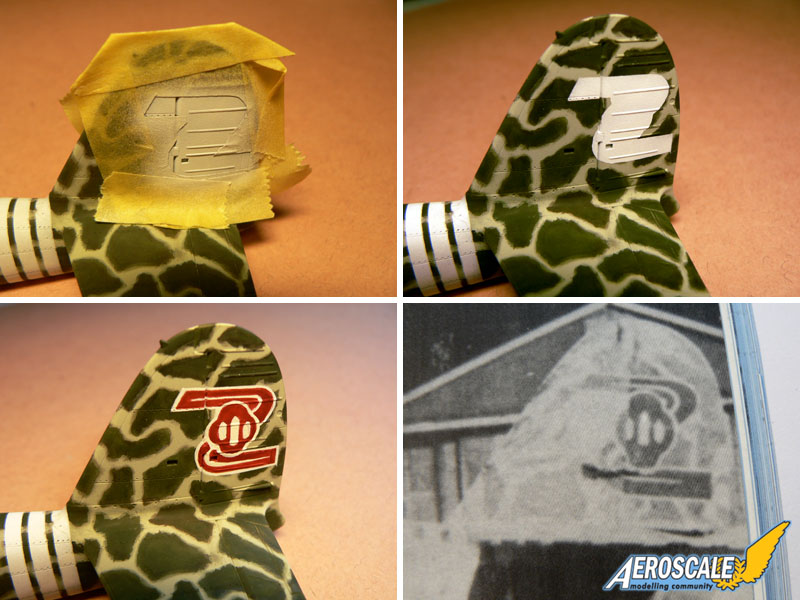
I've glued the cockpit greenhouse except for the movable parts. Now the model starts to look like a Ki-45 at last!
Jean-Luc
falcon04
Joined: January 13, 2008
KitMaker: 25 posts
AeroScale: 24 posts
Posted: Friday, January 18, 2008 - 09:34 AM UTC
Superb !
SGTJKJ
#041

Joined: July 20, 2006
KitMaker: 10,069 posts
AeroScale: 3,788 posts

Posted: Friday, January 18, 2008 - 10:41 AM UTC
Looks good, Jean-Luc. I think the camouflage looks good both before and after the "bluring" with pastels.
Great job on the markings.
Looking forward to see more
Great job on the markings.
Looking forward to see more

TedMamere
Joined: May 15, 2005
KitMaker: 5,653 posts
AeroScale: 4,347 posts
Posted: Saturday, January 19, 2008 - 11:07 AM UTC
Hi all!
I didn't progressed very much on the model of the aircraft today. I just sprayed several coats of Klir (Future) to obtain a glossy finish. This is very important prior to painting the panel lines with a n°00 brush because it will help the paint to flow into the recesses by capilarity action...

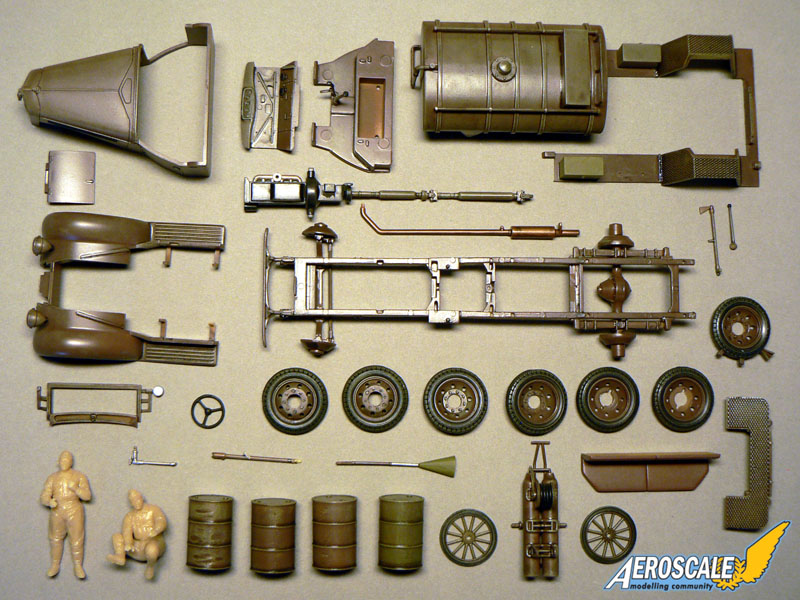
While the Ki-45 was set aside to dry I made a start on the fuel truck, the fire extinguisher cart and the figures. The kit of the Isuzu is very nice and easy to build...

For the picture, I simply test fitted the main parts without using glue and I found no construction difficulties. The interior of the cabin is somewhat simplified though and the thickness of some parts not always realistic. There is some room for improvement here for sure but I will try to compensate this with a nice paint job.
The little cart is a nice addition by Hasegawa and the two figures are very good. they are easy to assemble (no filler is needed because there are no gaps) and they have very realistic poses. I like them very much...
Jean-Luc
I didn't progressed very much on the model of the aircraft today. I just sprayed several coats of Klir (Future) to obtain a glossy finish. This is very important prior to painting the panel lines with a n°00 brush because it will help the paint to flow into the recesses by capilarity action...
While the Ki-45 was set aside to dry I made a start on the fuel truck, the fire extinguisher cart and the figures. The kit of the Isuzu is very nice and easy to build...
For the picture, I simply test fitted the main parts without using glue and I found no construction difficulties. The interior of the cabin is somewhat simplified though and the thickness of some parts not always realistic. There is some room for improvement here for sure but I will try to compensate this with a nice paint job.
The little cart is a nice addition by Hasegawa and the two figures are very good. they are easy to assemble (no filler is needed because there are no gaps) and they have very realistic poses. I like them very much...
Jean-Luc

CMOT70

Joined: August 23, 2007
KitMaker: 629 posts
AeroScale: 539 posts
Posted: Saturday, January 19, 2008 - 11:23 AM UTC
Hi Jean-Luc, did you find that the gloss coat cancelled out some of your work with the pastels? That's what has happened in the past for me anyway. In any case it doesn't matter because you can just add more after the flat coat at the end. Incidentally i also used pastels in a similar way for the SM79 i finished ealier this month. I also felt for that one that the contrast was a bit too strong between the camo colours.
Great work on the camoflage scheme and the rest of the build!
Andrew
Great work on the camoflage scheme and the rest of the build!
Andrew
TedMamere
Joined: May 15, 2005
KitMaker: 5,653 posts
AeroScale: 4,347 posts
Posted: Saturday, January 19, 2008 - 09:23 PM UTC
Quoted Text
Hi Jean-Luc, did you find that the gloss coat cancelled out some of your work with the pastels? That's what has happened in the past for me anyway.
Hi Andrew!
Yes that's often the case. But this time it's not too bad I think because I anticipated the fact that the gloss coat make some colors appear darker. That's why I used a lighter shade for the dark green. I hope the contrast will be reduced with the final satin coat though. The best would be not to spray a gloss coat at all but as I said before, to do nice and clean panel lines I have no other choice.
Thanks for the kind words...
Jean-Luc
TedMamere
Joined: May 15, 2005
KitMaker: 5,653 posts
AeroScale: 4,347 posts
Posted: Sunday, January 20, 2008 - 06:14 AM UTC
Hi all!
The Ki-45 will have to wait a little bit more since I only worked on the fuel truck today. I applied a coat of paint, drybrushed and then added a wash to all the sub-assemblies...
After that, the build is easy and everything goes together without a problem. I still think some areas could have been improved by Hasegawa, just look at the thickness of the door and you will know what I mean. Anyway, with the canvas cover fitted over the cabin, most of the weaker points of the model will be hidden...
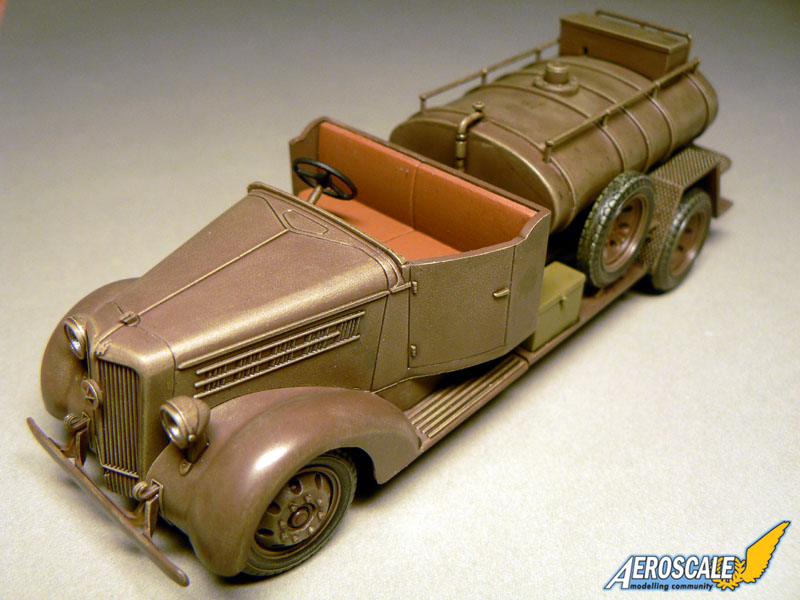
Tomorrow I'll do the panel lines of the aircraft.
Jean-Luc
The Ki-45 will have to wait a little bit more since I only worked on the fuel truck today. I applied a coat of paint, drybrushed and then added a wash to all the sub-assemblies...
After that, the build is easy and everything goes together without a problem. I still think some areas could have been improved by Hasegawa, just look at the thickness of the door and you will know what I mean. Anyway, with the canvas cover fitted over the cabin, most of the weaker points of the model will be hidden...
Tomorrow I'll do the panel lines of the aircraft.
Jean-Luc
calvin2000
Joined: July 25, 2007
KitMaker: 886 posts
AeroScale: 332 posts

Posted: Sunday, January 20, 2008 - 06:46 AM UTC
I have been enjoying this build of yours and want to do the camo you did I normally am intimidated at this stuff and stick to the simpler types but I think I want to try your way sounds like something I could master at least tame.
Holdfast
#056
Joined: September 30, 2002
KitMaker: 8,581 posts
AeroScale: 4,913 posts
Posted: Sunday, January 20, 2008 - 07:17 AM UTC
Nice job on the tail marking Jean-Luc, I'm gonna have a bash at producing a mask for it, Is thare any chance of a scan from your book?
Mal
Mal
 |

WEB HOSTING BY


Copyright ©2021 AeroScale and Kitmaker Network, a subsidiary of Silver Star Enterprises
All Rights Reserved. Please read our Conditions of Use and Privacy Policy.
All Rights Reserved. Please read our Conditions of Use and Privacy Policy.