Moselle, France
Joined: May 15, 2005
KitMaker: 5,653 posts
AeroScale: 4,347 posts
Posted: Sunday, January 20, 2008 - 09:25 AM UTC
Hi Kelly and Mal!
Kelly, I think this technique is indeed perfect for these kind of camouflages. It's not too complicated and will always give a good result. It's a little bit time consuming though...
Mal, here is a scan of the tail marking...

Is it big enough or do you need a higher resolution?
Jean-Luc

Better think one hour and build five minutes...
Than think five minutes and build an hour!
betheyn
 Senior Editor
#019
England - South East, United Kingdom
Joined: October 14, 2004
KitMaker: 4,560 posts
AeroScale: 2,225 posts
Posted: Sunday, January 20, 2008 - 10:51 AM UTC
Hi Jean-Luc,
The camo does look a lot better now you have blurred it a bit, I did think it looked a little stark before.
As usual I love your pre shading technique.
Very enjoyable build so far.
I like the fuel truck, (apart from the thick doors) but what are the chances of Hasegawa releasing it on its own

.
Andy

It's not the same, better, but not the same...
Victoria, Australia
Joined: August 23, 2007
KitMaker: 629 posts
AeroScale: 539 posts
Posted: Sunday, January 20, 2008 - 02:18 PM UTC
Quoted Text
I like the fuel truck, (apart from the thick doors) but what are the chances of Hasegawa releasing it on its own
I saw in a news articles somewhere that the truck will definately be released on it's own, just like the BMW from the FW190 kit has been released on it's own. Having said that though...if you also like the aircraft then it seems to be more cost effective to buy them as the package deal. Knowing Hasegawa style they will release the truck in 10 different boxings with different license plate decals...
Andrew
Current Projects:
Eduard 1/48 F6F-3 Hellcat
Hasegawa 1/350 Yukikaze
1/6 JJ Models Sarah "Gothic"
Idaho, United States
Joined: May 16, 2003
KitMaker: 895 posts
AeroScale: 457 posts
Posted: Sunday, January 20, 2008 - 05:14 PM UTC
Quoted Text
The interior of the cabin is somewhat simplified though and the thickness of some parts not always realistic.
Hello Jean-Luc,
As I have said before I am really impressed with the quality of your work. About those doors I'm no Isuzu expert but I seen many a door on US vehicles that are a good three to four inches thick so this might not be to far off after all. Can't wait to see everything together.
Sincerely,
Brian
There is only two kinds of fires. Those that use less than 500 gallons of water too extinguish and those that use WAY MORE!
Holdfast
President #056
England - South West, United Kingdom
Joined: September 30, 2002
KitMaker: 8,581 posts
AeroScale: 4,913 posts
Posted: Monday, January 21, 2008 - 09:38 AM UTC
Quoted Text
Mal, here is a scan of the tail marking...Is it big enough or do you need a higher resolution?
Thanks Jean-Luc
I've captured it and will see if I can use it at that resolution. I do intend to buy the kit, because I love this camo

but it might not be for a while. I could do with knowing the size of the tail on the kit, for comparison. If this is not too much trouble, the length of the rudder hinge line and the width of the tail at a point in line with the top of the trim tab on the rudder would be ideal, thanks.
With this and Andy's A6M3 I am itching to build a Japanese subject
Mal

P.S. Looks fine, thanks.
MAL the MASK
BULLDOG # 6 (President)
BEWARE OF THE FEW
Sappers: First in, last out. (UBIQUE)
It's not the same, better, but not the same.
Moselle, France
Joined: May 15, 2005
KitMaker: 5,653 posts
AeroScale: 4,347 posts
Posted: Monday, January 21, 2008 - 09:45 AM UTC
Hi all!
Daily update...
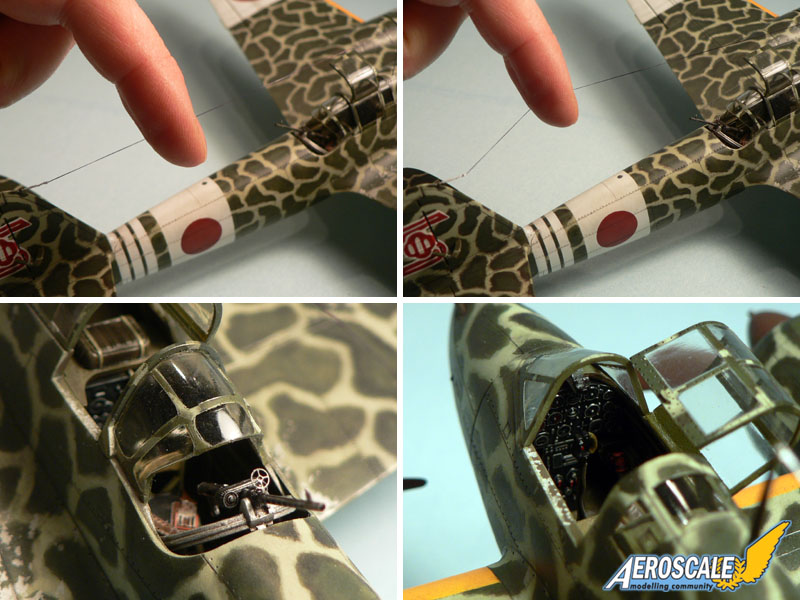
I finished the panel lines. Below is a picture of the underside since the effect is not very visible on the upper camouflage...

The Ki-45 is standing on his feets at last! Fitting the undecarriage was very easy. I also glued the engine cowlings and placed the propellers. The model received a final coat of satin to blend everything together...
I still have to install the small bits (gear doors, antennas, radio wire, open cockpit parts, guns, navigation lights etc...). I will also do some weathering with pastels but not too much this time. The end of the build is near.
Jean-Luc
Better think one hour and build five minutes...
Than think five minutes and build an hour!
North Carolina, United States
Joined: January 13, 2008
KitMaker: 25 posts
AeroScale: 24 posts
Posted: Monday, January 21, 2008 - 11:46 AM UTC
Really looks terrific ! The scrubbing / coating has made the patches look as good as they could - first rate. Looking forward to pics of the completed model.
Question - you mentioned earlier that the Q-tip method wouldn't buff off the edges of the patches. I assume that you used acrylics and not enamels - Tamiya ?
I use enamels which cure slowly and stay softer longer - acrylics harden rapidly, and perhaps they were just too hard for a softer buffing off.
I too have had what I thought was a great pastel weathering job disappear at the first touch of an overcoat ! Never again - I do use pastels at the very end, but they can't be fixed - frustrating as you can't handle the model !
Moselle, France
Joined: May 15, 2005
KitMaker: 5,653 posts
AeroScale: 4,347 posts
Posted: Monday, January 21, 2008 - 11:52 PM UTC
Hi falcon04!
Quoted Text
Question - you mentioned earlier that the Q-tip method wouldn't buff off the edges of the patches. I assume that you used acrylics and not enamels - Tamiya ?
Yes I always use Tamiya's range of acrylic colors...
Quoted Text
I do use pastels at the very end, but they can't be fixed - frustrating as you can't handle the model !
Did you try with hairspary? I know it's a good (and cheap) fixative for chalk and pastel drawings but I only used it on paper so far. I don't know how it looks like on a model. Maybe it is worth a try...
Jean-Luc
Better think one hour and build five minutes...
Than think five minutes and build an hour!
North Carolina, United States
Joined: January 13, 2008
KitMaker: 25 posts
AeroScale: 24 posts
Posted: Tuesday, January 22, 2008 - 02:58 AM UTC
AviPrint ( Eduard ) decal for "Koh" just released:

Joined: September 13, 2007
KitMaker: 69 posts
AeroScale: 60 posts
Posted: Tuesday, January 22, 2008 - 03:48 AM UTC
This is an excellent standard of work and not only that its packed with loads of informative tips that are not only useful for making this aircraft but many different models.
The last half a hour reading this thread has proved very useful, thanks very much for taking the trouble to document this build.
What colour did you use for the roundels
California, United States
Joined: November 28, 2007
KitMaker: 817 posts
AeroScale: 729 posts
Posted: Tuesday, January 22, 2008 - 04:22 AM UTC
This is delightful- your camo technique is a triumph! The truck, too, is so well done. My wallet is bracing for another blow when this hits the shelf at my LHS. Cheers!
[url]http://chukw.blogspot.com/[/url]
North Carolina, United States
Joined: January 13, 2008
KitMaker: 25 posts
AeroScale: 24 posts
Posted: Tuesday, January 22, 2008 - 06:53 AM UTC
RE: Hairspray
I experimented at various times with fixatives for pastels - using very thin enamel and acrylic clears applied very lightly - failed every time.
I think that the pigments are so sparse that they just disappear with any overspray - and I never use an aerosol can - droplets are too coarse and viscosity is to heavy.
I use washes and tinted clear acrylic oversprays - PolyScale clear flat or a mix of flat and clear well-thinned with PollyS airbrush thinner with a little acrylic flat grey, tan, black, or white added, so that the mix shows just a hint of the color - great for "complex" exhaust stains which contain bands of color or for the discoloration on afterburners or the aft panelling on an F-100, for example . You can get the effect you want by layering the application - keeping the mix thin and mostly clear allows you to modulate the application.
Another trick is to do this with an enamel clear coat and enamels, over a well-cured acrylic gloss sealer coat - you can then easily remove it if you don't like the result, using Turpenoid or good quality mineral spirits, without spoiling the basic finish.
Moselle, France
Joined: May 15, 2005
KitMaker: 5,653 posts
AeroScale: 4,347 posts
Posted: Tuesday, January 22, 2008 - 10:16 AM UTC
Hi all!
Thanks a lot for the additional infos and for showing some interest...
Those AVI decals look very nice. There are some nice alternative schemes on it. Especially the tail markings would have been usefull. But I'm glad I used Mal's Miracle Masks. By the way, they are featured on
Hyperscale!

I didn't progressed much today. I glued some details parts but I don't think it deserves a picture. I will try to finish the model tomorrow... if my 14 months old son allows it to me.

Now for something different: do someone read japanese! I wonder what the signs on the decal sheet mean? They are meant to go on the truck but I don't know what to use. Can someone help? I don't want to have "toilets" or something like that written on my model...

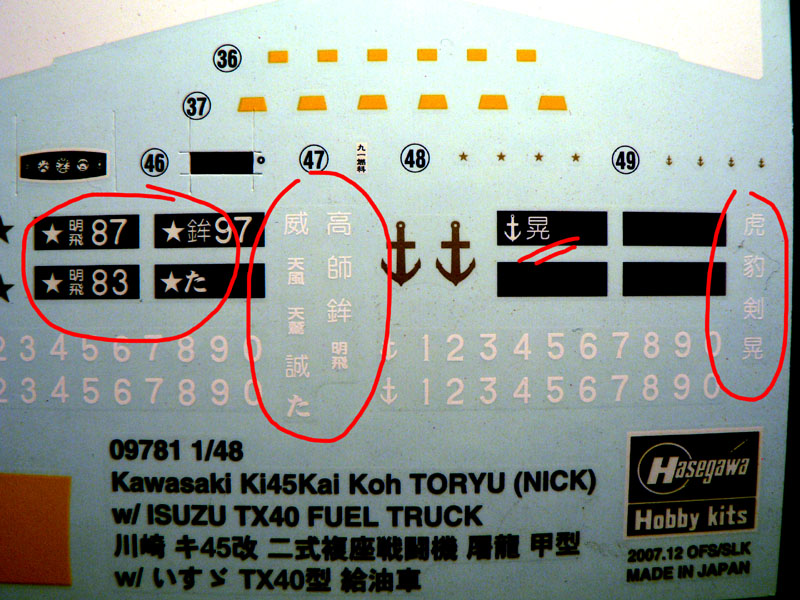
Let's see if we have members who read japanese...
Jean-Luc
Better think one hour and build five minutes...
Than think five minutes and build an hour!
California, United States
Joined: October 09, 2004
KitMaker: 65 posts
AeroScale: 45 posts
Posted: Tuesday, January 22, 2008 - 03:02 PM UTC
Excellent build!!
This ship will stand and she will fight!
U.S. Navy (Ret)
Aircraft Electrician
NAWS China Lake
Moselle, France
Joined: May 15, 2005
KitMaker: 5,653 posts
AeroScale: 4,347 posts
Posted: Tuesday, January 22, 2008 - 06:30 PM UTC
Quoted Text
What colour did you use for the roundels
Hi Gary!
Sorry, I missed that yesterday. I used Tamiya XF-7 red with a hint of black. I used the kit's decals as reference for the color...
Calvin, thanks. Do you think you can translate the signs? I suppose they are unit markings for the vehicle but I'm not sure at all...

Jean-Luc
Better think one hour and build five minutes...
Than think five minutes and build an hour!
Moselle, France
Joined: May 15, 2005
KitMaker: 5,653 posts
AeroScale: 4,347 posts
Posted: Wednesday, January 23, 2008 - 08:28 AM UTC
Hi all!
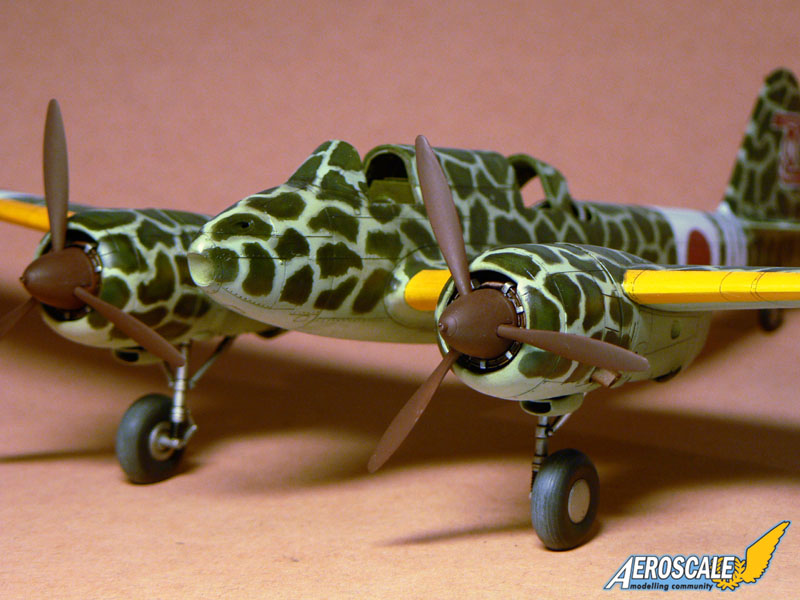
My Toryu is finished...
I glued all the detail parts, added some pastels and made the aerial wire out of elastic thread. It's the second time I use this stuff and I think I will use it more and more. Once in place, it is still bendable and therefore less fragile than everything else. The only things I've added to the kit are PE seatbealts and a gunsight from the spare box for the rear gun...
The kit was a pleasure to build and the painting, even if challenging, was very interesting to do. With such a camouflage, the model will surely attract some viewers at any model show...
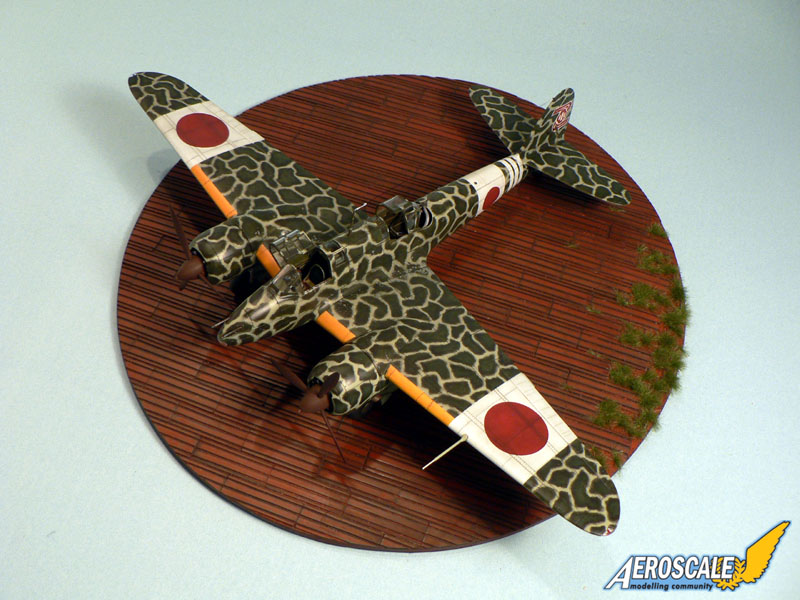
The display base is from Mark58 and represents japanese plankings found at Rabaul. I know it's not accurate for this aircraft but it sure looks good. I plan to do a diorama with a concrete ground later...
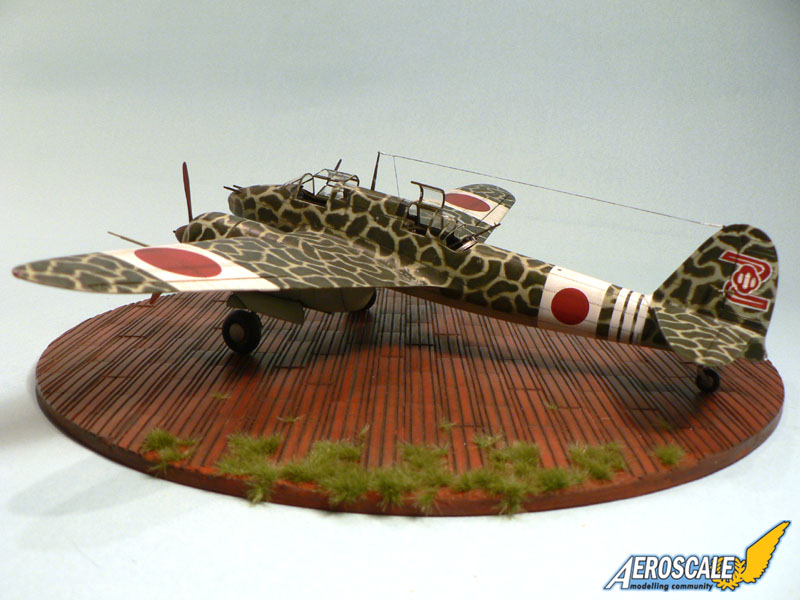
Here's a close up with the paint chipping on the wing root...

Now I will concentrate on the truck and the figures. I will also build Eduard's japanese bicycle and Tamiya's Kurogane to depict a busy late war scene, stay tuned...
Jean-Luc
Better think one hour and build five minutes...
Than think five minutes and build an hour!
Germany
Joined: September 07, 2005
KitMaker: 5,609 posts
AeroScale: 5,231 posts
Posted: Wednesday, January 23, 2008 - 10:02 AM UTC
Hi Jean-Luc
outstanding build ... as we expect it from you
I will try to "copy" your model ... but I'll use Uhu Tac instead of Maskol (never tried that before) and maybe use the one or other decal ... I am no artist as you are ... more some kind of a ham-fisted Grobmotoriker
BTW Hasegawa will release a Kurogane with a standard truck too ... hope Big T will release their special kits separately too (Ford and Kurogane) fingers crossed
best wishes
Steffen
DULCE ET DECORUM EST PRO HOBBY MORI
North Carolina, United States
Joined: January 13, 2008
KitMaker: 25 posts
AeroScale: 24 posts
Posted: Wednesday, January 23, 2008 - 10:32 AM UTC
Brilliant ! Very, very nice work !
Small nit - yellow stripes near front tip of prop blades, plus small yellow data rectangle at base of each blade are missing.
Texas, United States
Joined: January 30, 2006
KitMaker: 1,954 posts
AeroScale: 1,163 posts
Posted: Wednesday, January 23, 2008 - 12:09 PM UTC
As always, your finished product looks so good it makes me want to go out and buy this kit for myself.
sigh...
Someday I'll finish a model again...
Moselle, France
Joined: May 15, 2005
KitMaker: 5,653 posts
AeroScale: 4,347 posts
Posted: Wednesday, January 23, 2008 - 08:15 PM UTC
Hi all!
Thanks for the kind words!
Quoted Text
hope Big T will release their special kits separately too (Ford and Kurogane) fingers crossed
I think Tamiya already (or are about to) release their Kurogane...

Quoted Text
Small nit - yellow stripes near front tip of prop blades, plus small yellow data rectangle at base of each blade are missing.
Thanks for pointing that out. I always make a list at the end of a build when it comes to add all the small bits but I forgot this...
Quoted Text
Someday I'll finish a model again...
You are on the good way with the Wildcat...
Jean-Luc
Better think one hour and build five minutes...
Than think five minutes and build an hour!
Moselle, France
Joined: May 15, 2005
KitMaker: 5,653 posts
AeroScale: 4,347 posts
Posted: Thursday, January 24, 2008 - 10:15 AM UTC
Hi all!
Not much done today. I was away so I only post a progress picture of the Fuel truck. I've added the cabin canvas...
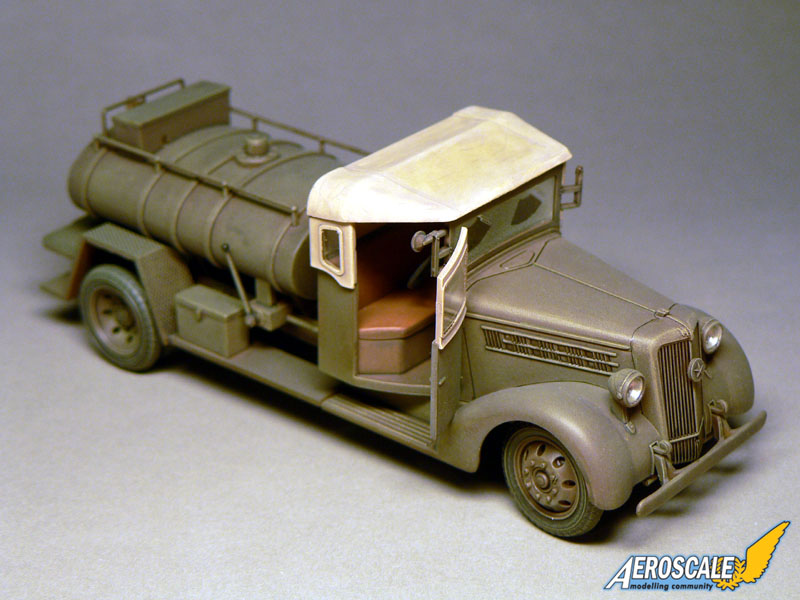
The door don't look that thick anymore. The model is almost finished but there are still a couple of things to do.
Jean-Luc
Better think one hour and build five minutes...
Than think five minutes and build an hour!
Moselle, France
Joined: May 15, 2005
KitMaker: 5,653 posts
AeroScale: 4,347 posts
Posted: Friday, January 25, 2008 - 12:46 AM UTC
Quoted Text
I will try to "copy" your model ... but I'll use Uhu Tac instead of Maskol
Hi Steffen!
How will you do that? I scratched my head several times in the last couple of days...
Do you plan to replace the maskol I used by Uhu Tac or will you paint the model in green first, apply the Tac and then paint it grey/green? Anyway, I'm looking forward to see how it will work.
Jean-Luc
Better think one hour and build five minutes...
Than think five minutes and build an hour!
Germany
Joined: September 07, 2005
KitMaker: 5,609 posts
AeroScale: 5,231 posts
Posted: Friday, January 25, 2008 - 02:35 AM UTC
Hallo Jean-Luc
I have few time as I have to leave soon to catch my train to Ettlingen.
I plan to make small sausages and place them on the model (just as you did with the maskol) .... It is a plan and I'll see if and how it workes out .....
viele Grüße
Steffen
DULCE ET DECORUM EST PRO HOBBY MORI
United States
Joined: August 12, 2007
KitMaker: 153 posts
AeroScale: 139 posts
Posted: Friday, January 25, 2008 - 11:35 AM UTC
Quoted Text
Hi all!
My Toryu is finished...
...The kit was a pleasure to build and the painting, even if challenging, was very interesting to do. With such a camouflage, the model will surely attract some viewers at any model show...
Jean-Luc
When done that well, it will most certainly attract viewers. I've always thought the Ki-45 a rather handsome plane, and you've certainly done it justice--that is
gorgeous !
Cheers

Automaton
Not everything that counts can be counted, and not everything that can be counted counts. (Albert Einstein)
Victoria, Australia
Joined: August 23, 2007
KitMaker: 629 posts
AeroScale: 539 posts
Posted: Friday, January 25, 2008 - 11:59 AM UTC
It turned out to be a great looking model for sure. I wish i had the sort of brush painting skills to do things like the tail logo, but that is one of my worst skills and practice doesn't help a lot so far!
Andrew
Current Projects:
Eduard 1/48 F6F-3 Hellcat
Hasegawa 1/350 Yukikaze
1/6 JJ Models Sarah "Gothic"