


Air Campaigns
Want to start or join a group build? This is where to start.
Want to start or join a group build? This is where to start.
Hosted by Frederick Boucher, Michael Satin
OFFICIAL: Support Aircraft Campaign
air-aset

Joined: March 25, 2004
KitMaker: 84 posts
AeroScale: 42 posts

Posted: Thursday, July 12, 2012 - 02:59 AM UTC
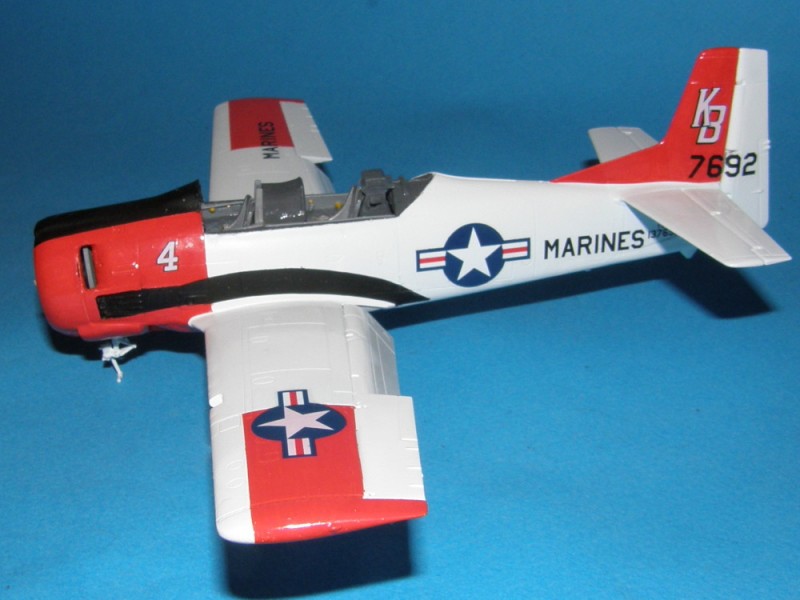
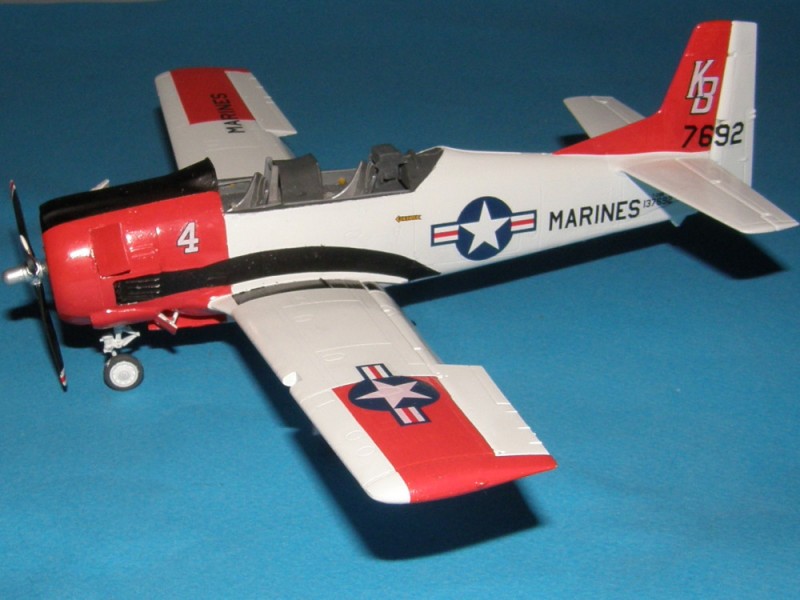
Hi All, heres my entry.
vertigo

Joined: November 11, 2004
KitMaker: 388 posts
AeroScale: 225 posts

Posted: Thursday, July 12, 2012 - 08:22 PM UTC
Hey guys, I think my apartment situation might be quieting down which is good news as I've been neglecting this campaign terribly.
Tomorrow morning I intend to read through the thread, start to finish, comment on all of your progress and settle back in. Although, I'm not sure I'll still be able to enter an aircraft this late in the game.
Tomorrow morning I intend to read through the thread, start to finish, comment on all of your progress and settle back in. Although, I'm not sure I'll still be able to enter an aircraft this late in the game.


JClapp

#259

Joined: October 23, 2011
KitMaker: 2,265 posts
AeroScale: 1,715 posts

Posted: Friday, July 13, 2012 - 07:50 AM UTC
Good to hear you are back on top, Vertigo. The campaign ran pretty well on auto-pilot while you were out, and still weeks to go.

SGTJKJ

#041

Joined: July 20, 2006
KitMaker: 10,069 posts
AeroScale: 3,788 posts

Posted: Saturday, July 14, 2012 - 01:01 PM UTC
A little more progress on the He 70. I have researched the Hungarian camouflage, but have come up with a number of different interpretations of what the colors really were. I decided on two greens, a light grey, and a medium brown. It looks right to me. 
More to follow

More to follow


shorty53
#330

Joined: July 15, 2011
KitMaker: 175 posts
AeroScale: 103 posts

Posted: Saturday, July 21, 2012 - 06:51 PM UTC
An update on my Arado Ar196. Just about everything is glued together. Have put undercoat on and some masking and painted the RLM65 on the underside.

vertigo
Joined: November 11, 2004
KitMaker: 388 posts
AeroScale: 225 posts
Posted: Saturday, July 21, 2012 - 09:12 PM UTC
@ Michael (flyboy92187)
Thats a great finish on the Pave Low, I love the patchy grey. What I especially like though is the weathering effects behind the engine, it turned out perfectly. Its probably a bit late to be asking, but how did you go about doing it?
@ Trevor (Snorri23)
Great work on the panel lines of the glider, the weathering pulls it all together. I like the base as well, Id be stoked if I could make a base like that.
@ Sal (ltb073)
That is a fantastic finish on such a huge aircraft, I dont think Id have the confidence to build something that large, then finish in natural metal and then decal it with that many decals. I get frustrated enough with the number of decals on a small jet like a BAe Hawk. You must have a lot of room to store that beast.
@ Frederick (cinzano)
I just have to say that cockpit looks amazing.
@ Ken (oraora)
All I can say is wow, your work with an airbrush just impresses me to no end. Ive only recently started using one myself and Id be happy if I could get half as good results as you have.
@ Adam (mykroft)
I love the Spitfire. I love the colour and I love that its in Swedish markings.
@ Jesper (SGTJKJ)
Looking good, I like the fact youre going with a Hungarian scheme. Im a big fan of alternative camouflage and marking schemes.
@ John (shorty53)
The Arado is looking great, it must take up quite a bit of room?

Jessie_C


Joined: September 03, 2009
KitMaker: 6,965 posts
AeroScale: 6,247 posts

Posted: Tuesday, July 24, 2012 - 05:07 PM UTC
Some more progress on the Trojan. It's up on its rickety nose leg and all the basic painting is complete now.
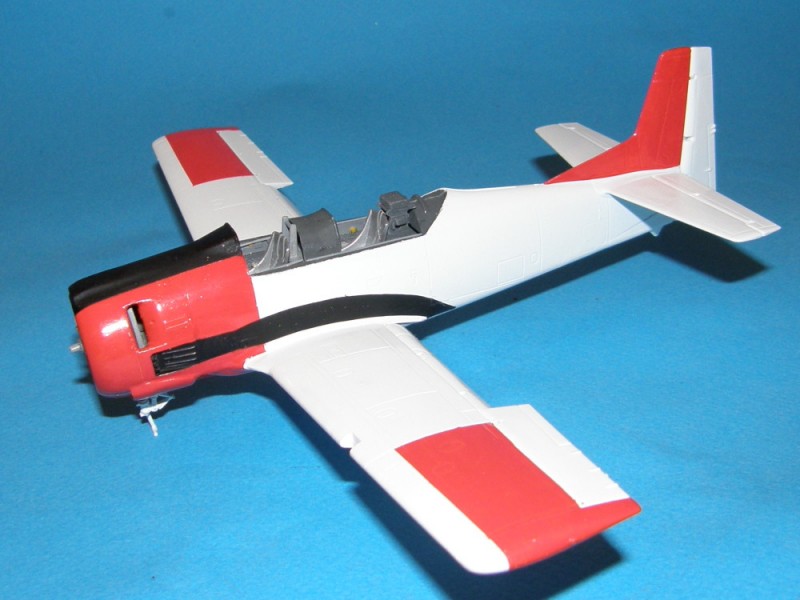
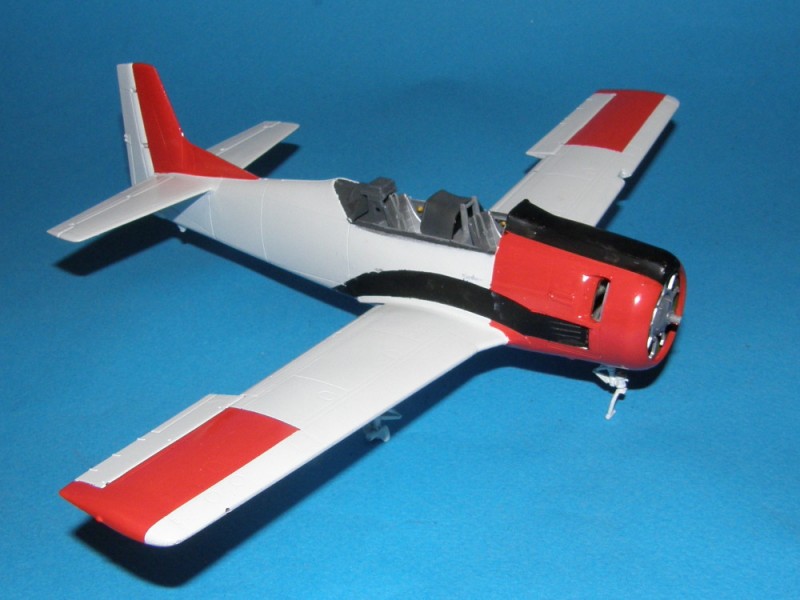
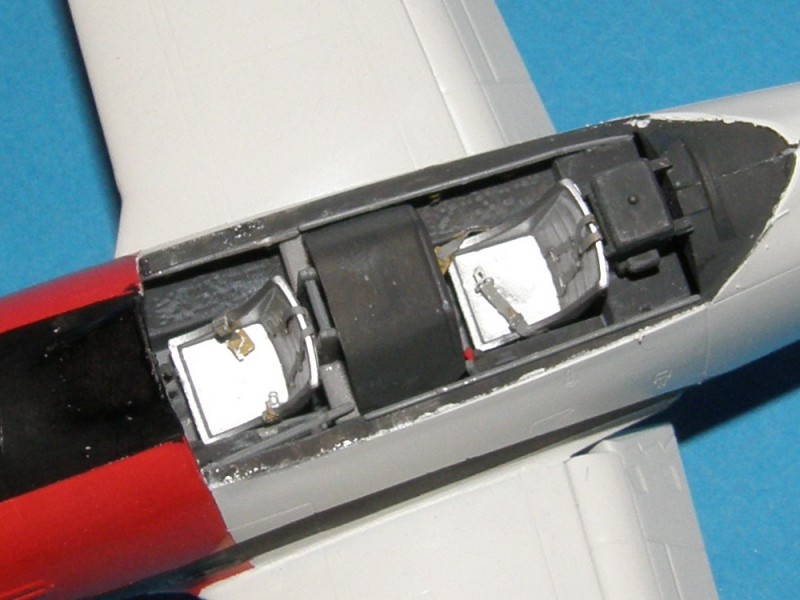
A peek into the cockpit, showing the only aftermarket parts used; a set of Lion's Roar seat belts which really dress up those otherwise plain seats.
There remain many fiddly detail parts and the decals.
A peek into the cockpit, showing the only aftermarket parts used; a set of Lion's Roar seat belts which really dress up those otherwise plain seats.
There remain many fiddly detail parts and the decals.
vertigo
Joined: November 11, 2004
KitMaker: 388 posts
AeroScale: 225 posts
Posted: Thursday, July 26, 2012 - 04:31 AM UTC
The Trojan is a fine looking aircraft and yours is coming along nicely Jessie.
Spreadsheet
I've updated the spreadsheet and I'd like everyone to check it to make sure I haven't missed anything.
Spreadsheet
I've updated the spreadsheet and I'd like everyone to check it to make sure I haven't missed anything.

windysean
Joined: September 11, 2009
KitMaker: 1,917 posts
AeroScale: 563 posts
Posted: Thursday, July 26, 2012 - 05:24 AM UTC
Sean,
sorry, I dropped out. I wasn't excited about my choice, and I couldn't make a decent go of it by August 11, so I pulled the plug. I wasn't sure about forming a new canopy shape or coming up with decals for it.
I'll definitely catch you all on another campaign down the road.
thanks for the excellent campaign idea. I'm resisting joining too many campaigns in the future, although there sure are a lot out of cool ones out there!
-Sean H.

ltb073
Joined: March 08, 2010
KitMaker: 3,662 posts
AeroScale: 174 posts
Posted: Thursday, July 26, 2012 - 05:47 AM UTC
Quoted Text
Spreadsheet
I've updated the spreadsheet and I'd like everyone to check it to make sure I haven't missed anything.
Alcatraz, Thanks for the complements,it took several days to get all those markings on her and she is now suspended form the ceiling in my basement weight room

You also dont have me down as being posted in the Gallery. I have 1 picture up back in May let me know if I need to post additional photos,
Thanks again,
Sal


vertigo
Joined: November 11, 2004
KitMaker: 388 posts
AeroScale: 225 posts
Posted: Thursday, July 26, 2012 - 06:36 AM UTC
Sorry about that Sal, I must have missed you in mix. I've updated the spreadsheet again.
I think the minimum picture requirement for the campaign was two but if it's hanging from the ceiling I'll let you off, I don't want you trying to wrestle it back down.
@ windysean
Don't worry about it, as it is I'm not able to even start a build for my own campaign. In fact I've had to drop out of every campaign I enlisted in.
I'll have another campaign idea sooner or later.
ltb073
Joined: March 08, 2010
KitMaker: 3,662 posts
AeroScale: 174 posts
Posted: Thursday, July 26, 2012 - 03:09 PM UTC
Quoted Text
I think the minimum picture requirement for the campaign was two but if it's hanging from the ceiling I'll let you off, I don't want you trying to wrestle it back down.
Not a problem I will just get a good photo of it in flight, dont want to buck the rules on an over-site on my part

Tomcat31
#042

Joined: November 18, 2006
KitMaker: 2,828 posts
AeroScale: 1,720 posts

Posted: Thursday, July 26, 2012 - 07:28 PM UTC
Don't worry too much the rule of having two pictures in the gallery is more for me to have a choice when it comes to doing the campaign feature, but a in-flight picture might be cool...

ltb073
Joined: March 08, 2010
KitMaker: 3,662 posts
AeroScale: 174 posts
Posted: Saturday, July 28, 2012 - 04:00 AM UTC
Quoted Text
Don't worry too much the rule of having two pictures in the gallery is more for me to have a choice when it comes to doing the campaign feature, but a in-flight picture might be cool...
Ok 1 from each side


Jessie_C
Joined: September 03, 2009
KitMaker: 6,965 posts
AeroScale: 6,247 posts
Posted: Monday, July 30, 2012 - 06:12 PM UTC
The major decals are on. Roden says that there are 4 decals #8; two of which are the BuNo for the yellow scheme and two are a rectangular rescue marking for below the cockpit. The rectangles don't exist. This will cause some consternation for inexperienced builders.

More importantly, the white is not opaque enough and the orange-red shows through. This is most noticeable on the wing insignia.
More importantly, the white is not opaque enough and the orange-red shows through. This is most noticeable on the wing insignia.
vertigo
Joined: November 11, 2004
KitMaker: 388 posts
AeroScale: 225 posts
Posted: Thursday, August 02, 2012 - 10:36 PM UTC
It's unfortunate when decals do not meet expectations, especially as they're really key to bringing the plane to life I think.
The emergency markings below the cockpit is an odd thing to leave out though as most, if not all, military aircraft carry them. Do you have any spares you can use?
The emergency markings below the cockpit is an odd thing to leave out though as most, if not all, military aircraft carry them. Do you have any spares you can use?
ltb073
Joined: March 08, 2010
KitMaker: 3,662 posts
AeroScale: 174 posts
Posted: Thursday, August 02, 2012 - 11:02 PM UTC
Jessica, I really like the way your build is turning out, shame about the decals and maybe it's the lighting but i didn't notice the red/ orange showing thru Looking forward to seeing that 1 finished 
Looking forward to seeing that 1 finished windysean
Joined: September 11, 2009
KitMaker: 1,917 posts
AeroScale: 563 posts
Posted: Friday, August 03, 2012 - 02:38 AM UTC
Quoted Text
Jessica, I really like the way your build is turning out, shame about the decals and maybe it's the lighting but i didn't notice the red/ orange showing thru
Jessica, do you have another wing insignia of relatively the same size in your spares? You can either apply it over the one already on, or remove the prior decal, mask, paint a white base to the shape of the insignia, then redecal. The tail letters are probably stuck that way.
I've used a brush before to touch up decals like that, but I don't recommend it on a build as nice as yours.
(I know you already knew that, an experienced modeler like you, but maybe the kids at home were wondering.
)-Sean H.

Jessie_C
Joined: September 03, 2009
KitMaker: 6,965 posts
AeroScale: 6,247 posts
Posted: Friday, August 03, 2012 - 03:26 AM UTC
Ordinarily I would, but since this is a sample build it's going to be right out of the box, warts and all.
windysean
Joined: September 11, 2009
KitMaker: 1,917 posts
AeroScale: 563 posts
Posted: Friday, August 03, 2012 - 06:07 AM UTC
Quoted Text
Ordinarily I would, but since this is a sample build it's going to be right out of the box, warts and all.
Ah! Then after you take your final review photos, but before you put it on your shelf among your other builds...
Jessie_C
Joined: September 03, 2009
KitMaker: 6,965 posts
AeroScale: 6,247 posts
Posted: Sunday, August 05, 2012 - 05:12 PM UTC
Final assembly is nearly done. All that remains on the airframe is touching up the various bits that need it. The canopies suffered catastrophic paint failure when I removed the masking; much of the paint came up with the masks 
The canopies are now soaking in a baggie filled with Easy Off and I'll try again.

The canopies are now soaking in a baggie filled with Easy Off and I'll try again.
shorty53
#330
Joined: July 15, 2011
KitMaker: 175 posts
AeroScale: 103 posts
Posted: Monday, August 06, 2012 - 12:04 AM UTC
Slowly getting closer to the end with the Arado AR196.


tinbanger
Joined: February 04, 2008
KitMaker: 2,507 posts
AeroScale: 1,814 posts

Posted: Monday, August 06, 2012 - 04:55 AM UTC
Hi All
I have finished my 1/144 CP-140 Aurora convertion to a
CP-140A Arcturus.
The kit was made by LS-E4(Japan).
Spray painted with Tamiya Acrylic paint and i used CanMilAir Decals.


I have finished my 1/144 CP-140 Aurora convertion to a
CP-140A Arcturus.
The kit was made by LS-E4(Japan).
Spray painted with Tamiya Acrylic paint and i used CanMilAir Decals.


eMan
#298

Joined: August 08, 2002
KitMaker: 1,182 posts
AeroScale: 351 posts

Posted: Wednesday, August 08, 2012 - 06:11 PM UTC
Progress update, 1/48 RA-5C Vigilante.


SGTJKJ
#041
Joined: July 20, 2006
KitMaker: 10,069 posts
AeroScale: 3,788 posts
Posted: Thursday, August 09, 2012 - 02:38 PM UTC
Beautiful build, Richard. Very clean build.
Nice progress, John. It is going to be a great looking Arado.
I have made some progress on my He 70. The main camouflage scheme is done and the details made. The next step is a clear coat and then the decals.
More to follow over the weekend


Nice progress, John. It is going to be a great looking Arado.
I have made some progress on my He 70. The main camouflage scheme is done and the details made. The next step is a clear coat and then the decals.
More to follow over the weekend
 |

WEB HOSTING BY


Copyright ©2021 AeroScale and Kitmaker Network, a subsidiary of Silver Star Enterprises
All Rights Reserved. Please read our Conditions of Use and Privacy Policy.
All Rights Reserved. Please read our Conditions of Use and Privacy Policy.