Air Campaigns
Want to start or join a group build? This is where to start.
OFFICIAL: "Zerstorer!" Campaign Thread
warreni
_VISITCOMMUNITY
South Australia, Australia
Joined: August 14, 2007
KitMaker: 5,926 posts
AeroScale: 2,201 posts
Posted: Tuesday, May 03, 2011 - 10:05 PM UTC
I finally started cracking on with my Dragon 1/32 Bf-110C-7even though I had a seat belt problem with the after-market Eduard belts.

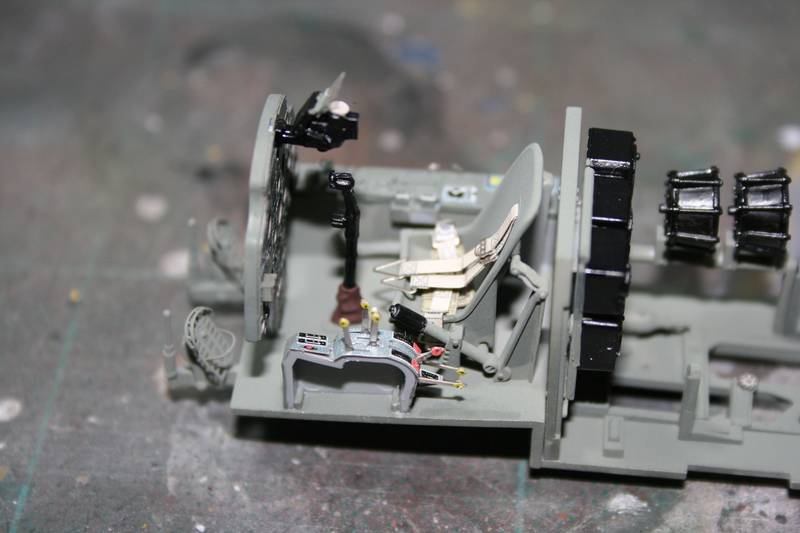
I also used an Eduard Zoom Self-Adhesive PE set for the cockpit. No problems so far except for the Eduard instructions which aren't the best.. too crowded.


No weathering done as yet. More progress piccies as I remember to take them..
rochaped
_VISITCOMMUNITY
Lisboa, Portugal
Joined: August 27, 2010
KitMaker: 679 posts
AeroScale: 669 posts
Posted: Tuesday, May 03, 2011 - 10:53 PM UTC
Hi Warren,
Believe the rudder pedals are upside down?? Excuse me if it's my mistake
emroglan
_VISITCOMMUNITY
Istanbul, Turkey / Türkçe
Joined: December 16, 2004
KitMaker: 1,163 posts
AeroScale: 255 posts
Posted: Tuesday, May 03, 2011 - 11:26 PM UTC
I concur Pedro, they are upside down. The protruded section must be at the bottom. Warren, you might also want to press the belts more onto the seat, they seem to be flying at the moment. These aside, very good job.
warreni
_VISITCOMMUNITY
South Australia, Australia
Joined: August 14, 2007
KitMaker: 5,926 posts
AeroScale: 2,201 posts
Posted: Wednesday, May 04, 2011 - 07:16 AM UTC
Looks like Eduard's instructions are not quite correct then.. Oh well.. Once you close the fuselage up you won't be able to see the pedals except with a mirror and flashlight anyway, even in 1/32.

Life is too short.. Modelling time too precious.. Thanks for the heads up Pedro.

As for the belts, that is a problem with multiple layers of PE Emre. They are stiff, the seat not too strong. If I try and bend them anymore it might break the seat. Some belts I have used in aircraft have seemed to be that stiff as well, especially the big leather covers they use.
warreni
_VISITCOMMUNITY
South Australia, Australia
Joined: August 14, 2007
KitMaker: 5,926 posts
AeroScale: 2,201 posts
Posted: Wednesday, May 04, 2011 - 11:26 AM UTC
Well, I went back to my reference, which is admittedly of a Bf-110G, but I believe the rudder pedals used were the same throughout, and the Eduard ones are not even close to the real thing. The ones in the kit, even though they dont have a toe strap, are just like the ones on the real plane, so the Eduard ones have been removed and the kit one put there instead... but no toe strap... Don't worry. only tiny insects and spiders will ever see them again...


emroglan
_VISITCOMMUNITY
Istanbul, Turkey / Türkçe
Joined: December 16, 2004
KitMaker: 1,163 posts
AeroScale: 255 posts
Posted: Wednesday, May 04, 2011 - 08:24 PM UTC

Quoted Text

.

As for the belts, that is a problem with multiple layers of PE Emre. They are stiff, the seat not too strong. If I try and bend them anymore it might break the seat. Some belts I have used in aircraft have seemed to be that stiff as well, especially the big leather covers they use.


Believe me, I know. I'm obsessed about getting those belts properly leaning against the seat and sometimes just two PE belts take more than 2-3 hours of my time, much of my patience and a few more locks of hair in my already bald head.

With Eduard sets, I'm beginning to believe that it's not really necessary to use more than half of a Zoom set. Just use the belts, install a few pe levers and parts here or there where it would show and forget about the rest

I am beginning to hope I'll get my Zerstörer ready for this campaign. Currently I'm tied up with Airfix's Nimrod and I need to complete it before 25th May to join a modelling contest. I hope I can complete my zerstörer afterwards.
BlackWidow
_VISITCOMMUNITY
European Union
Joined: August 09, 2009
KitMaker: 1,732 posts
AeroScale: 1,336 posts
Posted: Sunday, May 08, 2011 - 04:11 AM UTC
Well folks, I call her "Ready for Take Off"!
This is my campaign built, Messerschmitt Me 410 B-2. It's finished since last weekend, but I had no time to take pics yet. I painted it in the colours of a staff aircraft of I./ZG 26, based in Fassberg near Hannover early in 1944.


Detailing of the kit is really fine and fitting is good, except for the canopy. Bringing it on was a sheer nightmare .... 
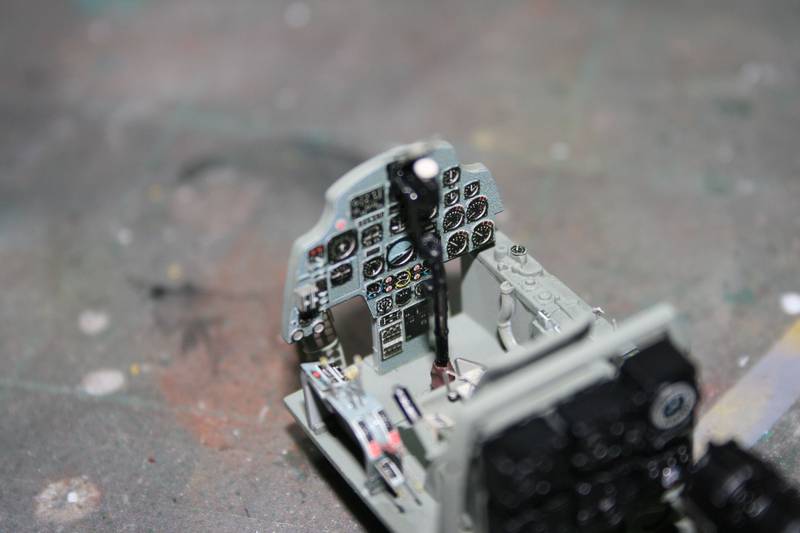
But now it's on and it will stay that way. So you can also see the unusual shape of it. The main colours I used come from Revell (RLM 02 and 76) and Agama (RLM 74 and 75).


The Me 410 (also known as "Hornisse" - "Hornet") was used as a heavy day fighter, for reconnaissance and as a fighter bomber. It was heavily armed with various weapons like with 4 x MG 151/20 (20 mm), as my kit is (see in pic 3) or with 2 x MG 151/20 and 2 x MK 108 (30 mm) or even with a 50 mm canon under the belly. Defense weapons were 2 x MG 131 (13 mm) in automatic carriages on both sides of the fuselage, which made the aircraft look a bit futuristic.


The aircraft was powered by 2 x DB 603G engines with 1850 hp each. The Me 410 units took a heavy toll on american bombers in the last 2 years of the war but also suffered heavy losses due to their weight and little manoeuvrability. Mustangs and Spitfires found in them very welcomed prey. Sadly there are only two Me 410 alive today in museums, one in England and one in the States.


If you like to see more of this impressive aircraft, take a look at this video:
http://www.youtube.com/watch?v=1zvkbIJWSRI

I will leave this campaign now and turn to my Desert Air Force Tomahawk for the P-40 campaign. In the next few days I will upload 2-3 pics to the Zerstörer Gallery.

Happy modelling!
Torsten
Siderius
_VISITCOMMUNITY
Tennessee, United States
Joined: September 20, 2005
KitMaker: 1,747 posts
AeroScale: 1,673 posts
Posted: Sunday, May 08, 2011 - 06:33 AM UTC
Torsten, your Me-410 is exquisite! It is a very good build I really enjoyed looking at it. Inspires me to build one myself in 72 scale. Thank you so much for sharing. Russell
Kiwi_Modeller
_VISITCOMMUNITY
Queensland, Australia
Joined: August 13, 2010
KitMaker: 188 posts
AeroScale: 62 posts
Posted: Sunday, May 08, 2011 - 01:44 PM UTC
yeh that looks fantastic Torsten very nicely done.
cheers,
Graham
Naseby
_VISITCOMMUNITY
Slovakia
Joined: October 15, 2010
KitMaker: 825 posts
AeroScale: 476 posts
Posted: Sunday, May 08, 2011 - 08:10 PM UTC
Fine lookin Messerschmitt Torsten! Its sad that You had problems with the canopy. Such thing can ruin the whole built in the end, but You managed it good.
Torchy
#047
_VISITCOMMUNITY
England - East Anglia, United Kingdom
Joined: September 13, 2005
KitMaker: 2,016 posts
AeroScale: 475 posts
Posted: Monday, May 09, 2011 - 03:56 AM UTC
Torsten,thats a fantastic build mate,and that base really sets it off,fine work my friend
Andy

edit. no swastikas on the tail ?
BlackWidow
_VISITCOMMUNITY
European Union
Joined: August 09, 2009
KitMaker: 1,732 posts
AeroScale: 1,336 posts
Posted: Monday, May 09, 2011 - 08:38 AM UTC
Thanks for your comments, guys! That's very nice of you! Yes, in the end I'm quite satisfied with the result. At the moment the "Hornisse" stands here on a small dio beside my new Opel Blitz Fuel Tanker.

@Andy
Yes, no swastika .... On decal sheets that you get in Germany are no "evil crosses" at all. That are political reasons. You might have heard about that problem already. We can discuss that while having a beer, okay!

Thanks!
Torsten
rochaped
_VISITCOMMUNITY
Lisboa, Portugal
Joined: August 27, 2010
KitMaker: 679 posts
AeroScale: 669 posts
Posted: Tuesday, May 10, 2011 - 04:55 AM UTC
Hi All,

@Torsten: Good & Mean looking 410 you got there! Are Luftwaffe planes sexy or what??

Here are some pics on my Bf.110 G-2 progress

Sem título por rochaped38


Sem título por rochaped38


Sem título por rochaped38

doing a dry-run on fuselage halves shows no problems in the fit

Sem título por rochaped38


Sem título por rochaped38
Also the upper & lower wing fit nicely, and looks like no filler needed, although it had substantial flash, which is odd, being a rather new mould??!


Sem título por rochaped38

This kit is a real addiction to any modeller

Hope you enjoy

Cheers
Pedro
rochaped
_VISITCOMMUNITY
Lisboa, Portugal
Joined: August 27, 2010
KitMaker: 679 posts
AeroScale: 669 posts
Posted: Wednesday, May 11, 2011 - 07:55 AM UTC
Well, the fuselage is glued & the cockpit is done minus canopy.

Sem título por rochaped38

The 2 piece tail also assembled without fuss

Sem título por rochaped38

This "step" in the bottom will not be a concern...


Sem título por rochaped38
because of it's giant canon fairing


Sem título por rochaped38

next post will be when all parts are assembled and the fun part (yes, painting) to start.

Thanks for watching, feedback is always welcome
Cheers
Naseby
_VISITCOMMUNITY
Slovakia
Joined: October 15, 2010
KitMaker: 825 posts
AeroScale: 476 posts
Posted: Thursday, May 12, 2011 - 12:56 AM UTC
Come on Pedro, You cant be serious! How on Earth do You make a cockpit like that ? That just isnt fair. But nevertheless Im looking forward to see Your built finished

In the meanwhile I finished the Dornier. How to summarize the whole built ? Well Italeri s Dornier is very very old, and it shows. Sometimes I do ask myself when is the right time to call a kit too old to be sold. Well in this case, the time is here. No interiour, raised panel lines, poor fit and poor details. That is the summary. I would not recomend this kit even with the only other 1/72 Dornier being that from ICM, which is new but also a pain to complete. Its definitely time for a new 1/72 Dornier and I hope Hasegawa or Revell, both of whom have produced a series of nice bombers in recent years will make us happy with one in the near future. As for me, the only other Dornier I will probably ever built will be the 1/48 one.


rochaped
_VISITCOMMUNITY
Lisboa, Portugal
Joined: August 27, 2010
KitMaker: 679 posts
AeroScale: 669 posts
Posted: Thursday, May 12, 2011 - 10:15 AM UTC
Naseby, thanks for your encouraging comments! Also a word of hope, seems Revell is about to deliver a 1/48 size of your build! Figure it must be based on the current 217 Monogram mould, wich is very good... So hope to see another gorgeous J from you

Cheers
SGTJKJ
#041
_VISITCOMMUNITY
Kobenhavn, Denmark
Joined: July 20, 2006
KitMaker: 10,069 posts
AeroScale: 3,788 posts
Posted: Thursday, May 12, 2011 - 09:16 PM UTC
Pedro, I agree with Naseby. Excellent cockpit! Looking forward to see more.

Naseby, you did a great job on the Dornier. I love the camouflage - very sinister looking and very appropriate for a night stalker. Thanks for sharing!
Naseby
_VISITCOMMUNITY
Slovakia
Joined: October 15, 2010
KitMaker: 825 posts
AeroScale: 476 posts
Posted: Saturday, May 14, 2011 - 09:17 PM UTC
Thanks for the comments. I will be off planes for a few days, since I have som armour to finish, but I will watch Your progress closely. Keep this great campaign going !
Tomcat31
#042
_VISITCOMMUNITY
England - North East, United Kingdom
Joined: November 18, 2006
KitMaker: 2,828 posts
AeroScale: 1,720 posts
Posted: Sunday, May 15, 2011 - 03:10 AM UTC
Sam and I are on a R/C flying holiday this week but the weather is not letting any flying happen at the moment

Fortunately I brought the Gekko with me so there will hopefully be some progress this week. I'll take some photos and upload them when we get back as I don't think the mobile connection we're using will cope
BlackWidow
_VISITCOMMUNITY
European Union
Joined: August 09, 2009
KitMaker: 1,732 posts
AeroScale: 1,336 posts
Posted: Sunday, May 15, 2011 - 03:21 AM UTC
@Pedro
That cockpit looks stunning, mate! Maybe even better than in the real plane ..... Go on with that great work.

@Naseby
Concerning the age of the kit, you did a wonderfull job! Looking at these photos I can't see the problems you've had with the build. But that's always the case. In the end you don't see the problems you've had with it, you just remember them. But be carefull if you think, the 1/48 Do 217 is easier .... I've built the E-5 version for the Anti Shipping Camapign. I needed a lot of filler and sanding, the fuselage consists of 3 parts and there are many fitting problems. So, not much better than the 1/72 kit ....
rochaped
_VISITCOMMUNITY
Lisboa, Portugal
Joined: August 27, 2010
KitMaker: 679 posts
AeroScale: 669 posts
Posted: Thursday, May 19, 2011 - 04:15 AM UTC
Hi Everybody,

a big thanks to all for your feedback on the cockpit!

Afraid my available modeling time has been few, so no big steps forward.
However few work done, it was probably not well made at all...
After glueing the 2 piece nose (no MG guns visible in this bird, it´s due for the C version latter) it was time to join it to the main fuselage and this pic shows my disappointment

Sem título por rochaped38

Some troublesome job ahead. As for the wings, not a bad fit but the engines nacelles display that famous gap of the earlier versions kits

Sem título por rochaped38

Sem título por rochaped38

Oh well, no harm comes from a little extra effort after all this is modeling right?

Cheers

p.s. Hope to see more great models on this forum
AussieReg
Staff MemberAssociate Editor
AUTOMODELER
#007
_VISITCOMMUNITY
Victoria, Australia
Joined: June 09, 2009
KitMaker: 8,156 posts
AeroScale: 3,756 posts
Posted: Friday, May 20, 2011 - 11:16 PM UTC
Ok you lot, I can hear all those nasty names you have been calling me !! Unfortunately real life has been dragging me (kicking and screaming) away from the bench for months now and I have been severely neglecting my builds and my Campaign Leader duties here.

I have updated the Roll Call/Build Status post on page 1 of this thread, so take a look to see a quick summary of the Campaign so far.

We have 13 builds in various stages of construction (not including my feeble attempt so far), and 4 magnificent Zerstorers completed and in the hangar. Please don't forget to drop a couple of pics in the Campaign Gallery HERE once you finish your build.

There is some amazing work on display here so far guys, and the posts have been very entertaining and informative, so keep modeling on and hopefully I will be able to actually contribute at some stage in the near future.

Cheers, D
Torchy
#047
_VISITCOMMUNITY
England - East Anglia, United Kingdom
Joined: September 13, 2005
KitMaker: 2,016 posts
AeroScale: 475 posts
Posted: Tuesday, May 24, 2011 - 02:19 AM UTC
Hi guys
Airfix have finally sent me missing sprue so I can now get going again,pics soon
Andy
Tomcat31
#042
_VISITCOMMUNITY
England - North East, United Kingdom
Joined: November 18, 2006
KitMaker: 2,828 posts
AeroScale: 1,720 posts
Posted: Tuesday, May 24, 2011 - 04:16 AM UTC
Hi All

As promised here are the progress shots taken while I was on holiday last week. the wind stayed in the wrong direction most of the week so quite a bit was done.

Cockpit sides and seats after all the base colours have been applied and the etch belts attached


Paynes Grey Oil wash applied to the interior


The frame mount and machine guns for the fuselage


Work started on the wings


and the fuselage put together with the cockpit and MG's installed


A quick test fit of all the sub assemblies.


The wings were left off so I could easily transport the sub assemblies home in the box. this will be all the update for the time being while I finish my Vindicator and Tomcat for some of the other campaigns.

As always comments, suggestions and critique is always welcome
Naseby
_VISITCOMMUNITY
Slovakia
Joined: October 15, 2010
KitMaker: 825 posts
AeroScale: 476 posts
Posted: Tuesday, May 24, 2011 - 08:27 AM UTC
@ Torsten: I was watching Your built of the Monogram Dornier closely because I was thinking of buying it, but as I saw all the troubles I will wait a while and hope the mighty chinese steam roller will send somthing better my way in the future. Wir werden mal sehen

@ Damian: Bench time ? Whats that ? I started my last two builts (1/35 Armour) both in a hotel room. I have more modeling stuff in my car trunk than at home.

@ Allen: So the 5th part will be Pirates of the Pacific ? The interiour is cool. The colour is interesting and the details are painted in a wery fine way. You have a steady hand.