

Trevor,
Sorry, I have nothing Japanese to help you with.
Bob
Air Campaigns
Want to start or join a group build? This is where to start.
Want to start or join a group build? This is where to start.
Hosted by Frederick Boucher, Michael Satin
OFFICIAL: P-40, Work Horse of WWII Campaign

Bigrip74

Joined: February 22, 2008
KitMaker: 5,026 posts
AeroScale: 2,811 posts

Posted: Saturday, June 18, 2011 - 08:02 PM UTC

ppawlak1

Joined: March 14, 2006
KitMaker: 1,973 posts
AeroScale: 59 posts

Posted: Saturday, June 18, 2011 - 08:14 PM UTC
Quoted Text
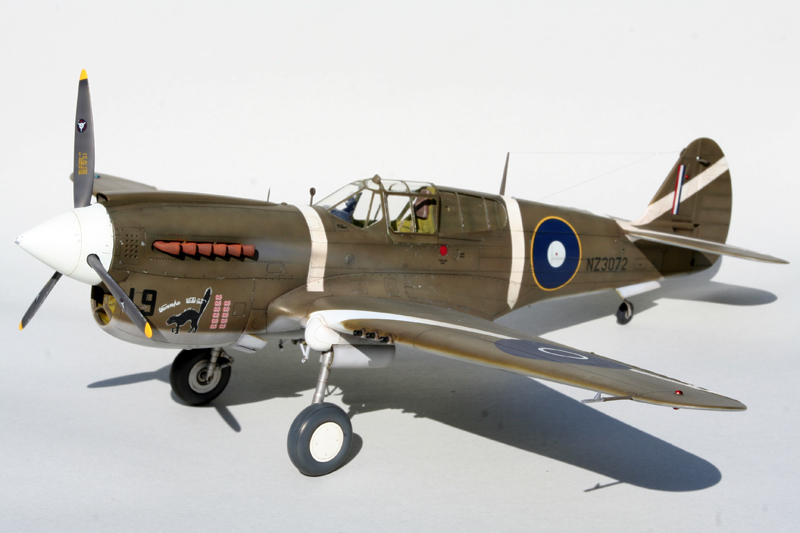
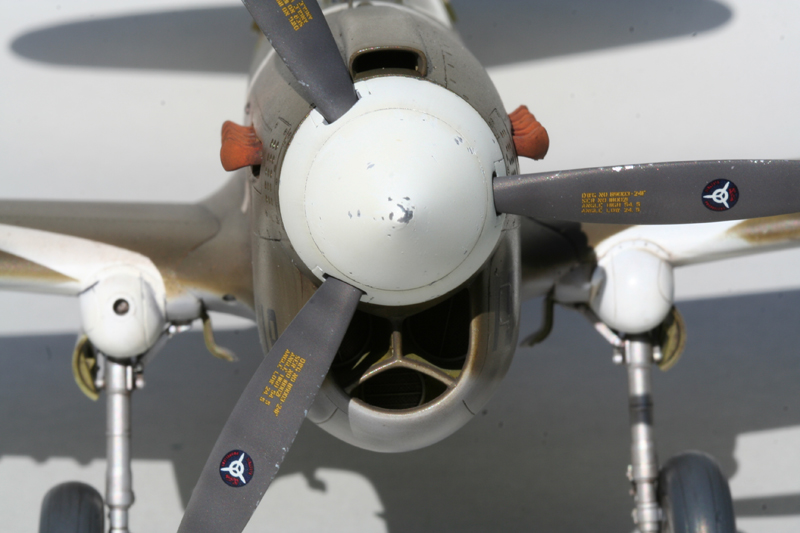
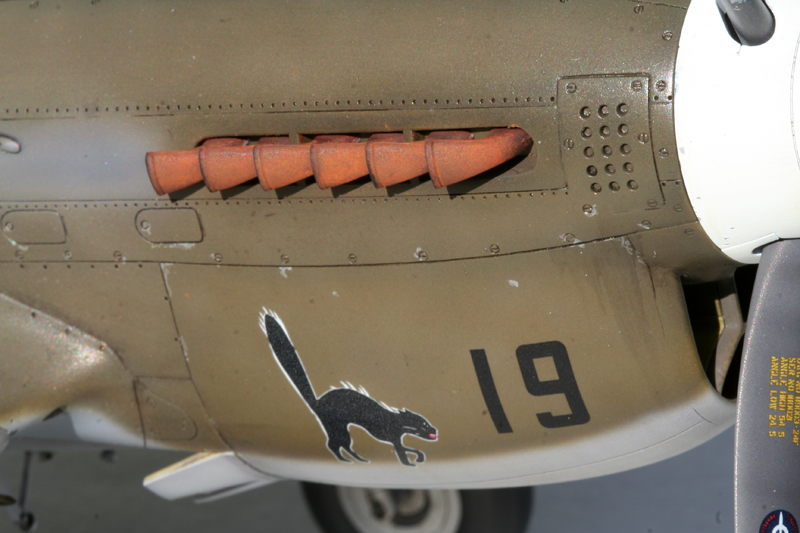
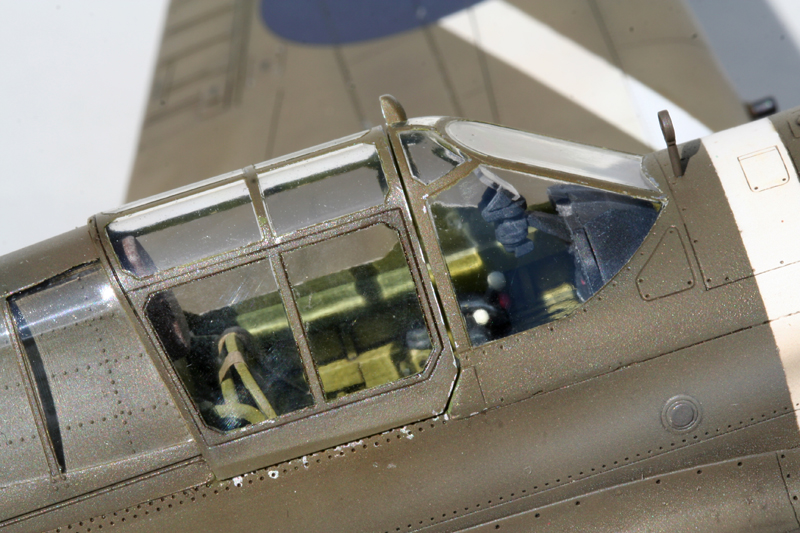
O.K., I'm done.
Here some pics:
Did you notice the pilot didn't close his canopy all the way before heading off for a debriefing beer. Got to give him a ruse for that....
Tell me what you think!

Beautiful

Cheers
Paul

Emeritus

Joined: March 30, 2004
KitMaker: 2,845 posts
AeroScale: 1,564 posts

Posted: Wednesday, June 22, 2011 - 08:04 AM UTC
Quoted Text
I am doing a Japanese captured a/c and need two red meatballs with white outline for the upper wing surface. Anyone out there who could assist me?
Hey, are you still missing those meatballs? I dug around my decal left-overs and found some:

The left ones are from a Hasegawa Zero, the right side - I have no idea, got the sheet from a friend who gave me a bunch of spare parts & stuff.
Diameter of the Hasegawa roundels: 26mm and 19,6mm. Those of the mystery sheet: 15,8 mm.
Would some of these be useful in your build?
Finally I got some more progress to show. All the stuff that goes between the fuselage halves (and wings too) is all but done and ready for assembly:


Snorri23

Joined: March 25, 2010
KitMaker: 514 posts
AeroScale: 244 posts
Posted: Wednesday, June 22, 2011 - 08:16 AM UTC
Yes those will do, I will i.m. you with the details. As for the update on kits, I posted several pics showing my progress and what kit I am using. For one suggested to me just to upgrade the Otaki kit with Kevin's seat. Will post an interior shot soon have it put together. photos coming soon.
NickZour

Joined: May 01, 2008
KitMaker: 1,437 posts
AeroScale: 1,241 posts
Posted: Wednesday, June 22, 2011 - 08:27 AM UTC
Quoted Text
Quoted TextGreat Work on your P-40 Mr. Leo
Good luck with your Finnish P-40 Mr. Eetu
Cheers Nick
Efcharisto pollikala!
Have an Alpha beer on it for me.
No offence, just maybe ease up on the politics in your signature, eh kiddo?

I hate beer and I am also too young to drink beer (15 years old)

About the politics on the signature....they are just....telling the TRUTH

I hate seeing the Slavs to call Macedonia is not Hellenic and you Mr. Leo, propably hate seeing "Danzig" writen "Gdansk" in the Polish language...

Cheers Nick
Snorri23
Joined: March 25, 2010
KitMaker: 514 posts
AeroScale: 244 posts
Posted: Friday, June 24, 2011 - 04:15 PM UTC
Here are my photos of my project an old Otaki kit which I have been told just needs a good seat. Just waiting for the postal strike to end so I can obtain my seats. A nice kit, scheme is going to be a captured by the Japanese.


http://i863.photobucket.com/albums/ab196/Snorri23/P-40%20campaign/K_ZOO-kamuflaz3.jpg


http://i863.photobucket.com/albums/ab196/Snorri23/P-40%20campaign/K_ZOO-kamuflaz3.jpg
Bigrip74
Joined: February 22, 2008
KitMaker: 5,026 posts
AeroScale: 2,811 posts
Posted: Friday, June 24, 2011 - 04:44 PM UTC
Trevor ,
That is a neat camo that you have chosen.
Bob
That is a neat camo that you have chosen.
Bob

AussieReg

#007
Joined: June 09, 2009
KitMaker: 8,156 posts
AeroScale: 3,756 posts
Posted: Saturday, June 25, 2011 - 11:11 AM UTC
Hi guys, a little progress report from way down south. I've buttoned up the fuselage and fitted the wings, but while the bottom of the wing assembly fitted very nicely, there was a gap along the top of the wing roots.

Rather than pull the wing tips up and create too much of a dihedral I decided to fill the gaps, which were an even width along the full length, with some .01"x.02" Evergreen strip.

I used Tamiya Extra Thin cement, and pushed the strip slowly into place with a knife tip. Once the long, straight length was dry, I worked the profile on the leading edge into position. I'm very happy with the result, it only needs a light sand now and I'm ready to mask and paint.

Cheers, D
Rather than pull the wing tips up and create too much of a dihedral I decided to fill the gaps, which were an even width along the full length, with some .01"x.02" Evergreen strip.
I used Tamiya Extra Thin cement, and pushed the strip slowly into place with a knife tip. Once the long, straight length was dry, I worked the profile on the leading edge into position. I'm very happy with the result, it only needs a light sand now and I'm ready to mask and paint.
Cheers, D


29Foxtrot
Joined: September 19, 2003
KitMaker: 708 posts
AeroScale: 674 posts

Posted: Sunday, June 26, 2011 - 05:11 AM UTC
Stefan,
Interesting subject for your P40 build, A29-113 it has been disputed over the colour of the 'U' code [which should be a pale blue with a white outline], for many years and the Allied flags should be on both sides of the lower cowling.
Sqn Ldr Cresswell when C.O of 77 Sqn RAAF with this aircraft is credited with shooting down the first Japanese aircraft over the Australian Mainland on 23/11/'42 [this aircraft's service life was 3 weeks short of 12 months]
A little of it's history of A29-113 can be found at http://adf-serials.com
{RAAF Series 2 is the menu to look into, on the Kittyhawk}
I hope this pic is of some help in regard to 113.

The camo scheme on this is RAAF Earth / Foliage Green over RAAF Sky Blue
Interesting subject for your P40 build, A29-113 it has been disputed over the colour of the 'U' code [which should be a pale blue with a white outline], for many years and the Allied flags should be on both sides of the lower cowling.
Sqn Ldr Cresswell when C.O of 77 Sqn RAAF with this aircraft is credited with shooting down the first Japanese aircraft over the Australian Mainland on 23/11/'42 [this aircraft's service life was 3 weeks short of 12 months]
A little of it's history of A29-113 can be found at http://adf-serials.com
{RAAF Series 2 is the menu to look into, on the Kittyhawk}
I hope this pic is of some help in regard to 113.
The camo scheme on this is RAAF Earth / Foliage Green over RAAF Sky Blue

Bigrip74
Joined: February 22, 2008
KitMaker: 5,026 posts
AeroScale: 2,811 posts
Posted: Sunday, June 26, 2011 - 05:31 AM UTC
@ D: did you need to sand much with your technique?
@ Rob: thanks for the data I need to look up a better reference for RAAF colors here or in other words find some paint that matches without having to mix and destroy my paint collection
Bob
@ Rob: thanks for the data I need to look up a better reference for RAAF colors here or in other words find some paint that matches without having to mix and destroy my paint collection
Bob
29Foxtrot
Joined: September 19, 2003
KitMaker: 708 posts
AeroScale: 674 posts
Posted: Monday, June 27, 2011 - 02:27 AM UTC
G'day Bob,
What brands of paint are you wanting to use and which RAAF colours do you need reference too ? Just let me know.
What brands of paint are you wanting to use and which RAAF colours do you need reference too ? Just let me know.
Bigrip74
Joined: February 22, 2008
KitMaker: 5,026 posts
AeroScale: 2,811 posts
Posted: Monday, June 27, 2011 - 06:26 AM UTC
Quoted Text
G'day Bob,
What brands of paint are you wanting to use and which RAAF colours do you need reference too ? Just let me know.
Rob,
I use Tamiya and Vallejo. Thanks for the help.
Bob
AussieReg
#007
Joined: June 09, 2009
KitMaker: 8,156 posts
AeroScale: 3,756 posts
Posted: Monday, June 27, 2011 - 04:49 PM UTC
Quoted Text
@ D: did you need to sand much with your technique?
Bob
Hi Bob. I slowly work the strip into place while the glue is still "tacky". This allows me to push it down slowly to the point where it is just level with the surface, and the glue softens the strip so that it can follow the profile of the wing root. All I need to do is give it a light sand to get rid of any glue residue and small marks. I will try to get some closer shots as I go further along.
Cheers, D
Rebilda
#057

Joined: May 11, 2010
KitMaker: 248 posts
AeroScale: 123 posts

Posted: Monday, June 27, 2011 - 10:38 PM UTC
Real nice work guys. Makes me wanna start another one...
@Bob: The two pics I posted in the gallery are enough to qualify?
@Bob: The two pics I posted in the gallery are enough to qualify?

29Foxtrot
Joined: September 19, 2003
KitMaker: 708 posts
AeroScale: 674 posts
Posted: Tuesday, June 28, 2011 - 06:37 AM UTC
Damian,
I've used the same technique on some of the older ARRI and AMT kits of the P40's I had built in the past, once I tried putting wedges under the cockpit floor to spread the fuselage halves into the wing roots. The Ever Green is a life saver as a gap filler.
Bob,
Tamiya paint numbers as a reference to as close as possible to RAAF colours.
RAAF Foliage Green:
Use either XF 13, XF 27, or XF 61
Tthis colour was close to the RLM 70 or the IJA Green as it was a blackish green when first applied, but faded very quickly in tropical conditions.
RAAF Earth:
Use either XF 68 or XF 72
RAAF Sky Blue:
Use XF 23 and add 10% of XF 2
RAAF PRU Blue:
Use either XF 18 or XF 50
RAAF Insignia Blue:
Use XF 17
Either of these two colours were applied to the rear half of the spinner caps when the front section was white.
Neutral Grey:
Use XF 53
Olive Drab:
Use either of XF 51 or XF 62
Chromate Yellow:
Use XF 4 and add 10% of XF 3
U.S.Green 42:
Use XF 58
If you are intending to build a P40 that was factory finished in the Dupont painted copy of the Temperate Land Scheme the R.A.F used in the early years, use XF 57 [Buff] / 58 or 62 [Olive Green, Olive Drab] over XF 23 [Light Blue], if you have to paint the spinner Green {such as the P40k flown by John Gorton} use X 28 as the spinner cap Green.
The RAAF also used a colour called RAAF Sky Grey, this is XF 19 which is a modern day RAF colour called Barley Grey.
Give me a couple of days to cross ref with the Vallejo colours.
Also Life color Acrylics had a good range of RAAF paints and their are 2 sets of 6 bottles:- RAAF set #1 has the Earth and Foliage Green.
Hope this info is of help to you with your projects.
Emeritus
Joined: March 30, 2004
KitMaker: 2,845 posts
AeroScale: 1,564 posts
Posted: Tuesday, June 28, 2011 - 07:34 AM UTC
Now doesn't everyone just love filling and sanding to blend in those multiple inserts! :=


Fortunately most of the panel lines matched quite well, but a few required filling and rescribing. Instead of putty or superglue I tried strecthed sprue and it worked very nicely. Not only neat and tidy for panel lines, there's the advantage of having exactly same material filling the seam as the rest of the kit, making rescibing much easier compared to regular putty (softer than styrene, easily cracked) or CA (cures harder than styrene if left alone for longer).
While the fit of the main fuselage inserts was decent, I still find it hard to grasp how Hasegawa managed to make the rather complex wing-to-fuselage joint practically flawless, with numerous curves and angles in the joint, and on the same kit have those simple fuselage inserts (flat contact surfaces, single-plane contours) that fit nowhere as well as the wing to the fuselage and sport a minimum of about three panel lines that refuse to line up no matter what...
But I guess it's the problem solving that's part of the fun, right?
I'll give those fuselage insert seams a coat of primer to confirm they're good to good, then I'm off to paint to the cockpit rear area so I can drop in the 'pit and get the airframe together.
Bigrip74
Joined: February 22, 2008
KitMaker: 5,026 posts
AeroScale: 2,811 posts
Posted: Tuesday, June 28, 2011 - 08:30 AM UTC
@ Damian: I have various results with filling gaps with styrene, and I am redoing that which I am presently trying to apply to my P-38 for your Zorstorer campaign. I seem to always take too much away leaving another problem to fix
@ Rob: I put your RAAF paint list on my hobby flash drive for future reference. Thanks for your help/
@ Leo: I read the campaign sheet and I guess that I did not stipulate a no. of photos in the gallery I thought the customary (1) was enough. BTW nice job on your N.
@ Eetu: those kits that give too many choices to which version that one wants to build is like a kid in a candy store. TOOOOO!!!! many choces makes my stomach hurt or rather my wrist with all of the sanding involved I guess I am just a simple guy (old fart) BTW your N is coming along nicely.
Bob
@ Rob: I put your RAAF paint list on my hobby flash drive for future reference. Thanks for your help/
@ Leo: I read the campaign sheet and I guess that I did not stipulate a no. of photos in the gallery I thought the customary (1) was enough. BTW nice job on your N.
@ Eetu: those kits that give too many choices to which version that one wants to build is like a kid in a candy store. TOOOOO!!!! many choces makes my stomach hurt or rather my wrist with all of the sanding involved
I guess I am just a simple guy (old fart) BTW your N is coming along nicely.Bob
emroglan

Joined: December 16, 2004
KitMaker: 1,163 posts
AeroScale: 255 posts

Posted: Tuesday, June 28, 2011 - 09:49 AM UTC
Quoted Text
Now doesn't everyone just love filling and sanding to blend in those multiple inserts!
Oh yeah, tell me about it... I nearly fainted with joy when I was building my P-40E!
I hope you don't run into many problems and get your build along. Good luck Emeritus!
Philippus

Joined: March 13, 2007
KitMaker: 182 posts
AeroScale: 65 posts

Posted: Wednesday, June 29, 2011 - 12:12 AM UTC
I'm in with this Academy 1:72 kit:

I have been working on it over the last couple of evenings and this is where I'm at:

Kind of got all excited and sealed it up before I got an shots of the cockpit but there is nothing special happening in there. Build is all OOB.
I have been working on it over the last couple of evenings and this is where I'm at:
Kind of got all excited and sealed it up before I got an shots of the cockpit but there is nothing special happening in there. Build is all OOB.
Bigrip74
Joined: February 22, 2008
KitMaker: 5,026 posts
AeroScale: 2,811 posts
Posted: Wednesday, June 29, 2011 - 06:23 AM UTC
Philip,
I know what you mean, when you are on a roll it is hard to stop and set up that stupid camera. What is your impression of the Academy kit?
Bob
I know what you mean, when you are on a roll it is hard to stop and set up that stupid camera
. What is your impression of the Academy kit?Bob
Dangeroo
#023

Joined: March 13, 2009
KitMaker: 2,058 posts
AeroScale: 67 posts

Posted: Wednesday, June 29, 2011 - 07:48 AM UTC
Quoted Text
Stefan,
Interesting subject for your P40 build, A29-113 it has been disputed over the colour of the 'U' code [which should be a pale blue with a white outline], for many years and the Allied flags should be on both sides of the lower cowling.
Sqn Ldr Cresswell when C.O of 77 Sqn RAAF with this aircraft is credited with shooting down the first Japanese aircraft over the Australian Mainland on 23/11/'42 [this aircraft's service life was 3 weeks short of 12 months]
A little of it's history of A29-113 can be found at http://adf-serials.com
{RAAF Series 2 is the menu to look into, on the Kittyhawk}
I hope this pic is of some help in regard to 113.
The camo scheme on this is RAAF Earth / Foliage Green over RAAF Sky Blue
Thanks Rob for the background info! Though I have a couple of books on the P-40, I have none in particular on the RAAF, so thanks for that!
Bob, I hope you're not expecting too much, but thanks for the advance praise...
Leo, Eetu and Damian, great work on your kits, there's lots to learn for a flying newbie/returnee in this campaign!
Philipp, your kit looks familiar...
I think the only difference to mine are the instructions and decals, at least all the small parts four the M are included in my kit.Now I've hat a steep learning curve, first scribing of panel lines, first real smoothing out of putty (thanks to my flex file!) and first masking of the canopy (that took a bl**dy long time!). My last plane was a P-51B and the canopy was hand painted on that one...
So here are some pics before the painting stage which will hopefully start this week:


Cheers!
Stefan
Philippus
Joined: March 13, 2007
KitMaker: 182 posts
AeroScale: 65 posts
Posted: Wednesday, June 29, 2011 - 09:43 PM UTC
I'm quite enjoying this build, seems to go together well enough.

Next step add some filler to the wing roots.


This is RAF Hendon's example of a P-40N. I'm painted the kit up as one very similar to that but making it a P-40M as shown in the Academy Instructions.
Thanks,
Philip
Next step add some filler to the wing roots.
This is RAF Hendon's example of a P-40N. I'm painted the kit up as one very similar to that but making it a P-40M as shown in the Academy Instructions.
Thanks,
Philip
Bigrip74
Joined: February 22, 2008
KitMaker: 5,026 posts
AeroScale: 2,811 posts
Posted: Thursday, June 30, 2011 - 05:27 AM UTC
@ Stefan: yep I expect a lot out of your build hey you are doing fine and with the scribing and the feather sanding great job.
Bob
hey you are doing fine and with the scribing and the feather sanding great job.Bob
Emeritus
Joined: March 30, 2004
KitMaker: 2,845 posts
AeroScale: 1,564 posts
Posted: Tuesday, July 05, 2011 - 08:47 AM UTC
Soon ready for priming:

The fit of the wings and stabilisers was good, only a few small spots needed a dab of putty. The moulded-in solid navigation lights have been cut off and holes drilled for the separate clear parts included in the kit. I wonder why they didn't mould in the just mounting holes in the first place instead of the solid lights...?
The fit of the wings and stabilisers was good, only a few small spots needed a dab of putty. The moulded-in solid navigation lights have been cut off and holes drilled for the separate clear parts included in the kit. I wonder why they didn't mould in the just mounting holes in the first place instead of the solid lights...?
Bigrip74
Joined: February 22, 2008
KitMaker: 5,026 posts
AeroScale: 2,811 posts
Posted: Tuesday, July 05, 2011 - 08:04 PM UTC
Eetu, maybe the clear parts were an after thought  never know with the kit manufactures.
Bob
never know with the kit manufactures.Bob
 |

WEB HOSTING BY


Copyright ©2021 AeroScale and Kitmaker Network, a subsidiary of Silver Star Enterprises
All Rights Reserved. Please read our Conditions of Use and Privacy Policy.
All Rights Reserved. Please read our Conditions of Use and Privacy Policy.