

Bob, thats awesome! Love it.
Great work being done in here.
Air Campaigns
Want to start or join a group build? This is where to start.
Want to start or join a group build? This is where to start.
Hosted by Frederick Boucher, Michael Satin
Official BF 109 Campaign

ShawnM

Joined: November 24, 2008
KitMaker: 564 posts
AeroScale: 510 posts

Posted: Monday, May 03, 2010 - 04:38 AM UTC

paultoz

Joined: December 29, 2005
KitMaker: 22 posts
AeroScale: 8 posts

Posted: Tuesday, May 04, 2010 - 02:55 PM UTC
So, just to prove that I have been doing something...here's some photos of the Me109F Trop as things come along. So here's a couple of it basically built and unpainted.


Now a couple with the RLM02 on


Then finally a couple with the sand colour..I forget which RLM it is


Next is a bunch of touch up to do.
Paul
Now a couple with the RLM02 on
Then finally a couple with the sand colour..I forget which RLM it is
Next is a bunch of touch up to do.
Paul

SGTJKJ

#041

Joined: July 20, 2006
KitMaker: 10,069 posts
AeroScale: 3,788 posts

Posted: Tuesday, May 04, 2010 - 08:33 PM UTC
Nice progress, Paul. Nice desert scheme.
Looking forward to see more.
Looking forward to see more.


Emeritus

Joined: March 30, 2004
KitMaker: 2,845 posts
AeroScale: 1,564 posts

Posted: Wednesday, May 05, 2010 - 12:56 AM UTC
Nice progress going on and some really fine finished entries too! 
I made a bit of a start on my entry this week. So, it'll be Hasegawa's 1:48 scale G-14 built as a Finnish G-6 with the help of a bunch of AM goodies as well as (obviously) new decals.


With the two types of canopies supplied in the kit and an earlier type tail kindly donated by a fellow modeler, the list of possible subjects is a long one (I might be mistaken, but I think any Finnish G-6 could be depicted with these parts).
I'm not 100% sure yet of what plane I'm going to do though. But in any case, I'll need to go shopping for some more decals, as the AML sheet doesn't have any stencils, I'm not too keen on using the kit-supplied ones, and the Aeromaster sheet, although looking very nice, is lacking some prominent markings like the trim tab warning texts for example.
I started off by removing almost all parts from the sprues; can't remember the last time I started a build like that. And like almost all aircraft kits, started from the cockpit.


While there were no serious flaws in the Aires' resin parts, it's clear the moulds had been around for a while when my sample was cast. Well, perhaps the gunsight, the inner side of that is somewhat messed up, but that doesn't matter anyway, since it's a Revi 12 unsuited for the G-6 (at least by default) and will be replaced with a Quickboost Revi 16.
The cockpit floor seemed to have warped a bit (angled upward) on the right side and didn't want to line up correctly with the corresponding sidewall. As the floor's very slight misalignment won't be visible on the finished model, I just trimmed the sidewall instead of trying to correct the warp.
I'm not sure if it's me or the parts, but the box on the right sidewall interfered with the rudder pedals, requiring again some trimming for a good fit.
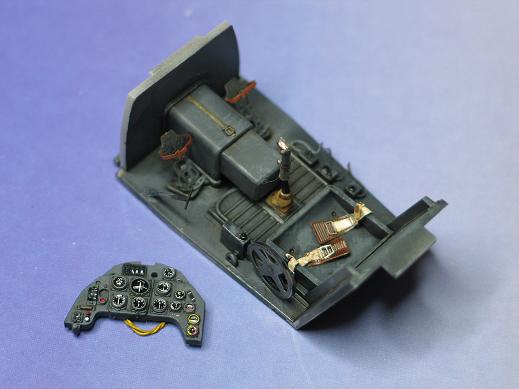
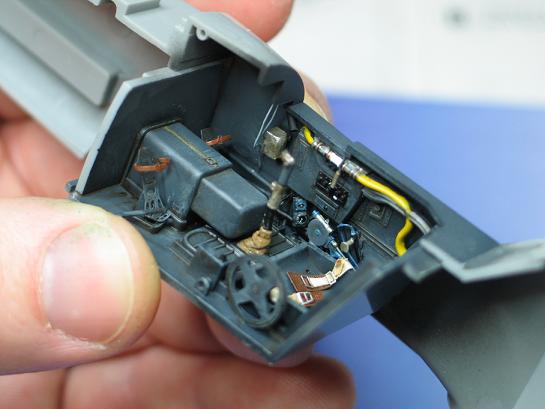
While the fit of the resin cockpit appears to be good and should present no problems, I found myself wondering why the folks at Aires didn't take advantage of the locating ledges moulded to the fuselage halves by the cockpit floor a bit longer to rest on the locators. (circled in the pic -->)

Instrument panel under construction:

Pretty basic aftermarket stuff here. A piece of thin styrene sheet was used to get the panel smooth and level for the PE parts. I would prefer the acetate film part going under the main panel to be as large as the panel though. Gotta dig some leftover film from the spares box now to get a level back surface for gluing, you know.
And to close this first WIP post of mine, here's most of the landing gear parts being worked on as well as the Ultracast resin parts.

The wheels seem to have been designed to fit Hasegawa kits, as they fit perfectly. I like!
And in case you're wondering, the second exhaust isn't defective, I broke it myself after misjudging the thickness of the pour stub and the thinness of the exhaust backing plate (and rushed with side cutters). Fortunately it snapped cleanly in two, so it's only a matter of painting the two pieces separately. No need to try gluing it back together.

Ps. Btw, has anybody mentioned the obvious campaign theme song, "109" by Bathory yet?
I made a bit of a start on my entry this week. So, it'll be Hasegawa's 1:48 scale G-14 built as a Finnish G-6 with the help of a bunch of AM goodies as well as (obviously) new decals.
With the two types of canopies supplied in the kit and an earlier type tail kindly donated by a fellow modeler, the list of possible subjects is a long one (I might be mistaken, but I think any Finnish G-6 could be depicted with these parts).
I'm not 100% sure yet of what plane I'm going to do though. But in any case, I'll need to go shopping for some more decals, as the AML sheet doesn't have any stencils, I'm not too keen on using the kit-supplied ones, and the Aeromaster sheet, although looking very nice, is lacking some prominent markings like the trim tab warning texts for example.
I started off by removing almost all parts from the sprues; can't remember the last time I started a build like that. And like almost all aircraft kits, started from the cockpit.
While there were no serious flaws in the Aires' resin parts, it's clear the moulds had been around for a while when my sample was cast. Well, perhaps the gunsight, the inner side of that is somewhat messed up, but that doesn't matter anyway, since it's a Revi 12 unsuited for the G-6 (at least by default) and will be replaced with a Quickboost Revi 16.
The cockpit floor seemed to have warped a bit (angled upward) on the right side and didn't want to line up correctly with the corresponding sidewall. As the floor's very slight misalignment won't be visible on the finished model, I just trimmed the sidewall instead of trying to correct the warp.
I'm not sure if it's me or the parts, but the box on the right sidewall interfered with the rudder pedals, requiring again some trimming for a good fit.
While the fit of the resin cockpit appears to be good and should present no problems, I found myself wondering why the folks at Aires didn't take advantage of the locating ledges moulded to the fuselage halves by the cockpit floor a bit longer to rest on the locators. (circled in the pic -->)
Instrument panel under construction:
Pretty basic aftermarket stuff here. A piece of thin styrene sheet was used to get the panel smooth and level for the PE parts. I would prefer the acetate film part going under the main panel to be as large as the panel though. Gotta dig some leftover film from the spares box now to get a level back surface for gluing, you know.
And to close this first WIP post of mine, here's most of the landing gear parts being worked on as well as the Ultracast resin parts.
The wheels seem to have been designed to fit Hasegawa kits, as they fit perfectly. I like!
And in case you're wondering, the second exhaust isn't defective, I broke it myself after misjudging the thickness of the pour stub and the thinness of the exhaust backing plate (and rushed with side cutters). Fortunately it snapped cleanly in two, so it's only a matter of painting the two pieces separately. No need to try gluing it back together.
Ps. Btw, has anybody mentioned the obvious campaign theme song, "109" by Bathory yet?

thegirl
Joined: January 19, 2008
KitMaker: 6,743 posts
AeroScale: 6,151 posts
Posted: Thursday, May 06, 2010 - 02:20 AM UTC
Not a bad start Eetu ! This will be a cool build follow , nice resin parts for the pit .
Emeritus
Joined: March 30, 2004
KitMaker: 2,845 posts
AeroScale: 1,564 posts
Posted: Monday, May 10, 2010 - 02:29 AM UTC
Thanks.
Now with the first splash of color on it, Xtracrylics RLM066, all the details stand out much better.

Next there'll be a dark wash to accent the details, some drybrushing, picking out the details and adding some wear & tear.
Working on the wings, I scribed the needed additional panel to the top of the wings as indicated in the instructions as well as glued the wheels bumps in place. As the whole line of Hasegawa's F/G/K kits share the same wing components, the roof of the wheel well is moulded smooth, leaving it to the modeler to carve the required dents for later types having wing bumps to accommodate larger size wheels.

After filling and sanding smooth the wing bump locator holes, I held up the wing parts agaisnt a table lamp and marked the shape of the dent to the wheel well roof with a pencil, followed by scraping with a curve blade to produce the said dents. Before joining the wing halves, I'll add some mode details to the wells.
With the blast tube protruding from the spinner appearing too small in diameter, I drilled out the hole larger and glued in a piece of a ferrule component.
Before:

After:

Looks much better when compared to the real thing I think.

Now with the first splash of color on it, Xtracrylics RLM066, all the details stand out much better.
Next there'll be a dark wash to accent the details, some drybrushing, picking out the details and adding some wear & tear.
Working on the wings, I scribed the needed additional panel to the top of the wings as indicated in the instructions as well as glued the wheels bumps in place. As the whole line of Hasegawa's F/G/K kits share the same wing components, the roof of the wheel well is moulded smooth, leaving it to the modeler to carve the required dents for later types having wing bumps to accommodate larger size wheels.
After filling and sanding smooth the wing bump locator holes, I held up the wing parts agaisnt a table lamp and marked the shape of the dent to the wheel well roof with a pencil, followed by scraping with a curve blade to produce the said dents. Before joining the wing halves, I'll add some mode details to the wells.
With the blast tube protruding from the spinner appearing too small in diameter, I drilled out the hole larger and glued in a piece of a ferrule component.
Before:
After:
Looks much better when compared to the real thing I think.

jaypee

Joined: February 07, 2008
KitMaker: 1,699 posts
AeroScale: 1,384 posts

Posted: Monday, May 10, 2010 - 11:12 AM UTC
That looks too real, stop pointing it at people Eetu. My first instinct is stick down and hard left when I see that!
All the work is looking great.
Masked and sprayed the wing markings for the Legion Condor Emil.
Still can't decide between 6.109 or 6.111. Must make up mind before I make the propellor.


All the work is looking great.
Masked and sprayed the wing markings for the Legion Condor Emil.
Still can't decide between 6.109 or 6.111. Must make up mind before I make the propellor.

afern401
Joined: October 06, 2009
KitMaker: 34 posts
AeroScale: 22 posts
Posted: Monday, May 10, 2010 - 01:46 PM UTC
Hey gang, the 109s are looking great. I was wondering if anyone has read Osprey Publishing's Modelling the Me Bf 109 B/C/D/E or Modelling the Me Bf 109? Any comments on either? Does the book that covers 109s in general go into lots of detail about modelling the different variations? Which aircraft type is covered the most in the B/C/D/E book? Sorry if I hijacked the thread, but I wasnt sure where else to post this. Thanks for any feedback, keep up the great work!!

doubtingthomas
Joined: March 17, 2009
KitMaker: 156 posts
AeroScale: 153 posts
Posted: Monday, May 10, 2010 - 03:34 PM UTC
Hello Terri and company-
Great work by all, but I'll particularly single out the WIP by Damian and Hermann on this page. Damian- we're working on the same pit, so your pictures were inspiring.
I don't have much time to model or take photos, so here's my 1:32 Hasegawa Bf109G-14 pit after 2 weeks' effort on-and-off. I added the requisite PE items, and scratchbuilt a few minor details here and there.
More later...I'm Sloooooow. (and spending too much time seeing what the rest of you are doing!
SGTJKJ
#041
Joined: July 20, 2006
KitMaker: 10,069 posts
AeroScale: 3,788 posts
Posted: Tuesday, May 11, 2010 - 01:26 AM UTC
Wow! Great cockpit, Tom. Looks really nice.
Looking forward to see more - in a couple of weeks
Looking forward to see more - in a couple of weeks

AussieReg
#007

Joined: June 09, 2009
KitMaker: 8,156 posts
AeroScale: 3,756 posts
Posted: Tuesday, May 11, 2010 - 01:46 AM UTC
Quoted Text
Hello Terri and company-
Great work by all, but I'll particularly single out the WIP by Damian and Hermann on this page. Damian- we're working on the same pit, so your pictures were inspiring.
Thanks Tom. I get my inspiration from pretty much everybody else on this forum, so it's nice to be able to give back a bit as well.
Your office looks great, the extra PE bits and pieces take it to the next level. Keep it up !!
Cheers, D

thegirl
Joined: January 19, 2008
KitMaker: 6,743 posts
AeroScale: 6,151 posts
Posted: Tuesday, May 11, 2010 - 02:26 AM UTC
Wow , you guy's sure don't dissapoint on the work being constructed ! Well done everyone so far .
I have been busy with my FE-8 build of late , but will have some progress pic's up soon . I have some caps in the wing root area which need filling with card . Almost at the priming stage so more to come soon
I have been busy with my FE-8 build of late , but will have some progress pic's up soon . I have some caps in the wing root area which need filling with card . Almost at the priming stage so more to come soon
AussieReg
#007
Joined: June 09, 2009
KitMaker: 8,156 posts
AeroScale: 3,756 posts
Posted: Tuesday, May 11, 2010 - 02:53 AM UTC
Hi all. Wings are on my G-10. The resin horizontal stabilizers are from Master Details.


Cheers, D
Cheers, D

FloydWerner
Joined: February 19, 2006
KitMaker: 144 posts
AeroScale: 141 posts
Posted: Wednesday, May 12, 2010 - 05:41 AM UTC
I'm at the paint stage. Here is the pre-shading applied. I hope to finish up the painting by the weekend.
Floyd

Floyd

Philippus

Joined: March 13, 2007
KitMaker: 182 posts
AeroScale: 65 posts

Posted: Wednesday, May 12, 2010 - 06:29 AM UTC
Hi all my 1:72 Tamiya 109 E-3 is moving on nicely even with the couple of disasters ive had!

More to follow soon!
Thanks,
Philip
More to follow soon!
Thanks,
Philip

Bigrip74
Joined: February 22, 2008
KitMaker: 5,026 posts
AeroScale: 2,811 posts

Posted: Wednesday, May 12, 2010 - 06:53 AM UTC
Ok! Damian, I am impressed. Nice build going on there.
Bob
Bob

hkopper
Joined: March 01, 2008
KitMaker: 529 posts
AeroScale: 340 posts
Posted: Thursday, May 13, 2010 - 11:42 AM UTC
Here is a quick update to the cockpit. I've finished with most of the weathering (consisting mainly of pin oil based washes and dry brushing some of the raised parts with tamiya flat aluminum). I feel that I should have the fuselage halves joined in the near future.


Here is the engine mostly built and primed. It will receive a coat of semi gloss black.


Thanks for watching,
Hermann.
Here is the engine mostly built and primed. It will receive a coat of semi gloss black.
Thanks for watching,
Hermann.
Bigrip74
Joined: February 22, 2008
KitMaker: 5,026 posts
AeroScale: 2,811 posts
Posted: Thursday, May 13, 2010 - 01:05 PM UTC
Hermann, WOW!!!!!!
Bob
Bob
hkopper
Joined: March 01, 2008
KitMaker: 529 posts
AeroScale: 340 posts
Posted: Thursday, May 13, 2010 - 02:11 PM UTC
Paul, top job on painting your Bf 109! I've always been a big fan of the tropical colour scheme.
Terri, Damian and Tom: excellent work with the cockpit ..the weathering and paint work is very convincing.
There are too many great builds going on at once to single one out. Excellent job everyone!
Hermann.
Terri, Damian and Tom: excellent work with the cockpit ..the weathering and paint work is very convincing.
There are too many great builds going on at once to single one out. Excellent job everyone!
Hermann.

werx07
Joined: February 21, 2010
KitMaker: 26 posts
AeroScale: 24 posts
Posted: Thursday, May 13, 2010 - 06:50 PM UTC
Wow, a lot of great builds in here. Here's my start. It's a True Details cockpit with some modifications with the Eduard PE set. There's some unsightly areas because of the surgery but it will be hidden once closed up.


hkopper
Joined: March 01, 2008
KitMaker: 529 posts
AeroScale: 340 posts
Posted: Friday, May 14, 2010 - 01:19 PM UTC
Here are a few pix of the WIP engine:


Thanks for watching,
Hermann,
Thanks for watching,
Hermann,
AussieReg
#007
Joined: June 09, 2009
KitMaker: 8,156 posts
AeroScale: 3,756 posts
Posted: Friday, May 14, 2010 - 04:13 PM UTC
Jason, your office is coming along great.
Hermann, your engine looks really nice. excellent detail.
Cheers, D
Hermann, your engine looks really nice. excellent detail.
Cheers, D
paultoz
Joined: December 29, 2005
KitMaker: 22 posts
AeroScale: 8 posts
Posted: Saturday, May 15, 2010 - 03:36 PM UTC
As others have said, there's some very nice builds going on here. 
I have now added all the 'small stuff' to the Me109F. Since the photo the gloss coat has been added. Nothing today though as I am worn out from gardening in the heat. Next are decals, weathering and flat coat. Might be finished by next weekend!

Paul
I have now added all the 'small stuff' to the Me109F. Since the photo the gloss coat has been added. Nothing today though as I am worn out from gardening in the heat. Next are decals, weathering and flat coat. Might be finished by next weekend!
Paul
Bigrip74
Joined: February 22, 2008
KitMaker: 5,026 posts
AeroScale: 2,811 posts
Posted: Saturday, May 15, 2010 - 08:33 PM UTC
@ Hermann: the engine is comming to life.
@ Paul: your camo is looking good.
I decided to throw some base color at my cockpit and it will need more before painting the details. It has been fun to be able to finally sit at the bench and play with some plastic.

Bob
@ Paul: your camo is looking good.
I decided to throw some base color at my cockpit and it will need more before painting the details. It has been fun to be able to finally sit at the bench and play with some plastic.

Bob

akhilleus
Joined: January 28, 2003
KitMaker: 28 posts
AeroScale: 27 posts
KitMaker: 28 posts
AeroScale: 27 posts
Posted: Sunday, May 16, 2010 - 02:12 AM UTC
Great campaign with great builds, gratz all.
Here is mine


I finished cockpit yesterday.


I repainted some cockpit details before close fuselage.
And final picture;

Here is mine
I finished cockpit yesterday.
I repainted some cockpit details before close fuselage.
And final picture;
 |

WEB HOSTING BY


Copyright ©2021 AeroScale and Kitmaker Network, a subsidiary of Silver Star Enterprises
All Rights Reserved. Please read our Conditions of Use and Privacy Policy.
All Rights Reserved. Please read our Conditions of Use and Privacy Policy.