Washington, United States
Joined: August 03, 2008
KitMaker: 436 posts
AeroScale: 69 posts
Posted: Monday, April 12, 2010 - 11:22 AM UTC
Shawn,
Nice one!!!!

But did they really use metal flake blue????

Waiting for more shots..... I am still planting grass and watching the rain clouds come in. Ok anyway, I don't have the paint yet for the camo....
Again, a nice one.... hope mine looks as good....
Bob

Missouri, United States
Joined: November 24, 2008
KitMaker: 564 posts
AeroScale: 510 posts
Posted: Monday, April 12, 2010 - 11:58 AM UTC
Nothing quite like getting lost in plastic
On the bench:Revell 1/48 P-38 Lightning built as an F-5B
Next:??
Missouri, United States
Joined: November 24, 2008
KitMaker: 564 posts
AeroScale: 510 posts
Posted: Monday, April 12, 2010 - 12:03 PM UTC
spinner cooling ring is a handsfree cell phone speaker
exhaust stubs are 2.5mm crimping beads
misc PE bits on the blower
scratch built items:
SC scoop
exhaust panels
rear bulk head
tail wheel
main gear doors
Fun build, would like to do another but I have a corsair beckoning!
Nothing quite like getting lost in plastic
On the bench:Revell 1/48 P-38 Lightning built as an F-5B
Next:??
Texas, United States
Joined: February 22, 2008
KitMaker: 5,026 posts
AeroScale: 2,811 posts
Posted: Monday, April 12, 2010 - 12:45 PM UTC
Shawn, you are a class act. This is a beautiful Messachmitt, and that stand is outrageous. By the way how much did the stand set you back? Now all we need is for Bob to finish his Messaschmitt to give you a wing man

Guys great jobs.
Bob
If it aint broke dont fix it.
Missouri, United States
Joined: November 24, 2008
KitMaker: 564 posts
AeroScale: 510 posts
Posted: Monday, April 12, 2010 - 01:00 PM UTC
thanks Bob

I was hoping someone would notice the stand.

It is one of two I was given last monday on my b-day, I figured it was fitting for my build.
Nothing quite like getting lost in plastic
On the bench:Revell 1/48 P-38 Lightning built as an F-5B
Next:??
Alberta, Canada
Joined: January 19, 2008
KitMaker: 6,743 posts
AeroScale: 6,151 posts
Posted: Thursday, April 15, 2010 - 01:48 PM UTC
I love it Shawn ! Turned out very well and a nice shade of blue to boot

Missouri, United States
Joined: November 24, 2008
KitMaker: 564 posts
AeroScale: 510 posts
Posted: Thursday, April 15, 2010 - 02:54 PM UTC
Thanks Terri, and thank you for letting me join in!

Nothing quite like getting lost in plastic
On the bench:Revell 1/48 P-38 Lightning built as an F-5B
Next:??
Washington, United States
Joined: August 03, 2008
KitMaker: 436 posts
AeroScale: 69 posts
Posted: Thursday, April 15, 2010 - 04:31 PM UTC
Shawn,
Nice one..... will miss watching your build.... Nice tail wheel also...
Finally got decent weather to paint, but found I don't have any aircraft paints... even if it is a cartoon aircraft I don't thing Panzer Gray or an Ambush Scheme would go over real well...

Later, Bob
AussieReg
 Associate Editor
#007
Victoria, Australia
Joined: June 09, 2009
KitMaker: 8,156 posts
AeroScale: 3,756 posts
Posted: Thursday, April 15, 2010 - 05:15 PM UTC
Quoted Text
of all the toon things on this...you ask about the metal flake?
Well Shawn, you did such an excellent job of scratchbuilding everything else to the EXACT original dimensions, the metal-flake blue is really the only thing that looks even vaguely out of place.
Super job mate, I love it !! And happy birthday for Monday, you snuck that one past us, didn't you ??
Cheers, D
ON the bench
Revell 1/24 '53 Corvette (building as '54)
Revell 1/24 BMW 507 Coupe and Cabrio
Italeri 1/48 Me262 B-1a/U1 Nightfighter
Monogram 1/24 '57 Chevy Nomad
Dragon 1/350 USS Frank Knox DD-742
Missouri, United States
Joined: November 24, 2008
KitMaker: 564 posts
AeroScale: 510 posts
Posted: Friday, April 16, 2010 - 01:27 AM UTC
OK D, I acquiesce you're correct.....I think I made it metal flake to make it less serious actually. I found myself at one point considering a total scratch build of the tail surfaces....not what I wanted to do for this build.
Bob, I will be watching to see how all the builds in here finish up, some great creativity and crafts(wo)men in here. I ALMOST did a panzer grey one...almost.
I will be building again very shortly in the Oragami Campaign. Im doing an original issue Revell 1/32 Corsair, but tarping the engine and canopy (sine both areas lack out of the box) so it will be a full underside (gear, bays, wing roots) detail and paint job build. Should be interesting.
Yeah I snuck my b-day by. All I did was work.
Nothing quite like getting lost in plastic
On the bench:Revell 1/48 P-38 Lightning built as an F-5B
Next:??
Maryland, United States
Joined: February 19, 2006
KitMaker: 144 posts
AeroScale: 141 posts
Posted: Saturday, April 17, 2010 - 05:48 AM UTC
Here is what I'm working on the 1/32nd scale Hasegawa Bf-109G-14/AS. I'll be using the markings in the box.

I'll be using the entire Master Caster line, even though the cockpit is designed for G-6 kit. I'll make it work. LOL

The hardest part of the cockpit conversion.

More to follow in the coming days.
Floyd
Missouri, United States
Joined: November 24, 2008
KitMaker: 564 posts
AeroScale: 510 posts
Posted: Saturday, April 17, 2010 - 10:02 AM UTC
wow!
Dramatic use of AM bits. Should be a real stunner when done.
Nothing quite like getting lost in plastic
On the bench:Revell 1/48 P-38 Lightning built as an F-5B
Next:??
Alberta, Canada
Joined: January 19, 2008
KitMaker: 6,743 posts
AeroScale: 6,151 posts
Posted: Sunday, April 18, 2010 - 02:47 AM UTC
Hi Floyd , that is going to be a fantasticlly detail model with the resin sets . Looking forward to this build .
Washington, United States
Joined: February 21, 2010
KitMaker: 26 posts
AeroScale: 24 posts
Posted: Sunday, April 18, 2010 - 09:43 AM UTC
I'll be building this kit.

With this scheme.

I've got some aftermarket resin, PE and decals I'll be using.
Washington, United States
Joined: August 03, 2008
KitMaker: 436 posts
AeroScale: 69 posts
Posted: Sunday, April 18, 2010 - 10:55 AM UTC
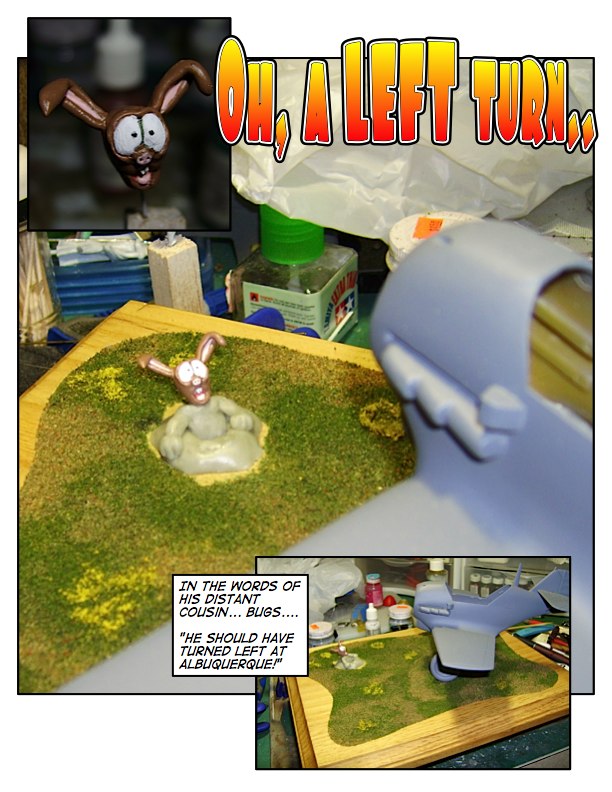
Well, with Shawn's magnificent Messaschnitzel completed I am left to keep the banner flying.... unfortunately, while the weather is fine for painting the paint supply is not. So, I have been working on another element of the build.....
Have you ever had one of those days when nothing seems to go right? Like making a wrong turn in Albuquerque (why always in Albuquerque? Can you imagine how many rabbit tunnels Bugs alone dug under that town?
) But popping up into the path of a taking off aircraft should rate as a really bad day...

My first "real" sculpture for a model........ Will fix the grass after it is painted and put in place....
Bob
AussieReg
Associate Editor #007
Victoria, Australia
Joined: June 09, 2009
KitMaker: 8,156 posts
AeroScale: 3,756 posts
Posted: Sunday, April 18, 2010 - 11:18 AM UTC
Super cool, Bob, I love it. I think that Wabbit might be in deep schnitzel though


(sorry)
ON the bench
Revell 1/24 '53 Corvette (building as '54)
Revell 1/24 BMW 507 Coupe and Cabrio
Italeri 1/48 Me262 B-1a/U1 Nightfighter
Monogram 1/24 '57 Chevy Nomad
Dragon 1/350 USS Frank Knox DD-742
Texas, United States
Joined: January 30, 2006
KitMaker: 1,954 posts
AeroScale: 1,163 posts
Posted: Sunday, April 18, 2010 - 11:26 AM UTC
Quoted Text
I'll be building this kit.
With this scheme.
I've got some aftermarket resin, PE and decals I'll be using.
You realize you have two different types of tails there, right?
your kit shows the late style tall vertical fin while the profile shows the shorter early style one.
just checking...
Washington, United States
Joined: August 03, 2008
KitMaker: 436 posts
AeroScale: 69 posts
Posted: Sunday, April 18, 2010 - 11:27 AM UTC
Thanks Damian.....
The wife collects bunnies, so I figured it was a perfect way to add one to the build.....
That He115 turned out really nicely........ will be interested in how your 109 finishes up...
Bob
Washington, United States
Joined: February 21, 2010
KitMaker: 26 posts
AeroScale: 24 posts
Posted: Sunday, April 18, 2010 - 11:50 AM UTC
Quoted Text
Quoted Text
I'll be building this kit.
With this scheme.
I've got some aftermarket resin, PE and decals I'll be using.
You realize you have two different types of tails there, right?
your kit shows the late style tall vertical fin while the profile shows the shorter early style one.
just checking...
Yes I realize that. The artist put the wrong tail on the profile. It's supposed to be the G-14. Here's another profile pic with the correct tail.

AussieReg
Associate Editor #007
Victoria, Australia
Joined: June 09, 2009
KitMaker: 8,156 posts
AeroScale: 3,756 posts
Posted: Sunday, April 18, 2010 - 11:56 AM UTC
Quoted Text
Thanks Damian.....
The wife collects bunnies, so I figured it was a perfect way to add one to the build.....
That He115 turned out really nicely........ will be interested in how your 109 finishes up...
Bob
Thanks Bob, this is my first 109 and my first 1/32 kit ever, so wish me luck !
BTW, does your wife realise that this bunny is entirely likely to lose the tips of both ears ?? She might not be so keen to allow one of her pets to visit your dio's in future .
Cheers, D
ON the bench
Revell 1/24 '53 Corvette (building as '54)
Revell 1/24 BMW 507 Coupe and Cabrio
Italeri 1/48 Me262 B-1a/U1 Nightfighter
Monogram 1/24 '57 Chevy Nomad
Dragon 1/350 USS Frank Knox DD-742
Missouri, United States
Joined: November 24, 2008
KitMaker: 564 posts
AeroScale: 510 posts
Posted: Sunday, April 18, 2010 - 02:36 PM UTC
excellent wabbit! Love it.
D, this is your first 1/32 build!? I LOVE that scale as 99% of my builds are that size.....my wife hates it.
So much room to work and detail to your hearts content.
Nothing quite like getting lost in plastic
On the bench:Revell 1/48 P-38 Lightning built as an F-5B
Next:??
AussieReg
Associate Editor #007
Victoria, Australia
Joined: June 09, 2009
KitMaker: 8,156 posts
AeroScale: 3,756 posts
Posted: Sunday, April 18, 2010 - 05:34 PM UTC
Quoted Text
excellent wabbit! Love it.
D, this is your first 1/32 build!? I LOVE that scale as 99% of my builds are that size.....my wife hates it.
So much room to work and detail to your hearts content.
Yes Shawn, first 1/32 aircraft ever. I've also made a start on a 1/32 P-47 for "Dressed to Kill." I figured, if I'm gunna go down in flames, might as well make it really bright !!
I grew up doing 1/24 and 1/25 truck kits with Dad, and 1/72 aircraft for myself. Most of my stash now is 1/48 with a couple of 1/72 multi-engines, the above 2 kits plus a P-39 in 1/32, and a VFS P-47 in 1/24.
Terri, just in case you were about to start yelling at me, I threw some paint at the cockpit, interior and wheel bays today. I'll post some pics of the cockpit once it's had some details applied. I'm enjoying this kit a lot, no fit issues and as Shawn said, plenty of room for my big hands to work.
Cheers, D
ON the bench
Revell 1/24 '53 Corvette (building as '54)
Revell 1/24 BMW 507 Coupe and Cabrio
Italeri 1/48 Me262 B-1a/U1 Nightfighter
Monogram 1/24 '57 Chevy Nomad
Dragon 1/350 USS Frank Knox DD-742
Alberta, Canada
Joined: January 19, 2008
KitMaker: 6,743 posts
AeroScale: 6,151 posts
Posted: Monday, April 19, 2010 - 03:33 AM UTC
Love the wabbit ! That is just to cool ! Maybe we should have a toon campaign in the future ?
D , I would never yell at you , might shake a finger though
Texas, United States
Joined: February 22, 2008
KitMaker: 5,026 posts
AeroScale: 2,811 posts
Posted: Monday, April 19, 2010 - 05:18 AM UTC
I would be in for a toon campaign

I know that I have not grown up quite yet

Bob
Quoted Text
Love the wabbit ! That is just to cool ! Maybe we should have a toon campaign in the future ?
D , I would never yell at you , might shake a finger though
If it aint broke dont fix it.
Texas, United States
Joined: January 30, 2006
KitMaker: 1,954 posts
AeroScale: 1,163 posts
Posted: Monday, April 19, 2010 - 06:22 AM UTC
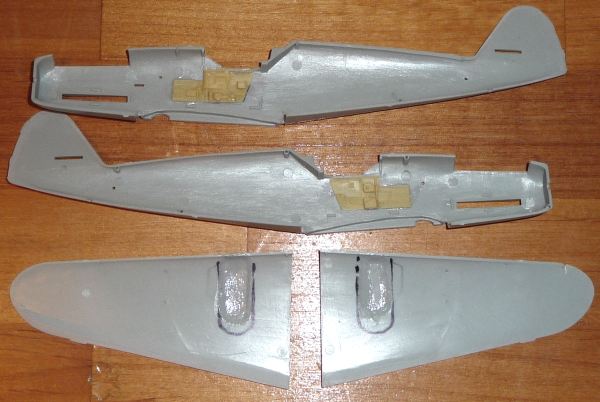
I have managed my initial start on the Hobbycraft 1/48 Avia S-199 I asked about building for this campaign.
this is the kit:

I am pretty sure I'll be building one in Czech service instead of the more commonly modeled Israeli aircraft, but I have not fully decided on that yet.
I am using the Aries resin cockpit set (sidewalls installed) and I have added the fairings for the enlarged landing gear to the upper wing.
I decided to grind out the area under the fairing bulges with a dremel tool so that the wheel wells will show the proper depth. I will have to smooth those areas out with putty and sandpaper before assembling the wings. The ground out areas are glossy because I hit them with liquid plastic glue after grinding to improve the bond of the fairings to the wing.