Air Campaigns
Want to start or join a group build? This is where to start.
Stars of the VVS Official Thread
TedMamere
_VISITCOMMUNITY
Moselle, France
Joined: May 15, 2005
KitMaker: 5,653 posts
AeroScale: 4,347 posts
Posted: Wednesday, August 08, 2007 - 04:07 AM UTC
Hi all!

Nice to have you all on board...

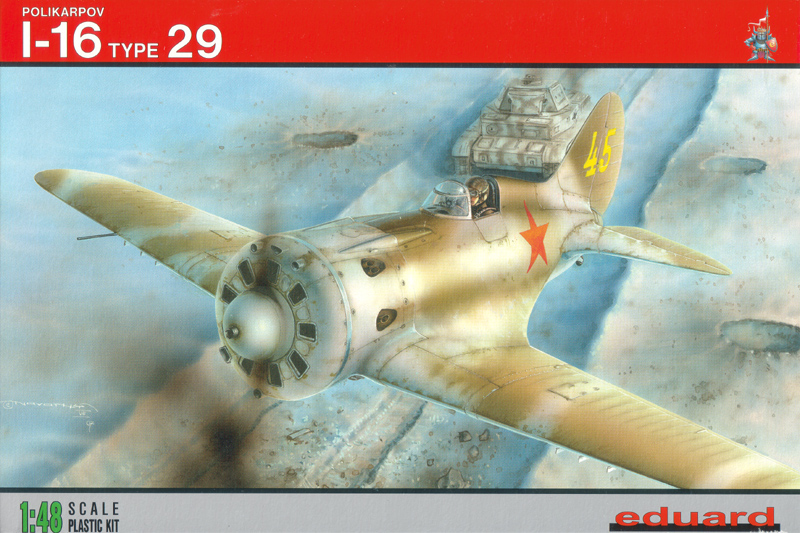
Fabian, don't forget the stars on your I-16!

Jean-Luc
Emeritus
_VISITCOMMUNITY
Uusimaa, Finland
Joined: March 30, 2004
KitMaker: 2,845 posts
AeroScale: 1,564 posts
Posted: Thursday, August 09, 2007 - 09:25 PM UTC
Masks applied.

This being a little older kit with the masks of the older vinyl type, I used them merely as templates for cutting better masks from masking tape. While just passable for flat surfaces, any curves are out of the question.


You know how hard it is to let go it something you've like in the past but has changed into something else?
I was disappointed in that vallejo primer again.
Now this was the newest can I got as a sample, and it seemed to perform better than the older (which produced awfully thick coats and orange peel), but it's still a disappointment. The surface is coarse and I have to sand the surface to prepare it for painting.
I don't what I'm doing wrong. This time I even kept the can in warm water before spraying, in hopes of getting a better finish, in vain.
I guess I'll have to find another brand. If only that mr. surfacer 1000 wasn't so overpriced. While superb, 10€ for a 100ml can is quite expensive. Usually 400ml cans cost around 5-10€....

Fortunately the sanding should be such a big chore, then it's time for the preshading.
_H_Dori
_VISITCOMMUNITY
England - East Anglia, United Kingdom
Joined: November 09, 2006
KitMaker: 295 posts
AeroScale: 276 posts
Posted: Thursday, August 09, 2007 - 10:57 PM UTC
Well I got started on my YAK 9T last night.
First of all apologies as I took pictures but my card or reader does not seem to be functioning so I will be borrowing one of my Dads cameras to take home tonight to re-photograph the project.

I opened the box and took out the rather cheap plastic bag containing the three sprues. (it looks pretty basic) On cutting open the bag and removing the sprues it reminded me of the ICM Mustang I built earlier in the year. That sort of oily feeling plastic instantly I knew I was in for fun.
I really enjoyed building the ICM Mustang and I am really looking forward to the challenge of this Alanger kit. Although the decals are worrying me slightly.
On removing the cockpit parts and fuselage from the sprues I took them to the kitchen and ran a bowl of warm soapy water to wash them. The wings are four main parts all contained on one sprue. Again I washed them.
There seems to be alot of flash and some scary looking sink marks, think I better get to my LHS tomorrow and get some putty.

I must say I'm really looking forward to this build as it is a plane I know little about. Hunting through my old Airplane binders I got when I was a kid I found a section on the Yak 1,3 & 9 and read it all. Interesting stuff I didn't realise how lightly armed these planes were yet how succesful they were.

More to come plus pics.....promise

H
lampie
#029
_VISITCOMMUNITY
England - East Midlands, United Kingdom
Joined: December 23, 2005
KitMaker: 6,249 posts
AeroScale: 3,270 posts
Posted: Friday, August 10, 2007 - 01:29 AM UTC
I thought Id have my Hurricane finished by now,but I have been getting distracted by my pilot figure.Now thats all finished I can get back to aircraft.
Im just about happy with the oil washes. Im painting the canopy a couple of frames at a time because Im hopeless at masking something so small and Ive found that its the easiest way for me personally.Because Ive used enamels on this its become quite a long drawn out process.
When the oil washes are totally dry I'll blend everything together and do some postshading.
Top View

Underside.

Its been a busy week at the bench!


Nige
05Sultan
#037
_VISITCOMMUNITY
California, United States
Joined: December 19, 2004
KitMaker: 2,870 posts
AeroScale: 258 posts
Posted: Friday, August 10, 2007 - 02:39 AM UTC
Well I started my MiG 15 a while back and progress has been made, a little. Cockpit and pilot are done,front half of fuse is together,nose gear well is closed up,and am now doing some rather extensive filling and correcting of the weapon bulges and blending the nose ring to the fuse.
fill,sand,prime.fill,sand,prime.fill,sand,prime.fill,sand,prime.fill,sand,prime.
Modeling is fun,modeling is fun,............back to my 6day War M51
All work I've seen here is splendid! Getting educated on various fighters Mother Russia had in the WW2 [auto-censored]nal.
Cheers!

Note: that would be A-R-S-E-N-A-L !
TedMamere
_VISITCOMMUNITY
Moselle, France
Joined: May 15, 2005
KitMaker: 5,653 posts
AeroScale: 4,347 posts
Posted: Friday, August 10, 2007 - 07:39 PM UTC
Hi all!


Quoted Text

I was disappointed in that vallejo primer again.


Eetu, Carlos Schneerson (csch) has just primed his Mosquito model. You can see it over in the Rumble in the East Asian Sky thread. I think the finish looks very nice. I wonder what primer he used?

Nigel, great progress. It won't be long until you receive your "Golden Wings" badge! The figure in the background looks very nice too!

Howard, I can't wait to see the pictures. The ICM and Alanger kits are the same so be very carefull with the decals. If you can, try to find replacement ones.

Ricky... pictures please!

Jean-Luc
winters1
_VISITCOMMUNITY
Brussels, Belgium
Joined: December 11, 2004
KitMaker: 166 posts
AeroScale: 64 posts
Posted: Friday, August 10, 2007 - 09:13 PM UTC
A little update:

the cockpit ( for so far there is one) mounted on the wings


the fuselage


the instrument panel, you won't see anything of it when it's complete but anyway
Emeritus
_VISITCOMMUNITY
Uusimaa, Finland
Joined: March 30, 2004
KitMaker: 2,845 posts
AeroScale: 1,564 posts
Posted: Friday, August 10, 2007 - 10:39 PM UTC

Quoted Text

Hi all!


Quoted Text

I was disappointed in that vallejo primer again.


Eetu, Carlos Schneerson (csch) has just primed his Mosquito model. You can see it over in the Rumble in the East Asian Sky thread. I think the finish looks very nice. I wonder what primer he used?


Judging from the color, I think that might be mr. surfacer from a spray can.
But that primer problem of mine will be solved soon. I lamented my problem at one Finnish forum and one bloke contacted me and said he could order me some mr. surfacer from HLJ.
The difference in price is unbelievable. The bigger cans where 3,70€, compare that to the 10€ for one small can here (those are 2,46 at HLJ...). Three big cans plus shipping should be around 20€, not a bad price at all.

Oh, I got the primer sanded and the surface is fine now. Just some extra work. Fortunately this plane has a quite smooth exterior.
Tomcat31
#042
_VISITCOMMUNITY
England - North East, United Kingdom
Joined: November 18, 2006
KitMaker: 2,828 posts
AeroScale: 1,720 posts
Posted: Saturday, August 11, 2007 - 03:54 AM UTC

Quoted Text

I was disappointed in that vallejo primer again.

Camogirl and I use automotive primer over here in the UK from a car spares chain of stores called Halfords. They come in grey, white and yellow (although yellow is used for scratch filling) they spray wonderfully and are reasonably priced at £7 for a 500ml can and we have rarely had any problems with them.

Also instead of sanding the primer smooth have you tried lightly rubbing over the dried primer with a fine scotch pad (not sure what it would be called in Finland) which would smooth the paint out rather than remove it.

Hope this helps
Emeritus
_VISITCOMMUNITY
Uusimaa, Finland
Joined: March 30, 2004
KitMaker: 2,845 posts
AeroScale: 1,564 posts
Posted: Saturday, August 11, 2007 - 04:56 AM UTC

Quoted Text


Quoted Text

I was disappointed in that vallejo primer again.

Camogirl and I use automotive primer over here in the UK from a car spares chain of stores called Halfords. They come in grey, white and yellow (although yellow is used for scratch filling) they spray wonderfully and are reasonably priced at £7 for a 500ml can and we have rarely had any problems with them.

Also instead of sanding the primer smooth have you tried lightly rubbing over the dried primer with a fine scotch pad (not sure what it would be called in Finland) which would smooth the paint out rather than remove it.

Hope this helps


In fact, I have a couple of cans of other primers as well. I bought some when I got into trouble with vallejo. One half-empty can of grey primer from a domestic Maston brand and one can of non-filling auto primer I bought at a car paint store, I especially asked the guy if they had something suitable for scale models. I have experimented with both on glossy cardboard and the car paint seems to be working quite well indeed.

I think we have those same scotch pads at grocery stores here in Finland. You mean the coarse foam pads (usually with a lighter and coarser side) used for cleaning kettles and frying pans? I think we might actually have have some. I'll take a look at the cupboards.
Accidentally removing too much paint wasn't a problem. I used 800 grade sandpaper and didn't sand through except for two or three tiny spots.
Damn, I miss vallejo's earlier grey primer, the one that was actually sandish yellowish shade of light grey. That was good stuff. It was good to paint over in about half an hour. It left this peculiar slightly gritty surface, but wiping it with a rigid napkin or tissue smoothed the surface beautifully.
But worries, I got some mr. surfacer coming from Japan and some experimenting to with that car primer. (and my other project currently in progress is a tank so some roughness isn't that bad.
goldstandard
_VISITCOMMUNITY
California, United States
Joined: March 29, 2007
KitMaker: 208 posts
AeroScale: 186 posts
Posted: Saturday, August 11, 2007 - 08:59 AM UTC
Hey Eetu, another option with Mr. Surfacer you can try is to mix the regular stuff that comes in a jar with some lacquer thinner until you get a milky consistency. It can be sprayed though an airbrush which would give you another option for priming.
Emeritus
_VISITCOMMUNITY
Uusimaa, Finland
Joined: March 30, 2004
KitMaker: 2,845 posts
AeroScale: 1,564 posts
Posted: Sunday, August 12, 2007 - 05:03 AM UTC
Yes, that's an option. To my knowledge, the spray can stuff is exactly the same thing in a different package.
While the regular thicker bottled stuff is more expensive where like the spray (around 4€ a bottle), it would be still much more economic than buying spray cans of it. It's just that I would rather stay away from fiddling with harsher thinners and the like. Spray cans are just so convenient for priming.
Emeritus
_VISITCOMMUNITY
Uusimaa, Finland
Joined: March 30, 2004
KitMaker: 2,845 posts
AeroScale: 1,564 posts
Posted: Sunday, August 12, 2007 - 08:14 PM UTC

Yesterday I sprayed the light blue on the undersides. RLM65, how does it look?
Tigerbait
_VISITCOMMUNITY
North Carolina, United States
Joined: September 28, 2005
KitMaker: 347 posts
AeroScale: 179 posts
Posted: Monday, August 13, 2007 - 02:01 AM UTC
Nearing completion. All that's left is the canopy and missiles and she's done. I'll be posting pics later this week (I hope ). I must say that the Trumpy MiG-21 was a pleasure to build. I'll put some work in on my Pacific Campaign planes then I'll try to finish up my 1/48 Academy MiG.
Merlin
Staff MemberSenior Editor
AEROSCALE
#017
_VISITCOMMUNITY
United Kingdom
Joined: June 11, 2003
KitMaker: 17,582 posts
AeroScale: 12,795 posts
Posted: Monday, August 13, 2007 - 02:19 AM UTC
Hi there

Well, Eduard have just kindly sent in this beauty for Review!


So it looks like I might be joining in after all - and with a change of plan from my original potential entry.

All the best

Rowan
Emeritus
_VISITCOMMUNITY
Uusimaa, Finland
Joined: March 30, 2004
KitMaker: 2,845 posts
AeroScale: 1,564 posts
Posted: Monday, August 13, 2007 - 06:41 PM UTC
Okay, now the airframe's all painted up and ready for varnishing and decals.

After digging up some references and comparing my paint samples, I ended up using dark and medium sea grey for the upper camo pattern.
Funny how you sometimes overestimate your skills. I did so on this. I was about to start masking prior to painting the lighter grey, when I got the clever idea of spraying freehand to save time. Really clever!
No, not with these skills yet. The results were quite intetersting (horrible), so I made the lighter grey areas larger than needed, masked up and re-sprayed dark grey to shape up the pattern. For freehand spraying, a tool of some kind would be a must for holding the model in place, holding the model with one hand and airbrushing with the other just won't work. I need both hands for steadiness.
I think I don't have to mention about not saving any time doing that.

If not counting that, painting went very smoothly on this model. No paint floodings, no masking mishaps. (I hope there's no surprises lurking underneath the canopy masks! )
The only thing that could be called problem was a few tiny spots of paint lifting up on the landing flaps, showing bare metal.

This isn't even a problem, more like spontaneous weathering.
In fact, I wish I could do that nice chipping on purpose.
oleander13
_VISITCOMMUNITY
Tennessee, United States
Joined: October 29, 2006
KitMaker: 30 posts
AeroScale: 28 posts
Posted: Wednesday, August 15, 2007 - 08:38 AM UTC
The evil satanic beast which is my wife's cat has made a strafeing run on the airfield where my P-39 was being housed. Not much was recoverable from the beast's onslaught, so looks like the airacobra will be replaced on the front lines by an Eduard Yak-3.

Hopefully the anti-aircraft battery I have installed around the modeling bench will pursuade the evil beast to not meander into bombing range of the Yak-3.

(In other words...cat's suck, and I think they hate plastic models)
TedMamere
_VISITCOMMUNITY
Moselle, France
Joined: May 15, 2005
KitMaker: 5,653 posts
AeroScale: 4,347 posts
Posted: Wednesday, August 15, 2007 - 06:43 PM UTC
Hi Mark!

Sorry to hear about your P-39. Maybe you could use the model as a wrecked aircraft in a diorama.
I'm looking forward to see pictures of your Yak-3 though. I will have to modify the table next time...

Eetu, that camouflage, despite the troubles you had, looks very goog to me!

Rowan, nice one! Knowing what splendid result you achieved with the Type 10 last year I'm sure the type 29 will look fantastic too.

Jean-Luc
winters1
_VISITCOMMUNITY
Brussels, Belgium
Joined: December 11, 2004
KitMaker: 166 posts
AeroScale: 64 posts
Posted: Thursday, August 16, 2007 - 02:12 AM UTC
My I-16 is almost ready to paint, some little parts and some filler here and there.
The kit's plastic is of good quality, it's quite sturdy. You could say that is positive, but if there's so much sanding/modifiying to be done that turns out negative
However I will not be able to build for a week, cause I'm going to France (Dordogne/perigord) with my parents.

greets
Emeritus
_VISITCOMMUNITY
Uusimaa, Finland
Joined: March 30, 2004
KitMaker: 2,845 posts
AeroScale: 1,564 posts
Posted: Thursday, August 16, 2007 - 06:37 AM UTC

Decaling almost done. Only thing missing are the stencils on the upper wing surface and some on the fuselage, where they're applied over other markings. Now there's two coats of future on the wing where the decals go, and one over the fuselage markings.

I've chosen to paint the cowling straps instead of trying the decal strips provided. The bare metal area behind the exhausts is still unpainted as well. This latter requires some carefully applied tape to mask the surroundings. From experience I know that tape will tear up decals even after a coat of future or varnish. Fortunately only the russian slogan is in the way and shouldn't be to hard to sort out.
lampie
#029
_VISITCOMMUNITY
England - East Midlands, United Kingdom
Joined: December 23, 2005
KitMaker: 6,249 posts
AeroScale: 3,270 posts
Posted: Thursday, August 16, 2007 - 08:11 AM UTC
Finished Entry
Finally managed to get this done.( Its been a bit of week)
This is my entry for the Stars Of The VVS Campaign.
Its the 1:72 Hasegawa Red Star Hurricane.


To be honest,its been a bit of a battle from start to finish, and Im quite glad its finally done. Even the ariel wire took at least 6 attempts to get to stay in position.
Straight to the display cabinet for this one,,LOL
Nige
TedMamere
_VISITCOMMUNITY
Moselle, France
Joined: May 15, 2005
KitMaker: 5,653 posts
AeroScale: 4,347 posts
Posted: Thursday, August 16, 2007 - 07:03 PM UTC

Quoted Text

However I will not be able to build for a week, cause I'm going to France (Dordogne/perigord) with my parents.


Hi all!

Fabian, have a nice trip! Maybe you can take your I-16 with you? It should not take away too much space in the pocket... Watch out for the "Foie Gras" and the wine when you will be in Dordogne. I hope you will visit Sarlat which is a beautifull little town.

Eetu, the red stars look very nice over the two tone grey finish!

Nigel, great job! A well deserved ribbon awaits you to reward your from the pain you had with the kit!

Jean-Luc
Blackwulf
_VISITCOMMUNITY
Ohio, United States
Joined: April 20, 2004
KitMaker: 215 posts
AeroScale: 120 posts
Posted: Sunday, August 19, 2007 - 05:24 PM UTC
Hello All,
I will be building the Accurate Miniatures Il-2 Stormovik for this campaign. I intend to make a diorama but may only be able to get the plane built due to a heavy workload. I have completed the cockpit except for a few details and have inserted it into the fuselage which has also been assembled at this time. I have also managed to install the left wing but I do not have any pictures of this just yet. This is my first major build in a long time so I am a little rusty and I am sure there will be things that the perfectionists will find wrong but I just want to get my first completed plane under my belt to stop the long streak of inactivity. The following are some pics from my cockpit. I scratchbuilt the seatbelts using masking tape and it was my first time doing it so they look a little rough-lol. I lightly weathered the inside but the photos make it look heavier than it does in person.


I will be labelling my diorama "Transformation" and hope to show the plane being transformed from the camo scheme with wheels to being white-washed with the skis. (If all goes well!)
Emeritus
_VISITCOMMUNITY
Uusimaa, Finland
Joined: March 30, 2004
KitMaker: 2,845 posts
AeroScale: 1,564 posts
Posted: Thursday, August 23, 2007 - 11:53 PM UTC

There, that was the trickiest thing to mask in the whole kit. That red of the spinner. I went by the rule thumb of painting lightest colors first, and painted the spinner white. When it was drying I realized that it created a masking nightmare. Because of the curves, masking for painting the red portion with straight strips of tape would be impossible. I reasoned that the only way of masking that would be with curved pieces of tape.
More problems ahead! Cutting circles is fun, isn't it? After about half-a-dozen attempts, I was able to cut a suitable shape, which I used. Despite my carefully applied tape markers, the tip masking went fubar. I finally got the problem solved by rolling masking tape around a brush handle, then cutting off a tube of tape with the sticky side in. This was then eyeballed to the spinner and more white sprayed to define the red portion. This time it worked.
Not perfect, but good enough for me.
Now it's time to add a few paint chips to the spinner and props, and then it's time for pastel weathering.
winters1
_VISITCOMMUNITY
Brussels, Belgium
Joined: December 11, 2004
KitMaker: 166 posts
AeroScale: 64 posts
Posted: Sunday, August 26, 2007 - 03:52 AM UTC
Back from France

I-16 is now ready to paint!!