

It's interesting that www.orionminiatures.com have also announced 5 colour day lozenge decals for release very shortly. But it doesn't say what scale, i assume 1/72 like their Staaken decals?
Anyway, the colour examples on their website look amazingly similar to the ones from your American connection that you have shown above.
Andrew
Early Aviation
Discuss World War I and the early years of aviation thru 1934.
Discuss World War I and the early years of aviation thru 1934.
Hosted by Jim Starkweather
Lozenge Camouflage 101

CMOT70

Joined: August 23, 2007
KitMaker: 629 posts
AeroScale: 539 posts
Posted: Wednesday, September 10, 2008 - 09:20 PM UTC

MerlinV
Joined: November 26, 2006
KitMaker: 608 posts
AeroScale: 602 posts

Posted: Wednesday, September 10, 2008 - 10:02 PM UTC
Looks good Stephen,
( I had a look at work, I still cannot see anything that is linked with WWI in plastic from home for some reason... Must be something to do with my settings).
As stated before, I will be in the cue when these go on the market.
Cheers,
Hugh
( I had a look at work, I still cannot see anything that is linked with WWI in plastic from home for some reason... Must be something to do with my settings).
As stated before, I will be in the cue when these go on the market.
Cheers,
Hugh

thegirl

Joined: January 19, 2008
KitMaker: 6,743 posts
AeroScale: 6,151 posts
Posted: Thursday, September 11, 2008 - 02:35 PM UTC
I have a question here . Did all lozenge get really dirty like that or did it depend on the roll of the aircraft ?
Looks good Stephen .
Looks good Stephen .

JackFlash

Joined: January 25, 2004
KitMaker: 11,669 posts
AeroScale: 11,011 posts
Posted: Thursday, September 11, 2008 - 03:14 PM UTC
Quoted Text
I have a question here . Did all lozenge get really dirty like that or did it depend on the roll of the aircraft ?
Looks good Stephen .
Greetings Ms. Terri;
Not dirty, it represents fabric texture. Remember the pattern was printed on at the factory not painted. the fabric weave shadows and thread texture is accountable for the overall effect. Dirt and oils would be confined to specific areas. Above the 4 colour wings have that texture where the fuselage has none at the taking of this image. Here is a bit of help on the subject of texturing lozenge decals. This is also posted in the body of this thread on page 1.
thegirl
Joined: January 19, 2008
KitMaker: 6,743 posts
AeroScale: 6,151 posts
Posted: Friday, September 12, 2008 - 02:50 AM UTC
Okay now I have a better understanding on what you mean by texturing , adding realism to the fabric . Not so much as showing a weathered effect but to get the feeling of a fabric surface . Thanks Stephen !
JackFlash
Joined: January 25, 2004
KitMaker: 11,669 posts
AeroScale: 11,011 posts
Posted: Friday, September 12, 2008 - 07:17 AM UTC
Quoted Text
Okay now I have a better understanding on what you mean by texturing , adding realism to the fabric . Not so much as showing a weathered effect but to get the feeling of a fabric surface . Thanks Stephen !
Thats it!
 Here is the really cool thing about Early Aviation modeling in my book. When you can take a plastic or resin kit and make it look like an in scale version of the real item it is a bit like magic. Slight of hand if you will. It is not so much high gloss vs dull flat, but more the relationship of the different textures - metal vs fabric and noting the differences.
Here is the 4 colour with a bit of texturing.

Below, I had a faux paux to fix. So two patches were laid down before the rib tapes.

thegirl
Joined: January 19, 2008
KitMaker: 6,743 posts
AeroScale: 6,151 posts
Posted: Friday, September 12, 2008 - 02:53 PM UTC
Yes , Stephen I would say that modelling is a art form . To be able to take a plastic kit and apply the paint , parts , PE , resin or what ever we can get or hands on to aid as , having a final product that we are happy with is art ! It's one of a kind , it's unique .
We create it with our own hands and imagination not to mention the creativity .
( gremlins in the machine - I like that one ! )
We create it with our own hands and imagination not to mention the creativity .
( gremlins in the machine - I like that one ! )
JackFlash
Joined: January 25, 2004
KitMaker: 11,669 posts
AeroScale: 11,011 posts
Posted: Tuesday, September 16, 2008 - 09:58 PM UTC
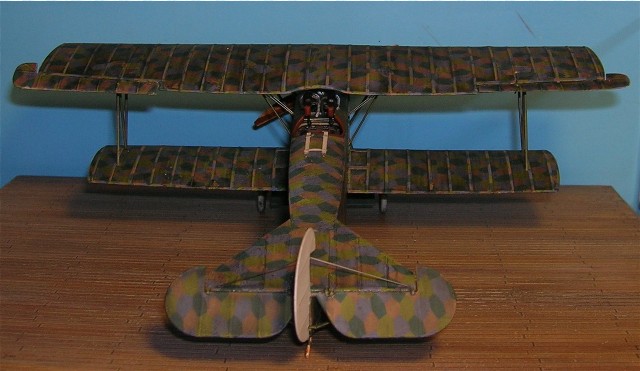
Here is the result of the all-lozenge applications for the American connection four colour. These images are to feature the lozenge without any of the normal BLV type stencils or national markings.
JackFlash
Joined: January 25, 2004
KitMaker: 11,669 posts
AeroScale: 11,011 posts
Posted: Tuesday, September 16, 2008 - 10:14 PM UTC
For your own information. Here is what it takes. I will tally the lozenge in "pieces used" for the simulated fabric covered areas. The 4 & 5 colour lozenge are slightly different widths like the originals. So keeping it to "how many pieces used" will give you the same total picecs used whether it is 4 or 5 colour.
To completely cover a Fokker D.VII in lozenge you will need;
20 pcs for the upper wing & ailerons, upper & lower surfaces.
12 pcs for the lower wing, upper & lower surfaces.
05 pcs for the fuselage, upper & lower surfaces.
08 pcs for the horizontal tail unit (stabilizers & elevators, upper & lower surfaces.
02 pcs for the vertical fin left & right.
04 pcs for the wheel covers.
------------------
51 pieces of lozenge.
For the ribtapes;
28 pcs for the lower wing. (using on piece rib tapes upper & lower surfaces, leading edge, trailing edge and wing tips).
34 pcs for the top wing (using on piece rib tapes upper & lower surfaces, leading edge, trailing edge and wing tips).
-----------------------
64 cut strips of lozenge.
With the surfraces prepainted in a clear gloss, it took me about 4 evenings of 2.5 hours each. With me doing the lower surfaces one night, upper surfaces the next night and rib tapes & edging tapes the next two nights.
JackFlash
Joined: January 25, 2004
KitMaker: 11,669 posts
AeroScale: 11,011 posts
Posted: Tuesday, September 16, 2008 - 10:36 PM UTC
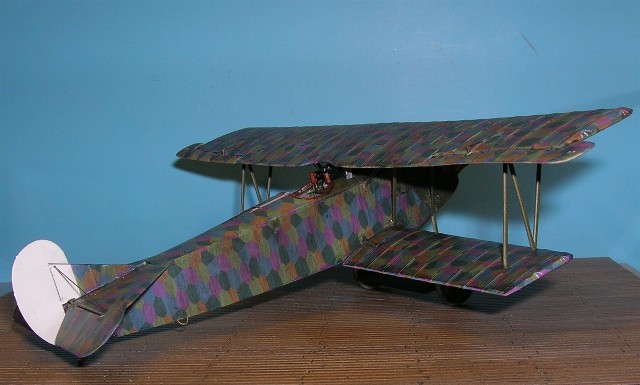
Next, Stay tuned guys & gals for the 5 colour lozenge applications.
JackFlash
Joined: January 25, 2004
KitMaker: 11,669 posts
AeroScale: 11,011 posts
Posted: Wednesday, September 17, 2008 - 09:45 AM UTC
After the 4 colour lozenge applications the other decals that go on this kit are;
08 crosses 02 @ for the upper & lower wing, fuselage and vertical tail.
33 stencils at various locations over the whole kit.
-------------------------------------
41 total national marking & stencil decals.
For a grand total of 106 decal pieces.

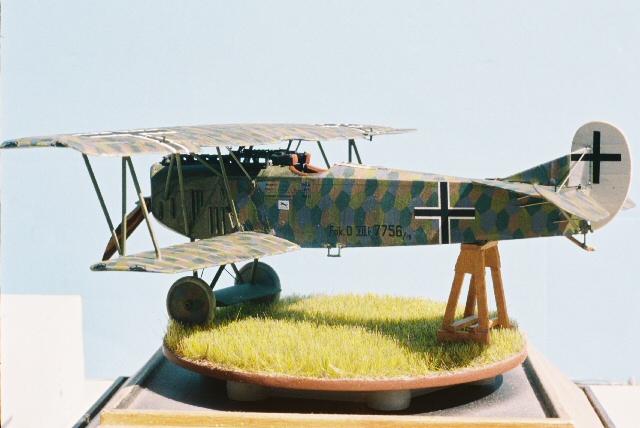
Note in this post war image of Fok. D.VII 7756/18, the original Schwerin built rudder fin / stabilizer has been replaced with an item manufactured by OAW. Note the mismatched original rudder cross with the item on the OAW fin / stabilizer.
08 crosses 02 @ for the upper & lower wing, fuselage and vertical tail.
33 stencils at various locations over the whole kit.
-------------------------------------
41 total national marking & stencil decals.
For a grand total of 106 decal pieces.
Note in this post war image of Fok. D.VII 7756/18, the original Schwerin built rudder fin / stabilizer has been replaced with an item manufactured by OAW. Note the mismatched original rudder cross with the item on the OAW fin / stabilizer.
JackFlash
Joined: January 25, 2004
KitMaker: 11,669 posts
AeroScale: 11,011 posts
Posted: Thursday, September 18, 2008 - 10:29 PM UTC
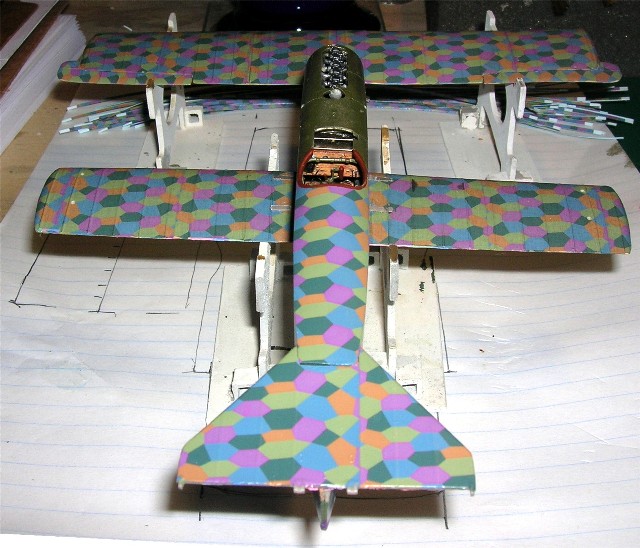
Beginning with the 5 colour. Note the cut lozenge strip under the cradle for the top wing.

jaypee

Joined: February 07, 2008
KitMaker: 1,699 posts
AeroScale: 1,384 posts

Posted: Friday, September 19, 2008 - 12:25 AM UTC
Just re-read this thread (excuse the pun) from the beginning. I've 2 questions for you Stephen, or anyone else who is listening.
1. How wide where the bolts of cloth used? Standard size nowadays is 42 or 60 inches dependent on type of fabric
2. You asked a question to which I don't think there was an answer, "why are there no tapes on the tail piece" care to enlighten these humble folks?
Thanks for such a through explanation on this subject. I feel much more confident to tackle a couple of wee Fokkers now

JackFlash
Joined: January 25, 2004
KitMaker: 11,669 posts
AeroScale: 11,011 posts
Posted: Friday, September 19, 2008 - 08:00 AM UTC
Hello JP!
Seams were sewn factory edge to factory edge using what we know as a "French stitch" (like blue jeans leg seams). There was not any attempt to cover these seams.
The rib tapes were usually attached to portions of the airframe that were wooden. The wood frame of the wing ribs had cotton strips nailed and tacked inplace on the wing rib caps. The fabric covering was applied nailed & sewn in place by hand. The wing was then doped. Then rib tapes were laid over the rib caps / seams and doped to seal them.Tapes were located over the wing ribs and all edges of the fabric covering attached to the wing skeleton. Light blue was used by OAW (Schneidemühl) and Salmon pink and possibly Violet was used by Albatros (Johannistahl) lozenge fabric tapes were used by all three manufacturers of the Fokker D.VII. If the fabric was damaged this attempted to keep the damage from crossing over into other areas between adjacent wings. All aircraft with fabric coverings used them or another form of rib cap was battens.
Quoted Text
1. How wide where the bolts of cloth used? Standard size nowadays is 42 or 60 inches dependent on type of fabric.
Seams were sewn factory edge to factory edge using what we know as a "French stitch" (like blue jeans leg seams). There was not any attempt to cover these seams.
Quoted Text
2. You asked a question to which I don't think there was an answer, "why are there no tapes on the tail unit. . ." Care to enlighten?
The rib tapes were usually attached to portions of the airframe that were wooden. The wood frame of the wing ribs had cotton strips nailed and tacked inplace on the wing rib caps. The fabric covering was applied nailed & sewn in place by hand. The wing was then doped. Then rib tapes were laid over the rib caps / seams and doped to seal them.Tapes were located over the wing ribs and all edges of the fabric covering attached to the wing skeleton. Light blue was used by OAW (Schneidemühl) and Salmon pink and possibly Violet was used by Albatros (Johannistahl) lozenge fabric tapes were used by all three manufacturers of the Fokker D.VII. If the fabric was damaged this attempted to keep the damage from crossing over into other areas between adjacent wings. All aircraft with fabric coverings used them or another form of rib cap was battens.
jaypee
Joined: February 07, 2008
KitMaker: 1,699 posts
AeroScale: 1,384 posts
Posted: Friday, September 19, 2008 - 08:59 AM UTC
Hi Stephen thanks for the quick reply
I get the bit about the tail sections now, there was only an outer framework for the tailplane ,no ribs.
I get why they are stitched factory edge to factory edge too. If cut edges were stiched they would fray quickly, the factory edge is stronger.
The kit I have in mind is an OAW and Roden does give you blue rib tapes so top marks so far to roden.
But what I was really asking is how far from factory edge to factory edge?
i.e how *wide* was the bolt of fabric. Bolts come in all sorts of widths for example a gentlemans suit would be cut from 60'' wide bolt, "if dressed to the nines", a reference to 9 sq yards for a perfect suit. 30 inch bolts might not fit round ones chest A sixty inch bolt would equate to 5/6'' wide strips in 1:72.
How wide are the strips you use when scaled up?
Oh and I assume you work from the wing root outwards. Or from the centre of an upper wing.
I get the bit about the tail sections now, there was only an outer framework for the tailplane ,no ribs.
I get why they are stitched factory edge to factory edge too. If cut edges were stiched they would fray quickly, the factory edge is stronger.
The kit I have in mind is an OAW and Roden does give you blue rib tapes so top marks so far to roden.
But what I was really asking is how far from factory edge to factory edge?
i.e how *wide* was the bolt of fabric. Bolts come in all sorts of widths for example a gentlemans suit would be cut from 60'' wide bolt, "if dressed to the nines", a reference to 9 sq yards for a perfect suit. 30 inch bolts might not fit round ones chest
A sixty inch bolt would equate to 5/6'' wide strips in 1:72. How wide are the strips you use when scaled up?
Oh and I assume you work from the wing root outwards. Or from the centre of an upper wing.
JackFlash
Joined: January 25, 2004
KitMaker: 11,669 posts
AeroScale: 11,011 posts
Posted: Friday, September 19, 2008 - 04:20 PM UTC
The four color fabric was 1320mm plus or minus 10mm wide and the five color fabric was 1350 plus or minus 10mm wide. There was some movement inboard with the seams on the four color fabric. still six panels.
jaypee
Joined: February 07, 2008
KitMaker: 1,699 posts
AeroScale: 1,384 posts
Posted: Saturday, September 20, 2008 - 03:32 AM UTC
magic, thanks stephen, i'll measure up what roden have provided.
Just fantastic stuff from you.
1350mm is about 54'' so not saville row Looking forward to tailoring up the Fokker D.VII for Ms. Terri's stripes campaign.
Just fantastic stuff from you.
1350mm is about 54'' so not saville row
Looking forward to tailoring up the Fokker D.VII for Ms. Terri's stripes campaign.
Mobious
Joined: May 18, 2008
KitMaker: 210 posts
AeroScale: 80 posts
Posted: Saturday, September 20, 2008 - 05:17 PM UTC
Hello Stephen,
Wanted to say thanks for this informative and instructional thread. the wealth of information is amazing. Thanks for sharing and the help.
Best Regards,
Mo
Wanted to say thanks for this informative and instructional thread. the wealth of information is amazing. Thanks for sharing and the help.
Best Regards,
Mo
JackFlash
Joined: January 25, 2004
KitMaker: 11,669 posts
AeroScale: 11,011 posts
Posted: Saturday, September 20, 2008 - 06:24 PM UTC
Greetings JP & Mobious;
Thank you for your kind words.
Thank you for your kind words.
JackFlash
Joined: January 25, 2004
KitMaker: 11,669 posts
AeroScale: 11,011 posts
Posted: Monday, September 22, 2008 - 08:33 AM UTC
Just keeping everyone up to speed. The top images are without texturing. The bottom have texturing.
Hatter50
Joined: June 17, 2006
KitMaker: 478 posts
AeroScale: 391 posts

Posted: Monday, September 22, 2008 - 08:44 AM UTC
Hey Stephen,
How about some higher res photos for us "Close-in" Challenged. I'd really like to see that texturing.
Regards
Steve
How about some higher res photos for us "Close-in" Challenged.
I'd really like to see that texturing. Regards
Steve
thegirl
Joined: January 19, 2008
KitMaker: 6,743 posts
AeroScale: 6,151 posts
Posted: Monday, September 22, 2008 - 09:23 AM UTC
Sorry Stephen but , I'm with Steve on this one . Close up's would be great to show off the effect better .
I'm guess That Eyegore got a hold of your camera , hopefully he'll get that cup of coffee and calm down some !
I'm guess That Eyegore got a hold of your camera , hopefully he'll get that cup of coffee and calm down some !
JackFlash
Joined: January 25, 2004
KitMaker: 11,669 posts
AeroScale: 11,011 posts
Posted: Monday, September 22, 2008 - 10:27 AM UTC
Be patient class more to come.
Hatter50
Joined: June 17, 2006
KitMaker: 478 posts
AeroScale: 391 posts
Posted: Monday, September 22, 2008 - 11:03 AM UTC
Terri,
Me thinks Stephen is toying with us here.....................
Steve
Me thinks Stephen is toying with us here.....................
Steve
thegirl
Joined: January 19, 2008
KitMaker: 6,743 posts
AeroScale: 6,151 posts
Posted: Monday, September 22, 2008 - 12:37 PM UTC
Yah , I think your right , he's planning something ! Not nice to toy with us like that . 
He won't let us down
He won't let us down
 |

WEB HOSTING BY


Copyright ©2021 AeroScale and Kitmaker Network, a subsidiary of Silver Star Enterprises
All Rights Reserved. Please read our Conditions of Use and Privacy Policy.
All Rights Reserved. Please read our Conditions of Use and Privacy Policy.