

Damian, Thanks for your input. Can you share with us a picture or two of the Red Black paint with the straight Black panel lines.
Working slowly but surely on wiring up the 1st engine. With double cylinders it takes just that much longer.
Joel
World War II
Discuss WWII and the era directly before and after the war from 1935-1949.
Discuss WWII and the era directly before and after the war from 1935-1949.
Hosted by Rowan Baylis
GWH 1/48 scale P-61A Black Widow
Joel_W

Joined: December 04, 2010
KitMaker: 11,666 posts
AeroScale: 7,410 posts
Posted: Friday, January 24, 2014 - 10:43 AM UTC


thegirl

Joined: January 19, 2008
KitMaker: 6,743 posts
AeroScale: 6,151 posts
Posted: Friday, January 24, 2014 - 01:04 PM UTC
Quoted Text
Terri, Many years ago, OK, nearly 40 years ago, I tried pastels but never could get the hang of them. Went on fine, but no matter how light a 1st few seal coats I put on, I managed to wash most of it right off.
When you apply your pastels, do you do it dry to just the painted surface, or do you coat the surface 1st?
Would adding a flesh color just give me a slightly different shade of black? Interesting idea, just not sure if the color difference would be enough.
Joel
Hi Joel , pastels can be tricky but those cheap dollar sotes are crap . I use Grumbacher . Been using the same stickys I bought 30 years ago .
For pastels to work the surfaces needs to have a flat finish for the pastel too stick to . With out this they will not adhere to a gloss surface and will wash away once a finish coat is applied . I'll go over this more on the 190 .
Yes , flesh will greatly aid in the gloss black . I will be using this mix for my build which I do have some progress on . Cockpit is ready for paint which should be getting sprayed this weekend with photo's posted up .....
Terri
Joel_W
Joined: December 04, 2010
KitMaker: 11,666 posts
AeroScale: 7,410 posts
Posted: Friday, January 24, 2014 - 01:27 PM UTC
Quoted Text
Quoted TextTerri, Many years ago, OK, nearly 40 years ago, I tried pastels but never could get the hang of them. Went on fine, but no matter how light a 1st few seal coats I put on, I managed to wash most of it right off.
When you apply your pastels, do you do it dry to just the painted surface, or do you coat the surface 1st?
Would adding a flesh color just give me a slightly different shade of black? Interesting idea, just not sure if the color difference would be enough.
Joel
Hi Joel , pastels can be tricky but those cheap dollar sotes are crap . I use Grumbacher . Been using the same stickys I bought 30 years ago .
For pastels to work the surfaces needs to have a flat finish for the pastel too stick to . With out this they will not adhere to a gloss surface and will wash away once a finish coat is applied . I'll go over this more on the 190 .
Yes , flesh will greatly aid in the gloss black . I will be using this mix for my build which I do have some progress on . Cockpit is ready for paint which should be getting sprayed this weekend with photo's posted up ....
Terri
Terri, going to get a basic set of earth tones at a local art shop, and give them a try.
Looking forward to your next update on the FW190.
Joel

md72

#439
Joined: November 05, 2005
KitMaker: 4,950 posts
AeroScale: 3,192 posts

Posted: Friday, January 24, 2014 - 05:02 PM UTC
Joel, FWIW, i picked up a set of 36 pastel sticks at Michaels. I'm guessing they were Christmas leftovers, but at $4.99 for the set I can't have gone to far wrong...

Joel_W
Joined: December 04, 2010
KitMaker: 11,666 posts
AeroScale: 7,410 posts
Posted: Saturday, January 25, 2014 - 08:51 AM UTC
Quoted Text
Joel, FWIW, i picked up a set of 36 pastel sticks at Michaels. I'm guessing they were Christmas leftovers, but at $4.99 for the set I can't have gone to far wrong...
Mark, Thanks for the heads up. I live only a few miles from a Michaels. Off on Sunday, and will be taking a quick trip to see if they still have any.
Joel

AussieReg

#007

Joined: June 09, 2009
KitMaker: 8,156 posts
AeroScale: 3,756 posts
Posted: Saturday, January 25, 2014 - 11:23 PM UTC
Quoted Text
Damian, Thanks for your input. Can you share with us a picture or two of the Red Black paint with the straight Black panel lines?
I will see if I can drag up a couple of photos Joel. I think the last one I did was a monogram P-61 in the Pin-Ups Campaign, but I will be using the same paints on a P-70 which is currently a hangar queen from the recent Nightfighters Campaign. I will make sure I get a few pics as I go.
Cheers, D

Joel_W
Joined: December 04, 2010
KitMaker: 11,666 posts
AeroScale: 7,410 posts
Posted: Sunday, January 26, 2014 - 01:32 AM UTC
Quoted Text
Quoted TextDamian, Thanks for your input. Can you share with us a picture or two of the Red Black paint with the straight Black panel lines?
I will see if I can drag up a couple of photos Joel. I think the las one I did was a monogram P-61 in the Pin-Ups Campaign, but I will be using the same paints on a P-70 which is currently a hangar queen from the recent Nightfighters Campaign. I will make sure I get a few pics as I go.
Cheers, D
Damian,
Thanks. I'm really curious to see just how that paint combination looks. I've seen several black aircraft weathered with lighter gray panel lines, so I just joined the crowd as I liked the overall effect.
Joel
Joel_W
Joined: December 04, 2010
KitMaker: 11,666 posts
AeroScale: 7,410 posts
Posted: Sunday, January 26, 2014 - 05:45 AM UTC
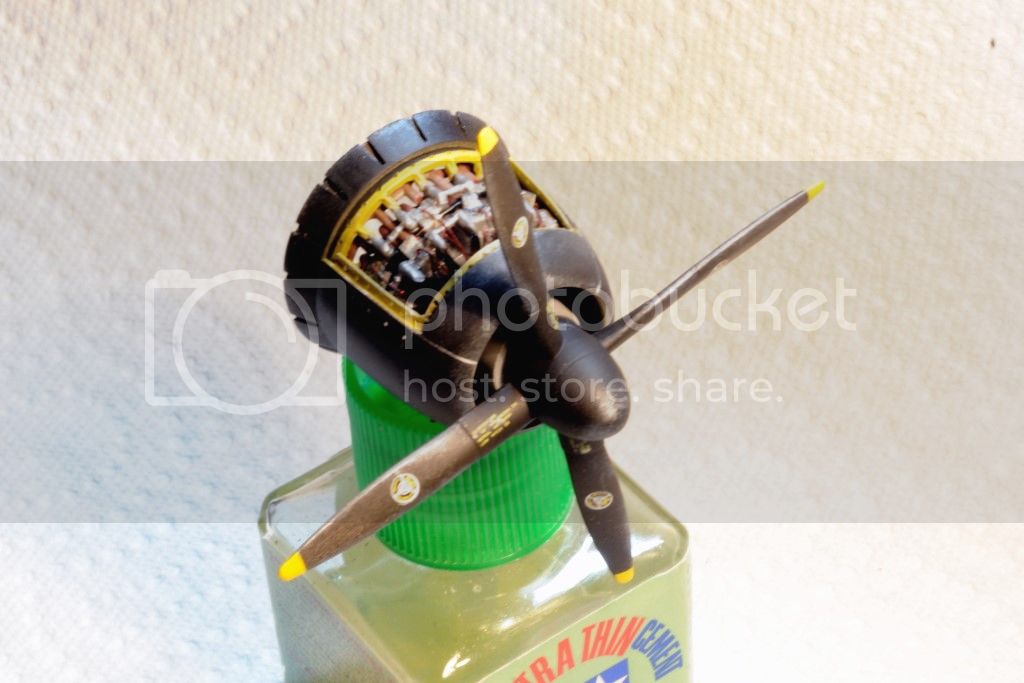
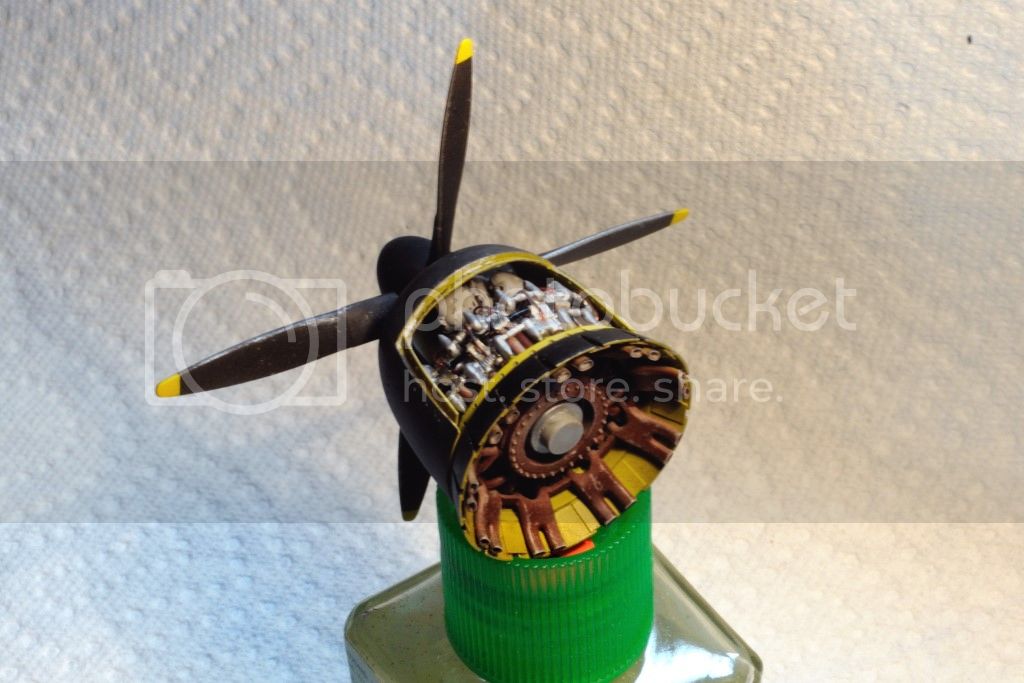
Finally finished the detailing of one engine and cowling assembly. I cut open one of the cowlings engine panels, then added from .040 strip plastic the framing after drilling out the mounting holes. Next I backed up the open cowl flaps with sheet as in real life that's the way they are. After painting all of the various pieces, and then assembling the basic engine, I added the black metal tube which I think houses various electrical wiring for both banks of cylinders. I then cut masking tape to simulate the mounting brackets for the tube and painted it Aluminum. Enamel coated electrical wrap wire was used to simulate the ignition wires on both cylinder banks, then painted hull red. Several enamel washes were then added. The final step was adding the exhaust manifold after the engine was mounted to the cowl assembly.
I've got to congratulate GWH for the most detailed engine I've seen to date in 1/48 scale. Simply outstanding to say the least.
The other engine will be housed in a fully closed cowl, and once the prop/spinner is added, you'll see very little of the front of the engine, so I'm going to take some short cuts with the detailing.
Here's some pictures of the finished engine and cowl assembly.
Joel


AussieReg
#007
Joined: June 09, 2009
KitMaker: 8,156 posts
AeroScale: 3,756 posts
Posted: Sunday, January 26, 2014 - 08:55 AM UTC
That looks great Joel, very nice work.
Cheers, D
Cheers, D
Joel_W
Joined: December 04, 2010
KitMaker: 11,666 posts
AeroScale: 7,410 posts
Posted: Sunday, January 26, 2014 - 09:08 AM UTC
Quoted Text
That looks great Joel, very nice work.
Cheers, D
Damian, Thanks so much for those kind words. I must admit that I really pushed myself to improve the engine details with techniques I've never used before. That black tubing is thick copper wire which was a real bear to bend and get to stay in place. I've never used tape before to make brackets, yet it worked perfectly. Who knew ;-)
Joel
AussieReg
#007
Joined: June 09, 2009
KitMaker: 8,156 posts
AeroScale: 3,756 posts
Posted: Sunday, January 26, 2014 - 09:12 AM UTC
I agree, there are just sooooooooo many neat little solutions to detailing. When I am struggling to find a solution I usually trawl through any of the ChukW build threads. Pure genius.
I find that various thicknesses of solder are generally more pliable for wiring and tubing needs.
Cheers, D
I find that various thicknesses of solder are generally more pliable for wiring and tubing needs.
Cheers, D

Peterpools
Joined: June 08, 2013
KitMaker: 197 posts
AeroScale: 193 posts
Posted: Sunday, January 26, 2014 - 09:30 AM UTC
JA
Outstanding work on the Big P&W and cowl assembly. Detailing and finish is dead on the money'
Awesome work
Bro
Outstanding work on the Big P&W and cowl assembly. Detailing and finish is dead on the money'
Awesome work
Bro

Joel_W
Joined: December 04, 2010
KitMaker: 11,666 posts
AeroScale: 7,410 posts
Posted: Sunday, January 26, 2014 - 09:35 AM UTC
Quoted Text
I agree, there are just sooooooooo many neat little solutions to detailing. When I am struggling to find a solution I usually trawl through any of the ChukW build threads. Pure genius.
I find that various thicknesses of solder are generally more pliable for wiring and tubing needs.
Cheers, D
Damian, I really need to buy some various dia solder as I have like just 2 sizes of copper wire. And yes, Chuck's detailing is simply amazing. He has some great techniques that I'm going to try.
Joel
Joel_W
Joined: December 04, 2010
KitMaker: 11,666 posts
AeroScale: 7,410 posts
Posted: Sunday, January 26, 2014 - 09:36 AM UTC
Quoted Text
JA
Outstanding work on the Big P&W and cowl assembly. Detailing and finish is dead on the money'
Awesome work
Bro
Pete,
Thanks for checking out my work. It's getting there, but still not quite up to your level.
Joel
Holdfast
#056

Joined: September 30, 2002
KitMaker: 8,581 posts
AeroScale: 4,913 posts

Posted: Sunday, January 26, 2014 - 06:52 PM UTC
Hi Joel, really nice work on that power egg 

Joel_W
Joined: December 04, 2010
KitMaker: 11,666 posts
AeroScale: 7,410 posts
Posted: Monday, January 27, 2014 - 02:33 AM UTC
Quoted Text
Hi Joel, really nice work on that power egg
Mal, Thanks for stopping by and having a look. Yeah, that egg came out rather good. Working on the other egg now. Fortunately for me, since it's completely enclosed, other then taking a few short cuts with the ignition wiring, it's staying basically stock.
Joel
Joel_W
Joined: December 04, 2010
KitMaker: 11,666 posts
AeroScale: 7,410 posts
Posted: Thursday, January 30, 2014 - 03:41 AM UTC
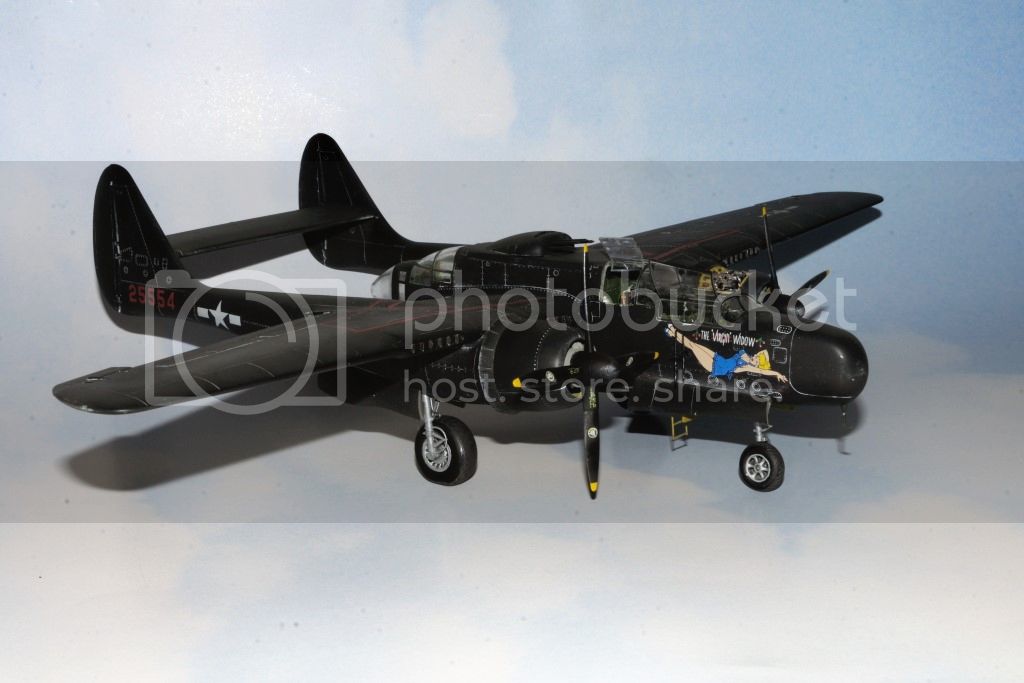
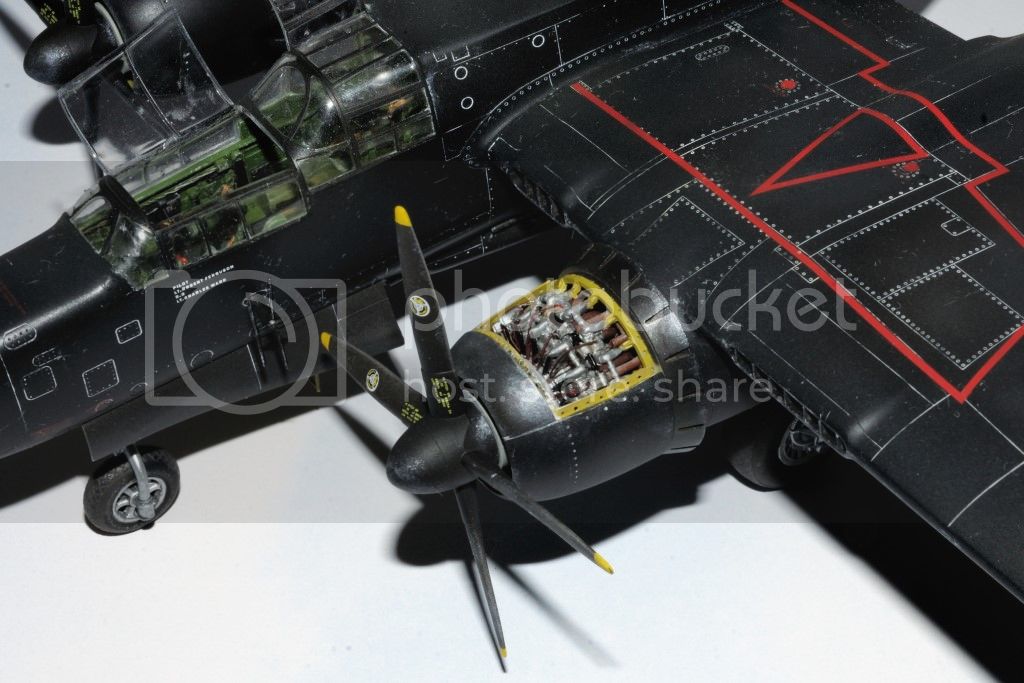
Well, every build has a start date & a completion date, and the P-61A-5 has finally reached it's finish date. The Widow is done, & in it's display case. It's been quite a journey as I pushed my scratch building skills a few notches, & over came a host of issues, to end up with what I consider my best effort to date. I'm certainly more then pleased with the final results. The only issue remaining is that with the props and open glass access panels, I'm more then a little hesitant to turn the Widow over, so I haven't photographed the finished wheel wells or undersides.
Here's a baker's dozen of the Finished Widow. Hope you all enjoy them, as well as my efforts throughout this build.
BTW, it's time for a change of pace from one WW11 prop to the next WW11 prop build. Up on my workbench is a Jet!! Yep, taking my 1st shot at a propless wonder. Taking a shot at the new Academy 1/48 scale F4B Phantom 11 with a few goodies.
Joel


Mcleod
Joined: April 07, 2010
KitMaker: 1,028 posts
AeroScale: 939 posts
Posted: Thursday, January 30, 2014 - 04:02 AM UTC
Beautiful, Joel. I'm sure there are museums frothing to have your work displayed. 
Joel_W
Joined: December 04, 2010
KitMaker: 11,666 posts
AeroScale: 7,410 posts
Posted: Thursday, January 30, 2014 - 04:31 AM UTC
Ben, thanks so much for stopping by, and posting those more then kind words. Don't think any museums, even kiddy ones, will be banging on my door to display my work. 

Joel
Joel
md72
#439
Joined: November 05, 2005
KitMaker: 4,950 posts
AeroScale: 3,192 posts
Posted: Thursday, January 30, 2014 - 05:37 AM UTC
WOW, now I have to go back ant examine this post very carefully before I continue on my P-61. 

Joel_W
Joined: December 04, 2010
KitMaker: 11,666 posts
AeroScale: 7,410 posts
Posted: Thursday, January 30, 2014 - 05:45 AM UTC
Quoted Text
WOW, now I have to go back ant examine this post very carefully before I continue on my P-61.
Why thank you Mark. hopefully one or two things I did can help you with your build.
Joel
Peterpools
Joined: June 08, 2013
KitMaker: 197 posts
AeroScale: 193 posts
Posted: Thursday, January 30, 2014 - 06:20 AM UTC
JA
Absolutely a brilliant build and no question, your best effort to date and that's going back 30 years! Fit and finish is spot on and the light weathering is absolutely perfect.
Awesome build
Bro
Absolutely a brilliant build and no question, your best effort to date and that's going back 30 years! Fit and finish is spot on and the light weathering is absolutely perfect.
Awesome build
Bro
Joel_W
Joined: December 04, 2010
KitMaker: 11,666 posts
AeroScale: 7,410 posts
Posted: Thursday, January 30, 2014 - 07:11 AM UTC
Quoted Text
JA
Absolutely a brilliant build and no question, your best effort to date and that's going back 30 years! Fit and finish is spot on and the light weathering is absolutely perfect.
Awesome build
Bro
Bro,
Coming from you and your high standards, I feel like I've really upped my game.
Joel
AussieReg
#007
Joined: June 09, 2009
KitMaker: 8,156 posts
AeroScale: 3,756 posts
Posted: Thursday, January 30, 2014 - 11:12 AM UTC
Stunning build Joel, one to be proud of!
Thanks for sharing so much detail during your build, threads like this one always give me so much inspiration as well as new ideas and techniques.
Now don't go and get too tangled up in the pointy-nosed wingy thingy world, it's evil. Make sure you return to the land of banging and clattering oily old radials and inlines real soon mate.
Cheers, D
thegirl
Joined: January 19, 2008
KitMaker: 6,743 posts
AeroScale: 6,151 posts
Posted: Thursday, January 30, 2014 - 01:15 PM UTC
Well done Joel ! You did one fine job on this build and handle the few issues with easy .
Terri
Terri
 |

WEB HOSTING BY


Copyright ©2021 AeroScale and Kitmaker Network, a subsidiary of Silver Star Enterprises
All Rights Reserved. Please read our Conditions of Use and Privacy Policy.
All Rights Reserved. Please read our Conditions of Use and Privacy Policy.