OFFICIAL: Club Med Campaign
British Columbia, Canada
Joined: September 03, 2009
KitMaker: 6,965 posts
AeroScale: 6,247 posts
Posted: Monday, January 13, 2014 - 02:24 PM UTC
When once you have tasted flight you will walk the Earth with your eyes turned skyward.
For there you have been, and there you will always long to return.
-Leonardo Da Vinci
England - West Midlands, United Kingdom
Joined: August 01, 2012
KitMaker: 960 posts
AeroScale: 391 posts
Posted: Monday, January 13, 2014 - 04:18 PM UTC
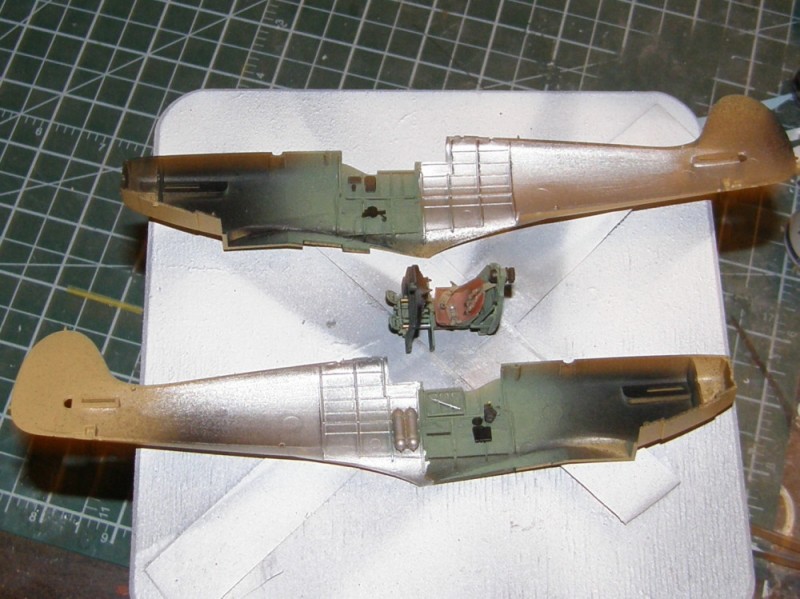
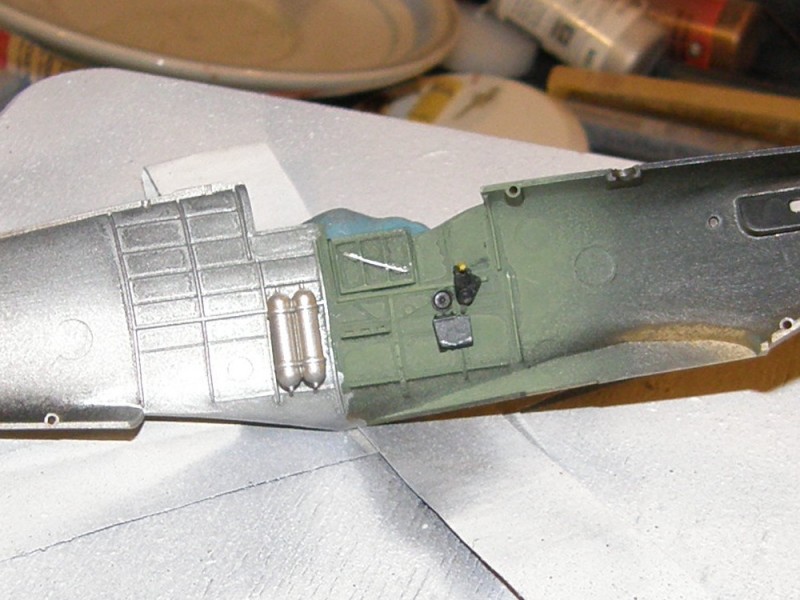
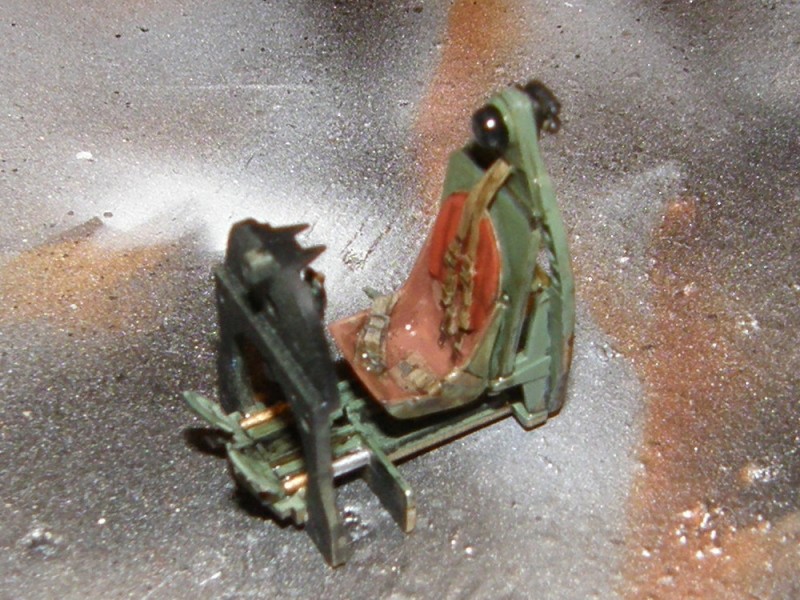
Jessie, I see that you have sprayed the inside of the fuselage. Did you use a fine point brush for the seat and cockpit? Are you also using acrylic paints?
British Columbia, Canada
Joined: September 03, 2009
KitMaker: 6,965 posts
AeroScale: 6,247 posts
Posted: Monday, January 13, 2014 - 05:30 PM UTC
I sprayed and brushed in the cockpit. The fine details needed a fine point brush, of course. I'm using a mixture of lacquers, enamels and acrylics. For example, the black was Tamiya spray lacquer, the silver Testors spray silver and the green Tamiya acrylic. Most of the detail colours on the seat and cockpit parts are Humbrol enamel.
When once you have tasted flight you will walk the Earth with your eyes turned skyward.
For there you have been, and there you will always long to return.
-Leonardo Da Vinci
Indre-et-Loire, France
Joined: May 23, 2011
KitMaker: 651 posts
AeroScale: 181 posts
Posted: Monday, January 13, 2014 - 08:33 PM UTC
Hi all,
very fine work Jessie !
Here is my re-2000 in-progress :
I finished the cockpit and glued the wings and began the putty work


cheers
nico

#305
Christchurch, New Zealand
Joined: February 01, 2006
KitMaker: 1,673 posts
AeroScale: 1,517 posts
Posted: Saturday, January 18, 2014 - 07:50 PM UTC
@Tom: Looking forward to seeing how the Mirage kit turns out Tom I've built the Pz11 version and I really liked the kit ... so much so that I have another in the stash to build!
@Jessie: Tamiya's Spitfire looks like it's going together easily Jessie? It looks reasonably well detailed in the front office and admirably painted to boot! Which markings are you using for it?
@Nico: Love the Re2000 Nico looking great so far! Looking forward to seeing which camo scheme you choose as the Italian aircraft colour schemes always look so challenging!
It's rather amazing that with the addition of a Daimler Benz motor that these aircraft turned out to be more than a match for the opposing aircraft. With the DB603 and DB605 they became rather pugnacious in appearance. I find myself rather drawn to them now (after scorning them for so long) they're rather graceful.
British Columbia, Canada
Joined: September 03, 2009
KitMaker: 6,965 posts
AeroScale: 6,247 posts
Posted: Saturday, January 18, 2014 - 09:31 PM UTC
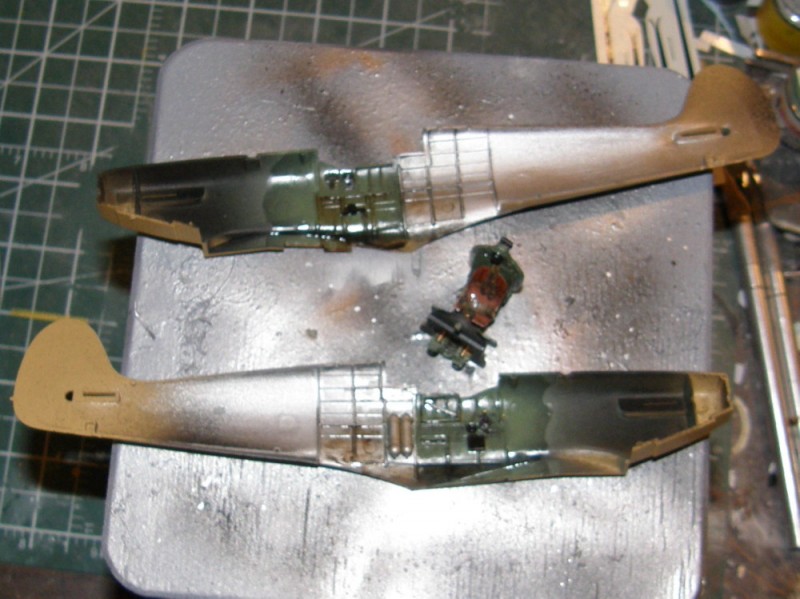
The Spitfire will wear Turkish markings from the same sheet I used to do the Focke Wulf.
When once you have tasted flight you will walk the Earth with your eyes turned skyward.
For there you have been, and there you will always long to return.
-Leonardo Da Vinci
Indiana, United States
Joined: January 13, 2009
KitMaker: 419 posts
AeroScale: 378 posts
Posted: Sunday, January 19, 2014 - 01:50 PM UTC
@ Nicolas: That Regianne is coming along nicely.
I'm back in the saddle with this campaign. Spent last week doing a lot of reference hunting for the MC.200. The Tamiya/ Italeri kit is a real gem with few vices that I can see. The vertical stabilizer is a little off in shape (and I have some ideas for that) otherwise its a real sweetheart. The construction format rewards breaking the steps into sub assemblies. I'll even be able to paint the entire AC without adding the motor until the final stage.
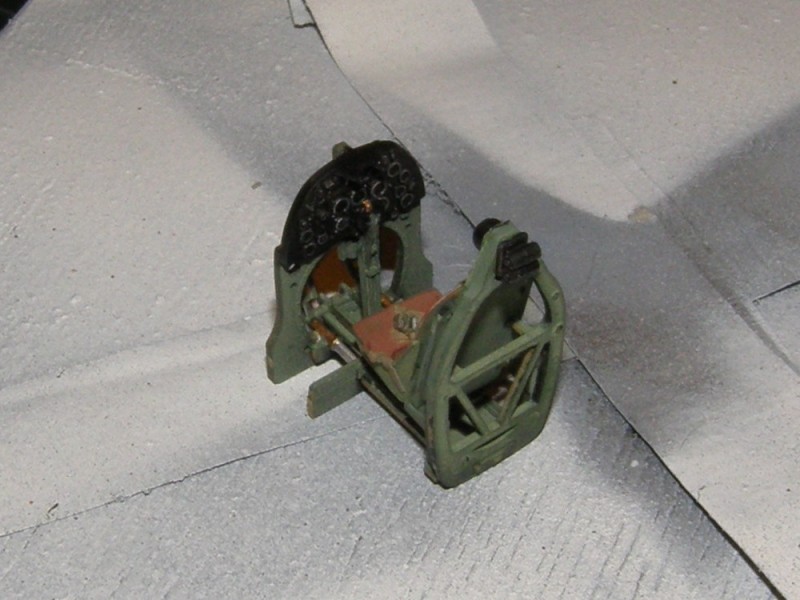
The motor is a nice little piece unto itself. I thought of adding some extras but upon inspecting the wiring sequence for the actual Fiat motor thought better of it. The ignition harness seems to wrap around the crank case and under the push rods. I just didn't want to fuss with that. Instead I focused on the crispness of the stock molded parts and gave it a nice paint job. I think it will due nicely.

Cheers,
Fred

Current Builds:
Hawk 75/Saetta: Club Med Campaign
Me410: FROG Campaign
Mystery Build (insert here)
British Columbia, Canada
Joined: September 03, 2009
KitMaker: 6,965 posts
AeroScale: 6,247 posts
Posted: Sunday, January 19, 2014 - 03:15 PM UTC
I love the little engine stand. Did that come with the kit?
When once you have tasted flight you will walk the Earth with your eyes turned skyward.
For there you have been, and there you will always long to return.
-Leonardo Da Vinci
British Columbia, Canada
Joined: September 03, 2009
KitMaker: 6,965 posts
AeroScale: 6,247 posts
Posted: Sunday, January 19, 2014 - 05:59 PM UTC
When once you have tasted flight you will walk the Earth with your eyes turned skyward.
For there you have been, and there you will always long to return.
-Leonardo Da Vinci
England - West Midlands, United Kingdom
Joined: August 01, 2012
KitMaker: 960 posts
AeroScale: 391 posts
Posted: Tuesday, January 21, 2014 - 02:27 AM UTC
Jessie, very nice detailing in the Spitfire cockpit.
Ontario, Canada
Joined: February 04, 2008
KitMaker: 2,507 posts
AeroScale: 1,814 posts
Posted: Tuesday, January 21, 2014 - 10:32 AM UTC
Model has basic cockpit and I have scratch built joy stick.

" The Die Hards"
43rd MIDDLESEX REGIMENT
MACHINE GUN CORPS
XXX CORP
The most effective way to do it, is to do it.
- Amelia Earhart
Indiana, United States
Joined: January 13, 2009
KitMaker: 419 posts
AeroScale: 378 posts
Posted: Sunday, January 26, 2014 - 10:39 AM UTC
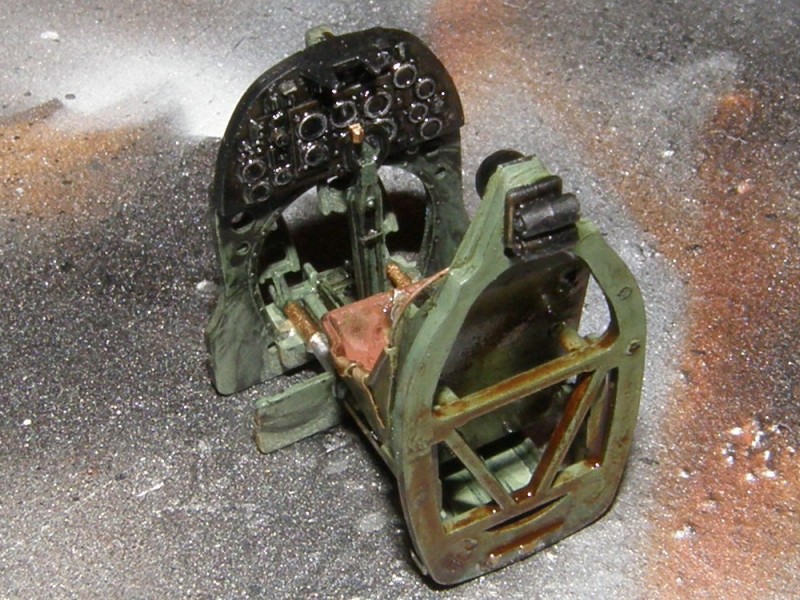
Spent a little time working on some stuff. Can't help wanting to dress up the office. Stock cockpit is a good starting point. Since it was missing some elements, I added resin throttle quadrants and PE bits from a CA Saetta. Harness comes from a fret supplied with kit. Also don't like the stock kit empty space behind the seat so I fabricated a bulkhead. Still a lot needs to be added before paint but I like where its heading.

The stock prop has a nice hub (the hub on a Saetta is very distinctive so that's important), however the propeller blades are very much the wrong shape. I have a nice white metal prop from a vac. kit but the hub is spartan so I went hunting through the bits box. Turns out that the blades from an old Monogram P-38 are the perfect shape and size to replace the stock ones. Having carefully cut out the hub and hollowed out the sockets for the new blades, I think I'll end up with a very convincing new prop!


Cheers,
Fred
Current Builds:
Hawk 75/Saetta: Club Med Campaign
Me410: FROG Campaign
Mystery Build (insert here)
Buenos Aires, Argentina
Joined: September 07, 2006
KitMaker: 918 posts
AeroScale: 688 posts
Posted: Sunday, January 26, 2014 - 01:22 PM UTC
Hi,
I´m going to begin this campaign eith a Hasegawa 1/48 Macchi C.205 Veltro with the Eduard Big Ed,


Cordoba, Argentina
Joined: January 27, 2011
KitMaker: 268 posts
AeroScale: 264 posts
Posted: Monday, January 27, 2014 - 12:52 AM UTC
Hello:
@Fred: I'm very intrest in your new campaign subject, I've the same kit, and I'm following your ideas; Thanks...!!!

@Daniel: Wellcome on board...!!! Otro "Gaucho" en la campaña...! (Another "Gaucho" in the campaign) We are not too many Argies in the site...! Nice Veltro, and a lot of brass to put in there...! It's a challenge...! Good Luck & Good Hunt...!

Here are a few pics of my advance...


I hope You Likes it...!
Thanks
Diego

#305
Christchurch, New Zealand
Joined: February 01, 2006
KitMaker: 1,673 posts
AeroScale: 1,517 posts
Posted: Monday, January 27, 2014 - 02:35 PM UTC
Awesome Diego stunning as always! Love the little extra's that just make the cockpit look so realistic!
England - West Midlands, United Kingdom
Joined: August 01, 2012
KitMaker: 960 posts
AeroScale: 391 posts
Posted: Wednesday, January 29, 2014 - 02:25 PM UTC
Daniel, welcome to the campaign.
Buenos Aires, Argentina
Joined: September 07, 2006
KitMaker: 918 posts
AeroScale: 688 posts
Posted: Thursday, January 30, 2014 - 12:40 AM UTC
Buenos Aires, Argentina
Joined: September 07, 2006
KitMaker: 918 posts
AeroScale: 688 posts
Posted: Saturday, February 01, 2014 - 12:25 PM UTC
England - West Midlands, United Kingdom
Joined: August 01, 2012
KitMaker: 960 posts
AeroScale: 391 posts
Posted: Saturday, February 01, 2014 - 12:43 PM UTC
Daniel, very nicely detailed cockpit.
Buenos Aires, Argentina
Joined: September 07, 2006
KitMaker: 918 posts
AeroScale: 688 posts
Posted: Saturday, February 01, 2014 - 01:26 PM UTC
Thanks Brent
Indiana, United States
Joined: January 13, 2009
KitMaker: 419 posts
AeroScale: 378 posts
Posted: Sunday, February 02, 2014 - 07:18 AM UTC
Little bits of progress on a cold Sunday:

New prop meets my expectation.

Little bits of brass to spruce up the landing gear. (I still don't know how I'm going to thread the brake lines through the landing gear braces.)

Got the bulkhead behind the seat to the shape I want. I find it useful to mask off the surfaces to be glued when possible before painting. It cuts down on clean up work later.

OK, this element here is a "fiction" created by the manufacturer to conveniently fill in the empty space. In reality this should _all_ be tubular framing (these are after all the engine bearers). In the middle should be a fuel tank mounted to the bulkhead and loads of hydraulic, fuel lines and the like. Its my hope to approximate those things and replace the fictional elements of the kit.
Cheers,
Fred
Current Builds:
Hawk 75/Saetta: Club Med Campaign
Me410: FROG Campaign
Mystery Build (insert here)
Alberta, Canada
Joined: April 07, 2010
KitMaker: 1,028 posts
AeroScale: 939 posts
Posted: Sunday, February 02, 2014 - 07:27 AM UTC
Daniel, I like that prop.
To prevent being called an 'expert', screw something up good every now and again.
Buenos Aires, Argentina
Joined: September 07, 2006
KitMaker: 918 posts
AeroScale: 688 posts
Posted: Monday, February 03, 2014 - 01:58 AM UTC
Thanks Ben
Buenos Aires, Argentina
Joined: September 07, 2006
KitMaker: 918 posts
AeroScale: 688 posts
Posted: Monday, February 03, 2014 - 02:01 AM UTC
Very nice Frederick.
Yes, it happens that they put things where really doesn`t exist.
Are you going to scrach that part?
Buenos Aires, Argentina
Joined: September 07, 2006
KitMaker: 918 posts
AeroScale: 688 posts
Posted: Friday, February 07, 2014 - 01:29 PM UTC