_GOTOBOTTOM
Early Aviation
Discuss World War I and the early years of aviation thru 1934.
WNW 1:32 RE.8
Neomega
_VISITCOMMUNITY
England - East Midlands, United Kingdom
Joined: August 15, 2010
KitMaker: 43 posts
AeroScale: 35 posts
Posted: Wednesday, January 26, 2011 - 05:10 AM UTC
Hope I'm not stepping on anyone's toes who is already planning one of these online builds, but the more the merrier I say!!

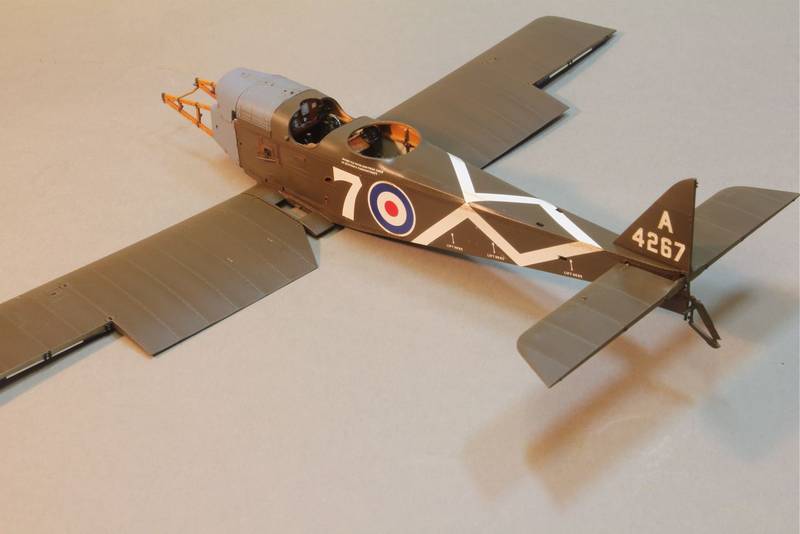
Ready? Deep breath........hold.......and relax! Now open the box and see all those lovely plastic wrapped sprues, a small etched brass sheet and nice stickers!

You all know what kits look like, so I won't bore you with pictures, suffice to say that this is arguably the best WNW kit I have seen so far - and that's saying something.... A nice big box full to the brim and their usual superbly illustrated instruction book.
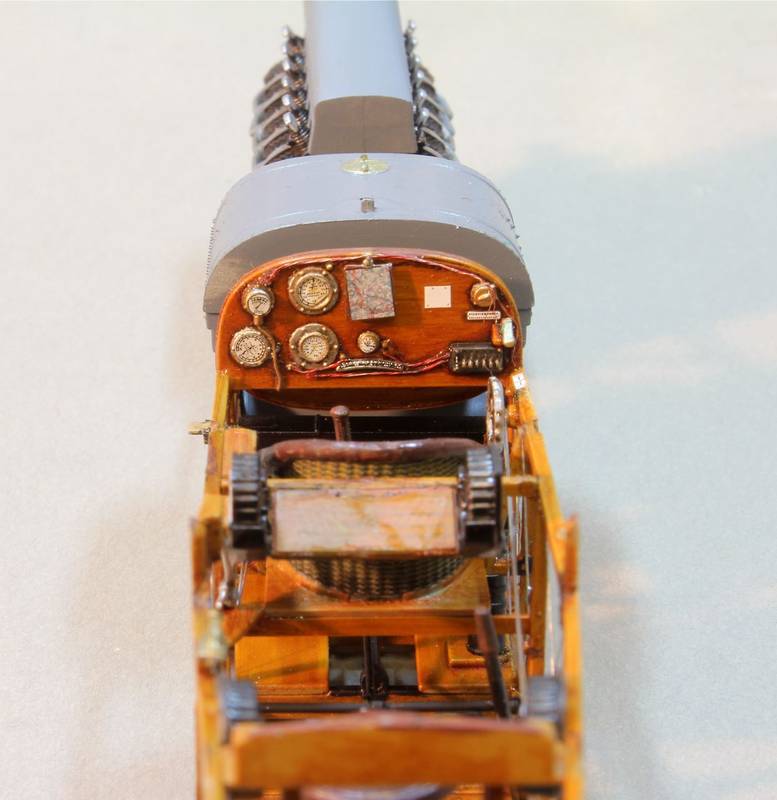
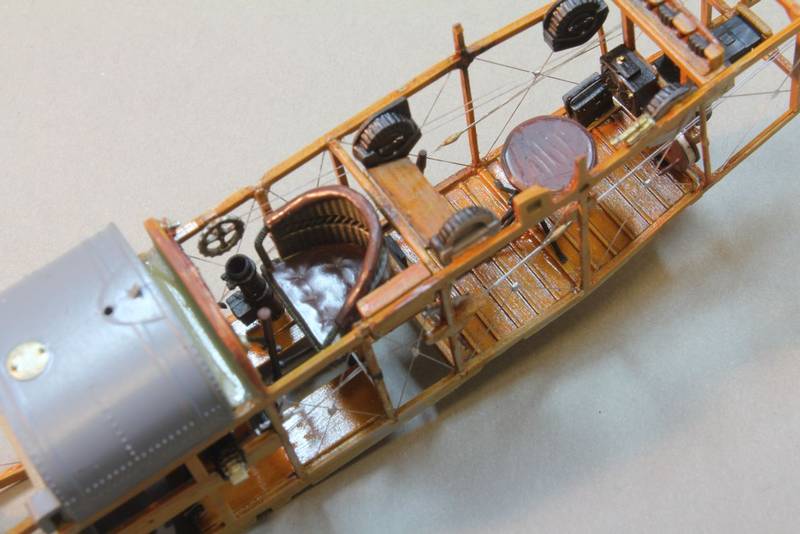
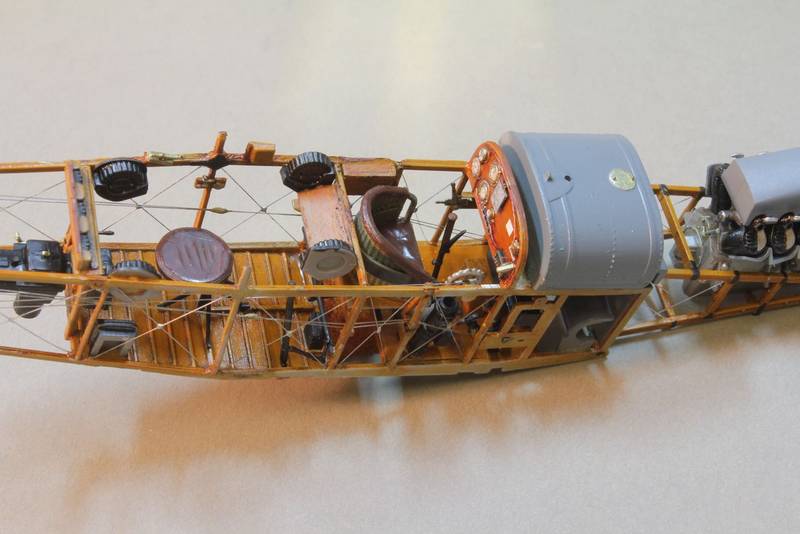
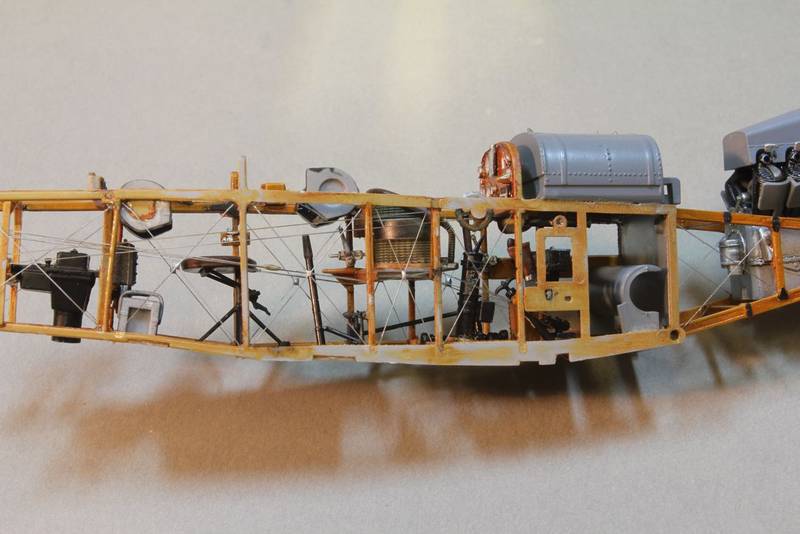
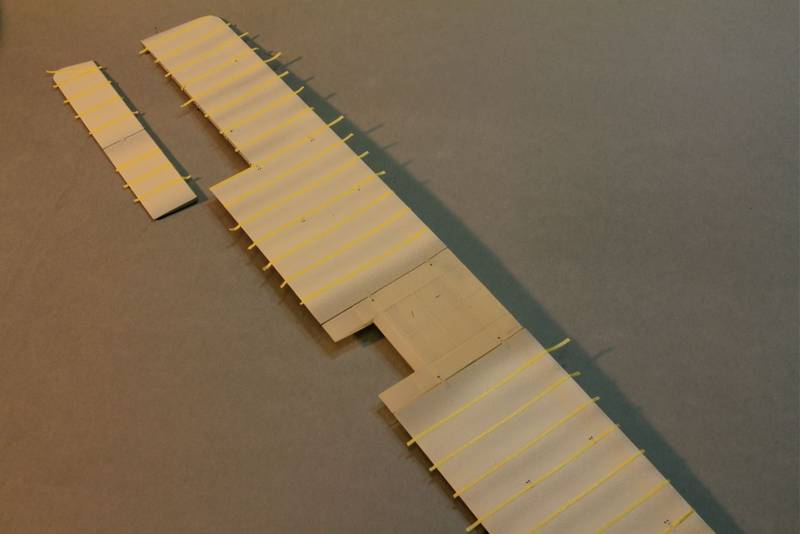
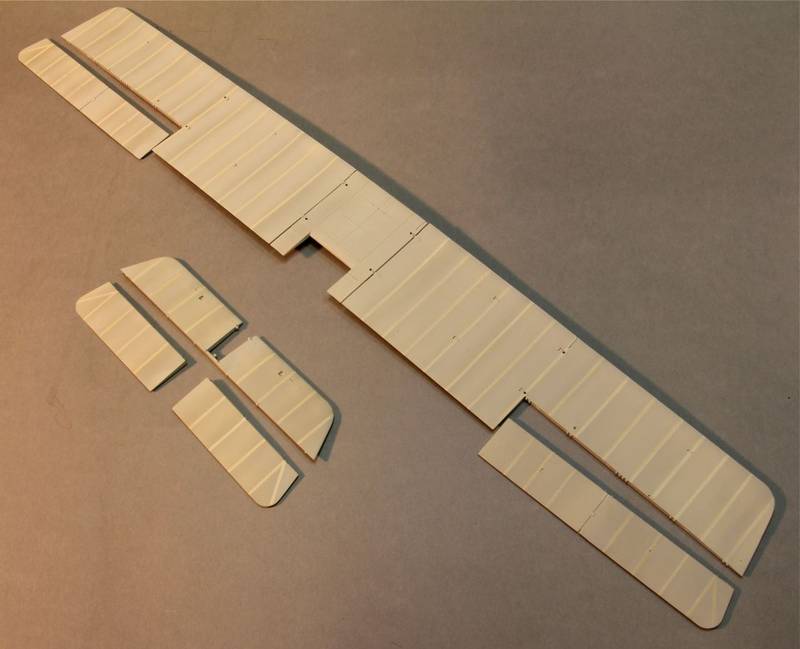
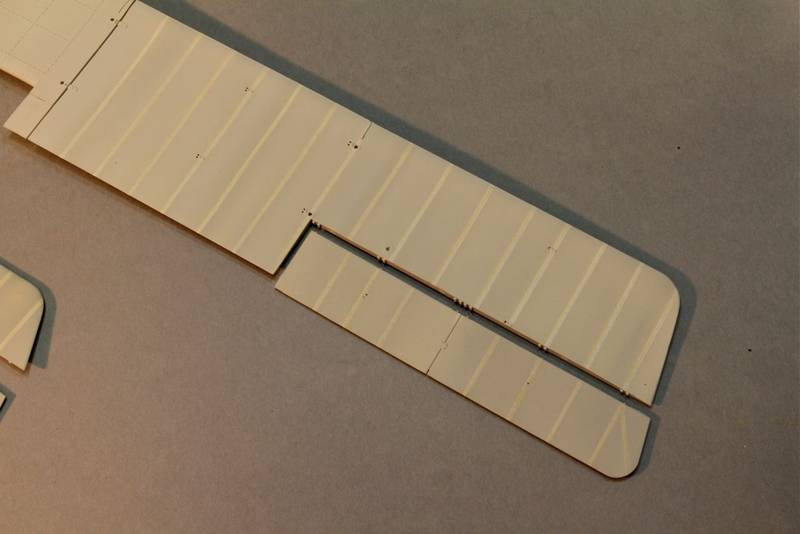
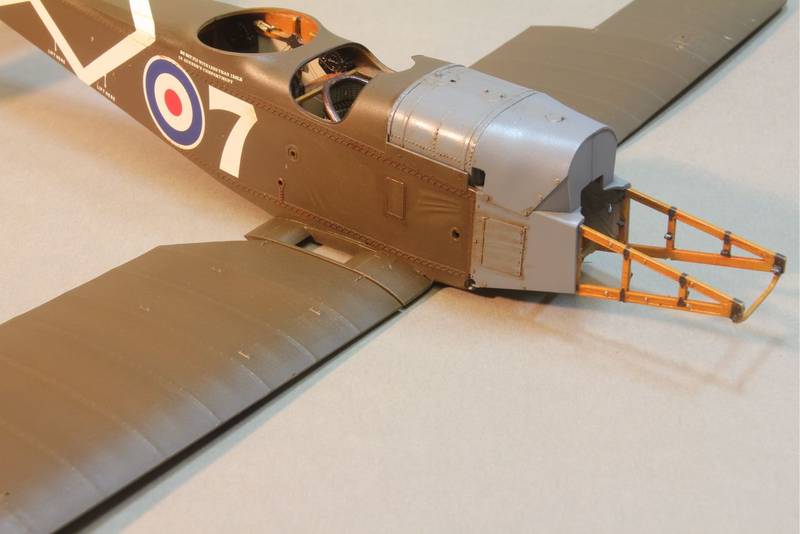
I started by spraying all the ‘wood’ parts of the plane with Tamiya XF59 Sand as the base coat to the oil based finish to be used. These were done on the sprue as it is easier to come with the small bits, but make sure you tidy up any mold lines first though., and check that you have identified all the wooden painted parts, as having to go back and redo one you have missed is a real pain.

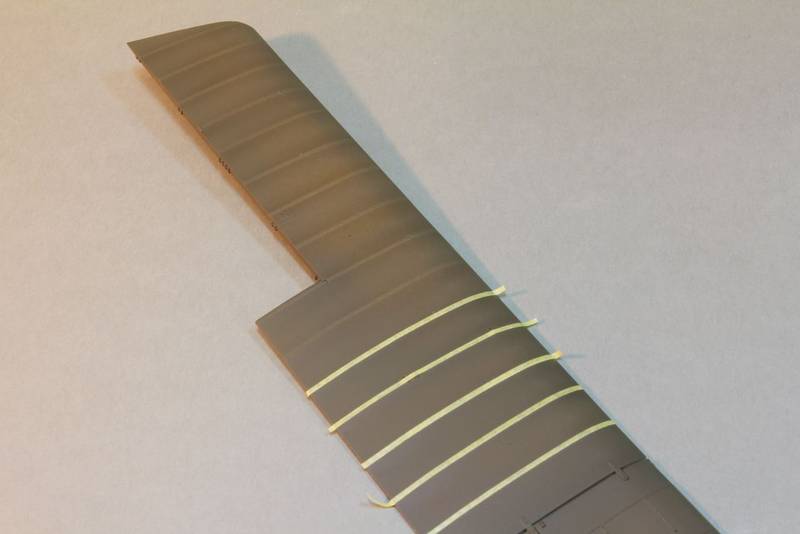
When dry, these were then coated with a layer of oil paint mixed with a little Liquin drying agent. I used a mix of yellow ochre, and raw umber with a dash of burnt sienna to get a rich brown hue. The resulting painted mess was then largely wiped off with a piece of sponge to leave a streaked wood grain effect. If you are not happy, simply repeat. The parts were then gently stroked with a fan brush for the final finer grained effect I wanted. A deceptively easy technique that allows a lot of control.

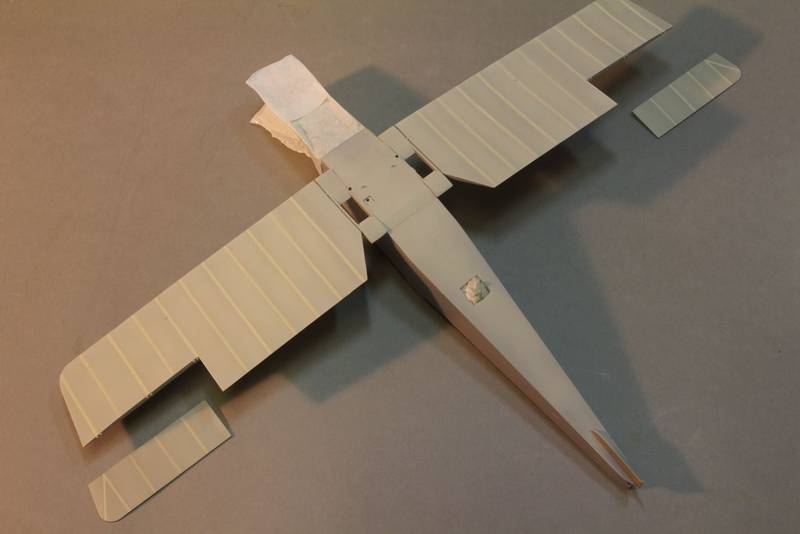
Now, even with Liquin added, the parts take a couple of days to dry properly, so I decided to tackle the engine.

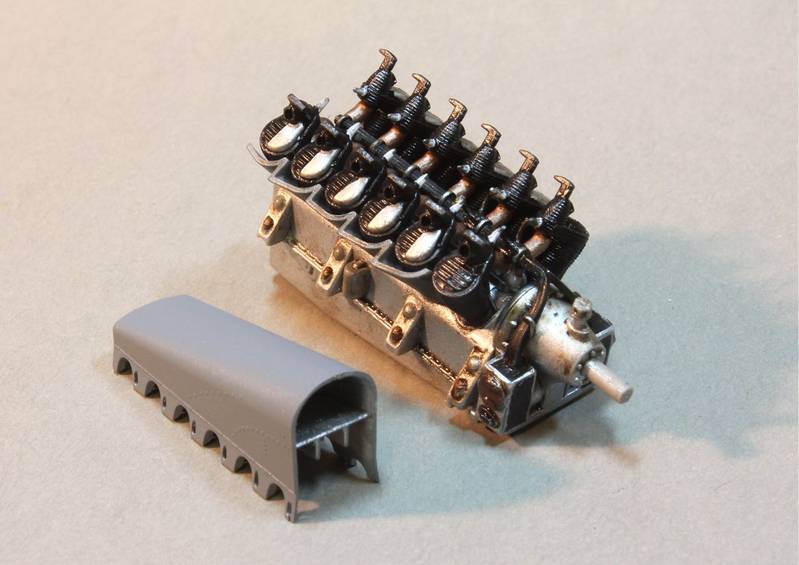
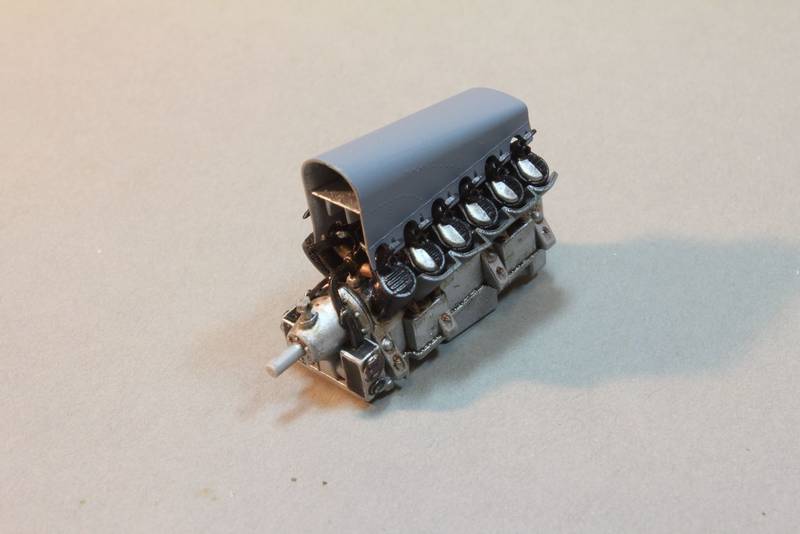
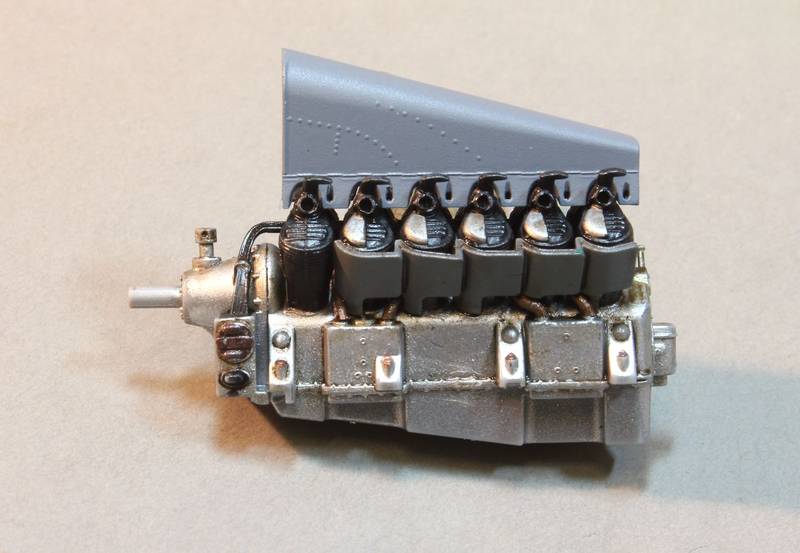
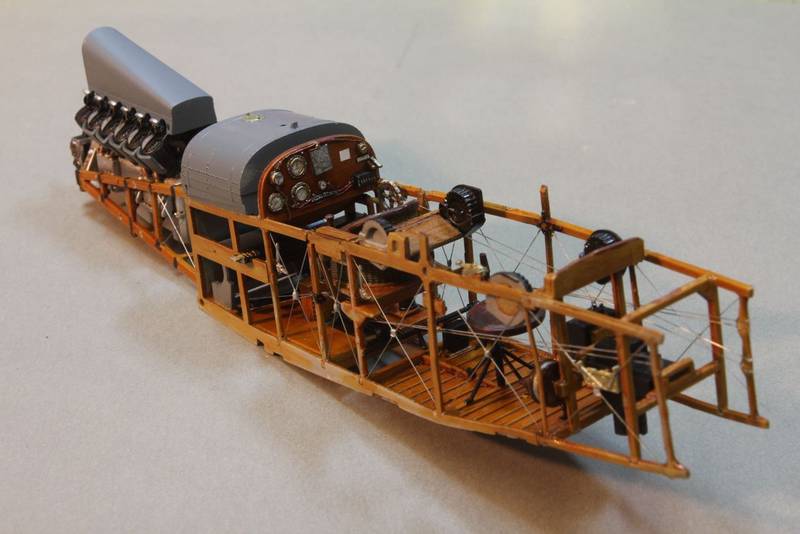
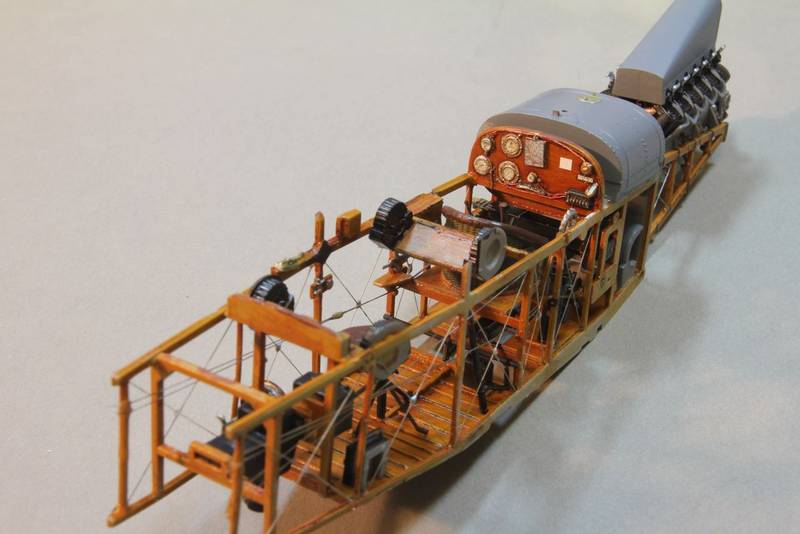
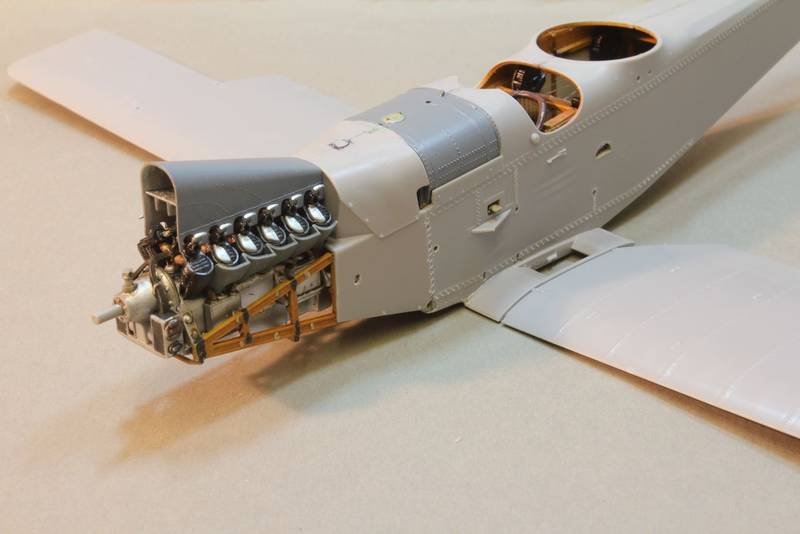
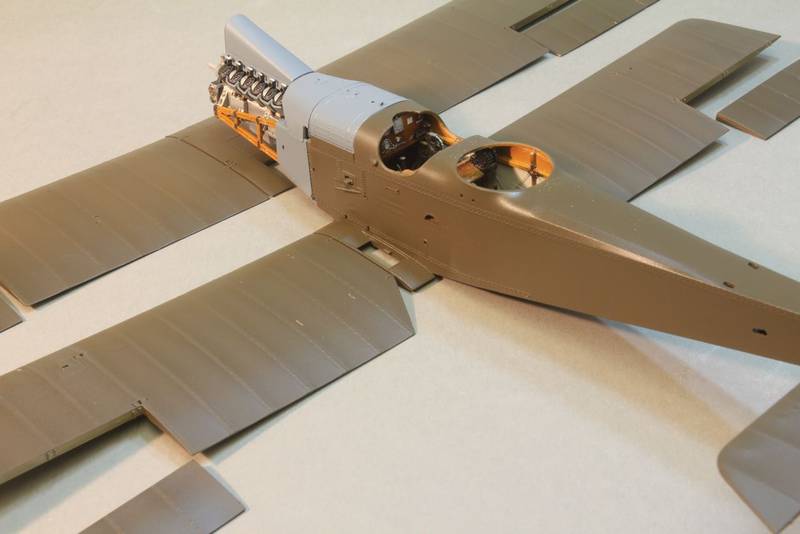
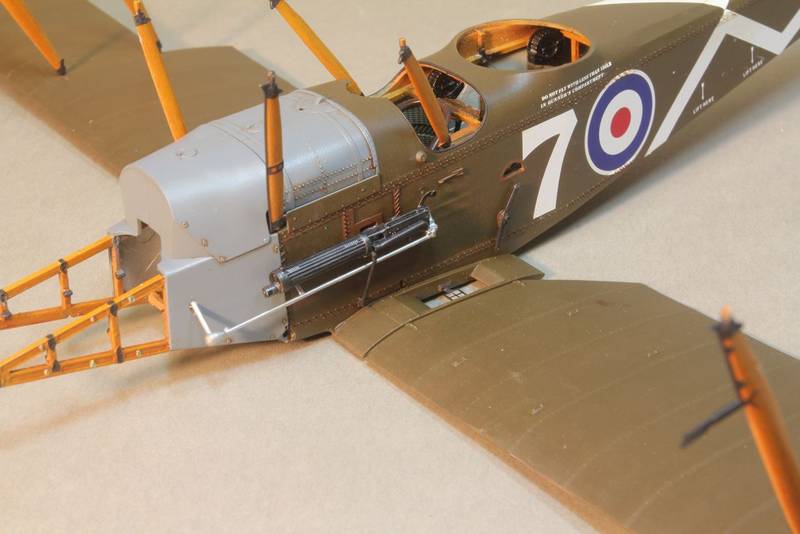
A lovely piece of work, this, with separate cylinders, intake pipes, crankcase and air duct. I assembled the key components and painted them before final assembly. Looking at reference photos, there is little to be added to this unit other than plug cables and pushrods.


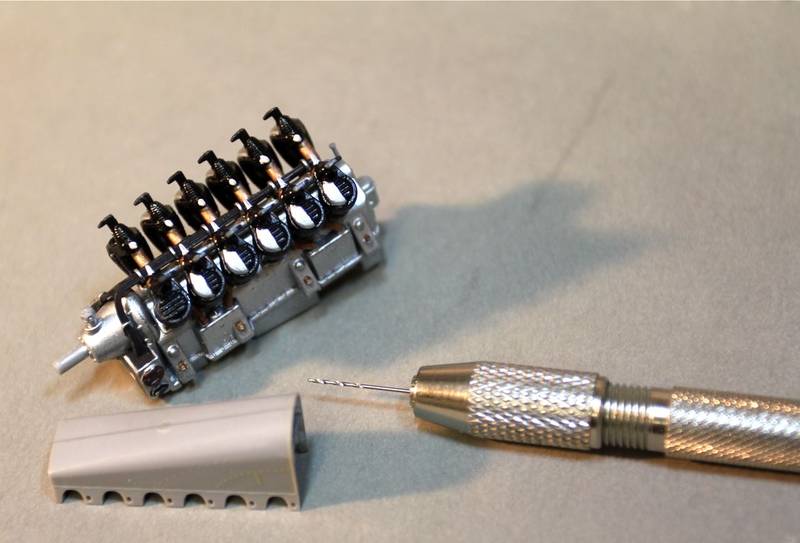
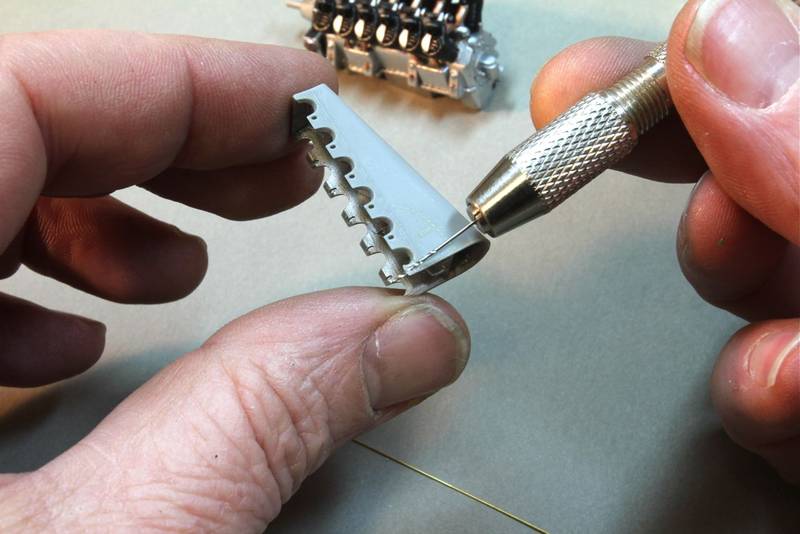
The pushrods actually run through the distinctive air intake scoop on top of the engine, so can only be added after assembly. I altered the existing holes in this scoop using a drill bit as a file and held at the angle of the pushrods when installed. These will be fitted at the end.

westr70
_VISITCOMMUNITY
United States
Joined: October 21, 2010
KitMaker: 7 posts
AeroScale: 6 posts
Posted: Wednesday, January 26, 2011 - 05:26 AM UTC
This is going to be fun to watch. Nice photos too.
Mgunns
_VISITCOMMUNITY
Arizona, United States
Joined: December 12, 2008
KitMaker: 1,423 posts
AeroScale: 1,319 posts
Posted: Wednesday, January 26, 2011 - 05:47 AM UTC
Hi Gordon:

The engine really turned out nice. Interesting method of how they ran the pushrods through the air intake scoop. I am tempted to get this kit, but have plenty on the build pile at the moment and don't want to get too far ahead of myself. I will be looking forward to more.

Best
Mark
Neomega
_VISITCOMMUNITY
England - East Midlands, United Kingdom
Joined: August 15, 2010
KitMaker: 43 posts
AeroScale: 35 posts
Posted: Wednesday, January 26, 2011 - 06:06 AM UTC
Thanks guys! It's a lovely model of a plug ugly plane! Re the pushrods, I had to look at the references quite hard to work out what was going on.

Now to the innards again.

With the ‘wood’ dry, I gave it all a spray of Tamiya X26 Clear Orange that added a more varnished mahogany tint. When dry, then assembly started.
I made the instrument panel a little darker in colour as per the instructions. When dry, the bezels, switches and knobs were picked out in brass, black and silver.

WNW supplies superb Cartograph made instrument decals that are so well printed, they need no trimming to fit the tiny bezels. Once dry, a drop of Tamiya Clear seals them on and created the glass. You need a good magnifier, but these dials are readable. And you even get a little map too!


There are a couple of moulded cables supplying the various instruments that were twin black and red covered electric flex on the real thing. Painting the moulded version is hard, so I decided to make ‘real’ flex. I stripped out four strands of copper wire from a piece of electrical wire. Painted two black and two red, then simply wound them together. I was surprised by the efficacy of the result! This was cut up and superglued to the panel in the correct places. Then the details were given a wash of raw umber oil paint.

Next was the fuselage frame assembly.

The engine mount and firewall were assembled. To the rear of this are fixed the side frames. These have their cross frames fixed on in order from the front to the rear. The pilot’s floor, oil tank and Vickers magazine were all fitted after painting. Finally the camera

The rear cockpit with the observers little round seat, auxiliary control column and floor fitted next. There appears to be no rear seatbelts fitted in the RE.8 – I suppose the pilot realised he had lost his observer when the plane suddenly went all nose heavy!

All the parts fit as though they grew there, a real tribute to the designers this!
When all was installed and painted, the whole assembly is then rigged. I use .3mm monofilament line painted with a silver felt tip. This was superglued through holes drilled in the frames. These were then touched up and white glue used as the cross fixings, painted when dry.

The twin rudder cables and elevator trim cables were also added and white glue used for the rudder control toggles used by the, hopefully still aboard observer, in the event of ‘Pilot Incapacitation’!

Finally, the superbly moulded pilot’s wicker seat was made. A more expert workman may remove the back moulded seam that supports the upper and lower portions of the seat back, but as this would be hardly noticeable, and with anything for an easy life, I didn’t bother. The wicker part was first painted with a thin matt black paint. Then it was dry brushed with yellow ochre oil paint to bring out the cane effect well. The seat and top capping were painted Tamiya XF 10 Flat Brown, which was rubbed with my thumb when dry to get a worn shinny leather effect.


The pilot’s lap belt will wait until the end, as I want it hanging outside the cockpit opening.

Finally, the fuselage interior was sprayed with Tamiya XF55 Deck Tan to represent the doped linen inside the fuselage, and the upper part painted with the wood effect.


TO BE CONTINUED>>>!
Gordon
ajdavies
_VISITCOMMUNITY
New York, United States
Joined: April 23, 2008
KitMaker: 4 posts
AeroScale: 3 posts
Posted: Wednesday, January 26, 2011 - 06:58 AM UTC
Gord,

That is lovely!!!! I thought you only got the kit last week. There's obviously nothing on the tele to distract you.

Mines still in its box.

A.
Neomega
_VISITCOMMUNITY
England - East Midlands, United Kingdom
Joined: August 15, 2010
KitMaker: 43 posts
AeroScale: 35 posts
Posted: Wednesday, January 26, 2011 - 07:04 AM UTC
Ta!

Killing time before I have to go to Nuremberg next week and loose a week of my life!

G
guitarlute101
_VISITCOMMUNITY
West Virginia, United States
Joined: December 18, 2006
KitMaker: 1,121 posts
AeroScale: 1,063 posts
Posted: Wednesday, January 26, 2011 - 07:51 AM UTC


Great job Gordon. Nice to see this one built here.

Mark
thegirl
_VISITCOMMUNITY
Alberta, Canada
Joined: January 19, 2008
KitMaker: 6,743 posts
AeroScale: 6,151 posts
Posted: Wednesday, January 26, 2011 - 11:49 PM UTC

Quoted Text


Great job Gordon. Nice to see this one built here.

Mark


Second that , very nicely done ! Internal rigging looks great and in scale , looking forward to the next set of progress pic's
OEFFAG_153
_VISITCOMMUNITY
Västra Götaland, Sweden
Joined: February 19, 2010
KitMaker: 1,473 posts
AeroScale: 1,450 posts
Posted: Thursday, January 27, 2011 - 12:16 AM UTC
Hi Gordon

Very nice indeed  – that wound electrical cord looks very convincing  – I may pinch this trick in future

I've got this kit winding its way to me from NZ as we speak – your build has certainly wetted my apetite even more!

Thanks for posting

Mikael
RAGIII
_VISITCOMMUNITY
North Carolina, United States
Joined: June 19, 2007
KitMaker: 604 posts
AeroScale: 600 posts
Posted: Thursday, January 27, 2011 - 03:48 AM UTC
Really looks great! Your enhancements to the kit are quite well done.
RAGIII
Neomega
_VISITCOMMUNITY
England - East Midlands, United Kingdom
Joined: August 15, 2010
KitMaker: 43 posts
AeroScale: 35 posts
Posted: Thursday, January 27, 2011 - 05:38 AM UTC
Thanks for the comments folks!

So, everything having dried, I fixed the cockpit insides into the fuz halves. The fit was excellent, I just needed to sand a little of the cockpit frame to allow the two halves to fit together.

Prior to this, you have to open up the correct elevator cable and rudder cable holes. WNW provide an etched surround to cover these holes, so absolute neatness is not worried about. I also drilled out the rigging holes to .4mm. I shall be using the RB Productions etched flat rigging wires, so wanted to get the holes the correct size first.

But, as I've never seen anyone ever use these in a review, this is a leap into the unknown. Being stainless, the do seem fiendishly difficult to cut. However, they also don't look prone to sagging either, so watch this space!

Glue applied, the halves were clamped and taped after aligning them as much as I could.

Next, I decided to do the lower wing. This is a one piece item, again, excellently moulded with fine rib stitching details. The wing was cleaned up, rigging holds opened up to .4mm, and, as I have decided to do aircraft B, in their colour scheme, the gun interruptor gear under the wing centre section was scraped off. Another slight trimming of the innards allowed the wing to be offered into place precisely.

More Plastic-weld and the wing was in place.


The tail feathers are such a good fit that I have decided to fit them at the end, after painting. It just makes masking easier! However, beware, the tail skid is a very delicate moulding and should be treated as such. If you break it, you would need to pin it!


I skipped a few of the fuz details such as the Vickers and the struts, as I want to add these after painting the main bits, so I assembled the top wing.

Again, superb moldings. Version B demands that I use the painted triples centre panel, which is a clear moulding. This was cleaned up, but being clear, it will be difficult to check until it is painted. The whole thing was painted over anyhow, so no clear masking here. The dihedral is fixed by the large wing tabs, so no problem foreseen there methinks!


So, now I go off to the Nuremberg Toy Fair for the day job, to sell radio control stuff to people who should know better. A week of goulash soup and Erdinger awaits. More when, of if (!) I get home!!
CaptainA
_VISITCOMMUNITY
Indiana, United States
Joined: May 14, 2007
KitMaker: 3,117 posts
AeroScale: 2,270 posts
Posted: Thursday, January 27, 2011 - 05:42 AM UTC
Nice start. I like the way this is going together for you. How are the tolerances on this kit?
JackFlash
_VISITCOMMUNITY
Colorado, United States
Joined: January 25, 2004
KitMaker: 11,669 posts
AeroScale: 11,011 posts
Posted: Thursday, January 27, 2011 - 04:17 PM UTC
I am really enjoying this build.
thegirl
_VISITCOMMUNITY
Alberta, Canada
Joined: January 19, 2008
KitMaker: 6,743 posts
AeroScale: 6,151 posts
Posted: Thursday, January 27, 2011 - 11:48 PM UTC
Yes , this is a very enjoyable build to watch so far . You are making excellent progress so far . Are you planning on leaving off the cowl side panels to show off the engine ? Would be a shame to cover up your nice detail painting .

Have fun at the toy fair !
edoardo
_VISITCOMMUNITY
Milano, Italy
Joined: November 30, 2007
KitMaker: 642 posts
AeroScale: 382 posts
Posted: Saturday, January 29, 2011 - 06:29 AM UTC
really a good job, Gordon!
those kits are really fantastic and your buid bring out the most of it!

ciao
edo
warreni
_VISITCOMMUNITY
South Australia, Australia
Joined: August 14, 2007
KitMaker: 5,926 posts
AeroScale: 2,201 posts
Posted: Sunday, January 30, 2011 - 08:35 AM UTC
Fantastic work Gordon. Maybe there should be the option of eaving the interior out to show it off! Then just a simplified one to jamb in there where it will never be seen by anyone without a boroscope.
Neomega
_VISITCOMMUNITY
England - East Midlands, United Kingdom
Joined: August 15, 2010
KitMaker: 43 posts
AeroScale: 35 posts
Posted: Sunday, February 13, 2011 - 03:51 AM UTC
So! Back home in Blighty again after a crack at Jerry! But I am missing Hefe-Weissbier already.

The RE.8 was usually doped undersides in Clear Doped Linen (CDL). Now, trying to get this supposedly common colour correct was a little trying. Is it whiter, should it be creamier....? I eventually plumped for the WNW suggested colour of Tamiya XF55 Deck Tan. Slightly greyer than yellow, but as most of these planes were not very old, I assumed that the dope would not have yellowed much.

Next, what to do about the rib-tapes. Most photos seem to show these as darker stripes on the wings. However, this is probably a shadow of the ribs showing thorough and highlighted by the daylight. On real examples such as at the Shuttleworth Collection, Hendon etc, they actually appear as lighter strips, being in fact two layers of linen thick at these points.

So, the ribs were sprayed with Vallejio Modelair 71075 Sand, being a light cream colour, and I had it in stock! The ribs were then masked with 1.5mm tape.

The Tamiya XF55 was then oversprayed, followed by a quick pass with Tamiya Smoke over each rib to add some slight depth. The masking removed, the wings were then given another very light dusting of XF55 just over the ribs to reduce their contrast a little and blend them in better.


You have to bear in mind that the finished wings will always be in shadow when being viewed normally, so looking at them in shadow gives you a better idea of their finished appearence.

The underside of the fuz of the machine I am modelling has PC10 rather the CDL underneath, hence the unpainted areas.

Now, the next stage is even more interesting. Exactly what colour is PC10 anyhow?!!

G
JackFlash
_VISITCOMMUNITY
Colorado, United States
Joined: January 25, 2004
KitMaker: 11,669 posts
AeroScale: 11,011 posts
Posted: Sunday, February 13, 2011 - 07:58 AM UTC
Testors Model Master Field Drab is a good start.
Neomega
_VISITCOMMUNITY
England - East Midlands, United Kingdom
Joined: August 15, 2010
KitMaker: 43 posts
AeroScale: 35 posts
Posted: Tuesday, February 15, 2011 - 09:59 AM UTC
OK, now to that elusive PC10 colour. Not that many places sell Tetors in the UK, so I can't heed Stephen's advice. Hence I had to make up my own.

I wanted it more on the browner side, rather than a darker green colour that would have been the case had I followed the instructions mix for Tamiya. Windsock once did an article on this colour with examples of both ends of the PC10 scale. They ranged from almost black to a pale tan. So, anywhere in-between should be OK!

Not helping much was it!

So, I made my mix from roughly (Very) 50/50 Tamiya XF 62 and XF10. Then lightened it with XF 4. After playing about a little, I ended up somewhere near what I wanted. I made it a little lighter to allow for darkening when varnished too. And, as a result of the mixing technique - tip some in, then more, I ended up with an industrial quantity of the stuff! So, 1/32nd HP 0/400 here we go!

After spraying and overnight drying I set about masking the ribs as before. I was by now getting really good at accurately cutting 1.5mm strips of masking tape without measuring it!

I wanted the effect of a highlighted rib, so sprayed a light coat of Smoke along the masked rib. Subtlety is the key her as you don't want it to look like a cartoon.

The masking removed, another light spray with smoke knocked back the contrast some more to give a, to my eye, pleasing relief effect. The rib stitching will be drybrushed with a paler green colour later just to add some contrast.

Finally I sprayed the whole lot with gloss clear to prep the finish for the stickers tomorrow!


To Be Continued... !
CaptainA
_VISITCOMMUNITY
Indiana, United States
Joined: May 14, 2007
KitMaker: 3,117 posts
AeroScale: 2,270 posts
Posted: Tuesday, February 15, 2011 - 01:40 PM UTC
It looks like you got the color right. It would be hard for anybody to say any olive drab color is wrong, but some look better than others do. I think you got the right color for this aircraft. It looks wonderful.
warreni
_VISITCOMMUNITY
South Australia, Australia
Joined: August 14, 2007
KitMaker: 5,926 posts
AeroScale: 2,201 posts
Posted: Tuesday, February 15, 2011 - 01:49 PM UTC
And how many color photos do we have of WWI aircraft?

Like most colors used on military vehicles and aircraft there are always variations. I know that most RAAF color schemes were done free-hand in the not-too-distant past so there is no 100% accurate way to paint them. I am also sure that no two Luftwaffe blotchy or squiggly camo scheme would have been the same.

So if you are happy with your colour Gordon that is all that matters. If someone tells you you are wrong, ask them to prove it. Even if they quote some old recipe that was used to mix up a paint colour the colour would still have varied batch to batch as ingredients were not mixed in exact proportions etc.
JackFlash
_VISITCOMMUNITY
Colorado, United States
Joined: January 25, 2004
KitMaker: 11,669 posts
AeroScale: 11,011 posts
Posted: Wednesday, February 16, 2011 - 06:33 AM UTC
The usual comparison is that O.D can be close to PC10, while field drab is close to PC12. PC12 has more red oxyide in it. In WWI the British were pretty stringent on (at the factory level) military acceptance for contracts. The inspectors were acting for the King and Queen. The only variances were within the condition or age of chemicals applied to the paint maunfacture process. The deterioration of these Paint Colours (PC) in the field depended on operational service exposure and age.
Mgunns
_VISITCOMMUNITY
Arizona, United States
Joined: December 12, 2008
KitMaker: 1,423 posts
AeroScale: 1,319 posts
Posted: Wednesday, February 16, 2011 - 08:54 AM UTC
Greetings Gordon:

I agree, if it looks good to the modeler, then that is all that matters, as there are many variations and opinions. On another forum there was a lengthy and heated debate as to the "true" color of PC-10. It was rather interesting but inconclusive. I look at the color photographs of the museum pieces and go from there. The TVAL SE5 is quite green, whilst photo's of the museum DH9a is more brown.
I also used the WNW mix as found in the SE5 using Tamiya paints and then doctored it up as my eyes saw fit.
I like what you are doing and think it looks good.

Best

Mark
Neomega
_VISITCOMMUNITY
England - East Midlands, United Kingdom
Joined: August 15, 2010
KitMaker: 43 posts
AeroScale: 35 posts
Posted: Monday, February 21, 2011 - 08:54 AM UTC
So, to the stickers! I know decal is the correct term, but I find the word 'Sticker' flushes out those who sometimes take themselves rather too seriously! My partner, bless her, calls them stickers anyhow...!

After a coat of Tamiya Clear, to give them a better base, these were applied in the usual manner using a decal softener. The Cartograph decals are pretty thin and suck down into the smallest recesses. They conform well into the stitching detail on the fuz superbly.

However, not usually a problem to complain about but the white is very dense, resulting in very unrealistically bright markings. No problem, I simply sprayed a light coat of Tamiya smoke over them to turn down the contrast and blend them in better.

This was most noticeable when I did the roundels. These needed the ribs masking, as before, to impart a slight shadow of the ribs underneath. I was happy with the subtle effect and was glad I didn't go mad!


Next, I added a burn umber oil paint wash to add a shadow to various details and to simulate oil leakage. After drying, the same detail was dry-brushed with a lightened version of my PC10 base-coat to highlight the stitching etc.


Various leather reinforcing patches were painted and WNW provide etched metal rings to tidy up the elevator and rudder cable outlets towards the tail, these were also leather.

Next was the forward firing vickers with it's interrupter mechanism. The version I am making used the clumsy looking external gearing system. The gun itself simply had the WNW etched front water jacket piece and the cocking leaver adding. The detail of the molding is exquisite. It simply needs painting black and dry-brushing with graphite to impart a metallic effect. The inter-plane struts had their metal ends and bands painted black also. I had previously painted them 'wood' when I did the interior colour. These were dry fitted into place.


And now the bit I had been dreading.

My abiding memory of the old Airfix RE.8 when I made it aged 12, were those bloody struts! The wing kept twisting left and right and falling off onto my bedroom carpet and resulted in a somewhat dissatisfactory result and accompanying tantrum!

However, you are never too old to learn anything. A little tip on WNW website shows the box being used as an alignment jig. Dead simple!! So, after cleaning up all the mounting lugs and drilling some of the centre section holed a little deeper, the wing was carefully dry assembled and placed in the box


Liquid poly was then carefully applied to the strut ends to lock them in place. Now, hopefully I will have exorcised the curse of the RE.8 otherwise

We'll see in the morning!
JackFlash
_VISITCOMMUNITY
Colorado, United States
Joined: January 25, 2004
KitMaker: 11,669 posts
AeroScale: 11,011 posts
Posted: Monday, February 21, 2011 - 02:30 PM UTC
We'll see indeed! Gordon you have taken this bird by the beak and bent it to your will. Most impressive so far.
 _GOTOTOP