

Nice one Gord.
I can't believe how fast you've managed to get this one stuck together.
Best.
A.
Early Aviation
Discuss World War I and the early years of aviation thru 1934.
Discuss World War I and the early years of aviation thru 1934.
Hosted by Jim Starkweather
WNW 1:32 RE.8

ajdavies

Joined: April 23, 2008
KitMaker: 4 posts
AeroScale: 3 posts

Posted: Monday, February 21, 2011 - 04:08 PM UTC

OEFFAG_153

Joined: February 19, 2010
KitMaker: 1,473 posts
AeroScale: 1,450 posts

Posted: Monday, February 21, 2011 - 08:04 PM UTC
Hi Gordon 
What a nice build of a very nice plane I really do like your approach to the subtle rib effects over the "stickers". Looking forward to how the box trick works out I have this one in the stash, and I think I'll do it after the Hansa B.
Best Regards
Mikael
What a nice build of a very nice plane I really do like your approach to the subtle rib effects over the "stickers". Looking forward to how the box trick works out I have this one in the stash, and I think I'll do it after the Hansa B.
Best Regards
Mikael

Mgunns
Joined: December 12, 2008
KitMaker: 1,423 posts
AeroScale: 1,319 posts

Posted: Tuesday, February 22, 2011 - 04:26 AM UTC
Hi Gordon:This is coming along nicely. It looks like the exorcism was successful. I did the DH9a. and it turned out in perfect alignment.
I don't have this one in my stash, as I am exercising good "stash management" skills; .....but it could end up there and on the shelf.
I like your use of oils for the subtle shading. I haven't tried that and will have to give it a go, your preshading on the 'stickers' is nice, you offer good tips with solid results.
Best
Mark
dmopath
Joined: July 02, 2010
KitMaker: 175 posts
AeroScale: 174 posts
Posted: Tuesday, February 22, 2011 - 11:12 AM UTC
I am very much enjoying your picts, and will keep this build log as a reference. Your HT really is a beauty!
A toast to your great job
A toast to your great job

Neomega

Joined: August 15, 2010
KitMaker: 43 posts
AeroScale: 35 posts

Posted: Saturday, February 26, 2011 - 05:59 AM UTC
Thanks for the comments folks!
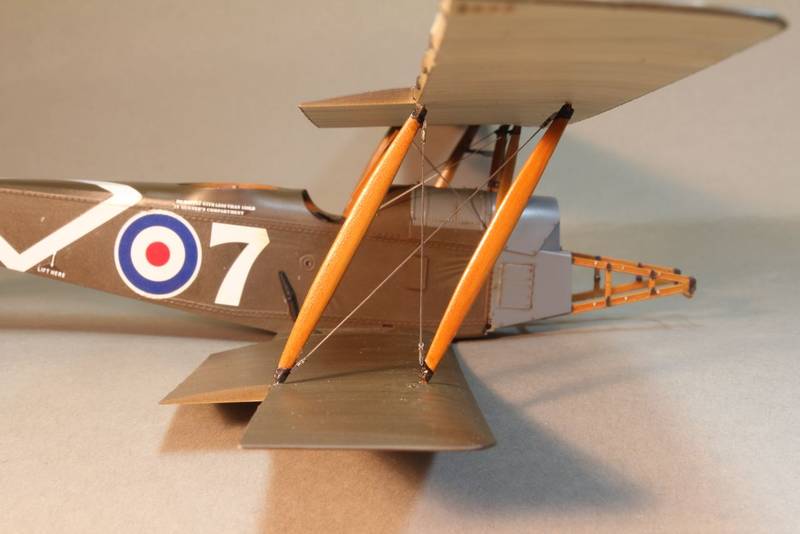
So... IT WORKED!! The wings are now in perfect alignment, although you have to bare in mind that it is only being held there by 8 tiny plastic pins, so don't shake it about!

Now, I have dispensed with the suggested building order and decided to rig the wings before adding other bits, as this will hinder the access to the rigging points. I also decided to leave off the ailerons for the time being too for the same reasons.
On a model of this scale, the rigging section is noticeable. Looking at the rigging the LVG CVI, it was a piece of cake when compared the RFC machines. Streamline flying wires being their thing.
So, I got some Radu Productions etched rigging wires from http://www.radubstore.com . I ordered 3 different sizes, as I didn't know at that time which was used where, until I finally got hold of the Windsock book 28 on the RE.8, containing the official rigging specs. Most, it would appear, would be done in 2BA and 1/4 BSF size wires. I also got some of the etched end brackets to see if I could give those a go too!
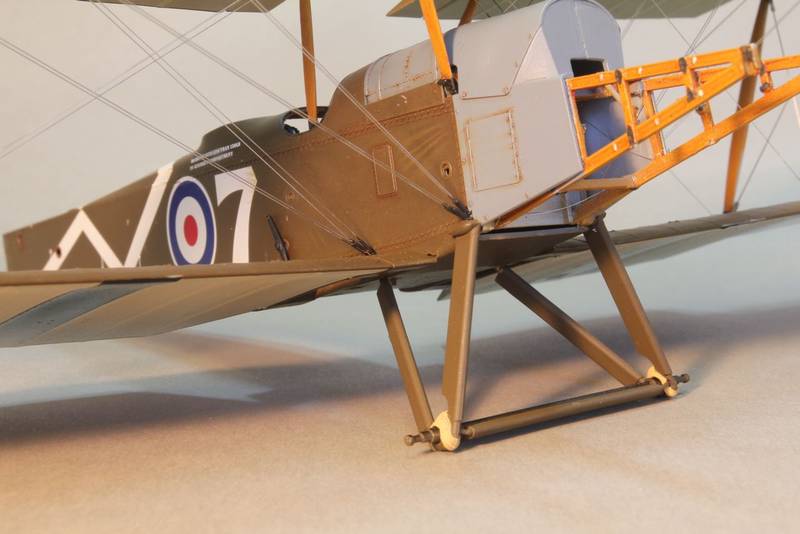
I am usually a ship modeller,( that's SHIP, OK?! ) so I decided to think of it as such. The basic rule of rigging is never to put anything in place which might make it difficult to access something else later on. Basically, think ahead. I started with the Stagger wires that support the fuz struts and the centre cross bracing wires. References show these have simpler attachments than some of the other wires, so I simply thick cyano'ed these in place.
Next was the start of the exciting/infuriating part. Making up flying wires.
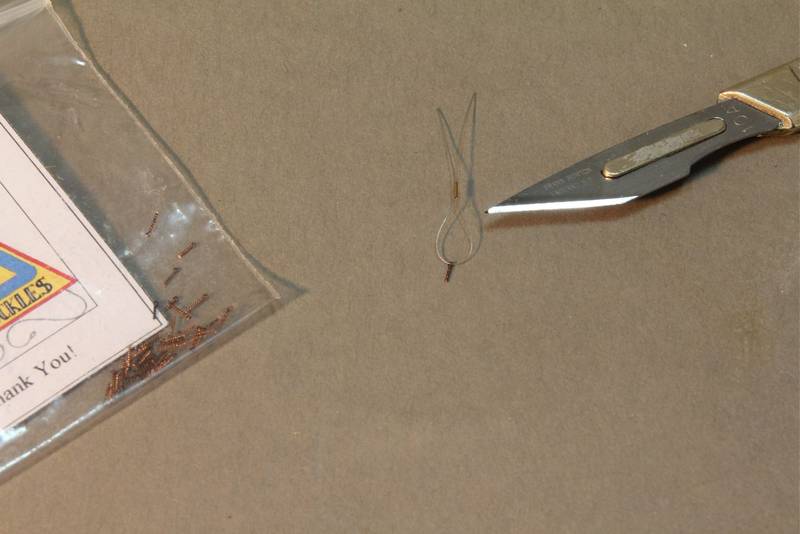
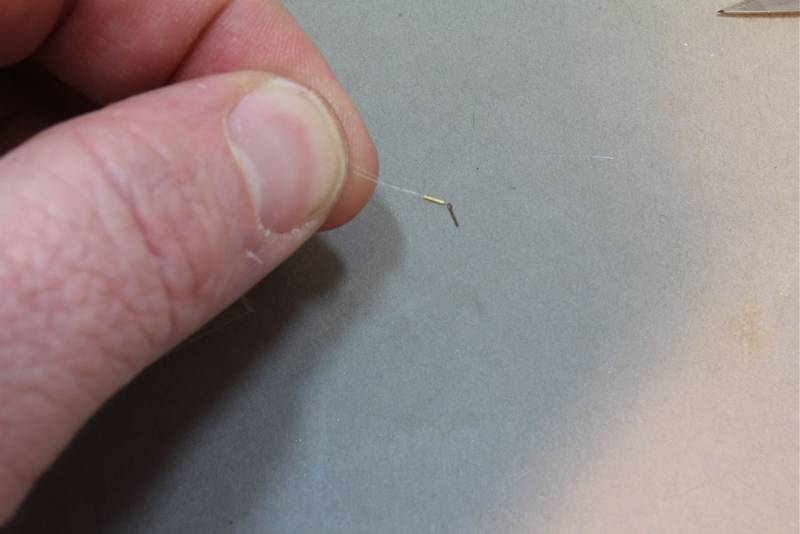
The etched wires are made from stainless steel, so are supposed not to be prone to sagging I'm told. I carefully chopped out the end brackets using a scalpel on a metal surface and, using my Etchmate tool, folded them to shape. These were then glued, using thick cyano, onto the ends of the correctly measured lengths of etched rod together with their accompanying tiny 'lock nuts' or O rings slid over the wire prior to attachment.
Using the 'flexible' type end fittings for the inter-plane rigging wires, these were carefully slipped over the molded lugs on the struts and held in place with a tiny drop of thin cyano. It took me half an hour to do one wire.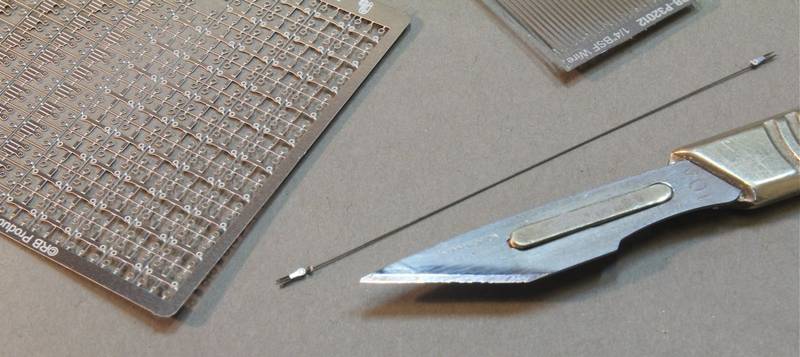
Finally, I coated the wires with Tamiya Smoke to dull the finish to a realistic brightness.
I'm writing this now as I'm taking a break before I do the other side. Otherwise I'll go blind (- Oh behave!) . Anyhow, I want me tea!
To be continued...
Gordon
So... IT WORKED!! The wings are now in perfect alignment, although you have to bare in mind that it is only being held there by 8 tiny plastic pins, so don't shake it about!
Now, I have dispensed with the suggested building order and decided to rig the wings before adding other bits, as this will hinder the access to the rigging points. I also decided to leave off the ailerons for the time being too for the same reasons.
On a model of this scale, the rigging section is noticeable. Looking at the rigging the LVG CVI, it was a piece of cake when compared the RFC machines. Streamline flying wires being their thing.
So, I got some Radu Productions etched rigging wires from http://www.radubstore.com . I ordered 3 different sizes, as I didn't know at that time which was used where, until I finally got hold of the Windsock book 28 on the RE.8, containing the official rigging specs. Most, it would appear, would be done in 2BA and 1/4 BSF size wires. I also got some of the etched end brackets to see if I could give those a go too!
I am usually a ship modeller,( that's SHIP, OK?!
) so I decided to think of it as such. The basic rule of rigging is never to put anything in place which might make it difficult to access something else later on. Basically, think ahead. I started with the Stagger wires that support the fuz struts and the centre cross bracing wires. References show these have simpler attachments than some of the other wires, so I simply thick cyano'ed these in place. Next was the start of the exciting/infuriating part. Making up flying wires.
The etched wires are made from stainless steel, so are supposed not to be prone to sagging I'm told. I carefully chopped out the end brackets using a scalpel on a metal surface and, using my Etchmate tool, folded them to shape. These were then glued, using thick cyano, onto the ends of the correctly measured lengths of etched rod together with their accompanying tiny 'lock nuts' or O rings slid over the wire prior to attachment.
Using the 'flexible' type end fittings for the inter-plane rigging wires, these were carefully slipped over the molded lugs on the struts and held in place with a tiny drop of thin cyano. It took me half an hour to do one wire.
Finally, I coated the wires with Tamiya Smoke to dull the finish to a realistic brightness.
I'm writing this now as I'm taking a break before I do the other side. Otherwise I'll go blind (- Oh behave!) . Anyhow, I want me tea!
To be continued...
Gordon

edoardo

Joined: November 30, 2007
KitMaker: 642 posts
AeroScale: 382 posts
Posted: Sunday, February 27, 2011 - 11:38 PM UTC
Hi gordon!
I have a question for you:
how do you straigthen the line?
I mean, they are a fixed length so, in my opinion, it will be either too short (i.e. the precise length of the wire when in tension) or too long (i.e. easily fit the turnbuckle, or the fixing holes on the wing surface, but too loose when fitted) .
I hope I made you understand in spite of my english...
Thank you
Ciao
Edo
Mgunns
Joined: December 12, 2008
KitMaker: 1,423 posts
AeroScale: 1,319 posts
Posted: Monday, February 28, 2011 - 05:00 AM UTC
HI Gordon:The wire looks good, a tribute to your patience and skill. I too have the set, but when I saw how small they were, I put them in my hobby box for a later date and courage. It is really coming along nicely.
Best
Mark
Neomega
Joined: August 15, 2010
KitMaker: 43 posts
AeroScale: 35 posts
Posted: Monday, February 28, 2011 - 09:52 AM UTC
Well...that was an experience! If you don't try, you'll never know!!
Now, I'm sure that there is some expert out there who has actually used this flat etched rigging technique successfully, and if it's you, please spill the beans - as it's not going to be me!
I eventually managed to get the flying wires to the lower wing on and they seemed pretty straight. The problem I then had was that the top wing is quite heavy and only held on by 8 thin struts. This means that whenever you turn the model over, the bloody thing moves slightly, making the rigging go all bendy - not a good look!
Turning it back made it go straight again though. However, another problem also reared it's head. When I went back into my workshop the next day after switching the heater off, the rigging had gone all bendy again. This was cured by warming the place up again, but didn't bode well.
The real excitement came when I started to rig the upper wing flying wires. As the stuff has absolutely no stretch, it is very difficult to get a consistently straight wire on both wings. The flex in the system works against you all the time meaning that once one set are tight, the other goes slack. What I really needed was a working set of 1/32nd scale turnbuckles on each wire to tension them. Or, maybe some kind of enlarging and miniaturizing ray to enable me to sort it that way!
So, much as it pains me, and I know that this makes me into some kind of modelling inadequate, but I have admitted defeat. Bobs Buckles are coming to the rescue and I'll have to make it with erroneously shaped rigging wires now won't I....!
See what I meant by the 'Curse Of The RE.8'?
And if you happen to see this model in a display or a comp somewhere, please feel free to comment on it's inaccuracy. And then I'll feel free to smack you one in the chops!
Going to weep myself to sleep now - but more to follow!
Gordon.

vulkanizer

Joined: December 26, 2009
KitMaker: 144 posts
AeroScale: 109 posts

Posted: Monday, February 28, 2011 - 10:04 AM UTC
Beautiful, very realistic work 

bobs_buckles

Joined: July 25, 2004
KitMaker: 4 posts
AeroScale: 3 posts

Posted: Monday, February 28, 2011 - 11:01 AM UTC
Gordon,
Beautiful work on the 'arry tate'.
Inaccurate buckles will be with you soon
All the best,
Bob Von Buckle VC & Bar Bar
Beautiful work on the 'arry tate'.
Inaccurate buckles will be with you soon
All the best,
Bob Von Buckle VC & Bar Bar

Mgunns
Joined: December 12, 2008
KitMaker: 1,423 posts
AeroScale: 1,319 posts
Posted: Monday, February 28, 2011 - 01:46 PM UTC
Don't feel bad Gordon:Bob's Buckles will look just fine. I like to use EZ line fine available from
Good Luck
Mark
Neomega
Joined: August 15, 2010
KitMaker: 43 posts
AeroScale: 35 posts
Posted: Thursday, March 10, 2011 - 10:41 AM UTC
Right then! I pinged off all the etched wires and put it down to experience (or lack of it) and adopted to plan B. Bob's Buckles got me some 110 tiny eyebolts and 2.5mm tubes in quick time and I set to.
If you've never used these before, they are easier to use then they first appear. The main problem being the size. Good tweezers with a flat face are essential. For the wire I use .3mm monofilament fishing line. This has a certain amount of stretch with is very useful in keeping the tension and when the temperature changes.
The eyebolts are carefully superglued into the holes you have pre-drilled at the rigging mounting points. Take care not to get any glue into the tiny ring hole!! Then, thread one of the tubes onto the line, which I coloured silver with a marker pen first. Then pass it through the ring hole and back through the tube again.
This will allow you to adjust and tension the rigging wire before locking it off with a tiny drop of thin superglue. Cut off the excess with fine nail scissors - job done! Repeat 88 times for the main wing rigging.
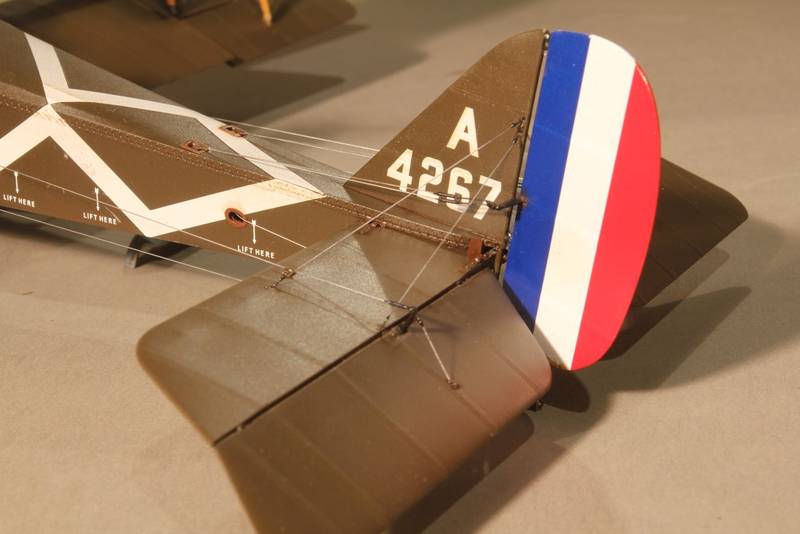
The RE.8 is a mass of wires, so check your references before your join the dots. I now really enjoy this part. Suddenly the whole thing comes together - like rigging a square rigged ship. The doubled up flying wires are fastened together with several clamps, these were reproduced with a drop of PVA and then painted black, as were all the rigging screws. I know the colour photos on the WNW site show silver, but all the archive ones look black, and anyhow, it looks better.... so there!
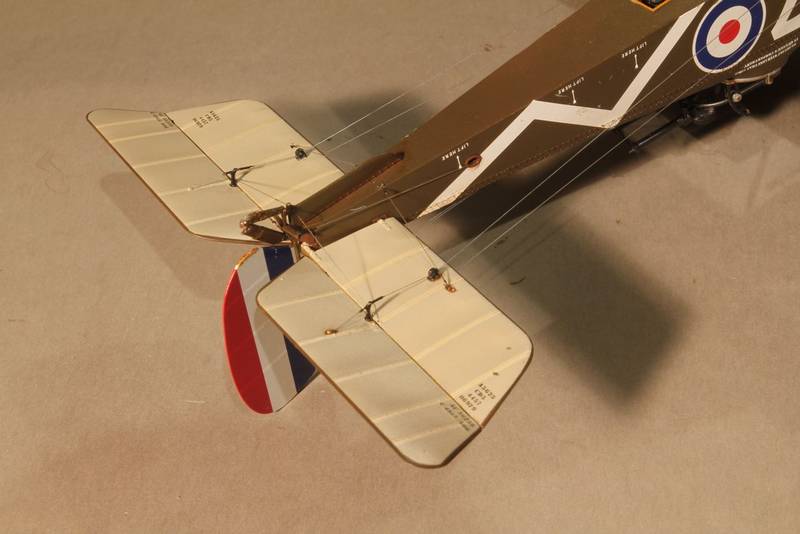
The elevator wires have to pass through a pulley on the underside of the stab, which was drilled accordingly, and through a tube guide on the upper surface. These are moulded onto the tail, but I trimmed them off and replaced with with a cut down rigging tube. The rudder had twin wires, one above the other. For the fixing I used etched turnbuckles from the Eduard 1/48th WWI rigging sheet and rigged the cables to these.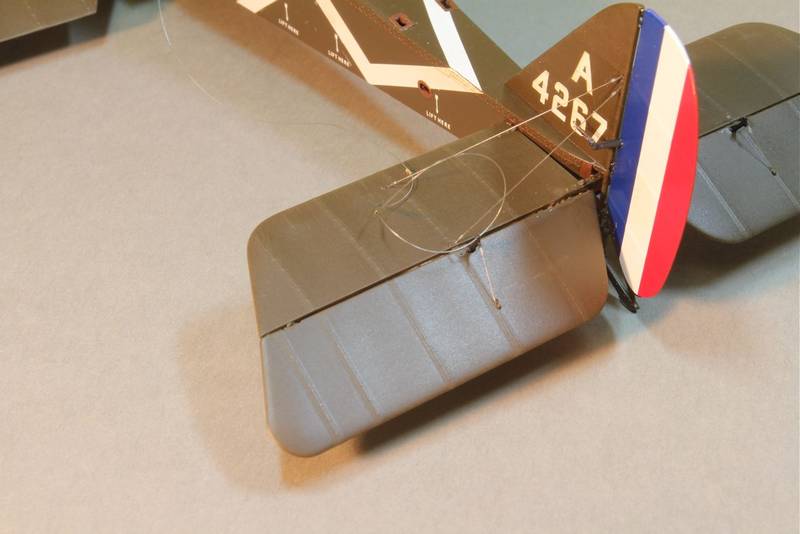
Cooking with gas now I am!! (Americans may well not be familiar with this colloquialism!)
If you've never used these before, they are easier to use then they first appear. The main problem being the size. Good tweezers with a flat face are essential. For the wire I use .3mm monofilament fishing line. This has a certain amount of stretch with is very useful in keeping the tension and when the temperature changes.
The eyebolts are carefully superglued into the holes you have pre-drilled at the rigging mounting points. Take care not to get any glue into the tiny ring hole!! Then, thread one of the tubes onto the line, which I coloured silver with a marker pen first. Then pass it through the ring hole and back through the tube again.
This will allow you to adjust and tension the rigging wire before locking it off with a tiny drop of thin superglue. Cut off the excess with fine nail scissors - job done! Repeat 88 times for the main wing rigging.
The RE.8 is a mass of wires, so check your references before your join the dots. I now really enjoy this part. Suddenly the whole thing comes together - like rigging a square rigged ship. The doubled up flying wires are fastened together with several clamps, these were reproduced with a drop of PVA and then painted black, as were all the rigging screws. I know the colour photos on the WNW site show silver, but all the archive ones look black, and anyhow, it looks better.... so there!
The elevator wires have to pass through a pulley on the underside of the stab, which was drilled accordingly, and through a tube guide on the upper surface. These are moulded onto the tail, but I trimmed them off and replaced with with a cut down rigging tube. The rudder had twin wires, one above the other. For the fixing I used etched turnbuckles from the Eduard 1/48th WWI rigging sheet and rigged the cables to these.
Cooking with gas now I am!! (Americans may well not be familiar with this colloquialism!)

Kornbeef
Joined: November 06, 2005
KitMaker: 1,667 posts
AeroScale: 1,551 posts

Posted: Thursday, March 10, 2011 - 11:29 AM UTC
Another Brit colloquiwotsit... It's the dogs Bo@@@cks. Beautiful insipring build leaving me so tempted to add this to my wishlist.
Keith
Keith

gcn123
Joined: September 13, 2007
KitMaker: 69 posts
AeroScale: 60 posts
KitMaker: 69 posts
AeroScale: 60 posts
Posted: Friday, March 11, 2011 - 12:05 AM UTC
It is starting to look very nice and it seems you know your way around the rigging although I get slightly worried when anyone admits they like rigging, its akin to admitting you like being a serial killer.
Could you run by me again how you did the double wires.
Many thanks
Could you run by me again how you did the double wires.
Many thanks

CaptainA
Joined: May 14, 2007
KitMaker: 3,117 posts
AeroScale: 2,270 posts
Posted: Friday, March 11, 2011 - 02:52 AM UTC
Rigging looks great. I would also like more on the double wires. Maybe a close-up photo.
I don't like rigging, but getting it done right is very, very satisfying.
I don't like rigging, but getting it done right is very, very satisfying.

Neomega
Joined: August 15, 2010
KitMaker: 43 posts
AeroScale: 35 posts
Posted: Friday, March 11, 2011 - 10:51 AM UTC
Neomega
Joined: August 15, 2010
KitMaker: 43 posts
AeroScale: 35 posts
Posted: Friday, March 11, 2011 - 11:16 AM UTC
The double flying wires are just duplicates of each other - they were just rigged using the tube and eye method. The kit has the location holes for all the rigging but I just drilled them a little deeper to glue the eyebolt in better.
The rudder used the Eduard set. This has many different turnbuckle styles, some double ended to be rigged at each end, and some are attached to horns or fixing brackets. I used the bracket fixed ones. As the rudder wires are doubled with one above the other, they fix to the rudder horn with a single bolt, one on top, the other below the horn.
I just carefully superglued the etchings in the same place, one above and the other below the horn. I then used the ring on the etching as the eyebolt and ran the cable through the tube as before.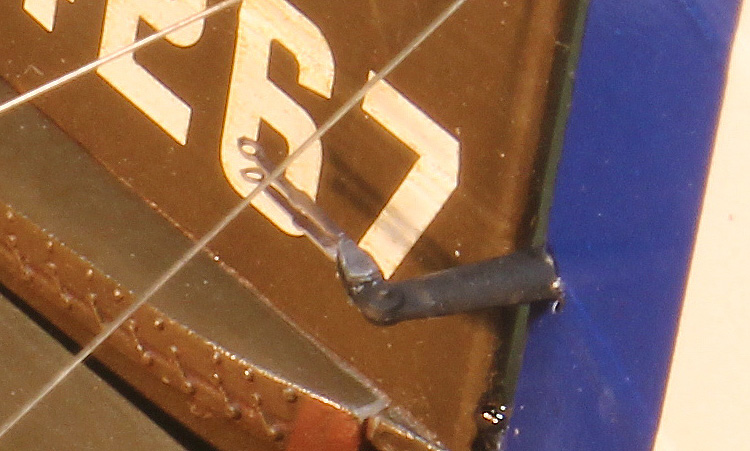
I'll get some photos up next week when I've finished the beast!
Ta!
Gordon.
Neomega
Joined: August 15, 2010
KitMaker: 43 posts
AeroScale: 35 posts
Posted: Monday, March 14, 2011 - 09:59 AM UTC
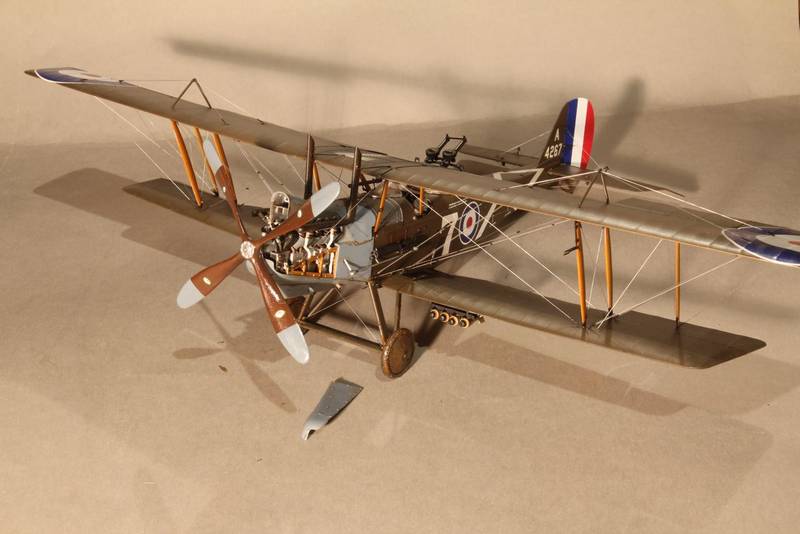
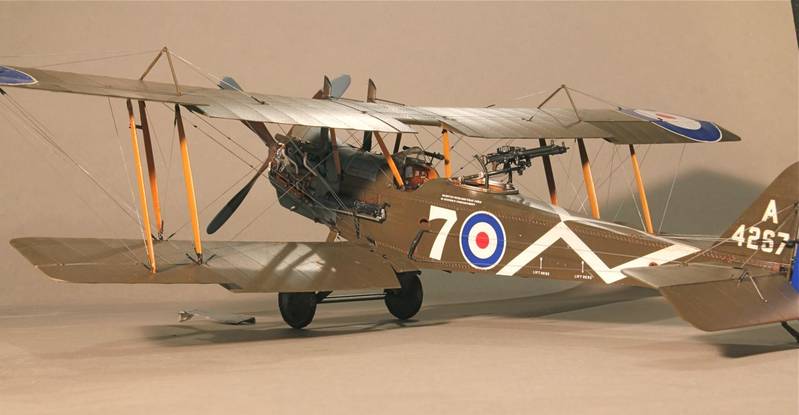
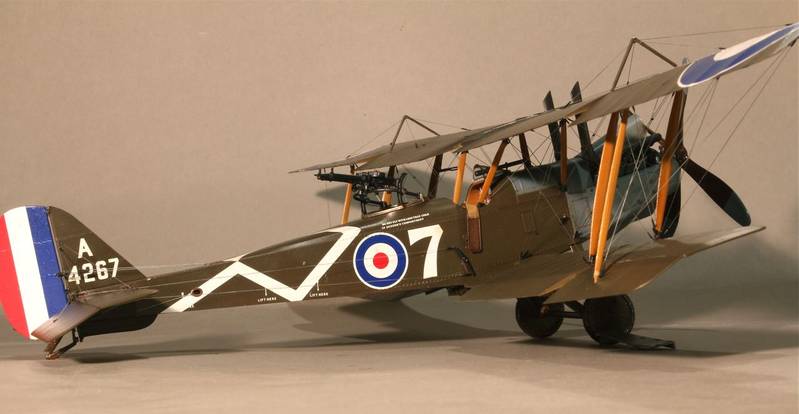
FINISHED!!
I find that these models suddenly come together and before you know it, bang! - done!
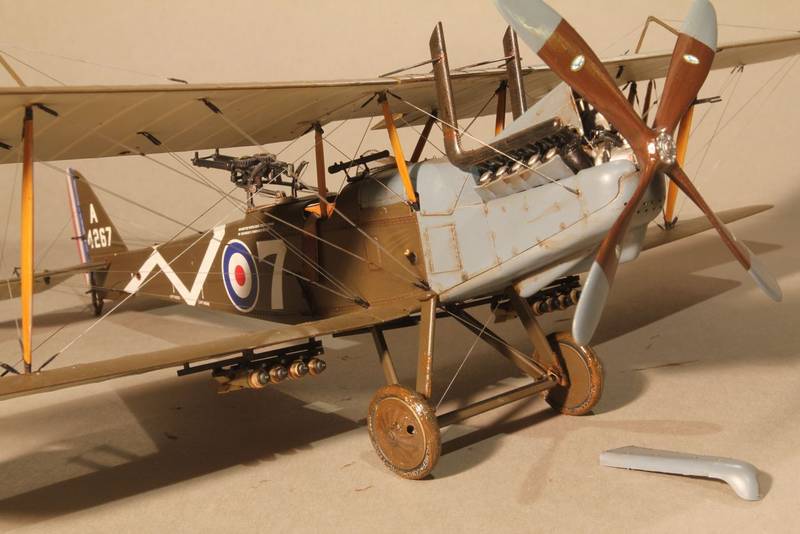
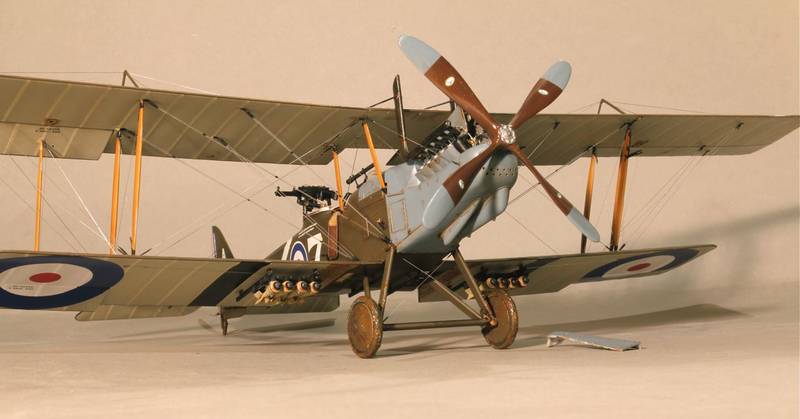
One of the tricky areas was the exhaust stacks, This is where you find that any slight mis-alignment of the cylinders, that you made right back at the beginning, will come back to haunt you. After a bit of fiddling however, they were made to look both square and in line.
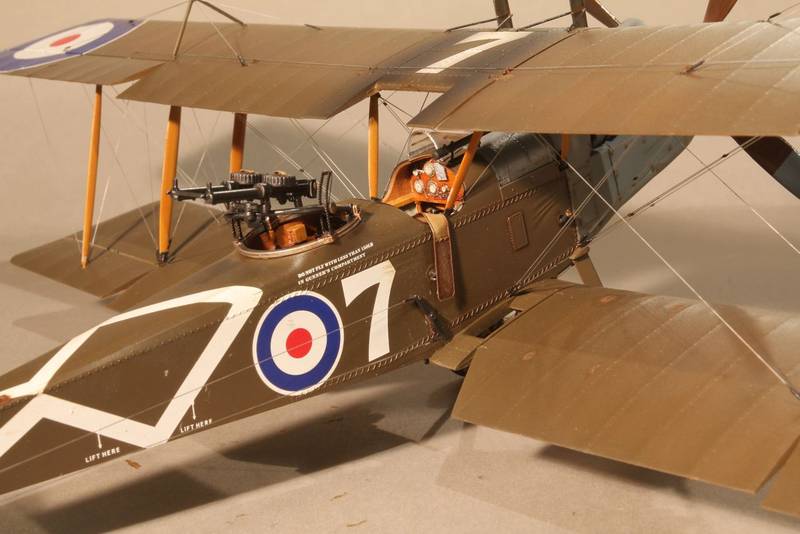
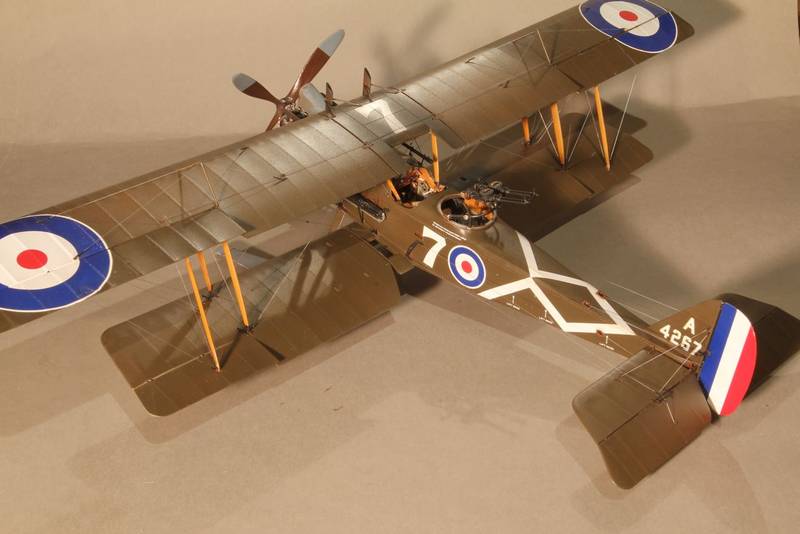
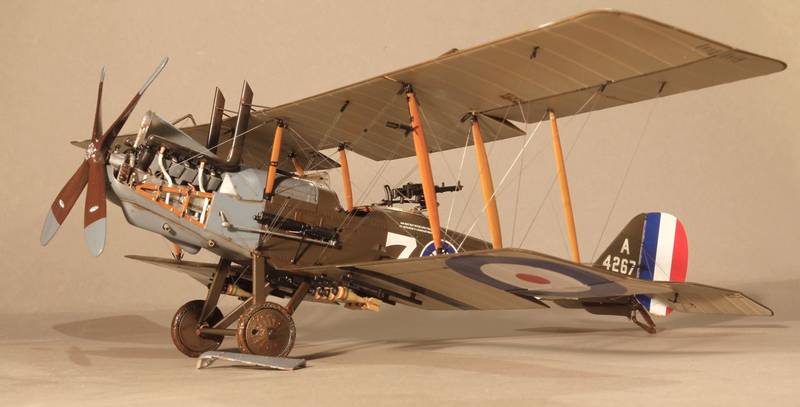
My version, and the reason I chose it, has twin Lewis guns. These are lovely little moldings that just require a graphite dry-brush over black to bring out all the lovely detail. I know after market ones are available, but these come pretty close. The mount has a couple of etched toothed guides and need to be rigged to sumulate the bungees.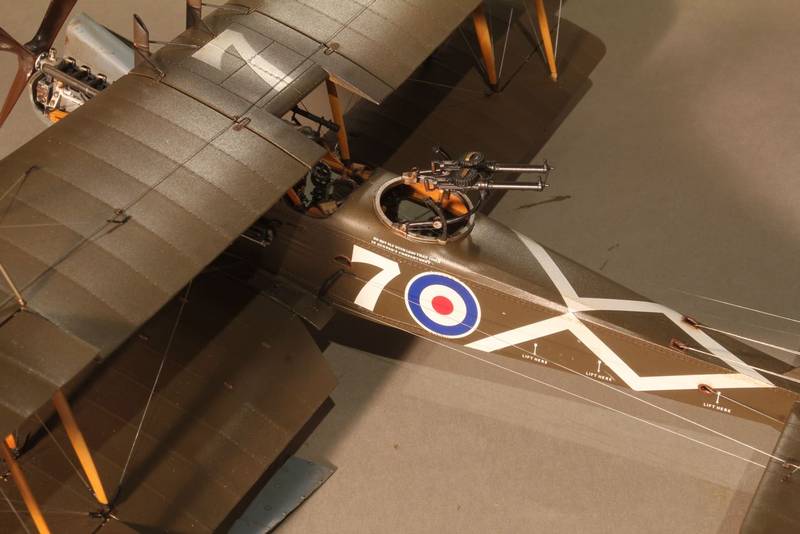
The little bombs were made and mounted, the prop painted - I did it in one colour as I can never get the hang of that fancy laminated effect. Someone should do a decal for these props - Remember I thought of it first!!
Finally, the pilots seat strap was painted and fixed, casually draped over the side, a bit of flander mud on the wheelsand a burnt umber oil wash on the appropriate areas. If you put a little drop on, you can then blow it to sumulate the airflow and , Voila! Job Done.
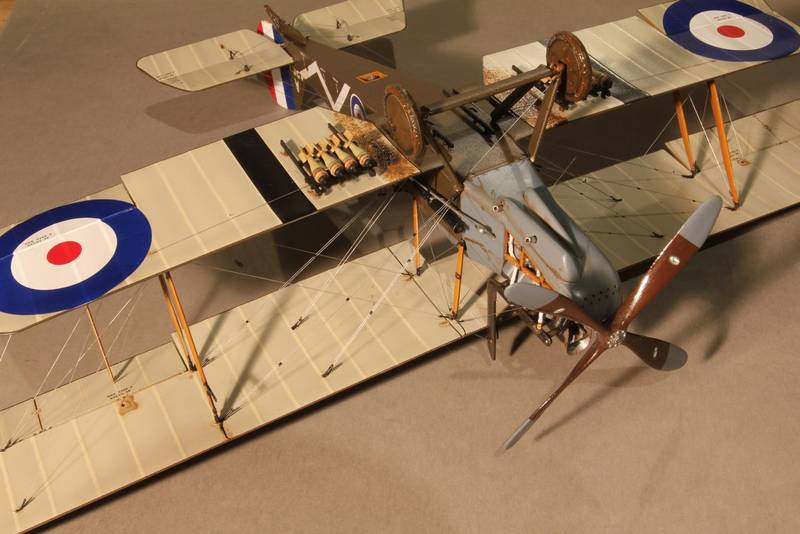
This model was a joy to build. More challenging than the LVF CVI as it demands more weathering here and there, and, my God, it's ugly!
Bring on the Fe.2B.....
Thanks!
Gordon.
I find that these models suddenly come together and before you know it, bang! - done!
One of the tricky areas was the exhaust stacks, This is where you find that any slight mis-alignment of the cylinders, that you made right back at the beginning, will come back to haunt you. After a bit of fiddling however, they were made to look both square and in line.
My version, and the reason I chose it, has twin Lewis guns. These are lovely little moldings that just require a graphite dry-brush over black to bring out all the lovely detail. I know after market ones are available, but these come pretty close. The mount has a couple of etched toothed guides and need to be rigged to sumulate the bungees.
The little bombs were made and mounted, the prop painted - I did it in one colour as I can never get the hang of that fancy laminated effect. Someone should do a decal for these props - Remember I thought of it first!!
Finally, the pilots seat strap was painted and fixed, casually draped over the side, a bit of flander mud on the wheelsand a burnt umber oil wash on the appropriate areas. If you put a little drop on, you can then blow it to sumulate the airflow and , Voila! Job Done.
This model was a joy to build. More challenging than the LVF CVI as it demands more weathering here and there, and, my God, it's ugly!
Bring on the Fe.2B.....
Thanks!
Gordon.
Neomega
Joined: August 15, 2010
KitMaker: 43 posts
AeroScale: 35 posts
Posted: Monday, March 14, 2011 - 10:00 AM UTC
FINISHED!!
I find that these models suddenly come together and before you know it, bang! - done!
One of the tricky areas was the exhaust stacks, This is where you find that any slight misalignment of the cylinders, that you made right back at the beginning, will come back to haunt you. After a bit of fiddling however, they were made to look both square and in line.
My version, and the reason I chose it, has twin Lewis guns. These are lovely little moldings that just require a graphite dry-brush over black to bring out all the lovely detail. I know after market ones are available, but these come pretty close. The mount has a couple of etched toothed guides and need to be rigged to simulate the bungees.
The little bombs were made and mounted, the prop painted - I did it in one colour as I can never get the hang of that fancy laminated effect. Someone should do a decal for these props - Remember I thought of it first!!
Finally, the pilots seat strap was painted and fixed, casually draped over the side, a bit of Flanders mud on the wheels and a burnt umber oil wash on the appropriate areas. If you put a little drop on, you can then blow it to simulate the airflow and , Voila! Job Done.
This model was a joy to build. More challenging than the LVF CVI as it demands more weathering here and there, and, my God, it's ugly!
Bring on the Fe.2B.....
Thanks!
Gordon.
Kornbeef
Joined: November 06, 2005
KitMaker: 1,667 posts
AeroScale: 1,551 posts
Posted: Monday, March 14, 2011 - 12:31 PM UTC
It's ugliness is its beauty. A really nice job Gordon, congratulations.
Keith.
Keith.

JackFlash
Joined: January 25, 2004
KitMaker: 11,669 posts
AeroScale: 11,011 posts
Posted: Wednesday, March 16, 2011 - 03:40 PM UTC

lcarroll

Joined: July 26, 2010
KitMaker: 1,032 posts
AeroScale: 1,025 posts
Posted: Wednesday, March 16, 2011 - 06:13 PM UTC
Quoted Text
It's ugliness is its beauty. A really nice job Gordon, congratulations.
Keith.
Gordon,
An incredibly ugly machine represented by an incredibly beautiful build! You should be very proud of your results.....nice work all round.
Cheers,

MTDriver
Joined: April 01, 2006
KitMaker: 119 posts
AeroScale: 10 posts

Posted: Thursday, March 24, 2011 - 07:15 PM UTC
Seen this in the flesh the other day,a stunning build indeed,and its ugliness is only matched by its creator,Lol!Flash(Gordon) makes me sick in his ability to seemingly knock something together and create a beautiful replica,and for those of you attending this Sundays Hinckley show,you may just happen to see it.And,I think to dispel the ghost of the 'Arry Tate',Flash should build the Airfix version too!
Dave.
Dave.
ajdavies
Joined: April 23, 2008
KitMaker: 4 posts
AeroScale: 3 posts
Posted: Friday, March 25, 2011 - 05:22 AM UTC
Now you've gone and done it Dave. Praising him in public like that.
As long as you don't make eye contact with him or feed him after midnight we should be alright.
But seriously. You are right. It is lovely, and in the twenty odd years I've known Gordon he has frequently mentioned that Airfix Re8.
Great work Gord.
All the best.
Adrian
As long as you don't make eye contact with him or feed him after midnight we should be alright.
But seriously. You are right. It is lovely, and in the twenty odd years I've known Gordon he has frequently mentioned that Airfix Re8.
Great work Gord.
All the best.
Adrian
Quoted Text
Seen this in the flesh the other day,a stunning build indeed,and its ugliness is only matched by its creator,Lol!Flash(Gordon) makes me sick in his ability to seemingly knock something together and create a beautiful replica,and for those of you attending this Sundays Hinckley show,you may just happen to see it.And,I think to dispel the ghost of the 'Arry Tate',Flash should build the Airfix version too!
Dave.
MTDriver
Joined: April 01, 2006
KitMaker: 119 posts
AeroScale: 10 posts
Posted: Monday, March 28, 2011 - 07:13 AM UTC

Photo of Flash's RE 8 and LVG on the table at the Hinckley show.
Mind you,we think he has one real seious drink problem since rigging that RE 8!
 ........Dave.
 |

WEB HOSTING BY


Copyright ©2021 AeroScale and Kitmaker Network, a subsidiary of Silver Star Enterprises
All Rights Reserved. Please read our Conditions of Use and Privacy Policy.
All Rights Reserved. Please read our Conditions of Use and Privacy Policy.