World War II: Germany
Aircraft of Germany in WWII.
Hosted by Rowan Baylis
Fw190D-9 Duo Review Build
TedMamere
_VISITCOMMUNITY
Moselle, France
Joined: May 15, 2005
KitMaker: 5,653 posts
AeroScale: 4,347 posts
Posted: Wednesday, March 10, 2010 - 05:43 AM UTC
Hi Rowan,

I can't wait to see how your Dora will look like with the Com-Art varnish.

I have applied the decals and they worked very well. I have never had any problems with Cartograf decals provided in the Eduard kits so it is not a surprise...


Next step will be to apply a wash to highlight the surface detail (panel lines and rivets).

Jean-Luc
Merlin
Staff MemberSenior Editor
AEROSCALE
#017
_VISITCOMMUNITY
United Kingdom
Joined: June 11, 2003
KitMaker: 17,582 posts
AeroScale: 12,795 posts
Posted: Wednesday, March 10, 2010 - 05:53 AM UTC
Hi Jean-Luc

It looks stunning with the decals on! The pin-striping for the fuselage bands works a treat.

I'm glad to hear the decals work well - I'll probably apply a few tonight. That may be a little soon, but I want to get a move on.

All the best

Rowan
Merlin
Staff MemberSenior Editor
AEROSCALE
#017
_VISITCOMMUNITY
United Kingdom
Joined: June 11, 2003
KitMaker: 17,582 posts
AeroScale: 12,795 posts
Posted: Wednesday, March 10, 2010 - 10:24 PM UTC

Quoted Text

I can't wait to see how your Dora will look like with the Com-Art varnish.


Hi again Jean-Luc

Well, I didn't get a chance to work on the kit last night, so no decals yet - but it's probably no bad thing to give the paint and varnish an extra day to harden. The Com-Art gloss varnish went on really nicely. It's thin enough to airbrush straight from the bottle, or you can brush it. It dries quickly to a nice hard shine that polishes well, and is easy to clean out of the airbrush. I've applied a second light coat (after polishing the first), this time thinned with Isopropyl Alcohol and it's looking like it'll be really good for decals.

I'll be out all day, so I hope to catch up a bit this evening.

All the best

Rowan
Merlin
Staff MemberSenior Editor
AEROSCALE
#017
_VISITCOMMUNITY
United Kingdom
Joined: June 11, 2003
KitMaker: 17,582 posts
AeroScale: 12,795 posts
Posted: Thursday, March 11, 2010 - 08:24 PM UTC
Hi again

Well, I got some of the decals on last night. As Jean-Luc says, the quality is excellent and they go on beautifully. The fuslage cross on my colour scheme is annoying, because you need to paint the black centre. I don't know if that's a mix-up on Eduard's part, because it's not indicated on the "Scheme F" painting diagram that I was following (it is shown for Dortenmann's alternative "Scheme B"). It's not the end of the world, because I need to do an overspray on the fuselage bands anyway, but it'll require careful masking.

More worrying is that the fuselage number seems very large - bigger than in both Eduard's and Jerry Crandall's artwork, and definitely bigger than what's partially visible in the only photo I have that shows it (in its earlier "Black 1 style). The B4 fuel triangle is too big too for Dortenmann's aircraft.

More later, including some progress pics.

All the best

Rowan
Merlin
Staff MemberSenior Editor
AEROSCALE
#017
_VISITCOMMUNITY
United Kingdom
Joined: June 11, 2003
KitMaker: 17,582 posts
AeroScale: 12,795 posts
Posted: Thursday, March 11, 2010 - 11:03 PM UTC
Hi again

Just a very quick update to show the stage I've got to:


I can't believe how the week's flown by - and I promised Jean-Luc I'd repair the Flitzer ready to shoot some pics for this weekend. So, I'd better get on with that rather than apply more decals to the Dora...

All the best

Rowan
TedMamere
_VISITCOMMUNITY
Moselle, France
Joined: May 15, 2005
KitMaker: 5,653 posts
AeroScale: 4,347 posts
Posted: Thursday, March 11, 2010 - 11:23 PM UTC
Hi Rowan,

Very nice progress indeed... and a special guest is present too!


Quoted Text

More worrying is that the fuselage number seems very large - bigger than in both Eduard's and Jerry Crandall's artwork, and definitely bigger than what's partially visible in the only photo I have that shows it (in its earlier "Black 1 style). The B4 fuel triangle is too big too for Dortenmann's aircraft.


I completely forgot to say that I also found the decals to be overall too large. It's as if the original artwork file has been resized by 5 or 10% somehow during the design process... Obviously they are usable nevertheless as you can see on both models.

I didn't had, and won't have, the time I hoped for to work on the Dora. The past two days were very busy and tomorrow I will be away as well. So you have time to catch up Rowan... and shoot the Flitzer pictures!

Jean-Luc
Merlin
Staff MemberSenior Editor
AEROSCALE
#017
_VISITCOMMUNITY
United Kingdom
Joined: June 11, 2003
KitMaker: 17,582 posts
AeroScale: 12,795 posts
Posted: Thursday, March 11, 2010 - 11:43 PM UTC
Hi Jean-Luc

Interesting that you found a size-issue with the decals too - I wonder what happened?...

The other irritating thing I've got to do on my Dora is re-spray the yellow tail. I thought the LifeColor RLM 04 seemed a bit bright and pale - and now I've got the "Yellow 1" on (which is a more accurate colour, according to my paint chips) the difference is really noticeable.

So, a few fiddly painting bits to do, but I'm hoping to get the model finished next week sometime...

All the best

Rowan

P.S. I've glued the Flitzer's undercarriage back on (yet again!) - hopefully it'll survive long enough for another attempt at a photo-session!

P.P.S. I'm starting to think I'm doomed with this Flitzer shoot! The undercarriage is on, I've been and bought some background paper... and now it's raining, so I can't get outside to shoot the pics! Aaaaghhhh!
TedMamere
_VISITCOMMUNITY
Moselle, France
Joined: May 15, 2005
KitMaker: 5,653 posts
AeroScale: 4,347 posts
Posted: Saturday, March 13, 2010 - 07:13 AM UTC
Hi all,

After having put the model on hold for a few days, came some heavy motivation to continue the build...


The Crandall books are great and don't regret to have purchased them. They are great sources for inspiration.

Anyway, today I have applied a wash on the model....


I have used oil paints diluted with White Courtrai Drier to work faster...


Below you can see that Eduard have dome a nice job on the surface finish of the model...


I will let the wash dry and then apply a flat coat.

Jean-Luc
Merlin
Staff MemberSenior Editor
AEROSCALE
#017
_VISITCOMMUNITY
United Kingdom
Joined: June 11, 2003
KitMaker: 17,582 posts
AeroScale: 12,795 posts
Posted: Saturday, March 13, 2010 - 10:43 PM UTC
Hi Jean-Luc

It looks really tasty! Can White Courtrai Drier be used with enamels to accelerate them? It might be a good alternative to Rustins Driers which is so useful with Xtracolors.

All the best

Rowan
Roxter
_VISITCOMMUNITY
Rigas, Latvia
Joined: July 04, 2007
KitMaker: 268 posts
AeroScale: 245 posts
Posted: Tuesday, March 16, 2010 - 03:17 AM UTC

Quoted Text


[ ]


Guys, really enjoy following your builds!

Just wanted to share a little tip for replacing rudder ribs. The pictures show that the method is very easy and helps imitating slightly raised ribs:


Cheers,
:-H
Mecenas
Joined: December 23, 2007
KitMaker: 1,596 posts
AeroScale: 1,275 posts
Posted: Tuesday, March 16, 2010 - 04:31 AM UTC
Hi Arseny,
it's really interesting method but what did you use for it? A putty? Surfacer? Thick paint?
Roxter
_VISITCOMMUNITY
Rigas, Latvia
Joined: July 04, 2007
KitMaker: 268 posts
AeroScale: 245 posts
Posted: Tuesday, March 16, 2010 - 07:51 AM UTC
Hi Mihal,

Frankly speaking this is not my method - I just posted the links to it. But I also use it quite often - especially when building Tamiya WW2 warbird subjects

I use Gunze Sangyo Surfacer 1000, but I guess heavy diluted putty will also suit just fine.

Here you can see some pics of FW-190A-8 in-progress build. I've imitated the ribs as in the described method. Works for me
Merlin
Staff MemberSenior Editor
AEROSCALE
#017
_VISITCOMMUNITY
United Kingdom
Joined: June 11, 2003
KitMaker: 17,582 posts
AeroScale: 12,795 posts
Posted: Tuesday, March 16, 2010 - 08:37 AM UTC
Hi Arseny

Neat! I used to do something very along those lines about 15 years ago by spraying Halford thick aerosol plastic primer - I'd forgotten all about it, so thanks for reminding me!

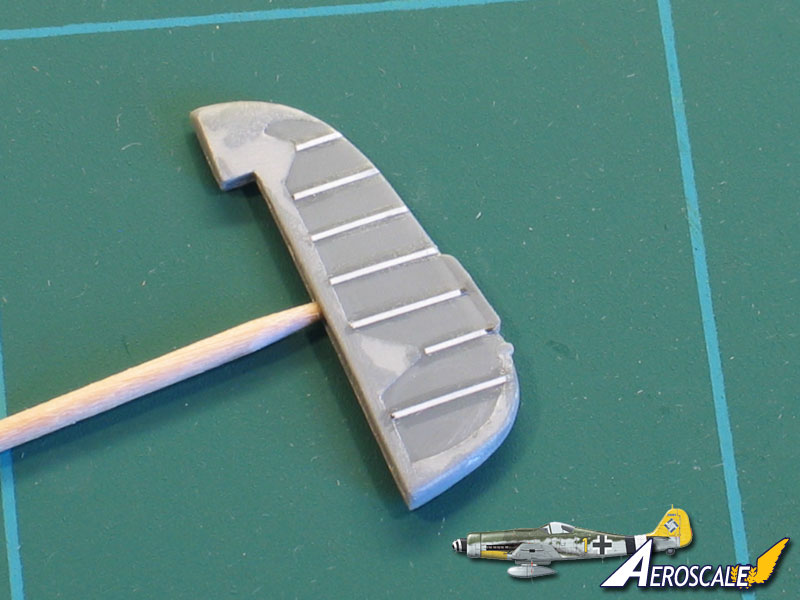
Using the "reverse" technique also works very well, i.e. mask the ribs with Dymo or another fairly robust tape and sand gently between them. It gives a very nice subtle effect that is especially useful on master parts for casting, because it can't be damaged when you remove them from the RTV mould.

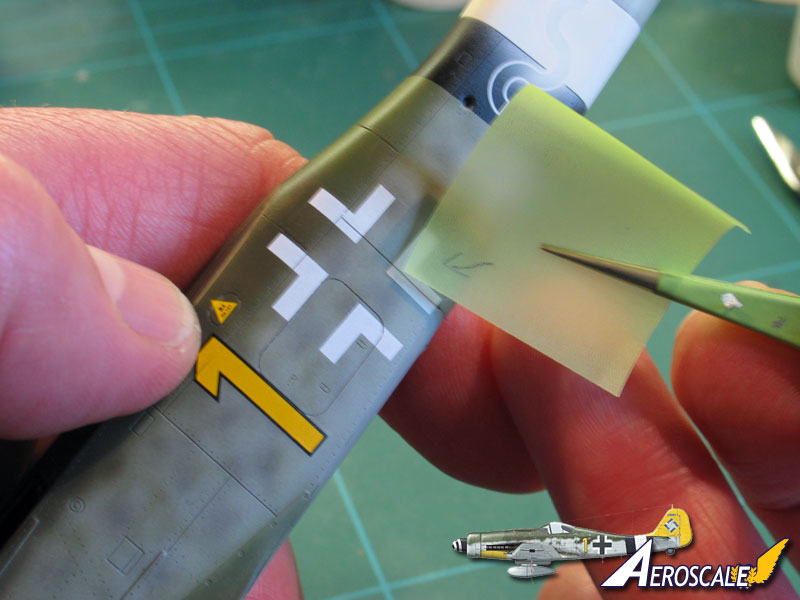
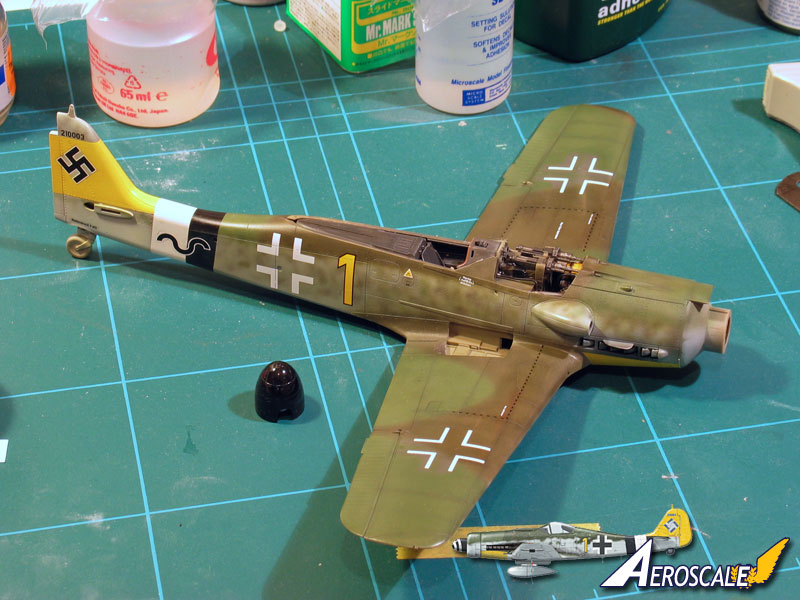
I've been out most of the last few days so there's been little chance to do anything to the Dora, but the last of the decals are on and have had a chance to really dry out:


I haven't applied the stencil markings where the aircraft was repainted, and I've cut the wing-walks short for the same reason (I'll do a slight overspray to soften the "cut-offs"). I've no idea whether the real aircraft was that way - to be honest, Eduard's stencils don't actually match the few shots I've got of Dortenmann's aircraft anyway, so it's all artistic licence.

The spinner spiral decal for Dortenmann's colour scheme has defeated me! Although it would go on, the resulting spiral was nowhere near as tight as either Eduard or Jerry Crandall show in their profiles, so I scrapped it. I may try one of the other spirals, but I think it'll be easier to simply paint it.

I should get a decent day at the workbench tomorrow, so I'll respray the RLM 04 and the fuselage cross and try to get moving again generally.

All the best

Rowan
NickZour
_VISITCOMMUNITY
Attica, Greece / Ελλάδα
Joined: May 01, 2008
KitMaker: 1,437 posts
AeroScale: 1,241 posts
Posted: Tuesday, March 16, 2010 - 10:15 AM UTC
Congratulations!

So fast & excellent

I'm jealous


Cheers Nick
TedMamere
_VISITCOMMUNITY
Moselle, France
Joined: May 15, 2005
KitMaker: 5,653 posts
AeroScale: 4,347 posts
Posted: Wednesday, March 17, 2010 - 08:28 AM UTC
Hi Rowan,


Quoted Text

Can White Courtrai Drier be used with enamels to accelerate them? It might be a good alternative to Rustins Driers which is so useful with Xtracolors.


Sorry for the late reply. I can't answer your question because I don't use enamels at all. But if you want I can get you one bottle of Courtrai Drier the next time I go to the Art shop and you can try by yourself...

After a four days break I have managed to find some time to work on my Dora again. First mission was to redo the underside panels which were damaged when removing masking tape...


It's not perfect but better than before. I will try to hide the patches as much as possible with the weathering later. I have then applied a coat of flat varnish...


While I was at it, i've decided to continue and get the aircraft on it's feets. The movable canopy part isn't glued in place yet...


Next time I'll do the weathering and add the detail parts (guns and antennas).

Jean-Luc
Merlin
Staff MemberSenior Editor
AEROSCALE
#017
_VISITCOMMUNITY
United Kingdom
Joined: June 11, 2003
KitMaker: 17,582 posts
AeroScale: 12,795 posts
Posted: Wednesday, March 17, 2010 - 08:39 AM UTC
Hi Jean-Luc

Yes please - I'd love to try the Courtrai Drier and they don't have any in my local art shop (I checked yesterday).

Your Dora looks fantastic with the undercarriage and canopy fitted! I'm still a way behind, but I did a bit of painting today and sanded the new drop tank closer to shape.

All the best

Rowan
thegirl
_VISITCOMMUNITY
Alberta, Canada
Joined: January 19, 2008
KitMaker: 6,743 posts
AeroScale: 6,151 posts
Posted: Thursday, March 18, 2010 - 01:08 AM UTC
This has been a very exciting build review to follow so far I'm really enjoying watching ever thing unfold . Just might have to get this kit after all

Excellent progress guy's
Merlin
Staff MemberSenior Editor
AEROSCALE
#017
_VISITCOMMUNITY
United Kingdom
Joined: June 11, 2003
KitMaker: 17,582 posts
AeroScale: 12,795 posts
Posted: Thursday, March 18, 2010 - 10:31 PM UTC
Hi again

Well, the last decals are on and the spinner has a spiral. I spotted an old Microscale sheet meant for a Ju 87 in my decals stash and found it fitted just about right.


The spiral seems to end "in mid-air" on all the profiles, so I've taken the cut-off point to be the panel line aroudn the spinner.

Now I've just got to paint the black on the fuselage crosses - a bit scary... I hope the decals don't lift!... and I'll be on the way to finishing this beastie!

All the best

Rowan
Merlin
Staff MemberSenior Editor
AEROSCALE
#017
_VISITCOMMUNITY
United Kingdom
Joined: June 11, 2003
KitMaker: 17,582 posts
AeroScale: 12,795 posts
Posted: Friday, March 19, 2010 - 11:27 PM UTC
Hi again

If you just heard a huge sigh of relief, it was because I've got the fuselage crosses painted successfully! I have to admit this fiddy and rather nerve wracking job was the one part of the build I've found a real pain - there were so many ways it could have ended in disaster...


Still, it's done and the results aren't bad. I do hope that Eduard include full decals in future boxings of the kit though...

All the best

Rowan
Mecenas
Joined: December 23, 2007
KitMaker: 1,596 posts
AeroScale: 1,275 posts
Posted: Saturday, March 20, 2010 - 01:07 AM UTC
This is one of the best german fusalge crosses I've ever seen. Good job Rowan!
Merlin
Staff MemberSenior Editor
AEROSCALE
#017
_VISITCOMMUNITY
United Kingdom
Joined: June 11, 2003
KitMaker: 17,582 posts
AeroScale: 12,795 posts
Posted: Saturday, March 20, 2010 - 06:13 AM UTC
Hi again

Many thanks Michal! - I'm just glad to have that stage safely out of the way.

I tinkered with a few more bits and pieces this afternoon and finally decided I was fed up with the kit looking basically the same every time I looked at it - so for a bit of a morale boost I attached the undercarriage and tail and dry-fitted the wheels and prop:


All the best

Rowan
buggalugs
_VISITCOMMUNITY
Australian Capital Territory, Australia
Joined: June 06, 2007
KitMaker: 135 posts
AeroScale: 115 posts
Posted: Saturday, March 20, 2010 - 08:45 AM UTC
Rowan

Looks superb! What did you use for masking the fuselage crosses - is that frisket tape or an equivalent? Looks like it allowed you more precision than Tamiya tape would have done.

cheers Brad
TedMamere
_VISITCOMMUNITY
Moselle, France
Joined: May 15, 2005
KitMaker: 5,653 posts
AeroScale: 4,347 posts
Posted: Saturday, March 20, 2010 - 11:35 AM UTC
Hi all,

Rowan, very nice job on the crosses.

The Dora looks great on it's feets isn't it?

I made the aerial wire today on mine and other smaller details...


Tomorrow I will add some paint chipping and weathering and the model will be finished.

Rowan, here are the only pictures where your fuel tank appears in vol.2 of Jerry Crandall's Dora books...


I don't think they will be of great help I'm afraid.

Jean-Luc
alpha_tango
_VISITCOMMUNITY
Germany
Joined: September 07, 2005
KitMaker: 5,609 posts
AeroScale: 5,231 posts
Posted: Saturday, March 20, 2010 - 06:46 PM UTC
Hi Jean-Luc

I love your model, but I think you got this one wrong:


On the early hood (that you used) you have the cale running into the hood and down to a roll (pretty much like in modern cars for the seat belts). This ensures the antenna is always straight. On the late canopy (blown style with Furchenzieher) it is only attached at one point of the hood and hangs down to the fuselage when the canopy is open...

al the best

Steffen
TedMamere
_VISITCOMMUNITY
Moselle, France
Joined: May 15, 2005
KitMaker: 5,653 posts
AeroScale: 4,347 posts
Posted: Saturday, March 20, 2010 - 07:42 PM UTC
Hi Stephen,


Quoted Text

I love your model, but I think you got this one wrong


Thanks for passing bay to say I did something wrong!

In Crandall's book it is written this machine wasn't fitted with the pulley system. But I know what you mean, I can either:
1 - shave of the round pulley system and leave the antenna like that or...
2 - Leave the pulley as it is but get the aerial wire straight.

I think I will do n°2...

Jean-Luc