In response to request from the U.S. Army for an improved Liaison aircraft, the Cessna Aircraft Company developed plans, tooled up, and began manufacturing. The first model 305 was delivered to the Army in December of 1950. The Army liked it, designated it the L-19 (Liaison), and named it the Bird Dog. Many L-19s were immediately deployed to the war in Korea. Others were sent to Army and National Guard units in other areas. Years later, Bird Dogs were sent to Vietnam and used in various combat roles by the Army, Air Force, and Marine Corps. The enemy feared the presence of the Bird Dog because it forewarned of bad things to come.
The basic Bird Dog is a 2100 pound (loaded), high wing tandem-seat aircraft with an all-metal skin and a six cylinder Continental engine providing the muscle to swing the big 90 inch prop. Bird Dogs with a fixed pitch prop had the 213 HP O-470-11 engine. Those with the constant speed prop were powered by the 213 HP O-470-15. With a 36 foot wing span, conventional gear (tail wheel), 60 degrees of flaps and power to spare, this work horse could haul two men, gear, a full load of fuel (41 gallons) and up to eight 2.75 inch rockets in and out of short runways even at higher elevations. With its excellent fuel economy, the Bird Dog can remain on station (at low power settings) for up to five hours. On floats the Bird Dog has successfully been used by bush operators and fish spotters. With a hook, the Bird Dog is perhaps one of the best banner/glider towing aircraft around.
By the time Bird Dog production ended, Cessna and Fuji had manufactured 3,431 aircraft (the Fuji built aircraft being produced under license). With the re-designation of aircraft in the United States in 1962, the L-19 became known as the O-1 Bird Dog. Many friendly nations are operators including Austria, Brazil, Canada, Chile, France, Italy, Japan, Norway, Cambodia, South Korea, Laos, Lebanon, Pakistan, Thailand and South Vietnam.
The Kit
Contents:
57 x Plastic Parts
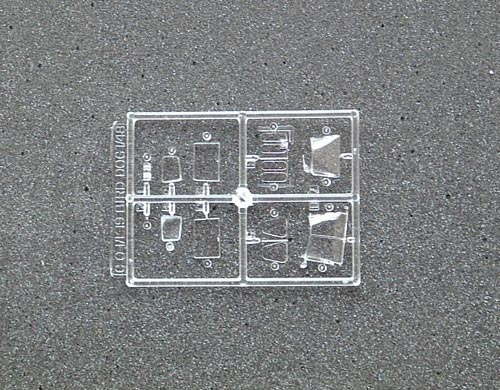
10 x Clear Parts
Decals for 3 aircraft
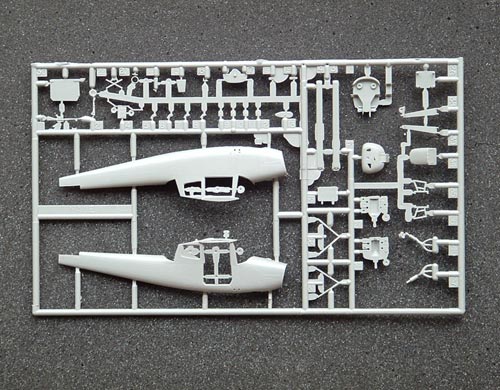
Plastic Parts
The main parts are moulded in mid-grey plastic but, due to the moulding process used, there is quite a lot of "flash" present on all the parts. The small parts are fragile, so I had to trim them carefully with a modelers knife and all parts need cleaning-up and sanding.
Test Fit
Due to the amount of flash on the parts, I tested the fit for every assembly step after cleaning up and sanding. Following a careful clean-up, the test-fit of the plastic parts is very encouraging.
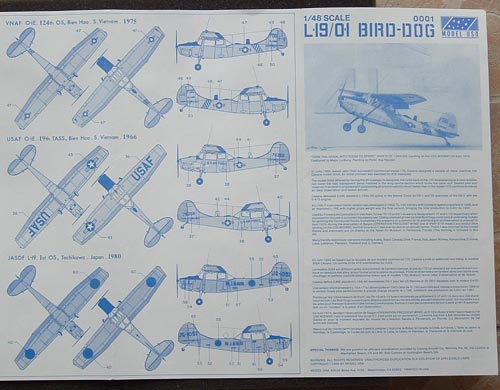
Instructions & decals
The assembly diagrams are easy to follow in 6 steps. The colour notes give FS references throughout and the painting diagrams are very clear. The Microscale decals look excellent; they are printed in perfect register and are glossy and very thin with minimal carrier film. Markings for an USAF O-1E 19th TASS, Bien Hoa, S. Vietnam in 1966 a VNAF O-1E 124th OS, Bien Hoa, S. Vietnam in 1975 a JASDF L-19 1st OS, Tachikawa, Japan in 1980.
Building & painting
As you'll have guessed from the test fit, the first job with this kit is to trim and then clean up every part carefully. Some parts need to be filled with putty, such as the wing and the tailplane.
Step 1is to assemble the seats, the floor and the engine blocks. After I glued the engine to the firewall, I painted them in aluminium for the engine and Interior Green for the firewall before attaching the instrument panel. The seats are painted in khaki before they are glued onto the floor, which is painted in USAF grey. Be careful in this step, the floors holes must be drilled out before installing the seats and pedals
Step 2 is to assemble the engine, the seats and the floor into one side of the fuselage, before adding the other fuselage half. I didnt glue the firewall with the floor because they could not fit together into the fuselage. I installed the firewall/engine block first, then the floor/seats assembly and finally the transparencies. These transparencies do not fit the fuselage without trimming. I wanted to build this Bird Dog with the door in the closed position (shown in the 4th step), so I glued the door first and then the transparency into the fuselage. That was a mistake! - the door and the transparency are too short by about 1 mm to fit into the fuselage, so I had to cut a piece of Evergreen plastic card and fit it into the fuselage.
Step 3 is to attach the wing, then fit the transparencies and the landing lights. The underside of the left wing must be filed down to reduce the thickness before gluing it to the upper surface, before attaching completed wing to the fuselage. At this point I hit a problem; the fuselage is about 1.5 mm too narrow to fit the wing. I measured the thickness of the fuselage sides and cut 2 toothpicks in order to spread the fuselage to fit with the wing. After the glue dried, I removed them. I didn't fit the landing lights at this stage, but added them after painting.
Step 4 is to assemble the tail, the rudder, the door and the landing gear. Attaching the tail and the rudder onto the fuselage is quite easy but, as with most things in this kit, they need trimming, filler and sanding. I had already done the door in a closed position in Stage 2. I didnt fit the tail gear in this step for fear of breaking it before I finished building the Bird Dog.
Step 5 is to assemble the wing braces, the front and rear canopies, the nose and the propeller. There was also a problem here; the front canopy is too short by about 1 mm to fit into the edge of the wing, so I cut another piece of plastic card and glued it into the wing edge before attaching the front canopy. After adjusting and gluing the canopies onto the fuselage, I used some putty to fill a gap between the front canopy and the fuselage. The nose must be cleaned up before gluing and then sanding to fit the fuselage. I didn't attach the propeller until after the final painting.
Step 6 is to assemble the radio antennas, the rocket racks and the under-wing flap hinges. This step is straightforward, but make sure you choose the correct antenna for each of the 3 aircraft versions.
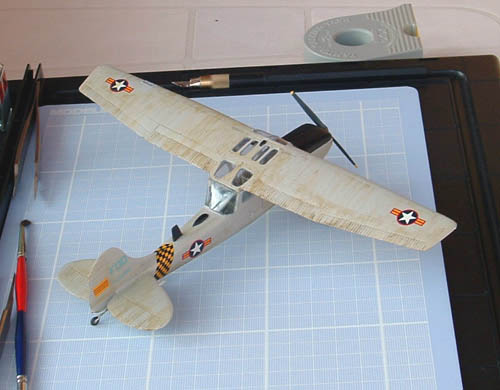
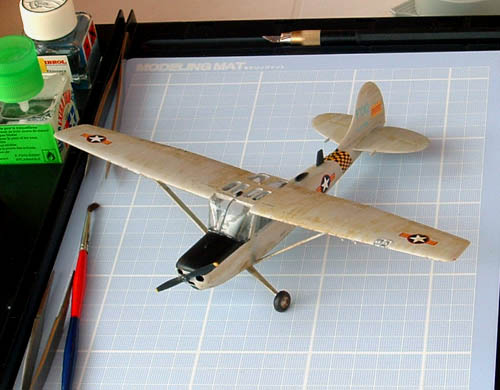
After masking the windows and canopies, I painted overall the model with Tamiya AS-16 (USAF Light Grey), followed by matt black for the anti-glare panel and wheels. I sprayed a coat of Humbrol gloss varnish before applying the decals. I used MicroSol to get the VNAF markings to snuggle down, but chose not to use all of the stencils shown in the instructions. After the decals were thoroughly dry, I sprayed another coat of Humbrol Matt Varnish over the model, adding the landing lights, the rear gear and the propeller.
I used Mig pigments Black Smoke and Vietnam Earth to weather my Bird Dog.
Conclusion
Model USA's kit of the Cessna L-19/O-1 is a rare subject and the only 1:48 scale kit in the model plastic market. The lengthy cleanup and the poor fitting parts - especially the transparencies - make this a kit for the more experienced modellers. I dont think this Model USA is an excellent kit for model contests, but Cold War aircraft fans should love this Bird Dog.
SUMMARY
For over fifty five years the venerable Bird Dog has served diligently in the U.S. and International military forces, the Civil Air Patrol, law enforcement, the U.S. Forest Service, missionary work, and in glider/banner towing operations all over the world. The Bird Dog has had an impressive record of service and is still sought-after for its capabilities and the sheer fun of flying a true Warbird.
My first built kit was an 1 :72 B-58 Hustler at age of 9 in the sixties, a gift of a military advisor in Vietnam. Through the seventies, I had built some aircraft and AFV: Monogram, Revell, Hasegawa, Tamiya, etc. till I was called on duty at 19. By many change in life and job, I abandoned this hobby...