

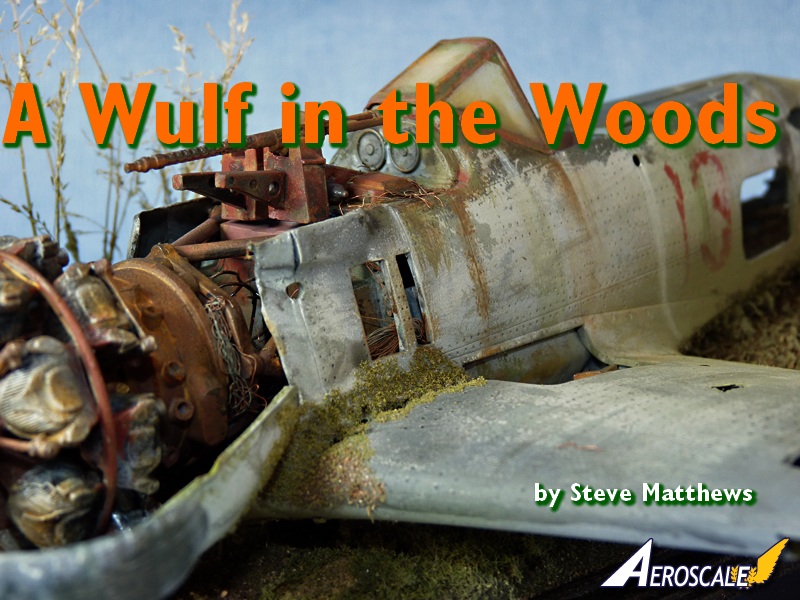
1⁄24A Wulf in the Woods
6
Comments

history
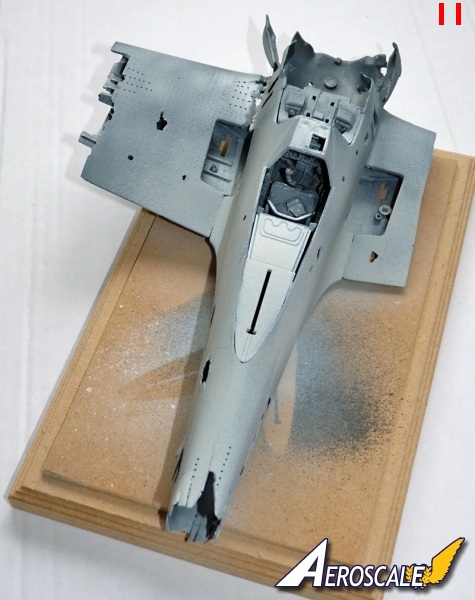
The FW-190 was widely used by the Luftwaffe's fighter wings in all fronts of the Second World War. More than 20 000 aircraft were produced for Germany and its allies. While most were destroyed during the war, a few have managed to survive until the present day. Occasionally a lucky explorer will stumble across a wrecked Wurger in the forests of Eastern Europe.the project, pictures 1 & 2
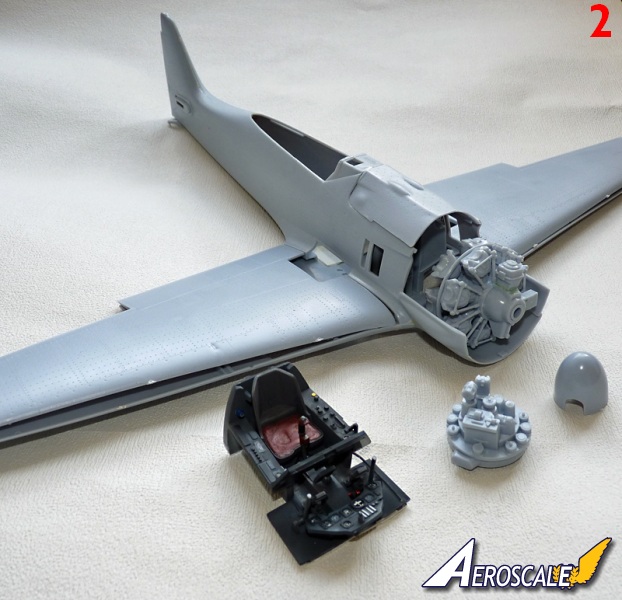
Ive been asked to put together an article for Aeroscale on the build and weathering techniques used during a recent wrecked aircraft project I have recently built. I hope you enjoy reading this as much as I did writing it. Ive tried to give as much information as I can on the techniques used but if Ive missed anything feel free to comment or PM me.I started this project well over a year ago with the intent to build a complete 1/24th scale FW190A6 from the old Airfix kit. As many of you will know, the kit dates from the 70s and has many toy-like features such as moveable control surfaces, undercarriage and canopy. While these might have made the kit interesting to younger buyers in the 70s, now they just cause major issues with accuracy and detail. So, it ended up boxed away and forgotten until I was looking for a project to build into a wreck. The real project started here.
A bit of research on the web shows that an almost complete FW190 had been found in a Russian forest and other badly damaged wrecks were scattered all over Norway. The inspiration for mine was a mix of the two. Decision made, out came the razor saw!
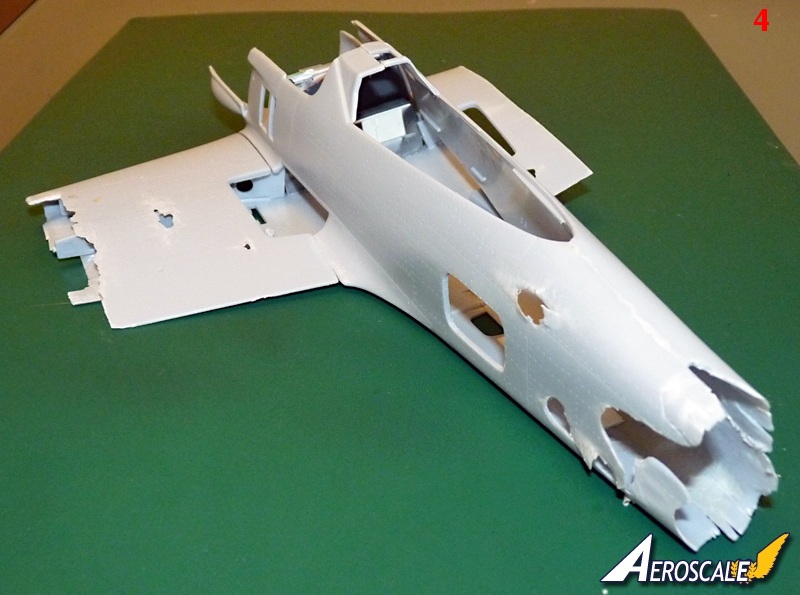
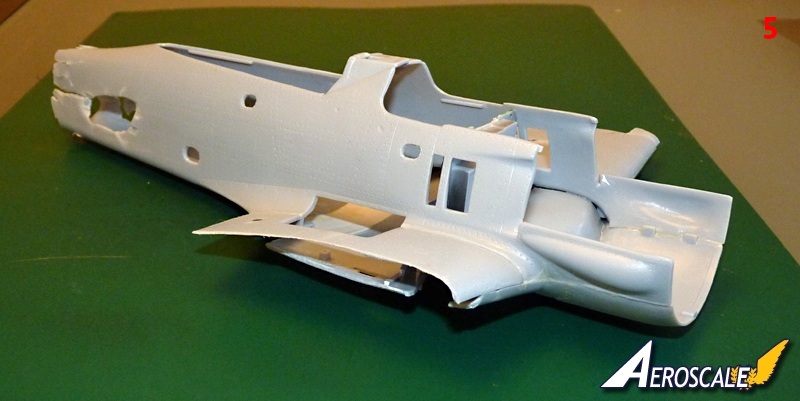
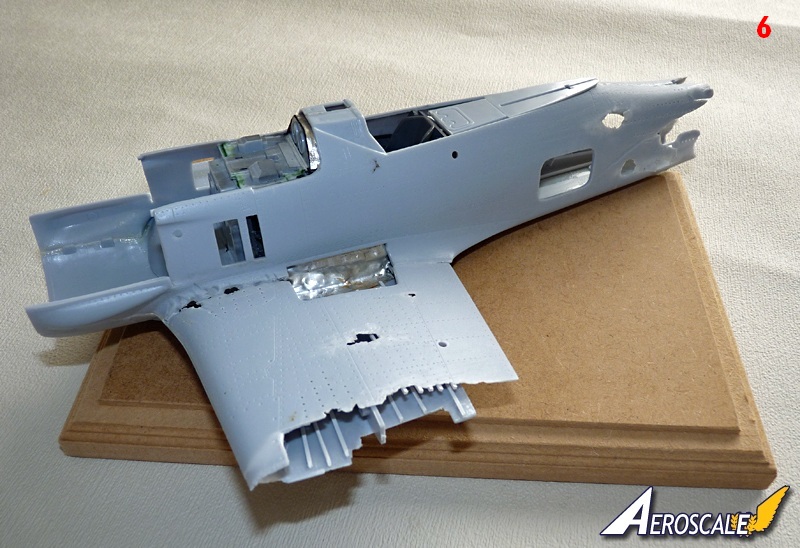
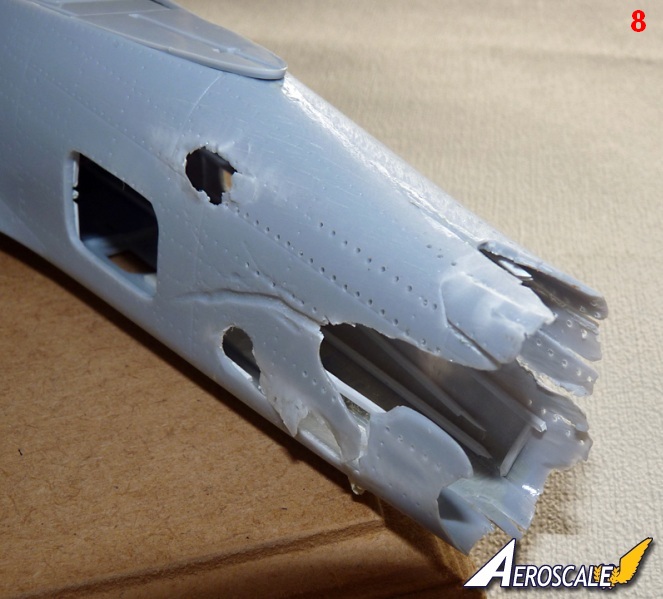
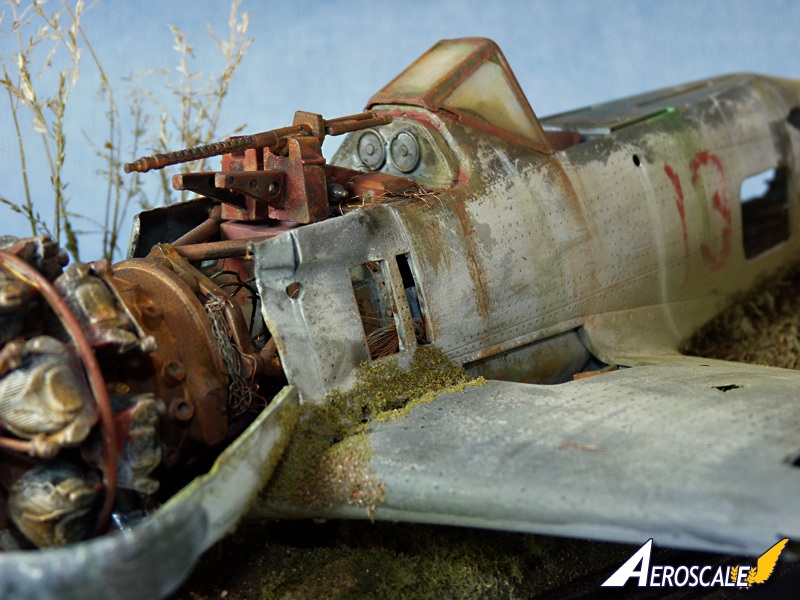
creating the damage, pictures 3 - 7
While the saw had reduced the kit to more or less the shape I was looking for, I was left the age old problem of square, over scale, thick edges. Trial and error with various files, tools and abrasive paper lead me to find that round burrs in my Dremmel, set to 1000 RPM started to do the trick. The heat generated by the burr also had the added effect of slightly warping the plastic. For anything other than a wreck, this would be a disaster but here it works in your favour reducing the edges and giving a worn, damaged metal look to the plastic. The same technique was also employed to reproduce battle damage.To make working on the project a bit easier, I mounted the main airframe on a temporary base as I found this also helped me to picture how the end result would look as the build progressed. Some of the gaps in the fuselage were filled with lead foil recycled from red wine bottles. Again, as this was going to be a wreck, I did not worry too much about keeping this smooth and neat. Foil panels were cut to size and fixed into place using superglue. Small gaps were filled with white glue. The cockpit was added next as were other panels such as undercarriage boxing and engine firewall foil, being used again where needed. The cockpit was looked at next and the Airfix kit is very helpful here in that the dials are provided as a separate clear part. To achieve the damaged and depleted look I simply removed this part and trailed wires from where the dials would have been before fitting and painting. The seat was held in place by Blutack for now.
Using the Dremmel with a 0.5mm drill bit, I removed some rivet detail from the rear fuse and wings before adding some internal structure, both to give the kit more interest. The ribbing was plastic stock cut to size and fixed with Plasticweld extra thin solvent. Not 100% accurate but with a bit of artistic licence, good enough.
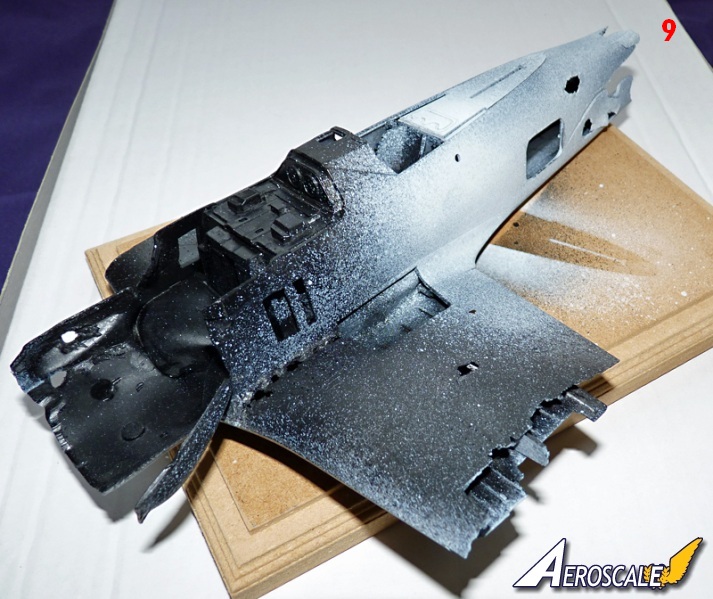
Painting, pictures 8 11
On to the fun bit, paint! Due to the amount of handling, the whole thing was wiped over with rubbing alcohol to remove finger prints, oil from the Dremmel and any remaining release agents. Then a coat of Halfords black primer, before this had dried completely Halfords white primer was sprayed heavily onto what I had decided was the front of the project. This give an artificial brightness to this area which I call forced contrast.The intention was to use the hairspray technique so loved by our armour building friends so the next layer of colour had to be tough. I also wanted this to look like oxidised aluminium which has the appearance of a metallic off-white. To achieve this I mixed Humbrol enamels, 60% matt off-white, 30% semi-gloss light ghost grey and 10% metallic silver sprayed randomly over the airframe until I had the tonal effect I wanted. The whole thing was then left to dry for 48 hours.
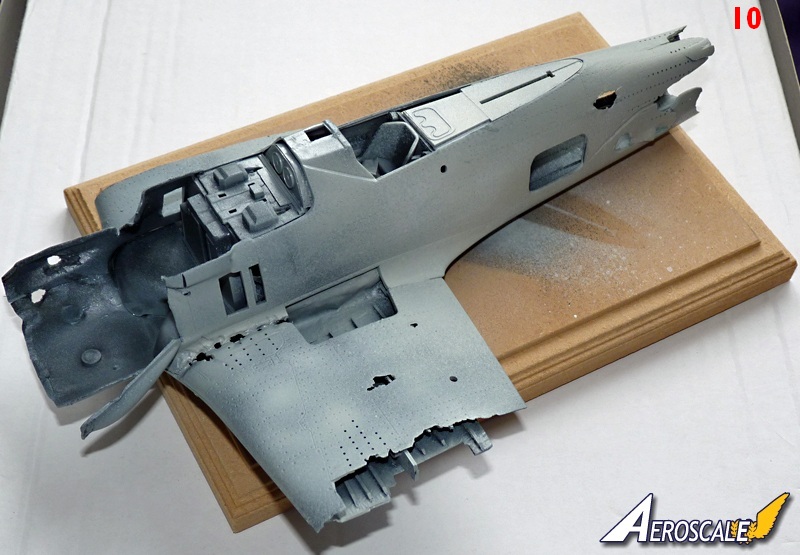
Once the enamels had hardened off it was time to start the paint application and weathering stages. This was done over one session using Tamiya acrylics for all colours. The reason behind doing so much work in one sitting is to ensure that all he paint layers are soft enough to work while ensuring that once you have the finish you want they will all harden and bond together. This makes them look far more realistic and tough enough to accept the weathering layers applied later. Paint finish was applied in layers as follow:
1. Two thin coats of hairspray and leave for 10 minutes
2. Random all over coat of RLM76 self mixed from light blue and grey and leave to harden for 15 minutes
3. Using warm water and an old tooth brush, scrub down the RLM to wear the paint. Where the hairspray is thickest and on edges, the paint will come away quickly. Work small areas at a time as once youve done this and the water has dried the paint will bond to the coat below and cannot be removed.
4. Apply another two thin coats of hairspray and leave for 10 minutes
5. Upper fuselage and wing camouflage added with RLM 75 & RLM 77. This is self mix of Tamiya paints also and again left for 15 minutes.
6. As with the RLM76 this was scrubbed down to wear the paint, in some areas you will remove just the camouflage colours, in other very small areas the RLM76 will come off as well. This is good as it gives the paint depth.
7. The next steps depend on what you want to do with markings. If youre using decals, spray the cockpit area in RLM02 and add them now, then move onto the weathering. Personally, I prefer to paint them on in this scale so it was another coat of hairspray and another 10 minute wait.
8. Using Montex masks, I masked up the red 13 and the black and white crosses. These masks came from A2Zee Models and it was the first time Id used them. They worked well and Id use these and A2Zee again.
9. Paint in the red 13 and cross in white /black. I also painted the cockpit areas in RLM02 self mix at this time too.
10. Finally, scrub down to wear the paint markings, be careful here as they are more edges and body and you can lose them very quickly.
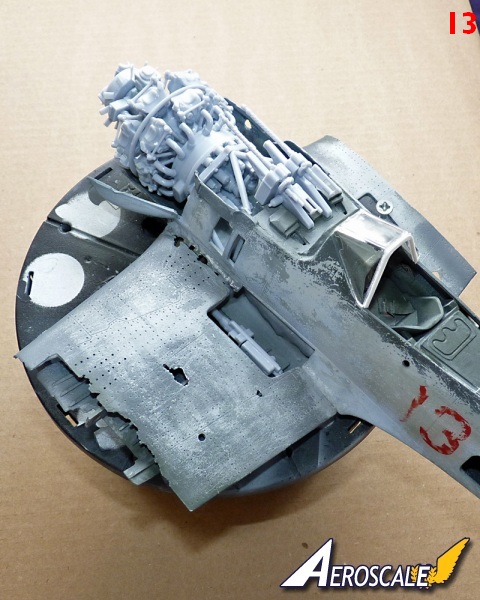
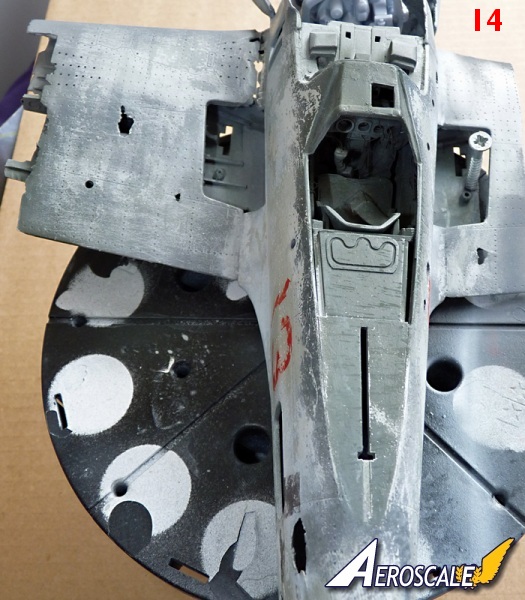
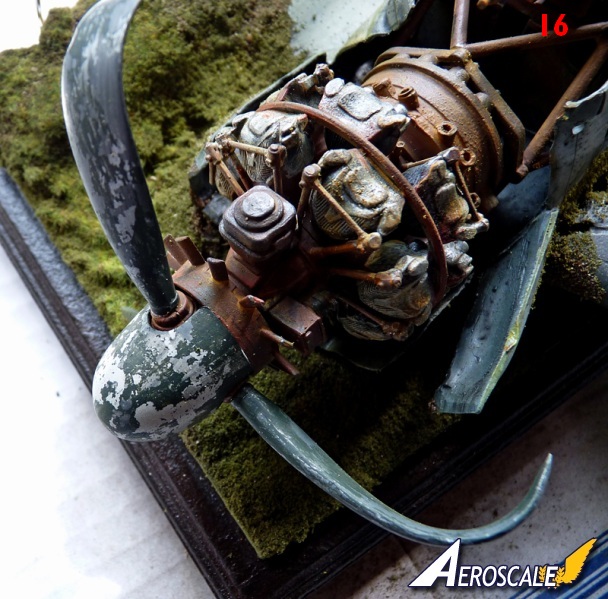
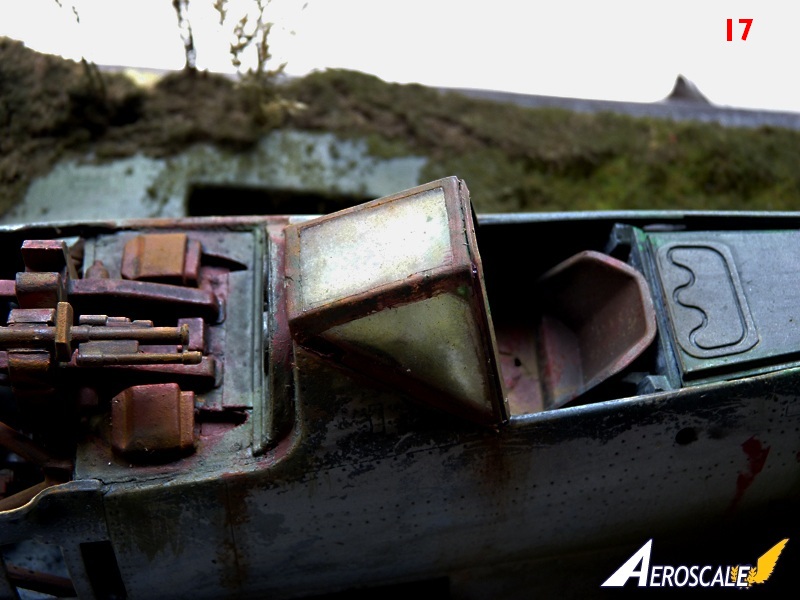
engine and cockpit, pictures 12 - 17
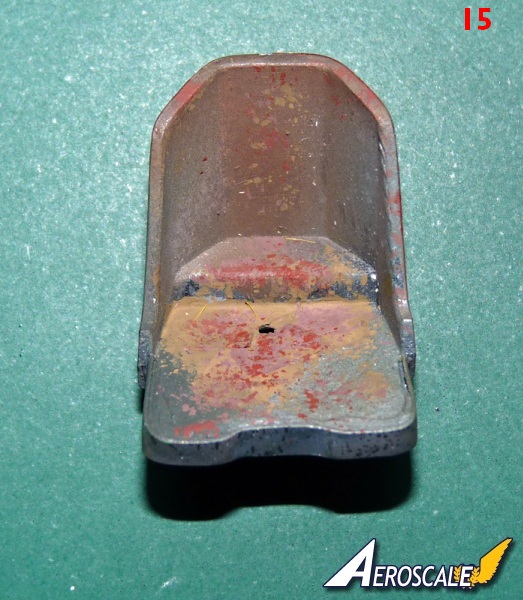
Youll notice that the engine and canon have been dry fitted. These were not on the airframe during the painting stages as being made mostly from ferrous metals, they will be weathered differently. I returned to the cockpit. This was left unmasked during painting which meant that various coats of hairspray and paint had built up inside. A quick scrub down with warm water and an old stiff No.5 paint brush made this look very convincing indeed with some areas back to the RLM66 black-grey and others under a dusting of greens and greys. I removed the seat, held in place by Blutack youll remember, to weather and rust separately. This was achieved by various coats of rust coloured Humbrol and Revell enamels, each allowed to dry before a stippling of Humbrol Maskol. This gives a build depth to the layers of rust when you rub off the Maskol. Im no expert at this but I was happy with the result. The engine and canon were given the same treatment. I paid special attention to the cylinder heads as these are aluminium and not the same iron/steel as the block and barrels, here I simply changed the enamel colours to match the pictures on the internet. Propeller blades and Spinner were treated in the same way as the main airframe the colours being the same Humbrol enamel oxidised aluminium base colour but then two differing dark black-greens mixed from Tamiya paints. Again hairspray coats and light scrub downs with warm water between each gave the worn appearance needed. The blades were bent into shape simply by immersing them in very hot water until pliable, be careful to ensure they are soft before you twist them or they will snap. Some wires were added here too, again just for interest, and the assembly was then glued into place.Final piece to add to the airframe was the windscreen. Looking at pictures of the real thing on the web you could see that years of UV, grime and dirt gave a yellow-green opaque appearance to the glass and Perspex. I reproduced this by firstly masking the clear panels then rusting up the frame using the same technique as the seat, then once this was dry removing the masking and giving the whole thing three heavy coats of Humbrol Matt finish varnish. This did what it always does and went into a milky grey bloom. This was dry brushed with a mix of yellow and green oil paints until it looked like it should.
finishing
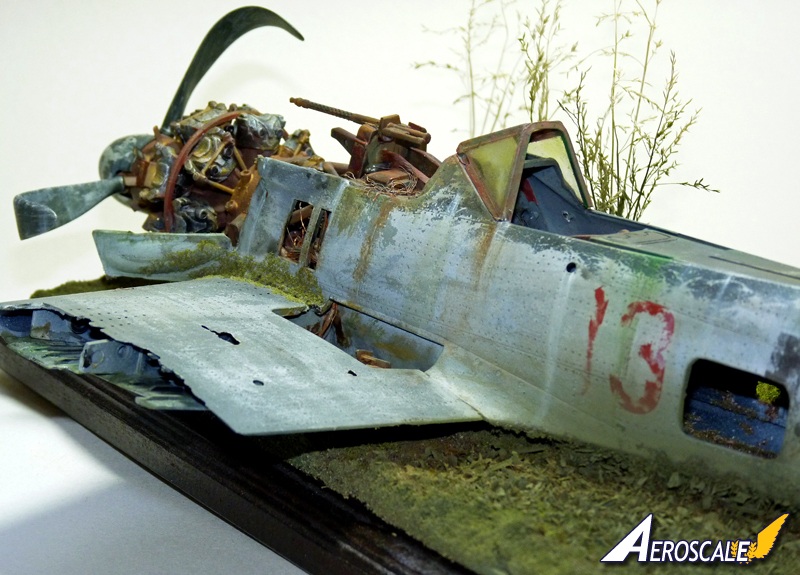
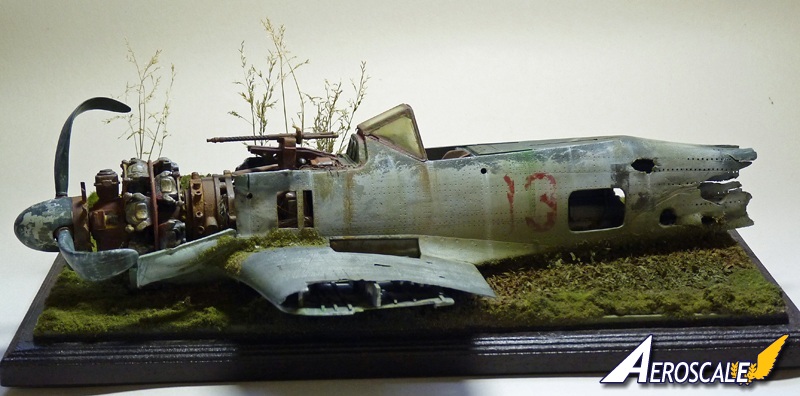
Onto the home straight now, the airframe was pin washed with sepia oil paint. While this was drying I did the same to the rusted parts but this time with yellow ochre. Then using oils again, I applied white, rust and green streaks to various areas of the whole airframe. My method for this is to apply a very small blob of neat oil colour to the top of the streak, then using a brush damped in clean Humbrol enamel thinners, draw the blob down the surface. Keep wiping the brush on clean kitchen paper towel and keep the brush damp. Too much thinner and the oil paint will run into the panel lines too little and you will paint a line. As with everything we do in our hobby, practise is the key.The airframe was fixed to a simple base with acrylic media added for lumps and bumps, decorated with various types of scatter and crushed dried leaves from the garden. I allowed some of this to creep onto the airframe to give it a grown over look. Grass seed heads were used to give a bit more height. The whole thing was sprayed with greens and browns from Tamiya, and again some of this was allowed onto the plane. Finally, the entire model was given a coat of Humbrol satin varnish for acrylics to pull it all together tonally.
conclusion
I really enjoyed this project; it made a real change to build something totally different that allowed me to use as many different techniques as this. All of these Id used before but never on one build.Thank you again for reading and I hope you enjoy the pictures.
SteveM


About the Author


FROM: ENGLAND - NORTH WEST, UNITED KINGDOM
Like many people I started building kits before I was aged 10 until the real world came and grabbed me sometime in my early twenties. I returned to the hobby 15 years later, building 1/72 WWII aircraft more or less from the box at first, adding more and more AM gear and spending a lot of cash on th...
Comments


Steve,
Very well done. The moss on the wing root is wonderful! I think you nailed the paint and oxidizing aluminum !
OCT 05, 2012 - 01:33 PM

I agree with Freddy. You really did a wonderful job with your Focke-Wulf. Wrecking an aircraft is no easy task, in order to do it correctly that is. Good work all around. Russell
OCT 05, 2012 - 03:00 PM

Thanks for the positive words, I'm glad you like her, it's the first time I've built a wreck so I'm very pleased with how it's turned out.
I'd like to thank Jessica for taking the time to post my very first feature , Jessica you're a
Cheers
Steve
OCT 05, 2012 - 10:37 PM

Excellent job Steve! It really looks convincing, a little creative photography/photoshop and it could be mistaken for the real thing!
Doug
OCT 06, 2012 - 01:46 AM

Exceptional work on this one Steve!!! Love everythign about it!! Well done!!!
OCT 06, 2012 - 09:15 AM
Copyright ©2021 by Steve Matthews. Images also by copyright holder unless otherwise noted. The views and opinions expressed herein are solely the views and opinions of the authors and/or contributors to this Web site and do not necessarily represent the views and/or opinions of AeroScale, KitMaker Network, or Silver Star Enterrpises. Images also by copyright holder unless otherwise noted. Opinions expressed are those of the author(s) and not necessarily those of AeroScale. All rights reserved. Originally published on: 2012-10-06 00:00:00. Unique Reads: 6709

WEB HOSTING BY


Copyright ©2021 AeroScale and Kitmaker Network, a subsidiary of Silver Star Enterprises
All Rights Reserved. Please read our Conditions of Use and Privacy Policy.
All Rights Reserved. Please read our Conditions of Use and Privacy Policy.