

1⁄32Silver Wings Fairey Flycatcher Build
4
Comments
Instructions
A few notes on the instructions for this kit:■ The drawings labeled as "1/32 scale" on pages 6, 7 and 8 are not actually 1/32 scale.
■ On page 8, the instructions list the dihedral measurement of the top wing as "13mm" when it should be 11mm. Silver Wings is aware of this and made the correction on the instructions for most kits, but be sure to check your instructions to be sure they are correct.
■ Note that the landing gear drawing shown in Step 22 (page 6) is for reference only, and the actual landing gear assembly is shown in step 30 (page 9).
Parts Cleanup
As with other Silver Wings kits, parts cleanup is fairly simple, and due to the soft resin they use for their kit, a sprue cutter can even be used to snip most parts from their pour stubs. After that, a few scrapes with the Xacto knife and/or sanding stick and the part is ready for use.With these kits, since there are no part numbers to worry about, I like to clean up all the parts and then begin the build. Any parts can be painted as appropriate after cleanup and before assembly as well. A few things to note when preparing your kit parts for use:
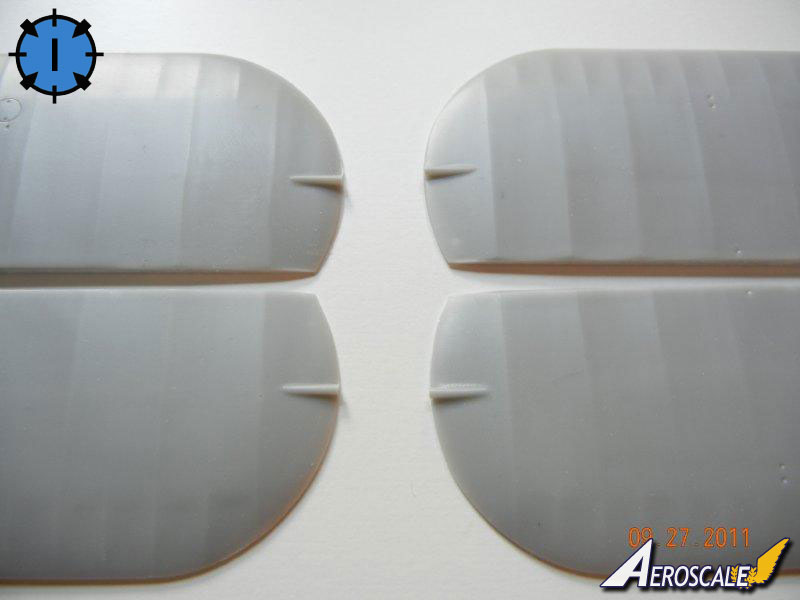
■ The wings have excess resin rods on the upper tips (see photo 1), these must be removed as the outer wing should be smooth.
■ The mating surfaces on the wing trailing edges and ailerons may require some additional cleanup to get them perfectly straight, test fit the parts as appropriate to see what cleanup may be required.
■ My kit had several spare parts, including two additional cylinder heads, etc. which you may want to set aside and not clean up unless you lose a part and need them later.
■ Check your fuselage framing for any breaks before you remove the pour blocks. You should repair any breaks with superglue before removing the pour blocks.
■ If you intend to use the kit provided cockpit frame cross brace tubes, be sure to measure them before you remove them from the pour stubs as I found I had to trim carefully in order to not end up with tubes that were too short.
■ The engine block has a pour block on the backside, and you should only remove the fins, leaving the center round part as this will be needed to attach the engine/cowl assembly to the fuselage.
■ Some of the engine cylinders may have some slight seams on the sides that require cleanup, however any that you "miss" during cleanup will likely not be visible on the finished model without searching really hard for them.
■ Test fit your propeller to the engine block and enlarge the hole as necessary to achieve a good fit.
■ The seat has a square that sits proud of the seat itself on the underside. This is used for positioning the seat on the support framing and should not be removed.
About the Author


FROM: GEORGIA, UNITED STATES
I've been modeling on and off for over 40 years. My primary interests are WW1, Interwar and WW2 aircraft, although I do build an occasional WW2 armour kit. I used to build 1/32 kits back in the 80's, but switched to 1/48 in the early 90's when all the nice new kits started showing up. I've sinc...
Comments

Fabulous review Doug and you have just tipped the scales for me in deciding whether or not to buy one of these superb models. The review will be a great reference when it finally gets built.
Off to Paypal we go.....!
Best regards
Gary
FEB 18, 2012 - 05:00 AM


Thank you Doug for this build article, I've been contemplating on this kit and watching Rowan's build. I think my mind is now made up, stop thinking and buy it
FEB 18, 2012 - 04:11 PM
Copyright ©2021 by Doug Nelson. Images also by copyright holder unless otherwise noted. The views and opinions expressed herein are solely the views and opinions of the authors and/or contributors to this Web site and do not necessarily represent the views and/or opinions of AeroScale, KitMaker Network, or Silver Star Enterrpises. Images also by copyright holder unless otherwise noted. Opinions expressed are those of the author(s) and not necessarily those of AeroScale. All rights reserved. Originally published on: 2011-11-12 00:00:00. Unique Reads: 8561

WEB HOSTING BY


Copyright ©2021 AeroScale and Kitmaker Network, a subsidiary of Silver Star Enterprises
All Rights Reserved. Please read our Conditions of Use and Privacy Policy.
All Rights Reserved. Please read our Conditions of Use and Privacy Policy.