

1⁄48Cessna UC-78 Bobcat
1
Comment
Introduction
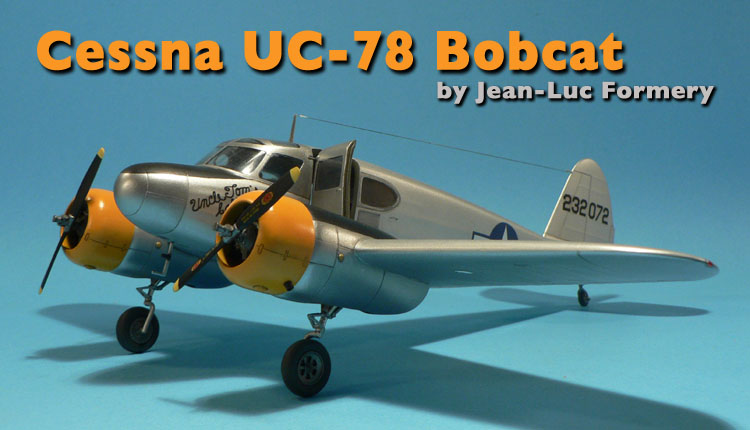
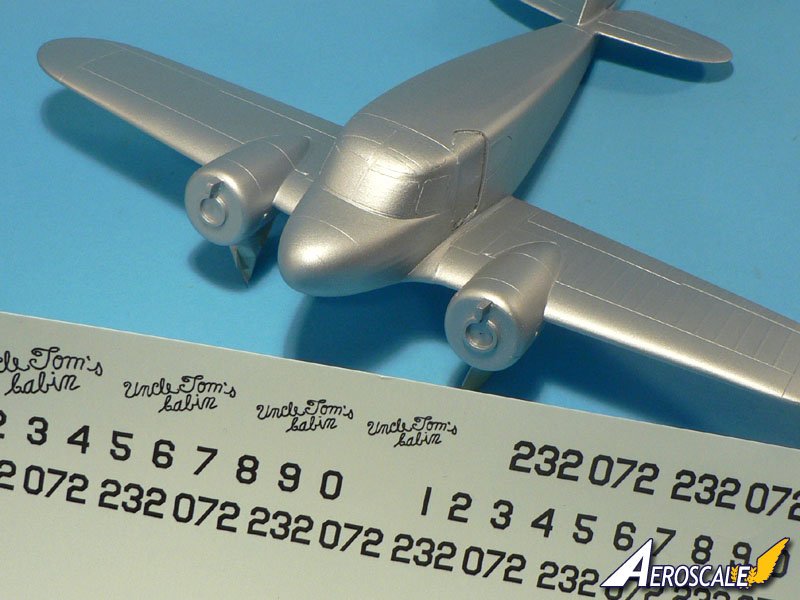
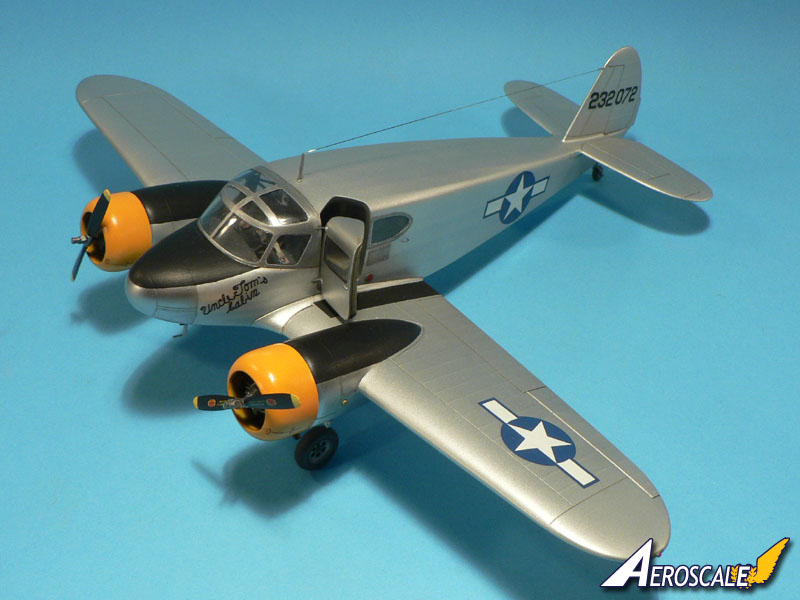
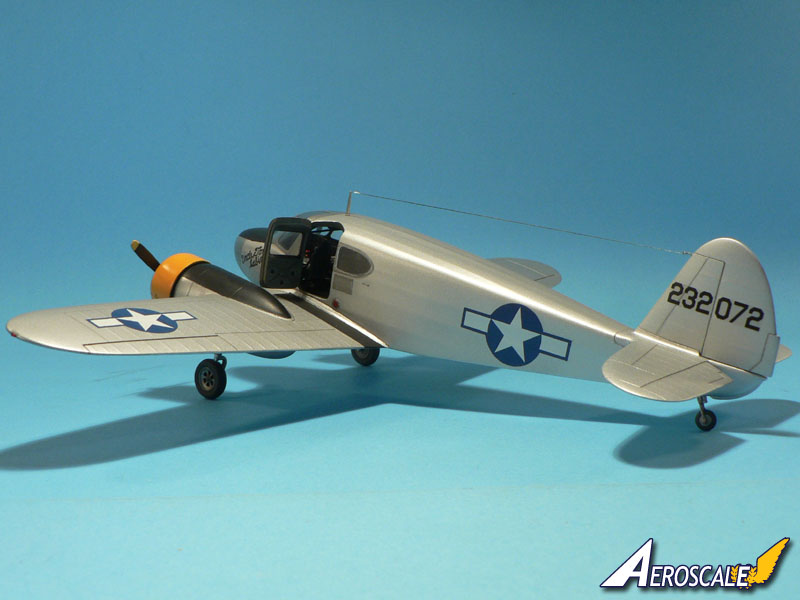
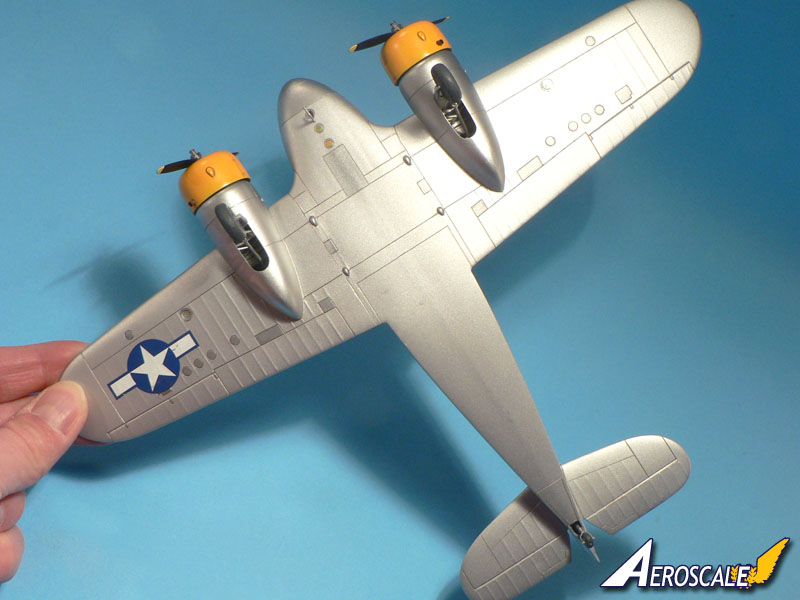
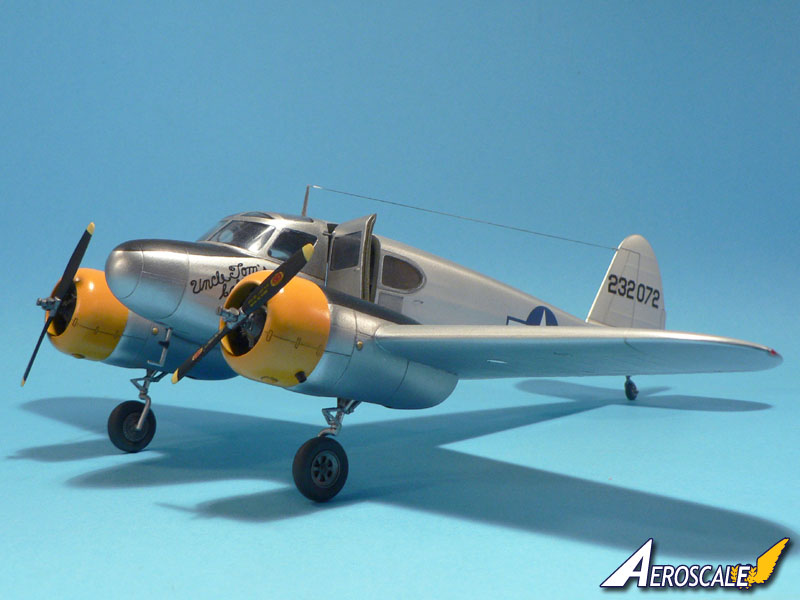
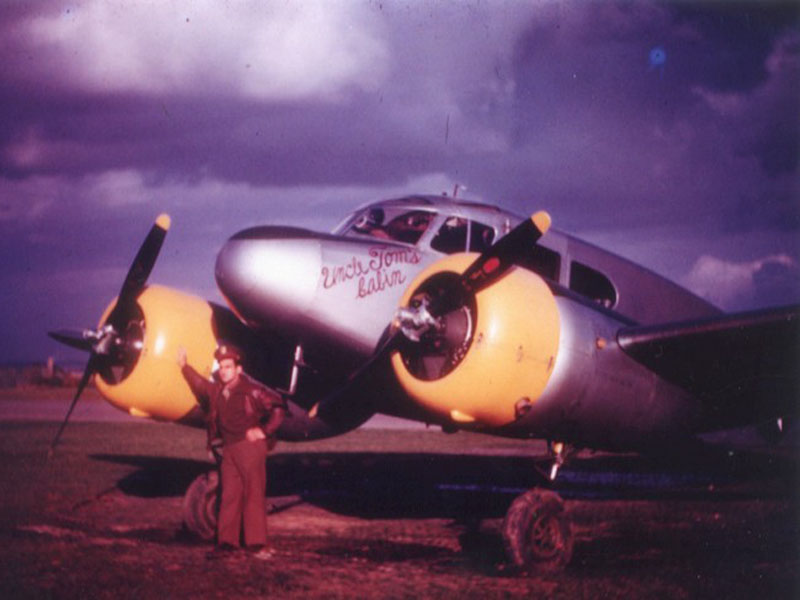
I have started this build for the Aluminium Campaign on Aeroscale. I decided to do the 1:48 scale Czech Model Cessna UC-78 Bobcat (see review here) in the markings of "Uncle Tom's Cabin" (n°42-32072) a hack aircraft which belonged to the 361st FG in England. The machine was all aluminium with black anti glare panels and yellow engine cowlings. Unfortunately the rest of the plane isn't visible on the picture I found on the www.361fg.com website, so the overall decoration will be pretty much guesswork.The interior
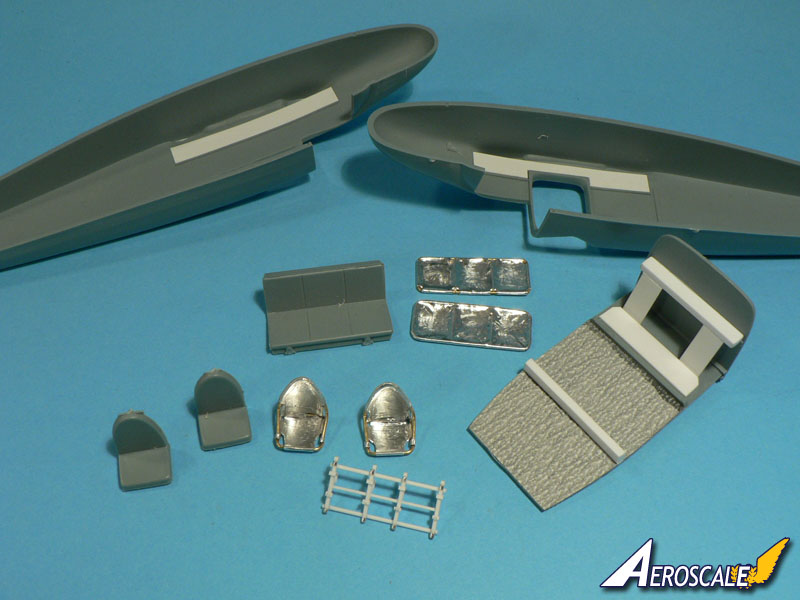
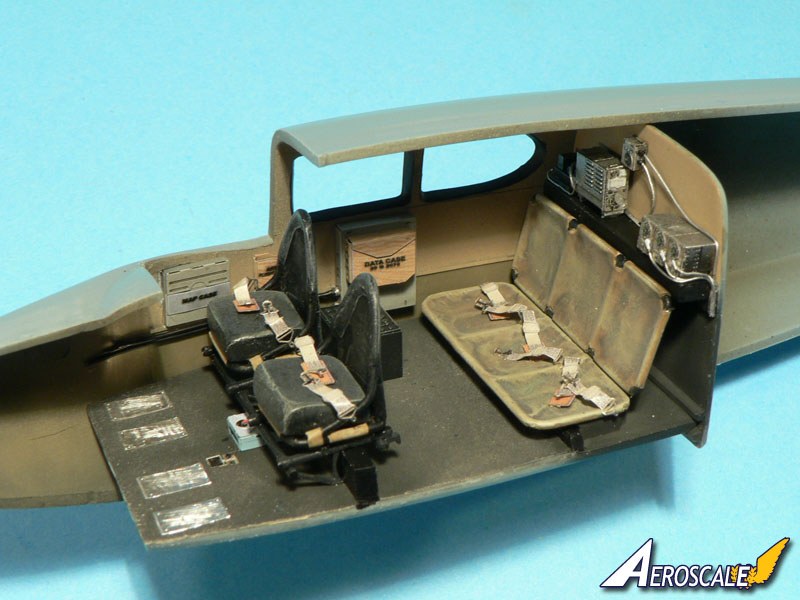
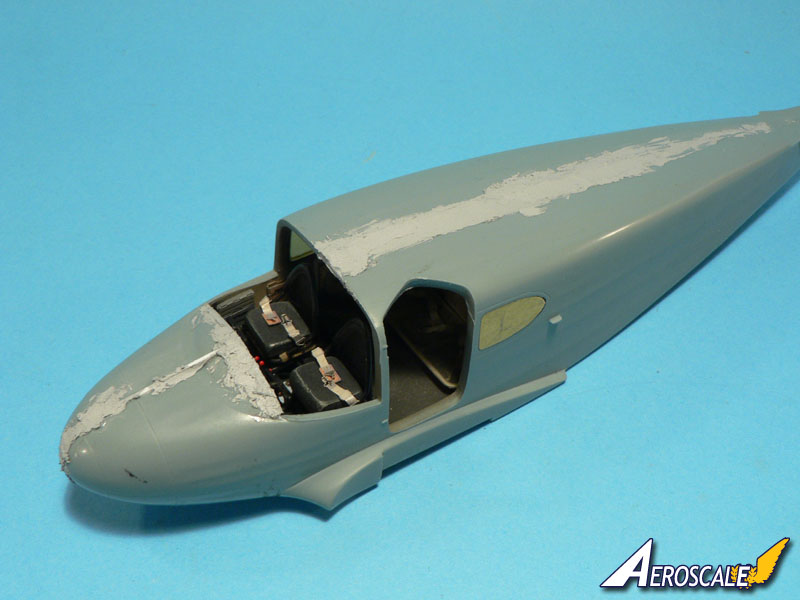
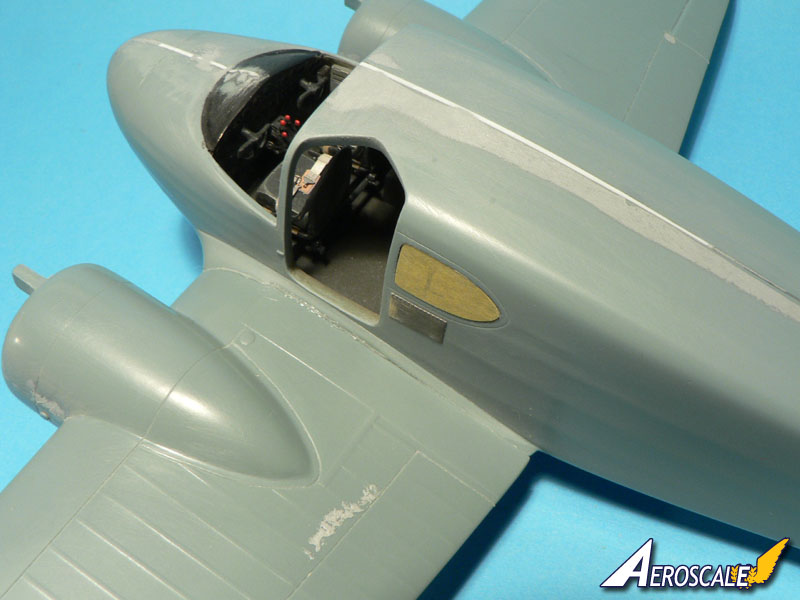
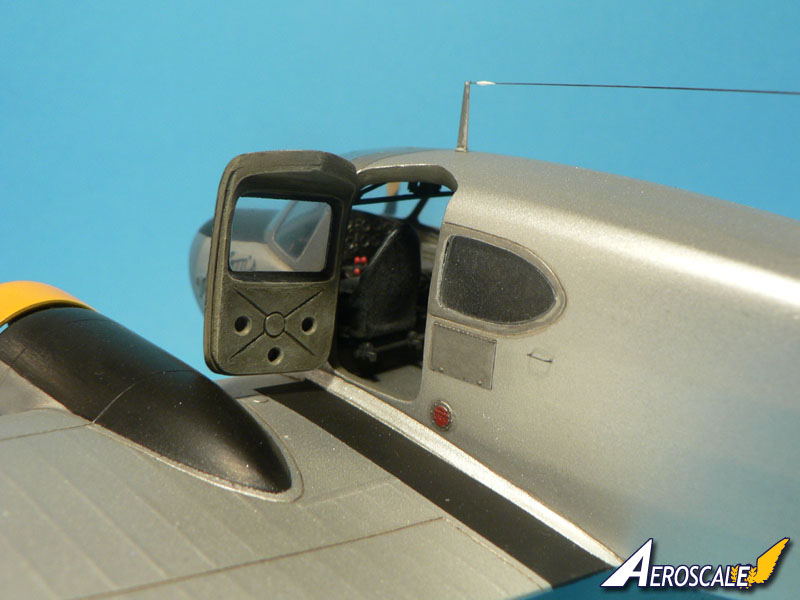
The Czech Model kit is pretty simple except for the interior which benefits much from the accompanying photo etched frets. Since I wanted to display the cabin door in the opened position on the finished model, I've replaced the pilot and passenger seats with scratchbuilt items to enhance realism. The original plastic parts may look alright if the access door is closed but they are too simplified if you allow the viewer to take a closer look inside. Note that True Details have done a civilian resin upgrade for the Czech Model kit and that a military interior should follow.The long rectangular patches on the cabin sidewalls are hiding the wing Karman hollows inside each fuselage halves. The kit provides photo etched parts for that but I opted for plastic sheets because they are easier to glue in place. I have used the metal parts as templates. Some plasticard was also used to scratchbuilt a frame for the two pilot seats. At the rear of the cabin, a structure made with evergreen stripes was done to act as support for the scratchbuilt passenger's seats. The latter, as well as the pilot seats, were made with wire bent to shape to replicate the tubular frame and self adhesive aluminium foil to represent the canvas. The floor was covered with fine sanding paper to represent what I assume was an anti slip revetement.
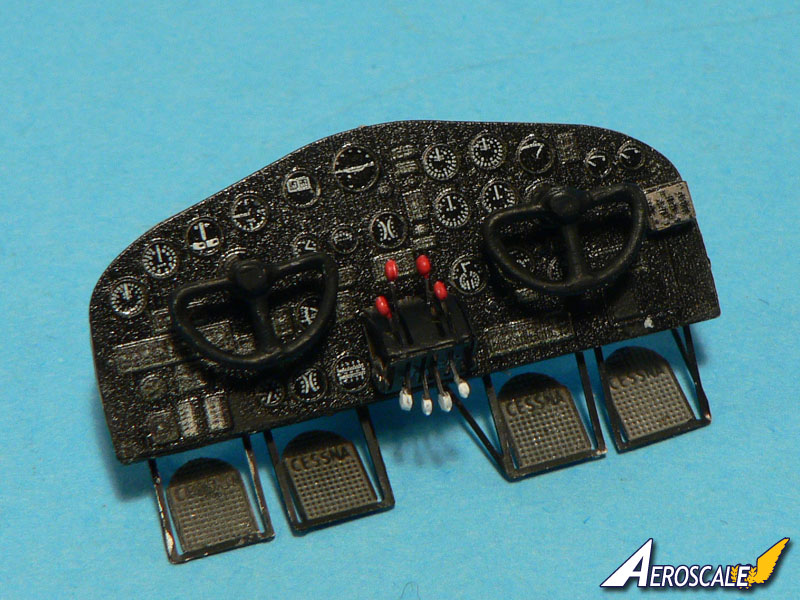
The instrument panel is made of two layers of PE parts glued on the optional plastic version of the kit. Of course, the latter was sanded smooth before receiving the metal parts. The instructions ask you to choose between the PE parts and the Styrene part but I found it more practical to use both to obtain a stronger assembly which will be easier to glue in place later. The levers are really small and, as always, a real pain to put in place. They received some PVA glue on their ends for a more realistic appearance. I'm not sure about their color though. Note on the accompanying photos the "Cessna" logos on the PE rudder pedals!
Once painted, the scratchbuilt seats look more convincing than the plastic ones. Seatbelts are provided in the kit and are pre-colored. The cushions for the pilots are made of Tamiya Epoxy Putty. Maybe I have exaggerated their thickness a little bit but obviously the Cessna pilots had some advantages over the fighter pilots. Let's say they are an homage to the excellent comfort of the Cessna Bobcat.The radio rack on the back is made with the photo etched parts present in the kit. I must say that they really add to the overall level of detail. Without them I would have said the kit is basic but with them the interior looks reasonably busy. Only some cables were added (made from fine lead wire) to match the photos I found of the real aircraft's interior.
Overall assembly
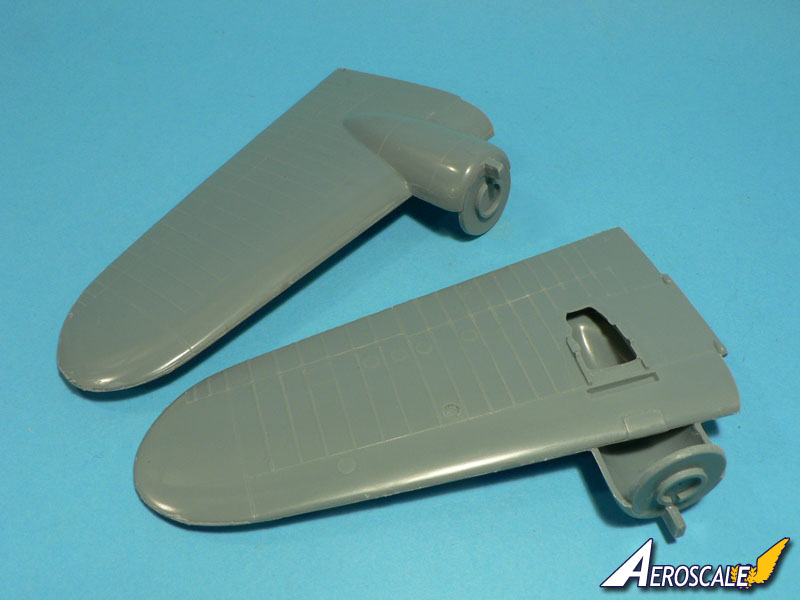
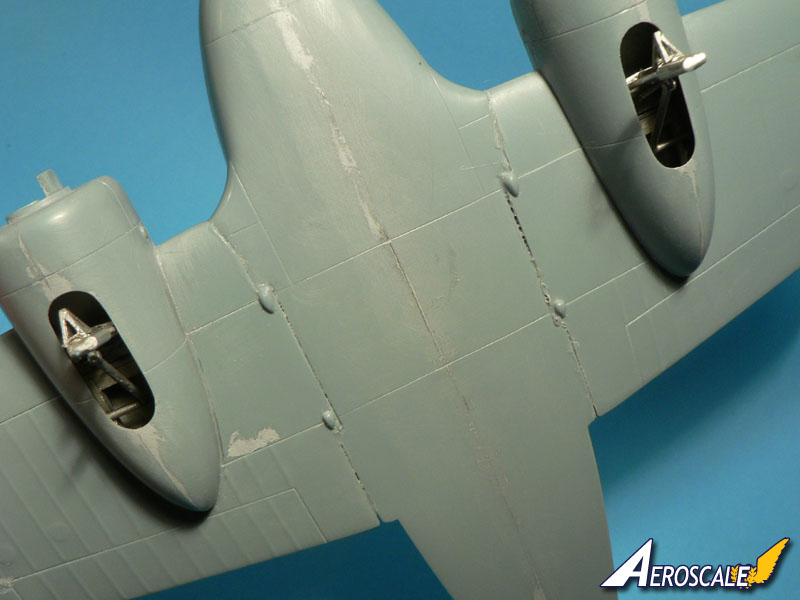
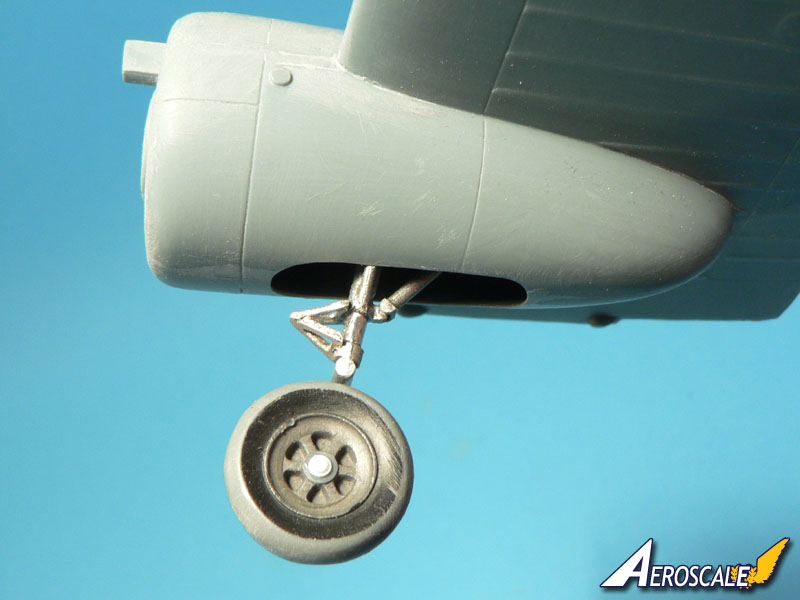
The wings are each composed of two parts that must be glued together, but the trailing edges need to be thinned down before for a more realistic appearance. The engine firewall for each wing has been glued in place as well while I was at it.There is a little problem with the engine nacelles to underwing fit: there is not enough space to get the legs in the proper position because the plastic is too thick. A simple solution is to grind away as much plastic as possible inside each nacelle halves. I have used a dremel tool for that. Czech Model simply forgot that 1mm thick plastic makes about 5cm in real. This means that almost 10cm of room would be missing on the real aircraft for the gear legs! But this problem is typical of short run productions and not really something to worry about. It is necessary to align both landing gears very carefully though, to be sure that their angle is the same. Otherwise the sit of the aircraft will look weird on the finished model.
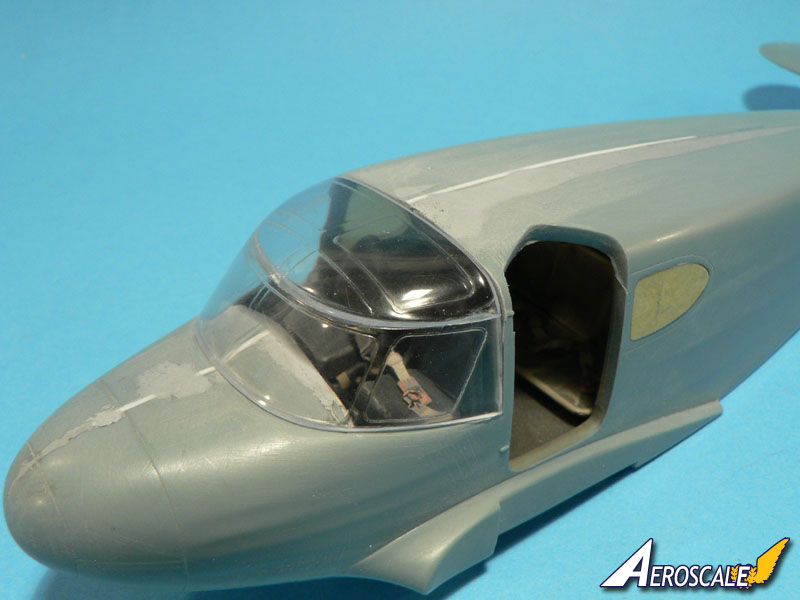
While I think it is a nice kit, Czech Model's Cessna Bobcat doesn't builds itself. Of course one has to help a little. For example, I had to adjust the cockpit floor and the rear bulkhead to achieve a decent fit when joining both fuselage halves together. However, when test fitting the windscreen I've noticed that it was wider than the fuselage. This is why I have added some stripes of plastic front and aft of the cockpit opening. Indeed, it is easier to widen the fuselage than reduce the width of the clear part.
To glue the instrument panel I've used the following method: I first glued the sub assembly on one fuselage side using plastic cement (remember, I've fixed the PE parts on the styrene version provided in the kit). Then I left it to dry for a couple of days. Finally, when I glued both fuselage sides together, I've also glued the other side of the instrument panel. It worked like a charm.
Once the fuselage halves have been glued together, I have smeared the resulting seam with putty. It looks bad on the photos but I must sat that I have applied more filler than needed because there are no panel lines to take care of. Sanding the seams was therefore very easy.
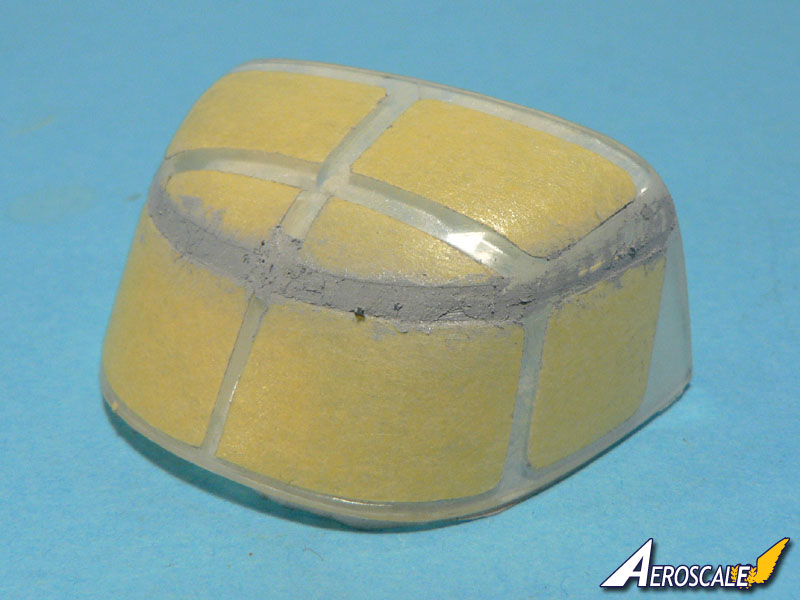
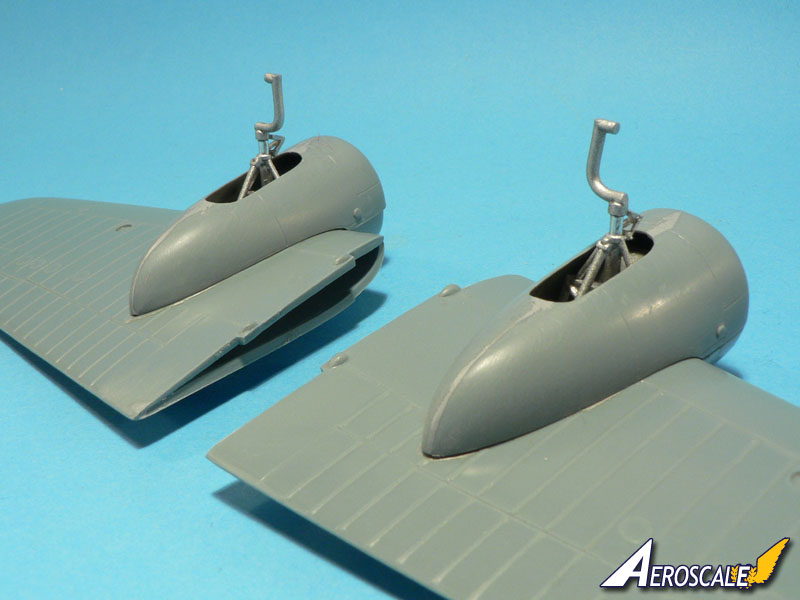
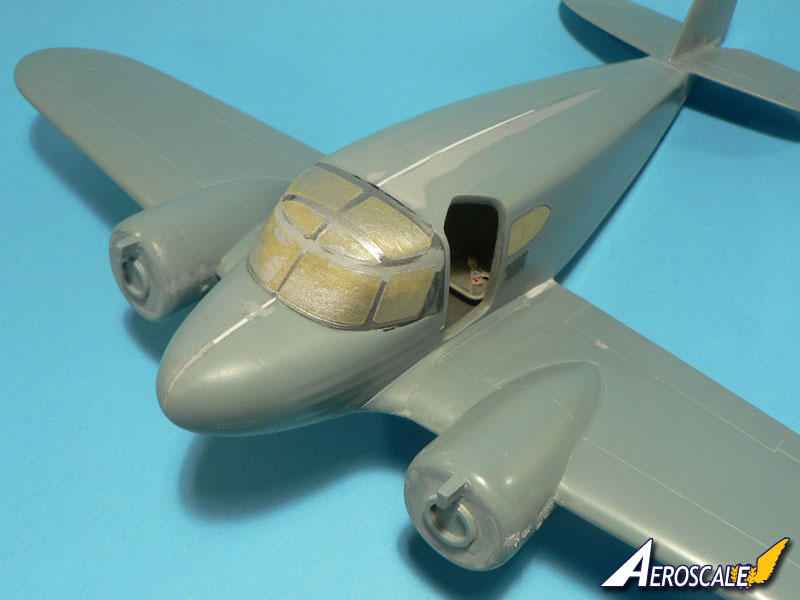
Next step was to dry fit the cockpit glazings. These are made of two parts: windshield and roof. Two variants of the latter are provided in the kit, one for the civilian version and one for the military one. The fit to the fuselage is not bad at all... if you haven't forgot to add the extra plastic stripes to widden it a little! The interior of the windscreen was painted and then the transparent canopy sub assembly was glued on the fuselage with plastic cement. Some filling and sanding was necessary to blend the cockpit glazings into the fuselage. The seams were filled with white glue and then painted in black to avoid the light to show through. Of course, before doing all that it is necessary to mask the transparent parts first!
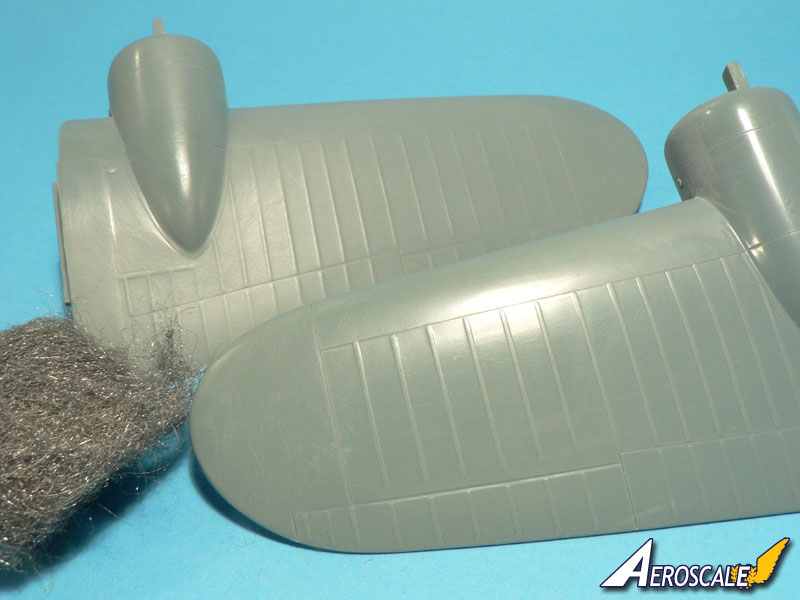
The horizontal and vertical tailplanes have then been fitted. Nothing particular to report. Fit is not perfect but again within what is acceptable I think. I have followed Rowan baylis' advice and toned down the fabric effect on the tailplane and the wings with steel wool (grade 0000). This stuff is very effective for such work.
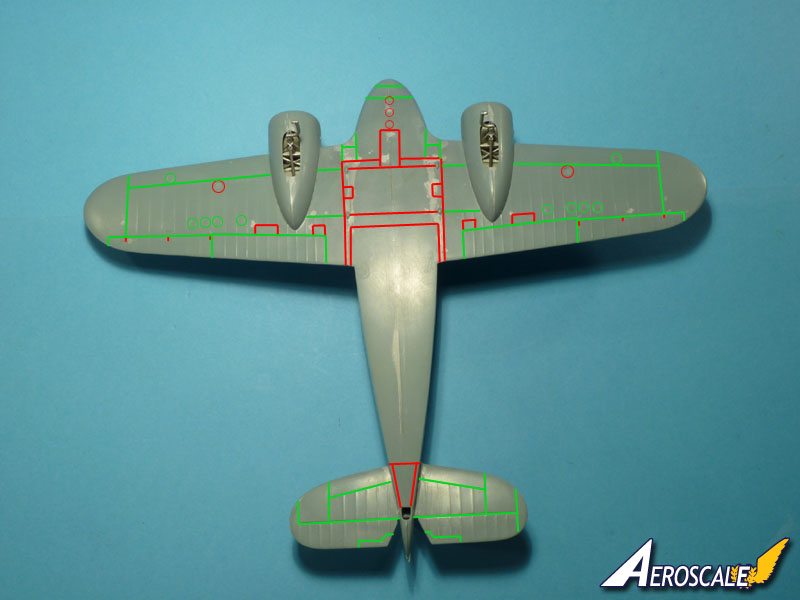
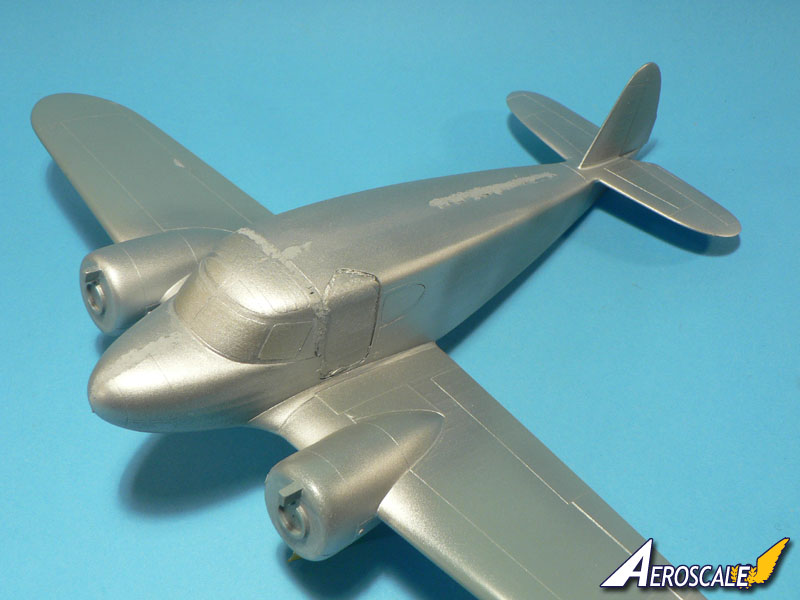
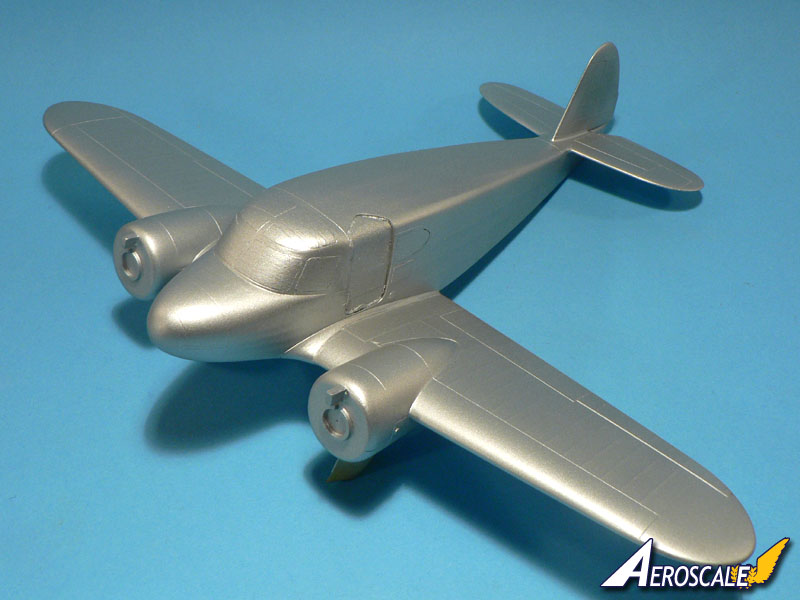
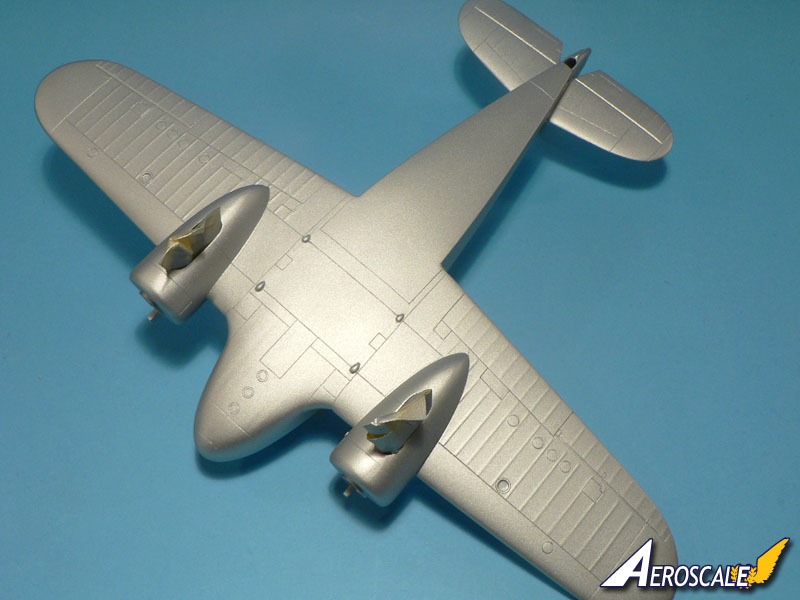
Here is how I did to glue the wings on the fuselage: I have first applied some plastic cement on the wing root and let it dry for a couple of minutes. Once the cement had finished to "eat" the plastic I applied a second coat, then the parts where mated together and held in place with some tape to force them to the right dihedral. The wing root joint is very good on the upper side but not so good on the underside. The gaps are in fact a result of the dihedral I gave to the wings. If I had butt joined the parts (it woulds have been possible) the wings would have been almost flat. Judging from photos, this is something that obviously wasn't the case on the real aircraft. I have also added some panel lines on the underside which were missing on the kit (red lines on accompanying photo). The panel lines highlighted in green are the original ones which I had to engrave anew after the steel wool session. Now the model was ready for painting at last.
Painting and decoration
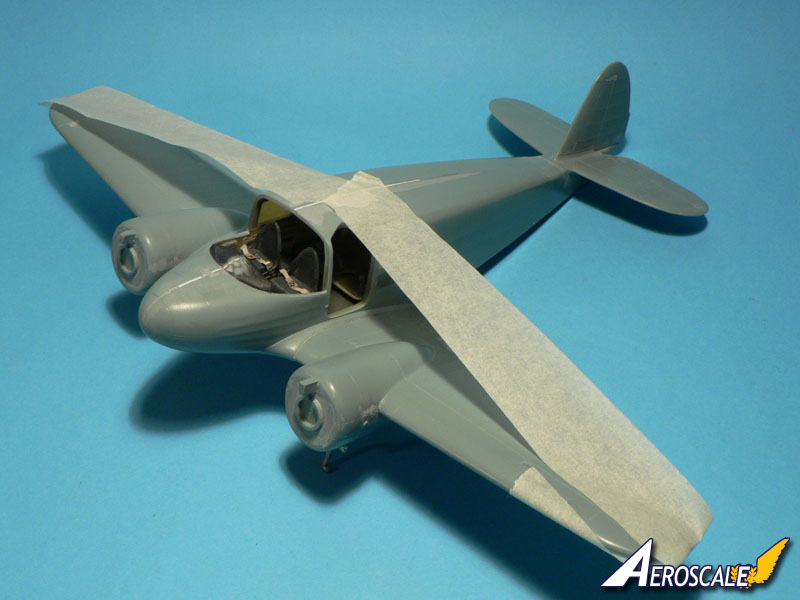
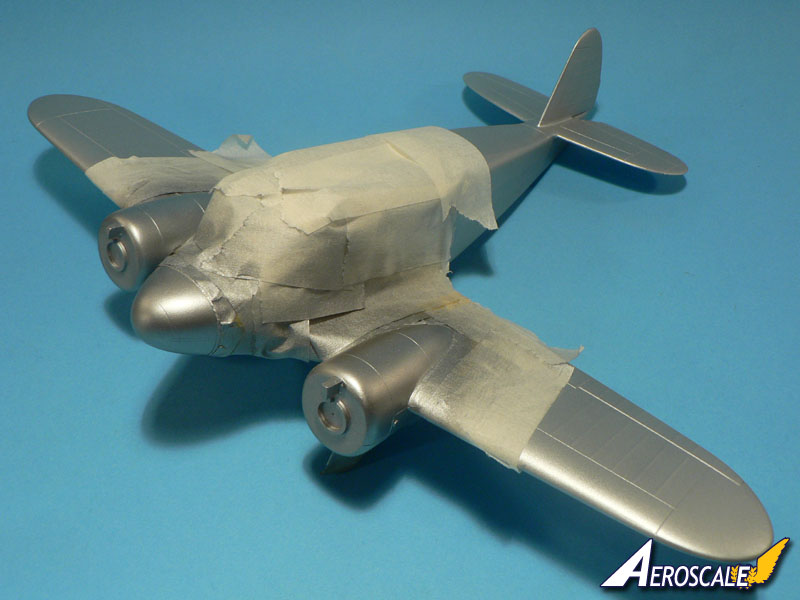
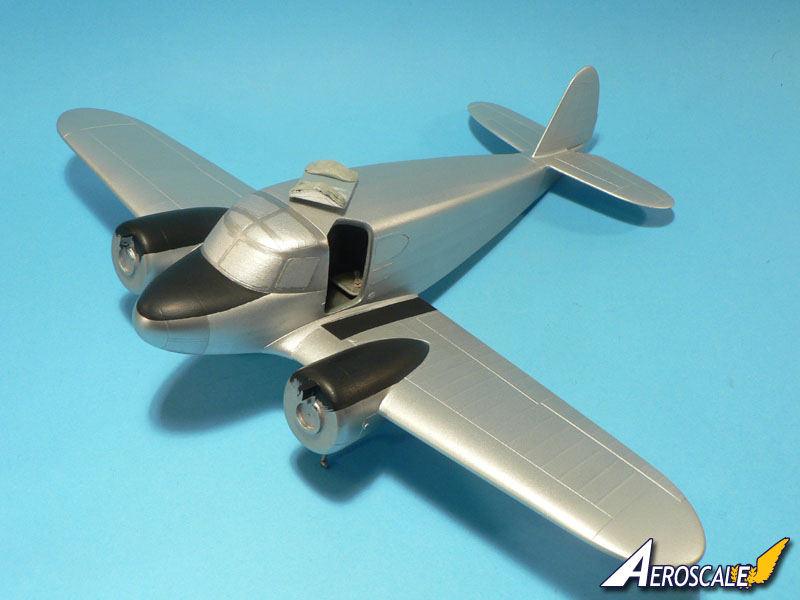
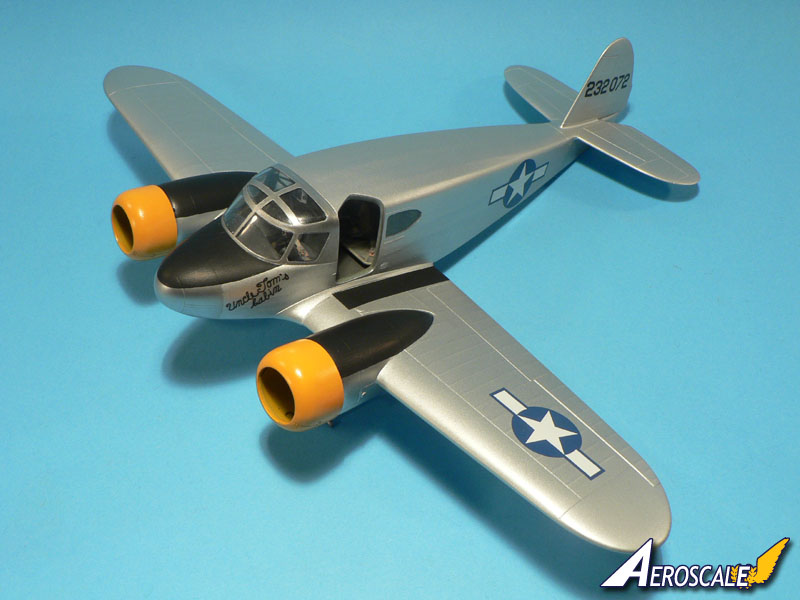
I have applied a first coat of Tamiya XF-16 Silver on the model to check the surface finish. I found some flaws here and there but nothing too dramatic. Tamiya's aluminium paint isn't very good for bare metal finishes but for doped aluminium it works very well and is nice to sand smooth when thoroughly dry. While I used the Tamiya paint for the doped aluminium surfaces I chose Mr Color for the metallic ones (engine nacelles and some smaller panels). I have used the grey plastic door to protect the interior while applying the silver paint. The black anti glare panels have been brush painted with Prince August acrylics. The risk of lifting off the fresh silver paint was to high so I have opted for this solution.I did my own decals for the build. I used a Carpena transparent decal sheet on which I have printed the artwork and numbers with my laser printer. To protect the toner I have brush painted two coats of Microscale Liquid decal Film over the sheet. The decals went on smoothly on the model and I chose black for the "Uncle Tom's Cabin" artwork. It could have been red or black with red surroundings but since the picture of the real aircraft has a red hue to it I'm not sure at all. I'm not very good at interpreting colors on old photos, so what decided me in the end was the fact that I didn't had a laser color printer at hand. I'm also not sure at all about the serial number. It is given as 232072 but I have read elsewhere that it is the serial of a B-17!? The US Star roundels came from the spare box.
Final construction
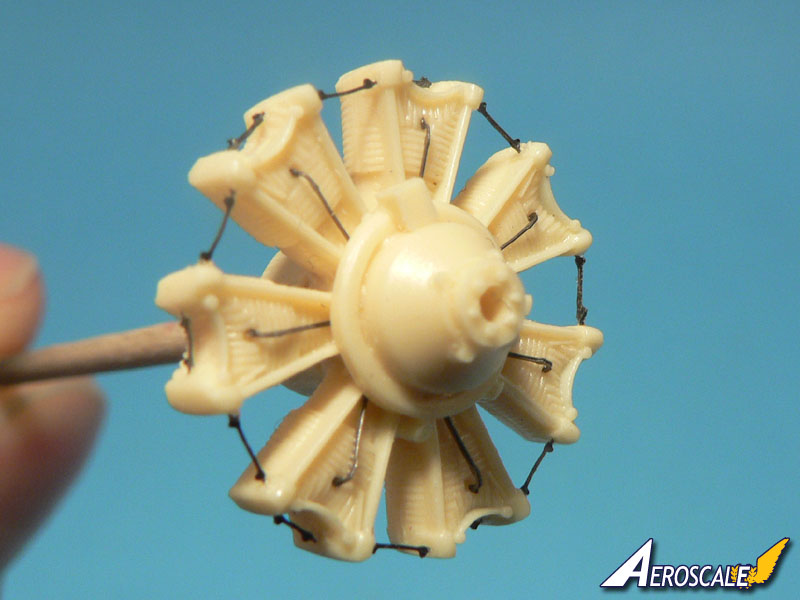
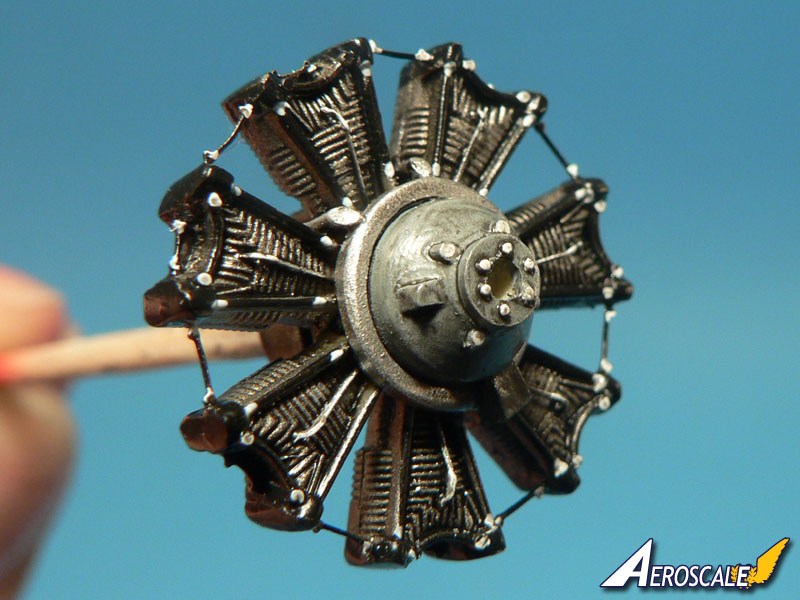
I have made a new pair of tyres for the aircraft since "Uncle Tom's cabin" had spoked wheels which are not provided in the kit. To do them I've use the front wheel of a He 219 and the main wheels of a P-39 which were glued together and sanded to shape with the help of some filler.I then did the engines. The most painful task of the whole project was to glue the small PE parts to the cylinders. There are 42 in total and there are no spares on the fret! Once painted, the radial engine looks very nice from the box though.
I have also ameliorated the cabin door. In reality, it is thicker than the parts provided by Czech Model. I first wanted to add some plasticard but I remembered that there was the plastic version so I test fitted it to the clear part. Bingo! It worked as if they were designed to go together! I have added the engraved details and a surrounding made of stretched sprue to make it looks more like the real thing. The door was finally fitted with PE hinges and glued in place.
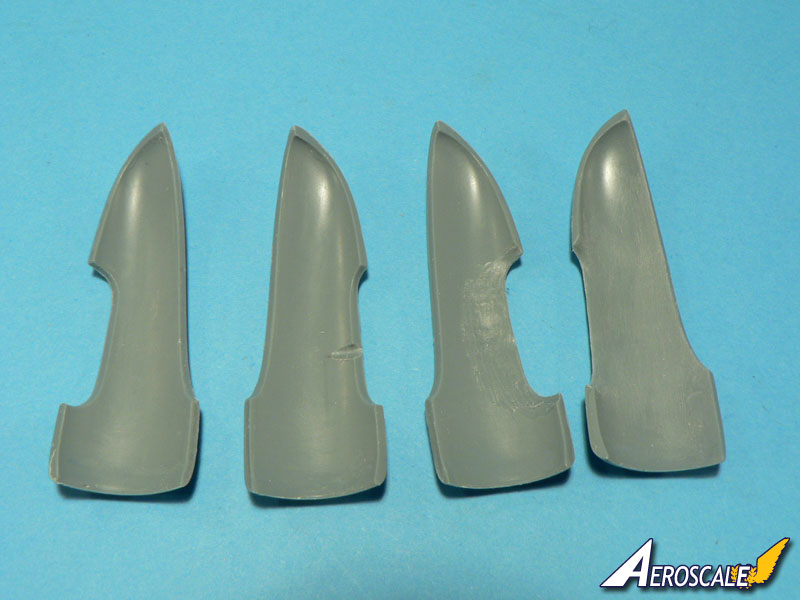
The engine cowlings have been reworked a little. Indeed, it is necessary to eliminate all the panel lines on them because the real ones were composed of only two parts (upper and lower) which were held together with three clips on each side. This is something Czech Model have depicted in a totally wrong way. Once sanded smooth and new panel lines added, the cowlings were painted yellow.
Final work consisted of darkening the panel lines, adding the aerial wire, fitting the landing and navigation lights and glueing the exhausts in place. These were made of metal tubing of the appropriate size.
The model hasn't been weathered yet. I will do this later since I want to include it into a diorama setting. So for the moment, 'Uncle Tom's Cabin" will remain factory fresh...

About the Author


FROM: MOSELLE, FRANCE
I'm mainly interested in WW2 aircraft and I build them in 1/48 scale.
Comments

Hey Jean-Luc,
I want to thank you for this model, it is almost as though you built it for me: An old radial light twin, in NMF (OK, mainly silver dope) and prominent yellow parts!
Some much silver and not a panel line to be seen--outstanding work, as usual.
Wonderful seats, beautiful radials.
The instrument faces, are those decals or printed film?
FEB 20, 2010 - 01:21 PM
Copyright ©2021 by Jean-Luc Formery. Images also by copyright holder unless otherwise noted. The views and opinions expressed herein are solely the views and opinions of the authors and/or contributors to this Web site and do not necessarily represent the views and/or opinions of AeroScale, KitMaker Network, or Silver Star Enterrpises. Images also by copyright holder unless otherwise noted. Opinions expressed are those of the author(s) and not necessarily those of AeroScale. All rights reserved. Originally published on: 2010-02-17 00:00:00. Unique Reads: 15096

WEB HOSTING BY


Copyright ©2021 AeroScale and Kitmaker Network, a subsidiary of Silver Star Enterprises
All Rights Reserved. Please read our Conditions of Use and Privacy Policy.
All Rights Reserved. Please read our Conditions of Use and Privacy Policy.