

1⁄48Lloyd C.V
10
Comments
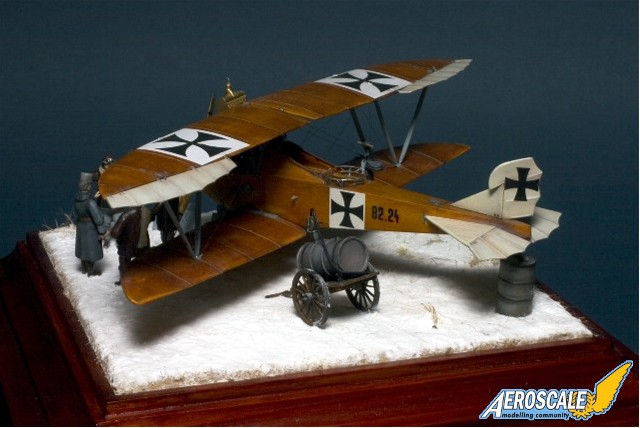
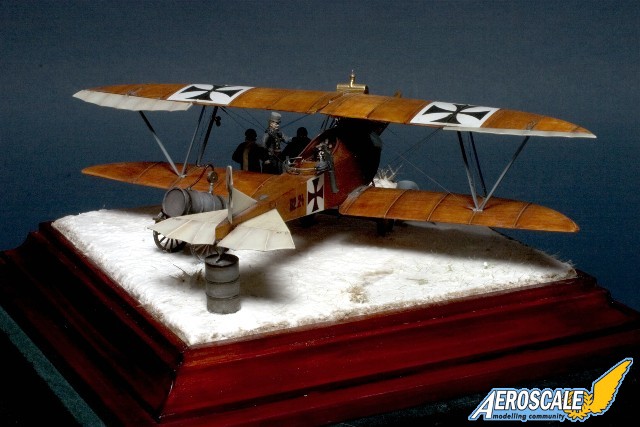
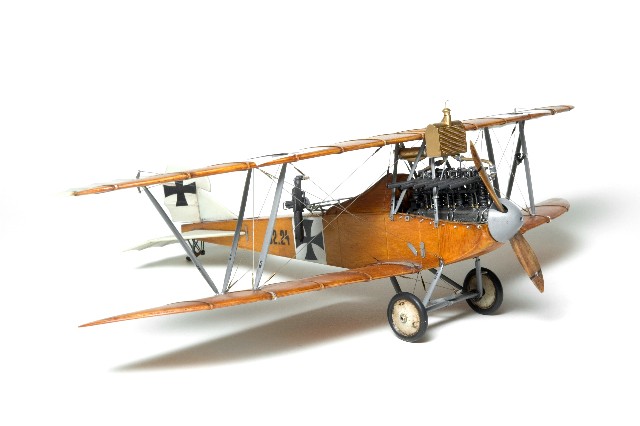
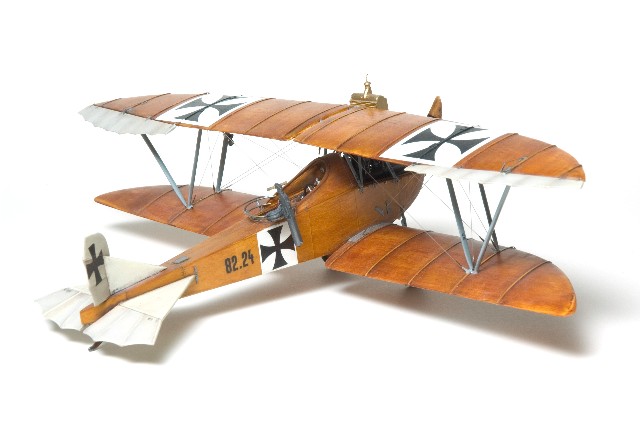
Lloyd C.V (WKF) 82.24,
The Lloyd C.V. marked an end of the all veneer wing development. To achieve significant weight reduction and to the matter of a perfectly streamlined design. Different to standard wing construction, the wing consisted of spanwise stringers instead of spars, around only very few wing rips to give the required profile and shape. Covered with 1,2mm plywood this wing was a very solid construction. The only problem was if holed by bullets the plywood skin was very difficult to repair. And in battlefield conditions the glue of the plywood was very sensitive to humidity.
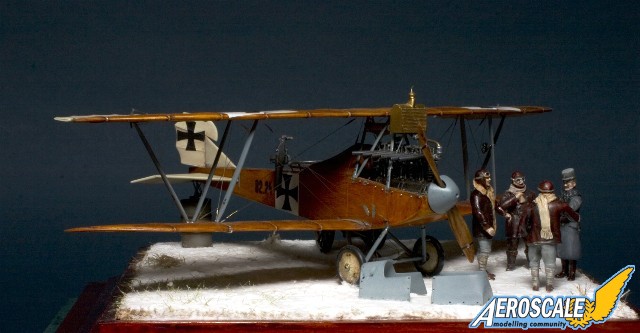
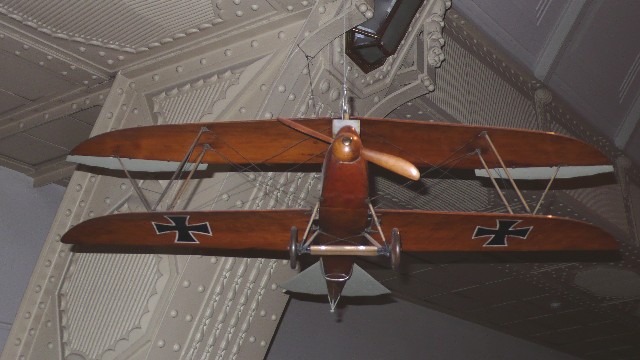
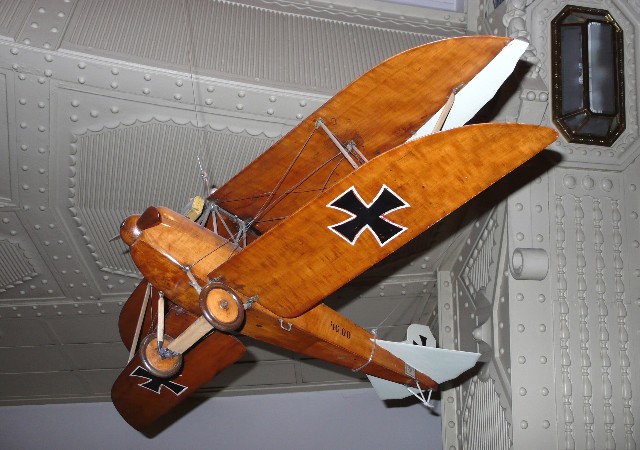
As a twoseater the Lloyd C.V was rather small in dimensions, very fast and depending on design features closer to fly as a scout than an observer aircraft. As a result of its speed and high wing loads the C.V had very high landing speeds. Under the controls of rather inexperienced pilots lots of landing crashes have been the result.
There have been built several series of this aircraft
The Lloyd manufactured series 46.00 to 46.49 powered with the185 hp Austro-Daimler AD 6 series 18.000 inline engine.
The WKF license built series 82.01 to 82.48 powered with the 220 hp MAG built Benz series 81.000 inline engine.
And finally The Lloyd manufactured series 46.51 to 46.98 powered with the185 hp (136 kW) Austro-Daimler AD 6 series 18.000 inline engine.
In the beginning, the new licence built MAG Benz engine suffered severe problems and needed a complete redesign of main engine parts. The outcome was a powerful but heavy engine. Also a more efficient cooling system was required. Under aspect of increased weights the C.V airframe design underwent major modifications. In fact the Series 82. aircraft did look like the Daimler powdered series 46. but are very different in their layout and constructive detail. All this put heavy delay on the delivery of the WKF built Series 82. Lloyd C.V and finally it was accepted in August 1917. Most Lloyd C.V. served on the eastern front. Later than withdrawn from operational service it was used as advanced trainer. Some have been attached to the postal flight to deliver mail to the army units.
The kit ,
I was very happy as the kit from Special Hobby appeared on the market. There have been no doubts that I have to build it with a real veneer finish. That means... all wood surfaces will be made of wood. The next decision was, not to build the Daimler engine powered version as supplied in the kit. I prefer the appearance of the more powerful Benz engine displayed in the WKF built 82. Series. This has nothing to do with the quality of the kit, because it is nicely moulded with fine details and I always appreciate manufacturers releasing kits of Austro-Hungarian aviation. My friends always call me crazy if I tell them I am working on a kit, because usually most of the parts remain in the box.
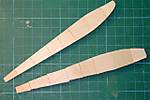
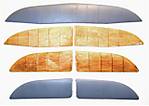
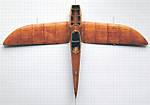
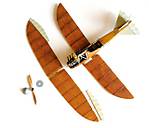
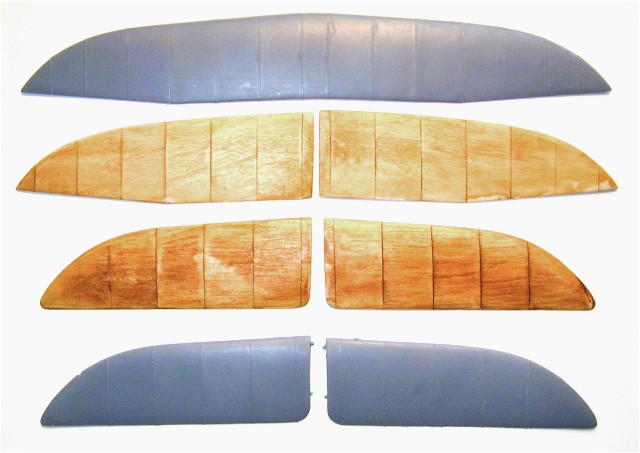
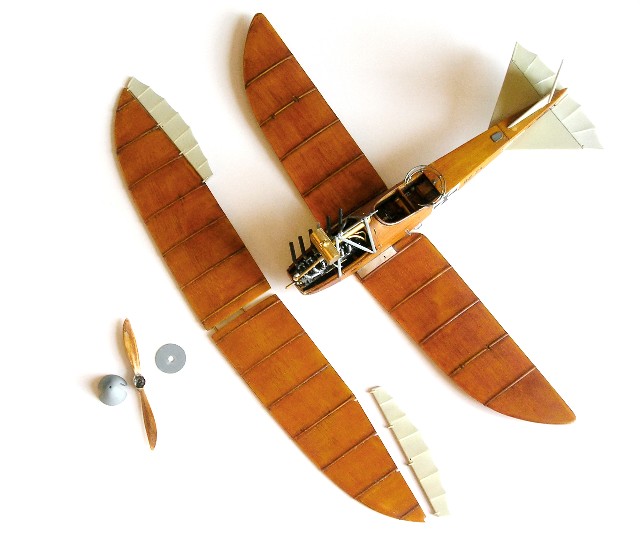
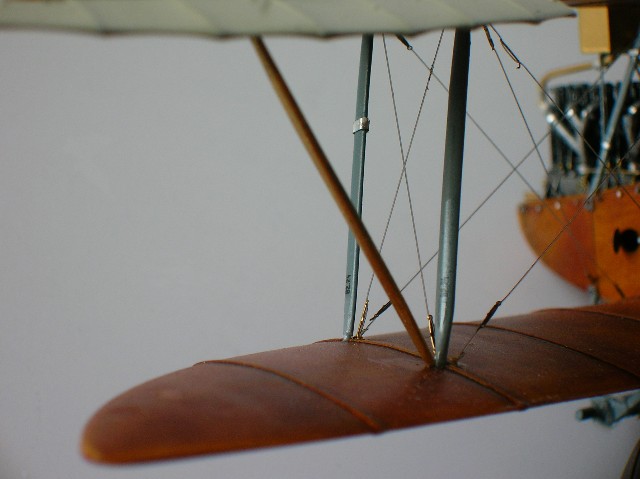
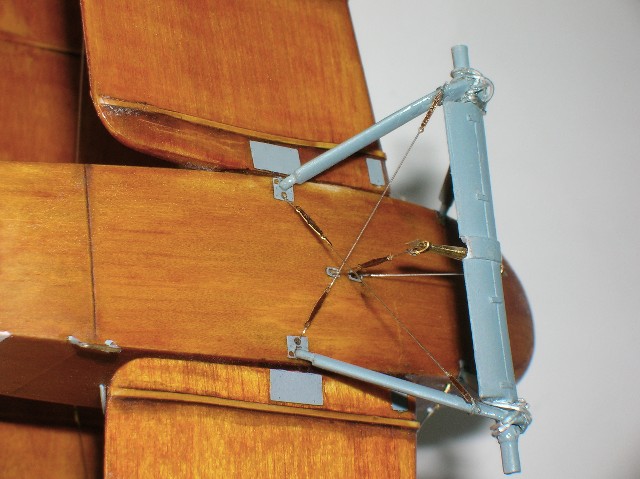
Lets start with the wings. Parts supplied with the kit could not be used for what I had in mind. So I decided to make them of plastic card, sand them down to the right shape and cover them with several pieces of veneer. Different to the kit the upper wings are separated too, like the lower wings. For covering the seams between the veneer panels evergreen stripes (0,5 x 0,25 mm) have been used. The direction of woodgrain on the wing was a basic question. As there have been no drawings or other information available, I consulted a lot of my friends associated to WWI aviation and even building replicas in 1:1 scale like Koloman Mayerhofer. In long discussions we came to the conclusion it must have been spanwise for static reasons. As I found out, much later in an article of a magazine of 1918 about building veneer wings we all have been wrong, it was chordwise! The reason was, the 3 layer ply was not included in static calculation. Modelers fate, I will not change it on my model.
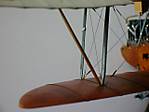
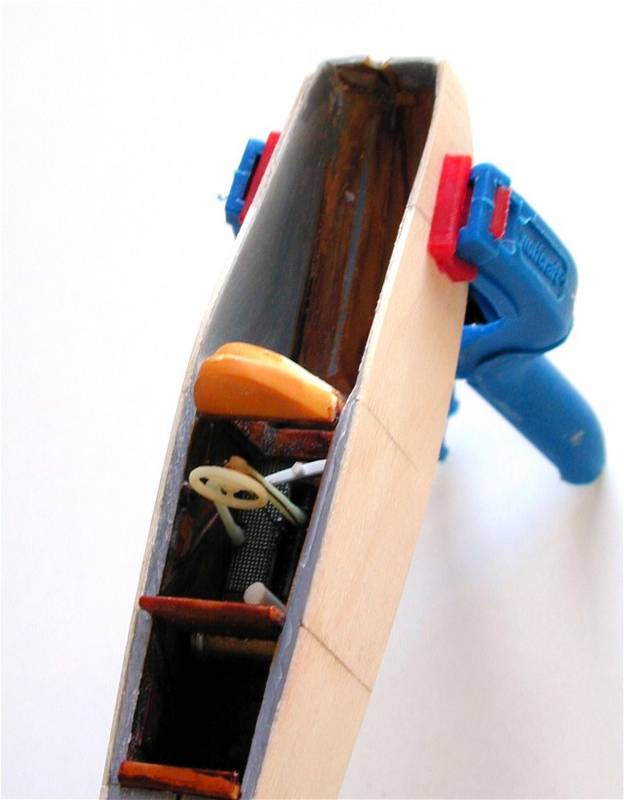
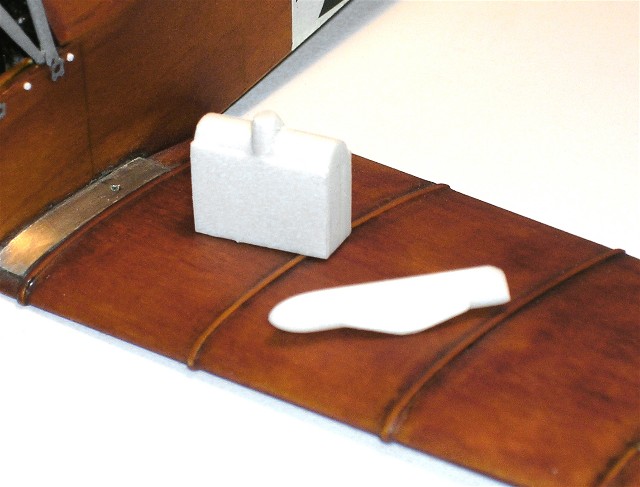
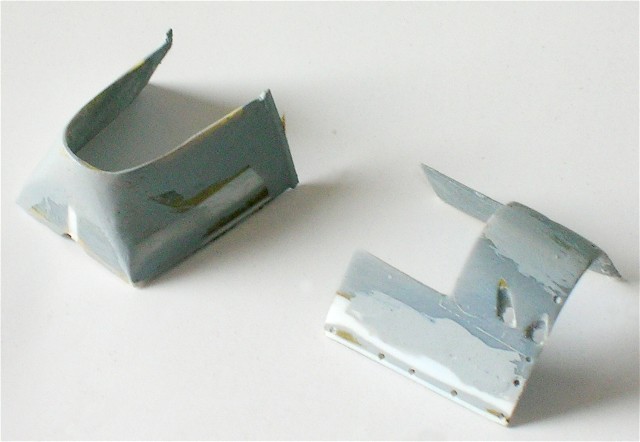
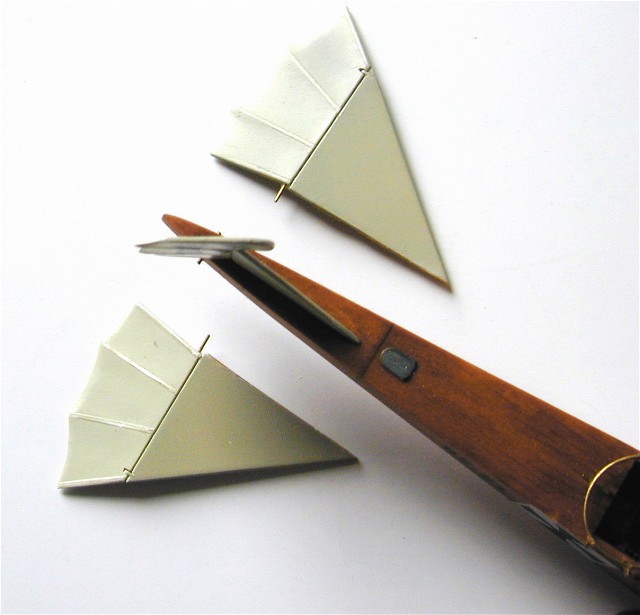
The fuselage halves are from the kit. It is always hard to start with the surgery. The cowling has to be removed and all details must be sanded down. There was not very much remaining from the fine moulds only the general shape. After extensively sanding the halves have been covered with panels of veneer. Ailerons, rudder and elevators have been used from the kit with only very few modifications.
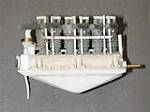
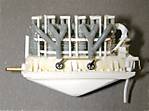
The Benz engine was completely made from scratch
Applying the veneer,
As frequently asked, here is a little instruction of how I usually do it. The material I prefer is birch wood veneer, it is flexible, has a very light colour, almost a broken white. Sheets recommenced have a thickness of 0,4 to 0,6mm. The required parts (panels) should be cut out carefully with a very sharp knife. It is recommended to scratch the material along the lines before cutting out. This avoids tearing of the veneer . Glue the panels with very thin Cynoacrylate as a bonding agent, since this assures that the wood will be soaked through and when fully cured gives a material which is easy to work with. After applying all the panels sand the surface . To get a very realistic looking surface the veneer should be sealed the a shellac varnish. This process should be done several times with sanding wet and dry until the result and colour is satisfying. The more often the shellac is applied the darker the colour becomes. It must look real because birch wood ply was commonly used on Austro Hungarian aircraft of this era.
Kit build,
The kit I basically used was No.: SH48013, Lloyd C.V from Special Hobby, in 1/48 scale. It contains 20 plastic parts provided on 2 sprues, 35 resin parts, 1 fret with photoetch parts film fort he dashboard, decal sheet providing models of series 46.01, 46.04, 46.07 and 46.37 The comprehensive 10 pages instruction sheet leaves no questions open. If one wants to make the 46.01 the radiator must be made from scratch because it was different to all others mounted im the front of the upper wing. In my eyes th gun canister is to small and to narrow but this is all to mention. The kit is highly recommenced and an extremely good basis for a nice model.
Available kits of the Lloyd C.V,
Choroszy Modelbud Resin Kit Series 46.21, 46.37 1:72 scale
Special Hobby Plastic Kit 1:72 scale
Sierra Scale Vacu Kit Series 46. 1:48 scale
Special Hobby, Plastic Kit Series 46.01, 46.04, 46.07, 46.37 1:48 scale
Jager Miniatures Resin Kit Series 46. 1:48 scale
References,
Austro Hungarian Army Aircraft of World War One, Peter M. Grosz, George Haddow, Peter Schiemer.
Der Grosse Krieg, die Österreichische-Ungarische Luftfahrtruppen, Jan Zahálka.
Die Flugzeuge der K.U.K. Luftfahrtruppe und Seeflieger 1914-1918, Erwin Hauke, Walter Schröder, Bernhard Tötschinger.
Österreichisches Staatsarchiv/Kriegsarchiv.
 Peter Plattner's Build
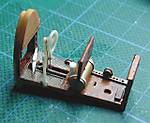


 Peter Plattner's build
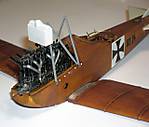
 Peter Plattner's build
 Peter Plattner's build
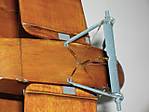 Peter Plattner's build
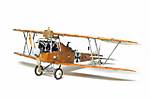 Peter Plattner's build
 Peter Plattner's build
 Peter Plattner's build


About the Author


Comments

Absolutely incredible, Peter. That's what I call modelling at its finest. The birch and shellac look great.
Regards,
Mark
NOV 24, 2008 - 11:05 PM
Wow , that is mighty fine craftsmanship on a very neat subject . Thanks for sharing and letting us know how you did the wood .
NOV 25, 2008 - 02:37 AM

I love it.... on the fuselage halves did you just veneer that to the kit plastic? so then it is encased in wood veneer? and the wings are made solely of wood. I want to get this straight in my mind as its a fabulous look ...
Kelly
NOV 25, 2008 - 04:22 AM
Funny how this bird looks so elegant in plan view and in profile looks rather silly!
crazy WWI modelers!
NOV 25, 2008 - 05:47 AM


I am very impressed. This is a fantastic, and very realistic build.
NOV 25, 2008 - 10:09 AM


Thank you all for your kind comments. It is a great pleasure and a real honour to be part of this comunity.
Actually I stuck more in the work with new masters than making models for my own.
Modelling is a real passion isn´t it?
regards Peter
NOV 27, 2008 - 10:00 AM
Copyright ©2021 by Peter Plattner. Images also by copyright holder unless otherwise noted. The views and opinions expressed herein are solely the views and opinions of the authors and/or contributors to this Web site and do not necessarily represent the views and/or opinions of AeroScale, KitMaker Network, or Silver Star Enterrpises. Images also by copyright holder unless otherwise noted. Opinions expressed are those of the author(s) and not necessarily those of AeroScale. All rights reserved. Originally published on: 2008-11-24 00:00:00. Unique Reads: 13058

WEB HOSTING BY


Copyright ©2021 AeroScale and Kitmaker Network, a subsidiary of Silver Star Enterprises
All Rights Reserved. Please read our Conditions of Use and Privacy Policy.
All Rights Reserved. Please read our Conditions of Use and Privacy Policy.