

1⁄48Masking Oscars Meatballs - Ki.43-II
9
Comments
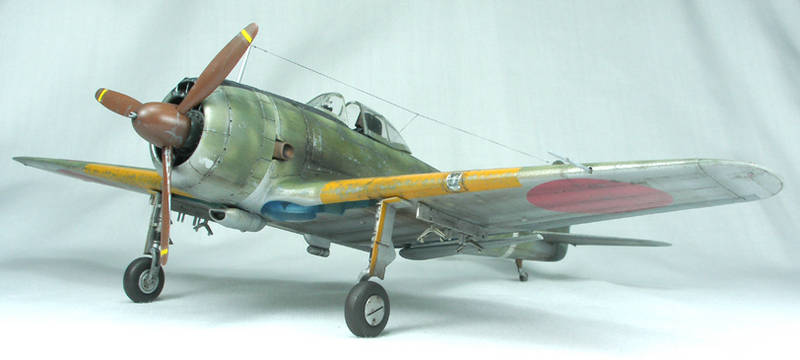
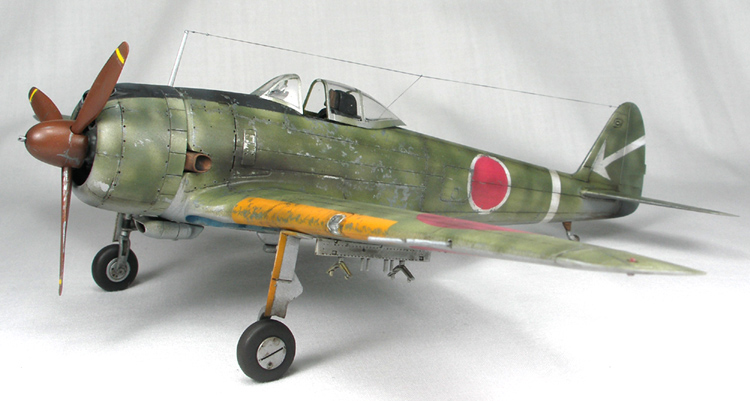
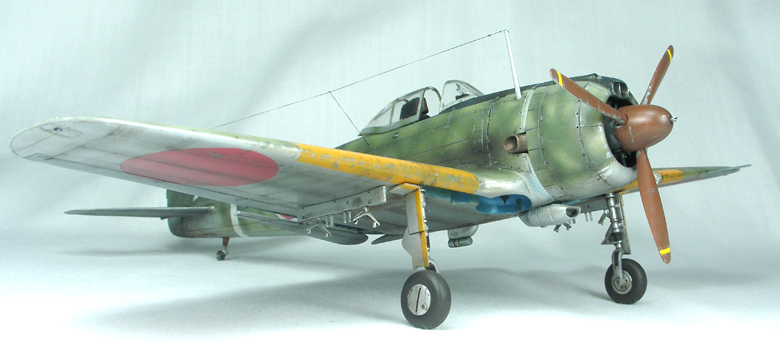
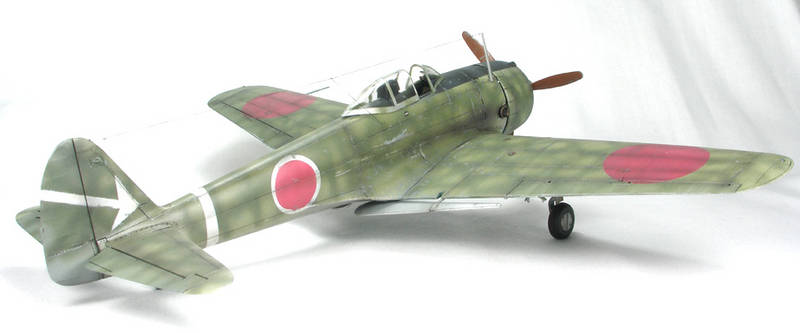
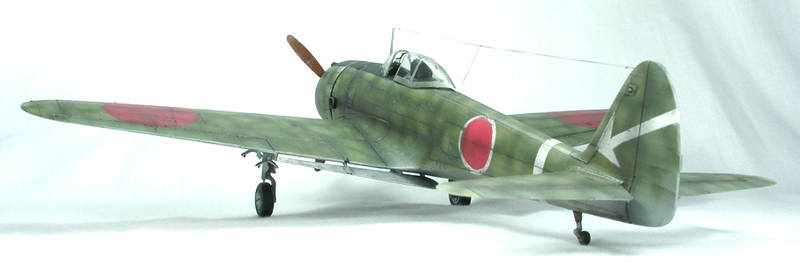
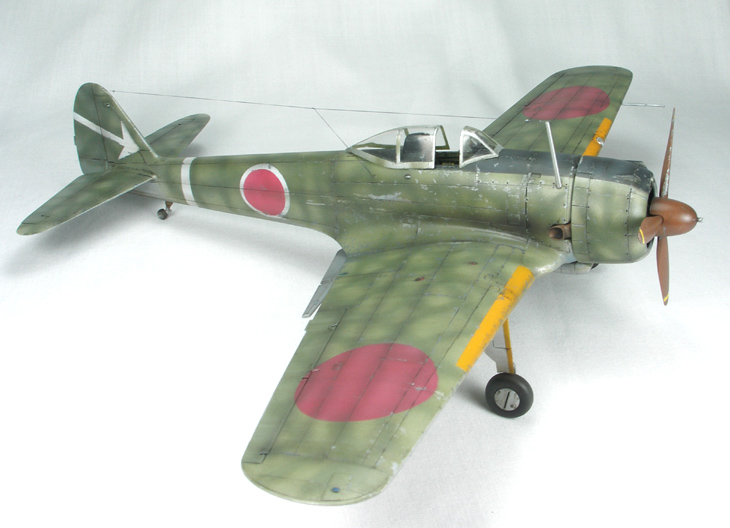
Hasegawas Oscar is typical of Hasegawas excellent high quality releases of the last few years. Released in 2001, the kit comes with 76 parts in mid grey plastic and a further 6 in clear plastic. The plastic is blemish free, exhibits fine recessed panel lines and the clear parts really are very clear. Decals look very nice also. This kit has been done in a number of different boxings featuring a number of different and very interesting schemes. My version was the JY82 boxing.
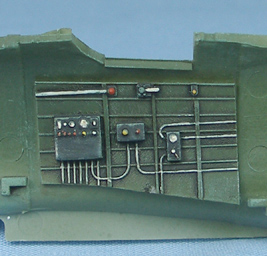
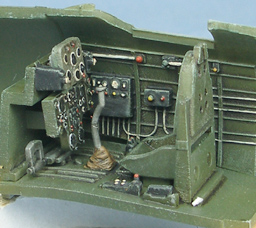
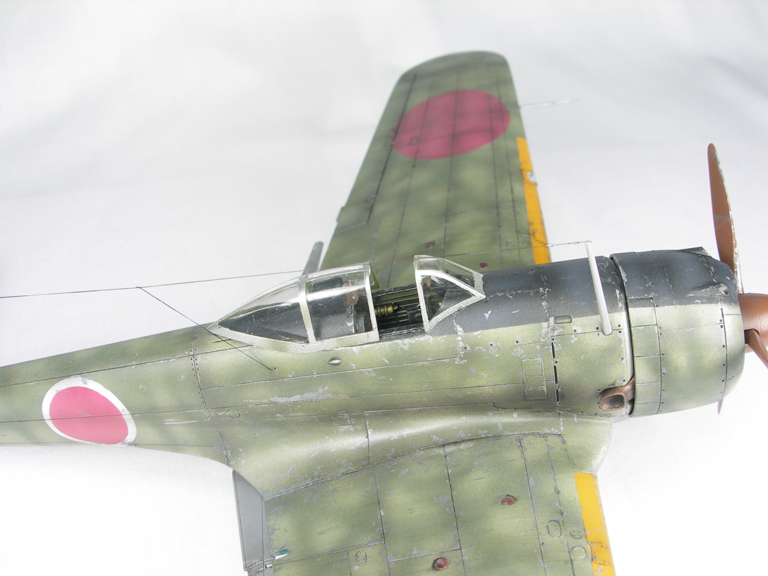
To be frank (no Japanese WW2 aircraft pun intended), I have absolutely no knowledge on Japanese aircraft of this era zip, nil, nada (I usually build WW1 era biplanes). Therefore, I built my Oscar straight out of the box with no additions I even resisted the urge to add seatbelts. Detail in the kit is very high. The cockpit, although little can be seen of it once done, is highly detailed, with plenty of crisp details and wiring. The only let down to my mind is the seat, which is rather chunky, and the cut outs are represented as shallow dimples. The engine is also very nicely detailed and comes in only 4 pieces despite this and the engines complexity, it is a very convincing representation. Regarding the fit of the kit, all I can say is that the fit is excellent. There are only a few minor points to watch for, namely the fit of the upper wing pieces at the forward edge of the wing some filler will be required as the wing join goes straight through the middle of the forward wing root panel. Secondly, the fit of the horizontal stabiliser is a little loose, so some propping up of the parts whilst drying may be needed. Hasegawa thoughtfully provide a number of vinyl plugs to allow certain components (undercarriage, prop) to be removed during transport a very neat idea. Clear parts are excellent they are bagged with the decals and mine were blemish free.
My choices on colour were, well, loose at best. I was initially going to go for the splotches over NMF finish seen on so many Oscars, but decided to have some fun with my idea of an experimental lizard scheme. No historical basis for this, other than I thought this sort of scheme would look cool on this aircraft. After the appropriate masking of the clear parts, painting started with my first ever attempt at NMF, and it was only really mildly successful in my opinion. I decanted some Tamiya rattle can TS-17 Gloss Aluminium into my airbrush and sprayed this on as a base coat al over the model. I then masked off some panels, decanted some Tamiya AS-12 Bare Metal Silver into the brush and shot this also. Control surfaces were masked off and sprayed Testors stainless steel, which under a matt coat looks like doped silver fabric. Next time I think I will try some Alclad or another paint to represent NMF the Tamiya paint is quite hardy but the pigment is a little too large. The top colours were a real mish-mash of Tamiya IJA green and RLM71 green, sprayed over the NMF in stripes. This was over-sprayed with a thinned mixture of the same colour with some Tamiya IJA Grey added. The yellow ID wing markings and black anti-glare panels were then masked and sprayed. Next it was on to the fun part painting the markings. Here is where the circle cutter came in to play.
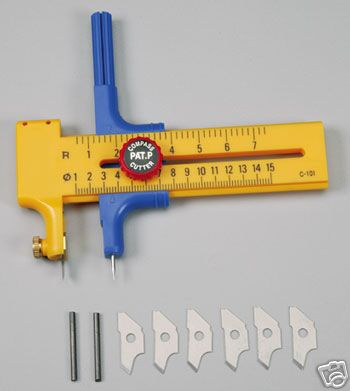
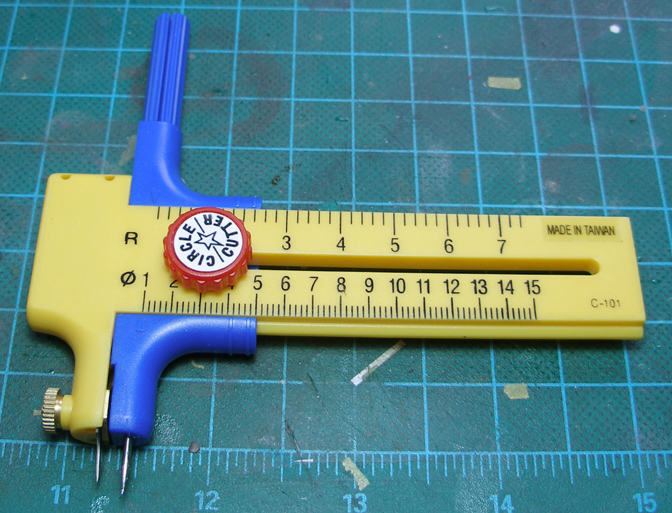
This was the first time I had really used a circle cutter to create masks for painting markings. I had picked the Hobbico circle cutter up off ebay rather cheaply a week or so prior to commencing the build. The Hobbico circle cutter is a very simple and sturdy design basically you have a stationary section with the cutting blade affixed, and a moving section with a central pin and handle which allows you to set the circle diameter. A small knob tightens the moving section onto the stationary section and sets the circle diameter. This cutter allows diameters of 1-15 cm, so really it is only good for larger markings. All you have to do is centre the pin at the centre of the circle, and rotate the whole device around the central axis, drawing the blade in a circle. Easy in principle. The first thing you notice is that the blade tip and pin tip are not the same level. Meaning that you either have to tilt the whole cutter to maintain contact of the tip and blade on the surface, or you have to dig the pin into something until the blade touches the surface to be cut. This makes rotating the cutter in a circle and keeping a sharp edge at a constant diameter surprisingly difficult. Therefore, I found that the best way to use the cutter was:
By making the balsa do the rotating work for me, I found it was very easy to get nice, sharp round circles. Overall, using the method described above, this cutter is a real gem for masking medium sized to bigger markings. Anything smaller than a 1cm diameter however, and you may need to look to other cutting devices or the decal box. The Hobbico circle cutter comes with six spare blades and pencil leads also, can be picked up quite cheaply online and in my mind is certainly good value for money and a handy tool to have in the tool box. I have no doubts that this tool could easily be used on thin plastics, balsa woods etc. Highly recommended!
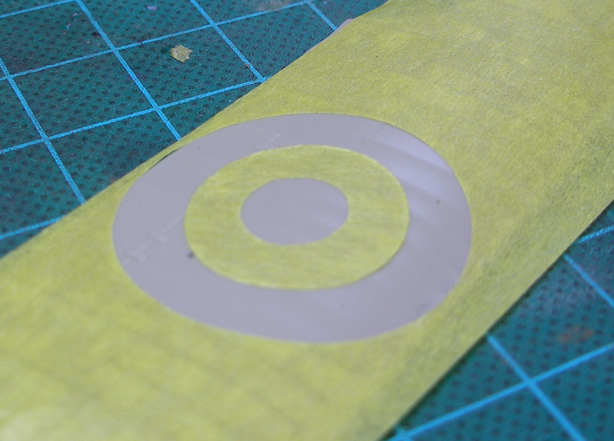
Anyways, back to the Oscar. Using the circle cutter, I cut out the appropriate sized meatballs, masked, and sprayed. Some post shading by lightening the red was also undertaken. The tail and fuselage markings were also masked and sprayed. Once this was done, I tackled the paint chipping. From my brief reading, I could see that these aircraft were quite badly beaten up and a lot of paint chipping occurred. So, out with the trusty paint brush and silver paint to apply copious quantities of paint chipping, focussing at the wing roots, cockpit and access panels on the airframe. Next, the exhaust staining was sprayed on. Lastly, I post shaded along the panel lines with some thinned Tamiya smoke to break up the consistency of the panels. A clear coat followed by a wash with black oils finished off the majority of the painting. The weathering of the undercarriage was completed using some mud coloured pastels around the wheels and underside of the wings. A final clear flat coat, attachment of the remaining small parts, rigging of the antenna using fine elastic, and she was done! My first Japanese aircraft model!
Overall I was very impressed with both the Hasegawa kit and the Hobbico circle cutter. After this experience I know that I will be painting a lot more of my roundels now!
To be frank (no Japanese WW2 aircraft pun intended), I have absolutely no knowledge on Japanese aircraft of this era zip, nil, nada (I usually build WW1 era biplanes). Therefore, I built my Oscar straight out of the box with no additions I even resisted the urge to add seatbelts. Detail in the kit is very high. The cockpit, although little can be seen of it once done, is highly detailed, with plenty of crisp details and wiring. The only let down to my mind is the seat, which is rather chunky, and the cut outs are represented as shallow dimples. The engine is also very nicely detailed and comes in only 4 pieces despite this and the engines complexity, it is a very convincing representation. Regarding the fit of the kit, all I can say is that the fit is excellent. There are only a few minor points to watch for, namely the fit of the upper wing pieces at the forward edge of the wing some filler will be required as the wing join goes straight through the middle of the forward wing root panel. Secondly, the fit of the horizontal stabiliser is a little loose, so some propping up of the parts whilst drying may be needed. Hasegawa thoughtfully provide a number of vinyl plugs to allow certain components (undercarriage, prop) to be removed during transport a very neat idea. Clear parts are excellent they are bagged with the decals and mine were blemish free.
My choices on colour were, well, loose at best. I was initially going to go for the splotches over NMF finish seen on so many Oscars, but decided to have some fun with my idea of an experimental lizard scheme. No historical basis for this, other than I thought this sort of scheme would look cool on this aircraft. After the appropriate masking of the clear parts, painting started with my first ever attempt at NMF, and it was only really mildly successful in my opinion. I decanted some Tamiya rattle can TS-17 Gloss Aluminium into my airbrush and sprayed this on as a base coat al over the model. I then masked off some panels, decanted some Tamiya AS-12 Bare Metal Silver into the brush and shot this also. Control surfaces were masked off and sprayed Testors stainless steel, which under a matt coat looks like doped silver fabric. Next time I think I will try some Alclad or another paint to represent NMF the Tamiya paint is quite hardy but the pigment is a little too large. The top colours were a real mish-mash of Tamiya IJA green and RLM71 green, sprayed over the NMF in stripes. This was over-sprayed with a thinned mixture of the same colour with some Tamiya IJA Grey added. The yellow ID wing markings and black anti-glare panels were then masked and sprayed. Next it was on to the fun part painting the markings. Here is where the circle cutter came in to play.
This was the first time I had really used a circle cutter to create masks for painting markings. I had picked the Hobbico circle cutter up off ebay rather cheaply a week or so prior to commencing the build. The Hobbico circle cutter is a very simple and sturdy design basically you have a stationary section with the cutting blade affixed, and a moving section with a central pin and handle which allows you to set the circle diameter. A small knob tightens the moving section onto the stationary section and sets the circle diameter. This cutter allows diameters of 1-15 cm, so really it is only good for larger markings. All you have to do is centre the pin at the centre of the circle, and rotate the whole device around the central axis, drawing the blade in a circle. Easy in principle. The first thing you notice is that the blade tip and pin tip are not the same level. Meaning that you either have to tilt the whole cutter to maintain contact of the tip and blade on the surface, or you have to dig the pin into something until the blade touches the surface to be cut. This makes rotating the cutter in a circle and keeping a sharp edge at a constant diameter surprisingly difficult. Therefore, I found that the best way to use the cutter was:
- 1. Set the radius you want;
- 2. Lay the tape to be cut over a thin piece of balsa wood (a couple of millimetres thick is all that is needed);
- 3. Centre the tip, push the tip down through the tape and balsa until the cutting blade touches and slightly penetrates the tape, making sure to keep the cutting tool upright;
- 4. Holding the cutting tool straight and upright, rotate the balsa block under the cutting tool in a complete arc or two, or until the tape is cut. Take care to keep the cutting tool upright and at constant depth to avoid changing the diameter of the circle halfway through the cutting process.
By making the balsa do the rotating work for me, I found it was very easy to get nice, sharp round circles. Overall, using the method described above, this cutter is a real gem for masking medium sized to bigger markings. Anything smaller than a 1cm diameter however, and you may need to look to other cutting devices or the decal box. The Hobbico circle cutter comes with six spare blades and pencil leads also, can be picked up quite cheaply online and in my mind is certainly good value for money and a handy tool to have in the tool box. I have no doubts that this tool could easily be used on thin plastics, balsa woods etc. Highly recommended!
Anyways, back to the Oscar. Using the circle cutter, I cut out the appropriate sized meatballs, masked, and sprayed. Some post shading by lightening the red was also undertaken. The tail and fuselage markings were also masked and sprayed. Once this was done, I tackled the paint chipping. From my brief reading, I could see that these aircraft were quite badly beaten up and a lot of paint chipping occurred. So, out with the trusty paint brush and silver paint to apply copious quantities of paint chipping, focussing at the wing roots, cockpit and access panels on the airframe. Next, the exhaust staining was sprayed on. Lastly, I post shaded along the panel lines with some thinned Tamiya smoke to break up the consistency of the panels. A clear coat followed by a wash with black oils finished off the majority of the painting. The weathering of the undercarriage was completed using some mud coloured pastels around the wheels and underside of the wings. A final clear flat coat, attachment of the remaining small parts, rigging of the antenna using fine elastic, and she was done! My first Japanese aircraft model!
Overall I was very impressed with both the Hasegawa kit and the Hobbico circle cutter. After this experience I know that I will be painting a lot more of my roundels now!


About the Author


FROM: QUEENSLAND, AUSTRALIA
the 16 years or so since I began modelling, I have been mainly interested in aircraft modelling, and in recent years I have primarily been interested in modelling aircraft of the Great War 1914 -1918 period. My other modelling interests include 40s era aircraft. My modelling philosophy is "it's ok...
Comments

Brad,
Excellent model! Excellent feature!
I haven't tried masking national insignia yet, but I have a circle cutter. Perhaps soon...
APR 12, 2008 - 03:35 PM

Great job! I always like the painted on insignia instead of a decal. You should be posting more features.
APR 12, 2008 - 05:17 PM

Thanks for the kind words guys - yes Rowan has been hassling me for more articles - i'd better get building then!!
BC
APR 12, 2008 - 11:23 PM
Nicely done Brad, painted on markings always look far superior to decals
Mal
APR 13, 2008 - 07:21 AM

a very interesting article supported by a magnificent build (or is it the other way around).
Those painted markign s are very realistic, not in the least because the painting has been done very professionaly.
i need one of those circle cutters... and a lot of skill, skill, skill....
APR 13, 2008 - 10:37 PM
Excellent job, Brad. The paint job is simply superb!
Thanks for sharing
APR 15, 2008 - 01:26 AM
Speaking of painted on markings, has any of you had success at painting on US emblems? If so, how did you go about it?
APR 15, 2008 - 06:25 AM

All the markings on my B17 assembly ship were painted on using Miracle Masks.
Nige
APR 15, 2008 - 07:22 AM

Beautiful work, Brad! I'm a big fan of the Oscar and it's nice to see one so well executed!
APR 18, 2008 - 08:05 PM
Copyright ©2021 by Brad Cancian. Images also by copyright holder unless otherwise noted. The views and opinions expressed herein are solely the views and opinions of the authors and/or contributors to this Web site and do not necessarily represent the views and/or opinions of AeroScale, KitMaker Network, or Silver Star Enterrpises. Images also by copyright holder unless otherwise noted. Opinions expressed are those of the author(s) and not necessarily those of AeroScale. All rights reserved. Originally published on: 2008-04-12 00:00:00. Unique Reads: 12082

WEB HOSTING BY


Copyright ©2021 AeroScale and Kitmaker Network, a subsidiary of Silver Star Enterprises
All Rights Reserved. Please read our Conditions of Use and Privacy Policy.
All Rights Reserved. Please read our Conditions of Use and Privacy Policy.