

1⁄35Focke-Wulf Fw 190 D-9 - Part 2
7
Comments
.
Some modelers purchase or fabricate their own thermaforming machines. Some of the machines can be quite large, so that an entire wing or fuselage can be copied from a carved wood original. These devices are usually called a vacum-forming machine. A hose from a vacum sweeper can be connected to the devise so that when turned on, the suction from the sweeper sucks the heated plastic down on to the original mold.
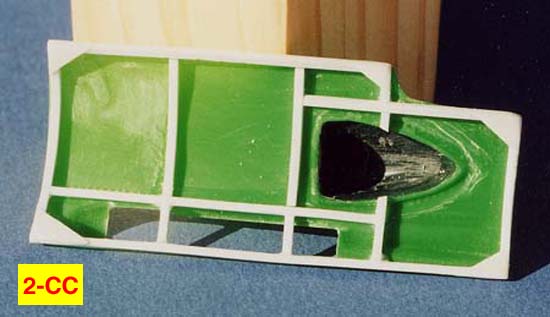
Many years ago Mattel Toy company made a thermaforming toy called a Vac-u-form. Modelers use this toy to fabricate scratchbuilt parts for their models. I ordered one from the Sears Christmas catalog in 1966. I still have it. Unfortunately, in the late 1960s, concern about children getting burned from using the toy, caused it to be removed from the market. I'm told that at times even today, the Mattel toy is offered on Ebay. Also, modeling magazines run advertisements from companies who sell more elaborate vacum forming machines with platforms that will vacuform parts of much larger size. But I still use my old Mattel toy from time to time. And it still works like a charm. (See photos 2-C and 2-D) These pictures show my old Mattel Vac-u-form, as well as the 1:32nd Revell FW 190 D kit parts that were used as originals, from which the thinner and closer to scale 15th thousandths styrene copies, were made. On the Mattel toy, the platform, where the original piece you want to copy is placed, is only 60mm by 80mm in size. So in reference to the size of a piece you want to copy, you're somewhat limited with the Mattel toy. In Photo 2-CC you see the inside of my unpainted vacuformed starboard engine cowling panel. The Mattel plastic was a light green in color. Those white reinforcing pieces are Evergreen plastic strips and some 15 thousandths white sheet styrene. Of course, the dark green super charger intake is the part from the Revell kit. Photo 2-DD shows the same engine cowl panel from the exterior side.
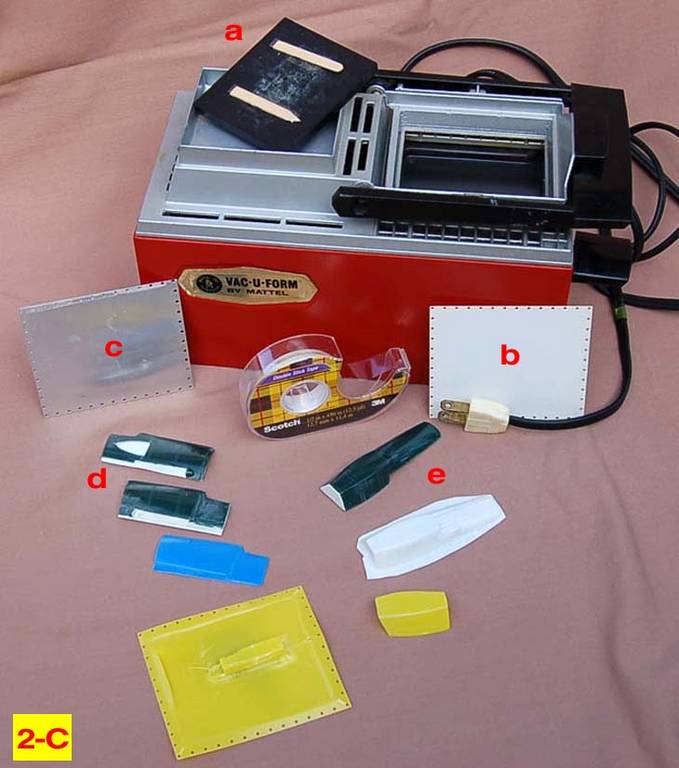
The following is a brief "how to" for using the Mattel machine: The styrene is placed down into the metal frame so the holes fit down on the "teeth". This two part black frame is on the right in Photo 2-C. The top part of the frame then clamps down over the plastic, holding it in place. There is a hinge in the middle of the machine that allows the two part frame to swing over to the left where the platform/original mold is attached. The heating process takes place on the right where a black pan (somewhat visible in the picture) is located under the sheet styrene. Also on the right side exterior is a pump handle that creates the suction. It is pushed up and down in quick strokes. From experience, I can tell by the sag in the sheet styrene as it heats up, when it is time to rotate the black frame assembly over to the left side platform. I rotate the black frame with the left hand. With the right hand I pump the handle to create the suction so the softened plastic would draw down over the original mold. Letter "e" shows the top cowling original part in dark green plastic where the machine guns would be located. The vacuformed copy is shown in white plastic below the letter "e".
In Photo 2-D you see the parts from a closer perspective. The two locations of the letter "a" show the port (on the left of the photo) and starboard (on the right of the photo) original engine cowling parts I hotknifed off the first Dora kit. Letter "b" shows a closer view of the original dark green top portion of the Revell kit cowling. The Mattel vac-u-formed copy for it is in white above. The blue vacuformed styrene part standing on end is the vacuformed copy made from the port engine cowl original (at "a" on the left of the picture) Pretty Prairie Blue, YES. Puke Green? NO! The yellow vacuformed piece is portion left after I cut away the portion of part "b" that I wanted to use. I had vacuformed that part twice; once in yellow plastic and once in white plastic.
INTRODUCTION
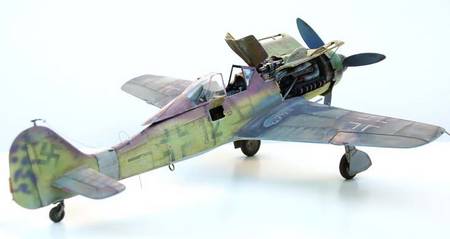
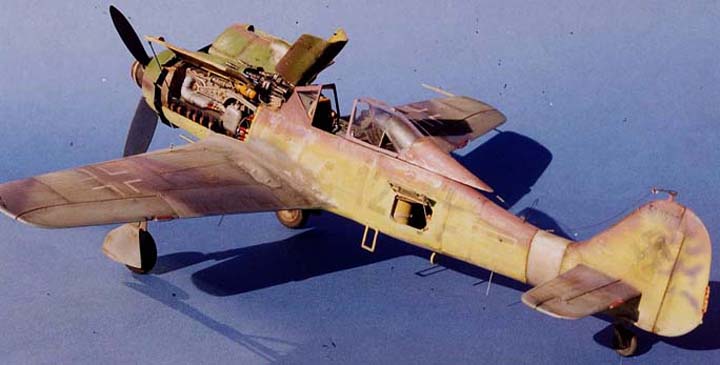
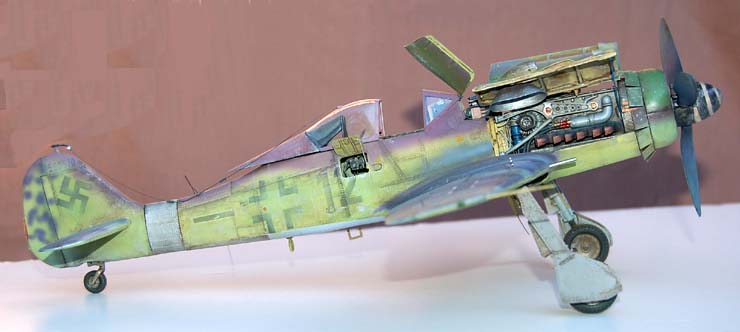
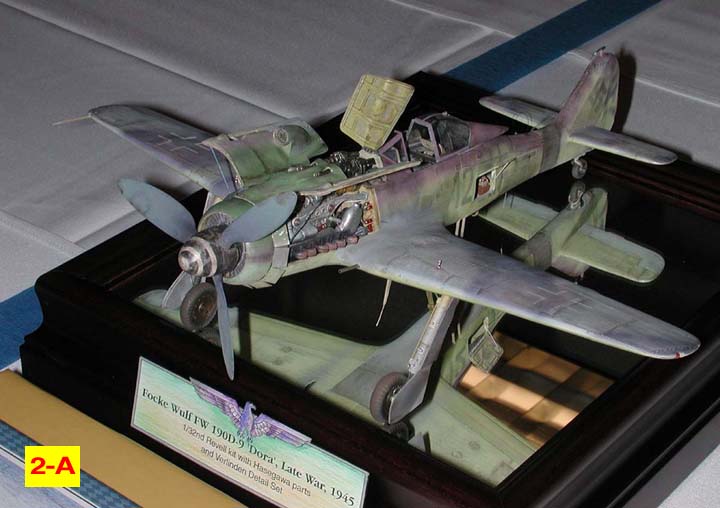
So here is the second installment, Part II, on the series of articles about my building of the old Revell 1:32nd Focke Wulf 190 D-9 Dora. Part One left off with the Rutman resin wheel well set being installed between the lower and upper wing halves. Now I will turn my attention to the work done inside the fuselage of the model before the two fuselage halves were glued together. And I will discuss the work done in the foward portion of the model, working with cutting off the nose and engine cowling portion of the Revell kit, so that I could scratchbuild the port and starboard engine cowl access panels that would be attached to the forward portion of the fuselage, in the open position. (See Photo 2-A) My plan was to use the kit engine and kit engine mounts as a place to start. I wanted to add scratchbuilt oil and coolant tanks, reservoirs, hoses and wiring to the basic kit engine. And I would need to alter the length of both port and starboard kit engine mounts so that all the added pieces would later fit together correctly, in the engine compartment, in a way that would give the "illusion of reality" when a person or a contest judge looked at the model. I spent 9 months working on this model, with several breaks for a week or so to "reinforce" my discipline; my ability to stay the course throught completion of the model. Most of the time on the model was spent in this front portion of the kit, fabricating and fitting each part until it all resembled hopefully, what I saw in the photographs of the engine compartment in the Squadron Signal Walk Around book on the FW 190 D-9. This book was mentioned at the end of Part One in the list of model accessory companies and publishers.THIS MACHINE SUCKS. . .
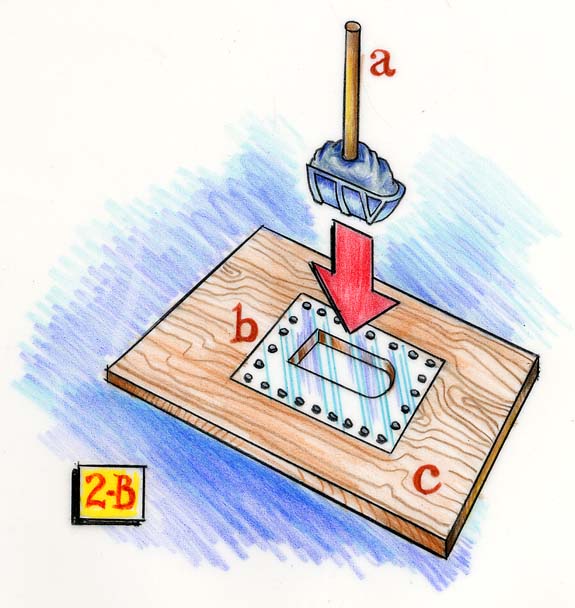
Because new port and starboard engine cowl access panels had to be scratchbuilt, I now want to mention a modeling procedure called thermoforming. I used the "thermaforming" technique to fashion those engine cowl access panels. The thermaforming term means that a modeler uses heat to bend or mold the plastic into the shape desired. There are a lot of different way to do this. Some modelers accomplish this task by first bending or wrapping plastic, such as sheet styrene or a length of plastic rod or stretched sprue, around a wooden dowl rod, or some curved surface that will not melt, when in contact with heat. The wooden dowel would be emersed into a pan of boiling water on the stove. Tape or rubber bands could be used to hold the plastic in place around the wooden dowel rod. ( In the case of wrapping plastic rod or stretched sprue around the dowl rod, they might use this procedure in order to make a scratchbuilt steering wheel, for example.) Sometimes good thermaforming results can be achieved by just holding the wooden dowl rod, with the plastic rod or stretched sprue wrapped around it, under hot water from the faucet, if the plastic rod or spure isn't too thick in diameter. These procedures are some of the ways to thermaform. In Photo 2-B you see a rather crude colored pencil sketch I drew, of another way to thermaform a part. If an aircraft kit canopy is all one solid piece of styrene and you want to show it in the open position, to better display your extra details in the cockpit we'll say, you can use the kit canopy as an original, and thermaform two copies which can be carefully cut apart with very small, sharp, tie flying scissors. The second copy? For in case you goof up, naturally. So in Photo 2-B letter "a" would signify the original one piece kit canopy. Modeling clay would be shoved into the interior cavity of the canopy and a wooden dowel rod pushed into the exact center of the clay. Then you would put that "combo mold" into the freezer to harden the modeling clay and stiffen the place where the wooden dowel (the handle) was inserted into the clay. After that part was good and stiff, it would be ready to use in the following way. Letter "b" represents the clear styrene rectangle. And letter "c" indicates the piece of plywood that you've cut a hole into that is the shape of the kit canopy. But, it is a little larger to allow enough room for you to thrust the wooden dowl canopy original mold down into the heat softened styrene. You could use tacks or some other means of attaching the clear recantangle of styrene over the hole in the plywood. You would then put the plywood piece w/ attached styrene into your oven as a means of heating up the clear styrene. When the clear styrene had the correct amount of sag, you would withdraw it from the over with oven mits, of course. Then you would take the wooden dowel rod handle and thrust the canopy mold down into the opening in the plywood.Some modelers purchase or fabricate their own thermaforming machines. Some of the machines can be quite large, so that an entire wing or fuselage can be copied from a carved wood original. These devices are usually called a vacum-forming machine. A hose from a vacum sweeper can be connected to the devise so that when turned on, the suction from the sweeper sucks the heated plastic down on to the original mold.
Many years ago Mattel Toy company made a thermaforming toy called a Vac-u-form. Modelers use this toy to fabricate scratchbuilt parts for their models. I ordered one from the Sears Christmas catalog in 1966. I still have it. Unfortunately, in the late 1960s, concern about children getting burned from using the toy, caused it to be removed from the market. I'm told that at times even today, the Mattel toy is offered on Ebay. Also, modeling magazines run advertisements from companies who sell more elaborate vacum forming machines with platforms that will vacuform parts of much larger size. But I still use my old Mattel toy from time to time. And it still works like a charm. (See photos 2-C and 2-D) These pictures show my old Mattel Vac-u-form, as well as the 1:32nd Revell FW 190 D kit parts that were used as originals, from which the thinner and closer to scale 15th thousandths styrene copies, were made. On the Mattel toy, the platform, where the original piece you want to copy is placed, is only 60mm by 80mm in size. So in reference to the size of a piece you want to copy, you're somewhat limited with the Mattel toy. In Photo 2-CC you see the inside of my unpainted vacuformed starboard engine cowling panel. The Mattel plastic was a light green in color. Those white reinforcing pieces are Evergreen plastic strips and some 15 thousandths white sheet styrene. Of course, the dark green super charger intake is the part from the Revell kit. Photo 2-DD shows the same engine cowl panel from the exterior side.
GRIM REAPER PAYS A VISIT
As mentioned above, my plan was to use the Mattel toy to vacuform both the port and starboard engine cowl access hatches, plus the cowl panel on top of the engine that both machine guns would protrude from. But I needed those sections from the first of the two Revell Dora kits I had, for my original parts to be vacuformed from. I used a hot knife to cut off the appropiate places on the first Revell Dora kit. However, I would now recommend using a jewelers saw instead of a hot knife for this chore, . . . I emphazise the word chore. The jewelers saw allows you to get closer to the spot where you want to cut without fear of melting the wrong area of the kit. Therefore you don't have to carve or sand so much of the remaining plastic to be removed, to get the part you want to vacuform.Look again at Photo 2-C. At letter "a" you see the 60mm by 80mm platform sitting at an angle above the recessed area where it is placed when using the machine. I used double sided tape, as you see in the Scotch Tape dispensor, to attach two pieces of a popsicle stick to the platform. The original piece to be copied is firmly attached to the popsicle sticks with the same double sided tape. Raising the part to be copied up off the platform in this way, gives a better copy that is easier to cut from the vac-u-form template. That plastic template is shown at letter "b" in white styrene instead of the puke green cowl panel above. During the build, I ran out of the multi-colored styrene template "blanks" that came with the original Mattel toy, so THE GRIM REAPER came to my rescue. Gary Ruhnke, a close friend, made an aluminum pattern for me. It was made so the holes would fit over the metal "teeth" in the machine that held the plastic in place. (The Grim Reaper is Gary's call sign on Armorama.com) His aluminum pattern is shown at letter "c". I still use it with a stack of sheet styrene cut to size, and a motor tool with the correct diameter drill bit to make more blank styrene templates to use in my Mattel toy. Letter "d' shows the two green plastic port and starboard engine cowls from the first Dora kit, after they were cut and sanded. I added white sheet styrene behind certain areas of the original green parts to help keep the general shape I was after, once the suction was applied when I used the Mattel vac-u-form.The following is a brief "how to" for using the Mattel machine: The styrene is placed down into the metal frame so the holes fit down on the "teeth". This two part black frame is on the right in Photo 2-C. The top part of the frame then clamps down over the plastic, holding it in place. There is a hinge in the middle of the machine that allows the two part frame to swing over to the left where the platform/original mold is attached. The heating process takes place on the right where a black pan (somewhat visible in the picture) is located under the sheet styrene. Also on the right side exterior is a pump handle that creates the suction. It is pushed up and down in quick strokes. From experience, I can tell by the sag in the sheet styrene as it heats up, when it is time to rotate the black frame assembly over to the left side platform. I rotate the black frame with the left hand. With the right hand I pump the handle to create the suction so the softened plastic would draw down over the original mold. Letter "e" shows the top cowling original part in dark green plastic where the machine guns would be located. The vacuformed copy is shown in white plastic below the letter "e".
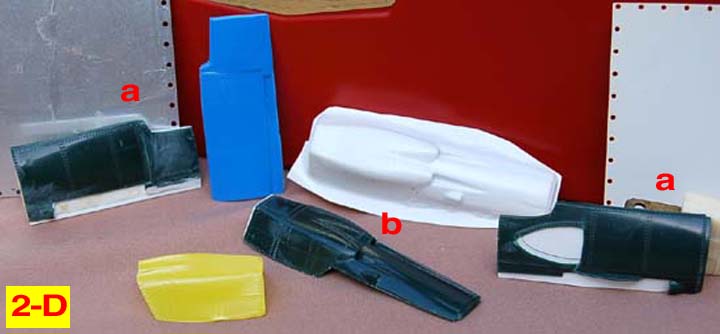
In Photo 2-D you see the parts from a closer perspective. The two locations of the letter "a" show the port (on the left of the photo) and starboard (on the right of the photo) original engine cowling parts I hotknifed off the first Dora kit. Letter "b" shows a closer view of the original dark green top portion of the Revell kit cowling. The Mattel vac-u-formed copy for it is in white above. The blue vacuformed styrene part standing on end is the vacuformed copy made from the port engine cowl original (at "a" on the left of the picture) Pretty Prairie Blue, YES. Puke Green? NO! The yellow vacuformed piece is portion left after I cut away the portion of part "b" that I wanted to use. I had vacuformed that part twice; once in yellow plastic and once in white plastic.

About the Author


FROM: KANSAS, UNITED STATES
I am primarily a figure painter and have been painting figures about 3 years now; still consider myself a novice. However, I started building models in 1965 and as a retired newspaper artist, I now have time to build models all the time, just for the fun of it and as a way to express my creative inn...
Comments

Hey Rick,
Great second installment! Talk about great reading! I hope you realise that now I expect the same quality of writing over on HFM :-)
Can't wait for part 3!!!
Rudi
OCT 15, 2006 - 02:21 AM

Hi Rudi!
:-) :-) No - Rick's ours now! - OK, we'll share!
But seriously - Rick's ability to explain everything in everyday language, while inspiring us all to reach for the highest standard is something to be treasured! Passing Forward is my new watchword (or 2!) for Aeroscale - it's an outstanding concept that underpins everything we stand for.
All the best
Rowan
OCT 15, 2006 - 02:46 AM
Rowan.... LOL for some reason when reading this you sounded just like Sith Master Darth Sidious :-) :-)
Could not agree with you more!!! Pay-it-forward is becoming the underlying spirit of HFM as well
Rudi
OCT 15, 2006 - 03:49 PM

Gentleman; to M.E. Merlin and M.E. Tarok:
@ Rudi: Thank you for your gracious remarks about my 1:32nd Dora
series, Rudi. Even though I realized I had a lot to say when I started the
first article, I was concerned that it would be so boring and dull to most
everyone. Candidly, it's a time consuming task, but fortunately I'm retired.
I felt if there were beginners who might get some value from my
ideas and concepts, it would be worth the time. Like the effort you've
put into Historicus Forma, Rowan is a very hard working editor. He has a
passion for this hobby. We're fortunate that he is willing to devote his time
to develop Aeroscale into the informative, timely, and exciting
information gathering site that it is becoming. But more importantly,
he is a very nice person and so easy and a lot of fun to work with. Part III
is a wrap and I'm now rolling the final part IV out on to the flightline. But I
also hope at some point to be able to do some more articles for HFM.
We will see.
@Merlin: Your comments are most appreciated, Rowan. In Part I I
I mentioned my late mentor and great friend Dick Clay and when I thought
of what his example meant to me and connected it with the "Pay-it-forward"
way of sharing with others, it just became something I felt needed to be
said. Unfortunately, we live in a confrontational world. It is easy to forget
what binds us all together as caring people. But I'll quote your words here:
Pay-it-forward is my new watchword (or 2!) for Aeroscale - it's
an outstanding concept that underpins everything we stand for.
Indeed, well chosen words. It "underpins" everything we stand for.
Thanks again,
Rick Brownlee
The Miami Jayhawk
OCT 15, 2006 - 05:27 PM

Well spoken Rick. The Feature is prime reading. Some of your techniques are applicable in other areas of modeling as well. You have a bit of something for everybody. Nicely done. I look forward to the engine fabrication. You are also right about "buffiesbest" The owner has a real eye for detail. But then again he is a multiple winner of the IPMS Judges Grand Award.
OCT 20, 2006 - 03:09 PM
Hi Stephen:
I certainly appreciate your kind remarks about my Dora series, "Jack".
And also, your imput about Buffiesbest. I am not famililar with the
individual personally but am certainly familiar with IPMS/USA's Judges
Grand Award, as I've seen up close at various Nationals, the models who
. . . . ah . . . duh? . . . let's make that "models THAT have received. . . .
those awards. The Grim Reaper, a Kansas City friend of
many many years ordered some of the very small diameter solder
wire from Buffiesbest just the other day, via a phone order and
got to talk with the gentleman. Grim says he's a stand up guy!
Thanks again,
OCT 20, 2006 - 05:03 PM

At last, finaly got a chance to read it.
Great part two Rick, well written with some interesting and useful tips and tricks.
Loking forward to part three.
Take it steady
Vic
NOV 01, 2006 - 08:10 PM
Copyright ©2021 by Rick Brownlee. Images also by copyright holder unless otherwise noted. The views and opinions expressed herein are solely the views and opinions of the authors and/or contributors to this Web site and do not necessarily represent the views and/or opinions of AeroScale, KitMaker Network, or Silver Star Enterrpises. Images also by copyright holder unless otherwise noted. Opinions expressed are those of the author(s) and not necessarily those of AeroScale. All rights reserved. Originally published on: 2006-10-15 00:00:00. Unique Reads: 9383

WEB HOSTING BY


Copyright ©2021 AeroScale and Kitmaker Network, a subsidiary of Silver Star Enterprises
All Rights Reserved. Please read our Conditions of Use and Privacy Policy.
All Rights Reserved. Please read our Conditions of Use and Privacy Policy.