


Early Aviation
Discuss World War I and the early years of aviation thru 1934.
Discuss World War I and the early years of aviation thru 1934.
Hosted by Jim Starkweather
weathering, etc.

Biggles2

Joined: January 01, 2004
KitMaker: 7,600 posts
AeroScale: 121 posts

Posted: Monday, October 12, 2020 - 04:59 AM UTC
Building my first AC in a long time - Eduard 1/48 Fokker Dr l in particular. I'm more familiar with weathering/chipping armour models. WWl AC, being mostly fabric and wood, is very different. What would be the typical weathering for a WWl aircraft besides oil leaks, exhaust stains, and some chipping on metal/aluminum parts - cowling,etc?

JPTRR

#051


Joined: December 21, 2002
KitMaker: 7,772 posts
AeroScale: 3,175 posts
Posted: Monday, October 12, 2020 - 05:34 AM UTC
Hi Biggles,
Mud/dirt deposits under wings/fuselage behind tires.
I've seen some dirty WW1 stuff but I think attrition prevented most from lasting long enough to get to grubby. That said, tears in the covering (whether combat or wear-n-tear) would be patched and the material might be significantly different than the surrounding covering.
Grimy/oily/greasy fingers smeared around access hatches, and maybe along cockpit combings.

JPTRR
#051
Joined: December 21, 2002
KitMaker: 7,772 posts
AeroScale: 3,175 posts
Posted: Monday, October 12, 2020 - 05:48 AM UTC
Oh yeah, and the castor oil spewed from the radials would cover the machine for a few feet behind the engine.
Stephen T. Lawson, CALLSIGN: JackFlash, is a WWI aircraft guru. Here is one of his posts: wrecked or derelict aircraft
Stephen T. Lawson, CALLSIGN: JackFlash, is a WWI aircraft guru. Here is one of his posts: wrecked or derelict aircraft
JPTRR
#051
Joined: December 21, 2002
KitMaker: 7,772 posts
AeroScale: 3,175 posts
Posted: Monday, October 12, 2020 - 05:51 AM UTC
Meant to include this, from The Aerodrome, which is WWI: How to "weather" WWI airplane
Weathering on WW1 aircraft
Weathering on WW1 aircraft
Biggles2
Joined: January 01, 2004
KitMaker: 7,600 posts
AeroScale: 121 posts
Posted: Monday, October 12, 2020 - 11:41 AM UTC
Thanks JPTRR! 

M4A1Sherman
Joined: May 02, 2013
KitMaker: 4,403 posts
AeroScale: 254 posts
Posted: Thursday, October 15, 2020 - 03:10 AM UTC
Quoted Text
Building my first AC in a long time - Eduard 1/48 Fokker Dr l in particular. I'm more familiar with weathering/chipping armour models. WWl AC, being mostly fabric and wood, is very different. What would be the typical weathering for a WWl aircraft besides oil leaks, exhaust stains, and some chipping on metal/aluminum parts - cowling,etc?
Hi, Biggles!
Very happy to hear from you on THIS side of the fence! Would LOVE to see your progress on your Fokker Dr.I project!

One thing to keep in mind, as the late, GREAT Shepard Paine used to say:
"Armor gets filthy; airplanes merely get dirty..."
He also said:
"LESS is MORE..."
If I were you, I'd keep the weathering on the "light"-side, as aircraft (even in the fields) tend to be "fussed over" more than armor does. Of course, there ARE many exceptions. Just a suggestion...
World War I aircraft, being a very new technology in those days of yore, tended to BURN A LOT OF OIL and they also LEAKED more oil than they burned. Checking the pristine aircraft at museums and at air shows (HA! Which airshows are those???) aren't advisable, unless you're checking DETAILS.
I would use TAMIYA's "SMOKE", which dries to a glossy or semi-glossy sheen; perfect for FRESH oil-stains and oil-streaks. Oil stains tend to pick up dust and dirt pretty quickly, turning them "FLAT" or "MATTE". But bear in mind what I said earlier in this post, that being, "airplanes tend to be "fussed over"...
Given that PAINT TECHNOLOGIES a hundred years ago weren't anything NEAR to approaching the sophistication and durability we enjoy today, SOME "weathering" would be in order. I would "FADE" the UPPER SURFACES of your Dr.I's Wings and Fuselage Spine a bit. A light dusting of CLEAR (Flat or Gloss), mixed with a few shades of your UPPER Colors streaked from front to rear, along with a healthy dose of CLEAR FLAT over this "streaking", should give you your desired results in conveying an impression of USE in the outdoors. I wouldn't get "too nuts" with "mud-spatter" and the like; nothing will ruin a great paint-job on an aircraft model more quickly than an over-abundance of mud. Don't forget that in most cases, ground crews take pride in the aircraft they service, so I'd keep the "dirt-factor" light...
Be SAFE & HEALTHY!
VR, Dennis
Biggles2
Joined: January 01, 2004
KitMaker: 7,600 posts
AeroScale: 121 posts
Posted: Friday, October 16, 2020 - 04:08 AM UTC
Great advice! Thanks Dennis. I tried the above links, but most were no longer active, or shut down.
M4A1Sherman
Joined: May 02, 2013
KitMaker: 4,403 posts
AeroScale: 254 posts
Posted: Friday, October 16, 2020 - 10:13 AM UTC
Your Very Welcome, Biggles!
Feel free to ask any questions here on AEROSCALE! Everyone here, including myself, are always ready and willing to offer advice, help and even commiseration!
Good Luck with your build, and please share your progress with us!
Stay Healthy!
VR, Dennis
Feel free to ask any questions here on AEROSCALE! Everyone here, including myself, are always ready and willing to offer advice, help and even commiseration!
Good Luck with your build, and please share your progress with us!
Stay Healthy!
VR, Dennis

krow113
Joined: March 16, 2010
KitMaker: 473 posts
AeroScale: 101 posts
Posted: Thursday, December 10, 2020 - 08:45 AM UTC
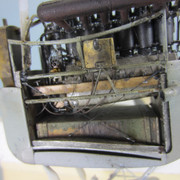
You can do as little or as much as you want. I believe with open valve gear , fabric and fibre seals there would be a mess.
This is my WNW Gotha engine pod exposed:
This is my WNW Gotha engine pod exposed:
 |

WEB HOSTING BY


Copyright ©2021 AeroScale and Kitmaker Network, a subsidiary of Silver Star Enterprises
All Rights Reserved. Please read our Conditions of Use and Privacy Policy.
All Rights Reserved. Please read our Conditions of Use and Privacy Policy.