World War II: Great Britain
Aircraft of Great Britain in WWII.
Hosted by Rowan Baylis
Eduard Spitfire Mk. I
SteveAndrews
_VISITCOMMUNITY
England - South East, United Kingdom
Joined: August 16, 2010
KitMaker: 693 posts
AeroScale: 551 posts
Posted: Tuesday, September 01, 2020 - 02:41 AM UTC
Hi Rowan,

It's great to read you are making progress with the kit and the research. I'm looking forward to seeing the results.

I hear what you say about techniques too. I must admit I'm never really satisfied with my own cockpits. I've tried all sorts from classic dry brushing and washes to painting them using figure painting techniques, even oils. I keep telling myself that the next build I will crack it! Maybe I should follow your lead and just practice one way of doing things. I'm going the Malta group build with a Spitfire Vb, so that's the one I'll make work!

Happy modelling,

Steve
M4A1Sherman
_VISITCOMMUNITY
New York, United States
Joined: May 02, 2013
KitMaker: 4,403 posts
AeroScale: 254 posts
Posted: Tuesday, September 01, 2020 - 11:11 AM UTC
Hello, Steve!

Please don't mind me butting in- Don't ever give up! I've had quite a few health problems over the last few years, and sadly, I've had to lay my paint brushes, air brushes and other modeling stuff aside for a while. I should be coming back soon, as I had started a project of converting die-cast 1/24 Ford Model As aside last Autumn after suffering 4 heart attacks. It's a chore to move from one room to another for me, BUT! "Never say die!" has become my favorite motto.

I've cracked open the boxes of my new EDUARD Spitfires, P-51Ds, and my new TAMIYA P-38s, (yes, that's multiples of each) and I'm anxious to get back into "things". It's hard to believe that nearly another year has flown by since my trip to the Emergency Ward, last year. All I can say about that is, my workshop needs a good cleaning up before I attempt any modeling! Boy do those Mustangs, Spitfires and Lightnings look DELICIOUS!!! My fingers are becoming very anxious in getting after them.

Noo, it's just my diabetic neuropathy kicking in, again. Settle down there, Partner...

The reason I'm bringing this little "pep-talk" up is that if you think you're failing with one method, keep trying until you come up with a technique that works for you. I didn't just "fall into" the method I like to use in constructing my 1/48 Cockpits as I had described earlier in this thread; it was all done by "trial and error" over many years' time.

Another thing is to find a technique you're comfortable with, and then EXPAND upon it. No one's going to fault you if you should happen to use your own methods and then maybe adding a few different techniques other modelers are using and incorporating some of these things into your own.

For example- I've already explained, (or at least tried to), my own techniques in Cockpit-painting, weathering, detailing and applying "fixatives" and/or "sealers". This has worked for me over the years- I'm comfortable with it. It's tedious, yes. But it works for me and it, (for me, anyway) yields much better results than using washes. One can "feather" crushed Artists' Pastels and/or Weathering Powders with the use of a soft Round Red Sable Brush (there are a veritable myriad of different sizes and shapes to be had) to some very neat visual-effects. The whole concept is to achieve a "Trompe l'oeil" (Fr.) effect, i.e "To fool the eye". I've used this method on my models for years, notably on my scale Figures, which range from HO scale (1/87) on up to 120mm, rather than oils. I should add that I DO like "pin-washes' in certain applications. By brushing on Pastel Powders or Weathering Powders, one has much better control, and a mistake can be corrected with reasonable results by using just plain old WATER...

Just don't give up; use the method(s) you're comfortable with, and if you DO want to try something "new", then practice on JUNK- DON'T practice on a model that is your latest "pet project" of the moment. If your "experiment" works on a junker, it will more than likely work on your latest "favorite project".

I can go on and on covering "dos and don'ts" but this is neither the time nor the place.

Maybe, if enough AEROSCALE modelers were interested, we could all "pool" methods, advice, techniques, ideas, etc into one "Grand Knowledge Bank" of sorts, which of course, would be open to anyone, Master Modeler, or Novice... Just a thought...

Good Luck with your Spitfire Mk.V, Steve!

Everyone Stay Safe & Healthy!

VR, Dennis
SteveAndrews
_VISITCOMMUNITY
England - South East, United Kingdom
Joined: August 16, 2010
KitMaker: 693 posts
AeroScale: 551 posts
Posted: Tuesday, September 01, 2020 - 11:05 PM UTC
Hi Dennis,

Thanks so much for the encouragement. I hear you! My strong inner critic pushes me towards perfection (whatever that is). Sometimes that's a great motivator, at other times it undermines my self-confidence.

I'm rooting for you, and a strong recovery from your illness. I would love to see some of your work. That techniques bank sounds like a wonderful idea. @Rowan, what do you think? How about that as a site development?

And, yup, you can please add advice and help directly to the Vb build when it kicks off next month. I've chosen a kit that has some well reported problems but I think I can manage.

Now, it will be even more interesting to see Rowan's cockpit progress.

Thanks once again, and very good luck with your recovery.

Bye for now,

Steve.
Jessie_C
_VISITCOMMUNITY
British Columbia, Canada
Joined: September 03, 2009
KitMaker: 6,965 posts
AeroScale: 6,247 posts
Posted: Wednesday, September 02, 2020 - 03:29 AM UTC
For everyone's interest, a whole lot of the "Start Here" forum consists of hints and tips which effectively make up a techniques bank. In particular, when I was an editor I created a series of features on the general theme of "How To..." and those features are still in the forum. If you have a modelling idea which you can explain in a few simple steps, how about creating your very own "How To..." feature and submitting it?
M4A1Sherman
_VISITCOMMUNITY
New York, United States
Joined: May 02, 2013
KitMaker: 4,403 posts
AeroScale: 254 posts
Posted: Wednesday, September 02, 2020 - 08:16 AM UTC
Hi, Jessie! and You're Very Welcome, Steve!

Well Jessie, I had kind of a "General Info" kind of a Bank in mind which might have included other things like a "By the way, look what I've come across in my "travails" around my workbench", or "Here's a great new adhesive I've never seen used on models before...", etc. It might have just been an "Information Dump", if you will, where one would find various useful modeling tidbits and such...

As I said in my post, "It's just a thought..."

VR, Dennis
SteveAndrews
_VISITCOMMUNITY
England - South East, United Kingdom
Joined: August 16, 2010
KitMaker: 693 posts
AeroScale: 551 posts
Posted: Thursday, September 03, 2020 - 09:11 AM UTC
Hi Jessie and Dennis,

I had a look at the 'Start Here' forum for beginners and wow it's full of interesting stuff for sure and of course it's got a lot of new modellers questions which is great for people starting out.

I was thinking of something a bit different - a forum or something focussed on common modelling tasks like painting cockpits or weathering or adding scratch built details. In short the kind of thing that we all encounter and have different approaches to and different levels of experience. Topics could be organised under headings. I have a feeling it would generate interest, discussion and site traffic. I'd happily contribute.

I have a fear that we've have now hijacked Rowan's blog with a completely different topic, so I might start a new one and see if there's interest.

Rowan, show us something quick to get us back on track.

Bye for now folks.
cabasner
_VISITCOMMUNITY
Nevada, United States
Joined: February 12, 2012
KitMaker: 1,083 posts
AeroScale: 25 posts
Posted: Thursday, September 03, 2020 - 11:07 AM UTC
Being a fairly recently converted Eduard fanatic, as soon as I became aware that this Limited Edition kit of Eduard Spitfire Mk 1 airplanes was available, I just HAD to order it. I got mine a few weeks ago, but haven't explored it to the extent that his thread has already shown the details in this kit to have. I'm even more thrilled now! Between this and the Tamiya Mk 1, we couldn't be in a more of a modeler's heaven, could we?
M4A1Sherman
_VISITCOMMUNITY
New York, United States
Joined: May 02, 2013
KitMaker: 4,403 posts
AeroScale: 254 posts
Posted: Friday, September 04, 2020 - 12:22 AM UTC
Hi, Curt!

Haven't seen you since I decided not to post on ARMORAMA anymore. I think you'll find a much more congenial atmosphere here at this site. Take some time and look the EDUARD Spitfire Mk.I kits' parts over and compare them to the TAMIYA kit of same. In my opinion, the EDUARD Spits are better, but not without a few minor glitches, such as the "sink marks" in the Exhaust Stacks of the EDUARD kit(s), for example. No such thing as "perfection", but the EDUARD Mk.Is come pretty darned close. It'll be interesting to see what they can do once they decide to release a Mk.V. There are Mk.V bits and pieces included in their Mk.I kits, soooo...

What I'm really anxious to see from EDUARD are their "projected for 2020-2021 1/48 P-51B/C Mustangs, P-40B and F4F Wildcat kits. I'm hoping that these will be made with "all-new tooling" as well.

Getting back on track to Rowan's Mk.I "double-builds", I have to say that he's definitely doing justice to these kits- I've been checking back several times a day to watch Rowan's progress, as the Spit Mk.I has always been ONE of my favorites.

Good Health to All!

CHEERS!
Merlin
Staff MemberSenior Editor
AEROSCALE
#017
_VISITCOMMUNITY
United Kingdom
Joined: June 11, 2003
KitMaker: 17,582 posts
AeroScale: 12,795 posts
Posted: Friday, September 04, 2020 - 06:21 AM UTC
Hi everyone

Sorry for the dearth of updates. I have been pottering along steadily, though, and should have some real progress to show on Sunday, when I can put in a good day's work at the modelling bench and also do a photo session.

Basically, as things stand, everything's painted for the interior and I'll aim to give it all a coat of Klear when I get home from work tomorrow, leaving it to cure overnight before starting weathering with oils on Sunday. If I can push things along a bit with the help of my paint drier, I might even get the cockpits finished that day...

It would be really nice to get the fuselages closed up and move on, because I can see my target deadline of Battle Of Britain Day looming all too soon.

All the best

Rowan
Merlin
Staff MemberSenior Editor
AEROSCALE
#017
_VISITCOMMUNITY
United Kingdom
Joined: June 11, 2003
KitMaker: 17,582 posts
AeroScale: 12,795 posts
Posted: Saturday, September 05, 2020 - 06:48 AM UTC
Hi again

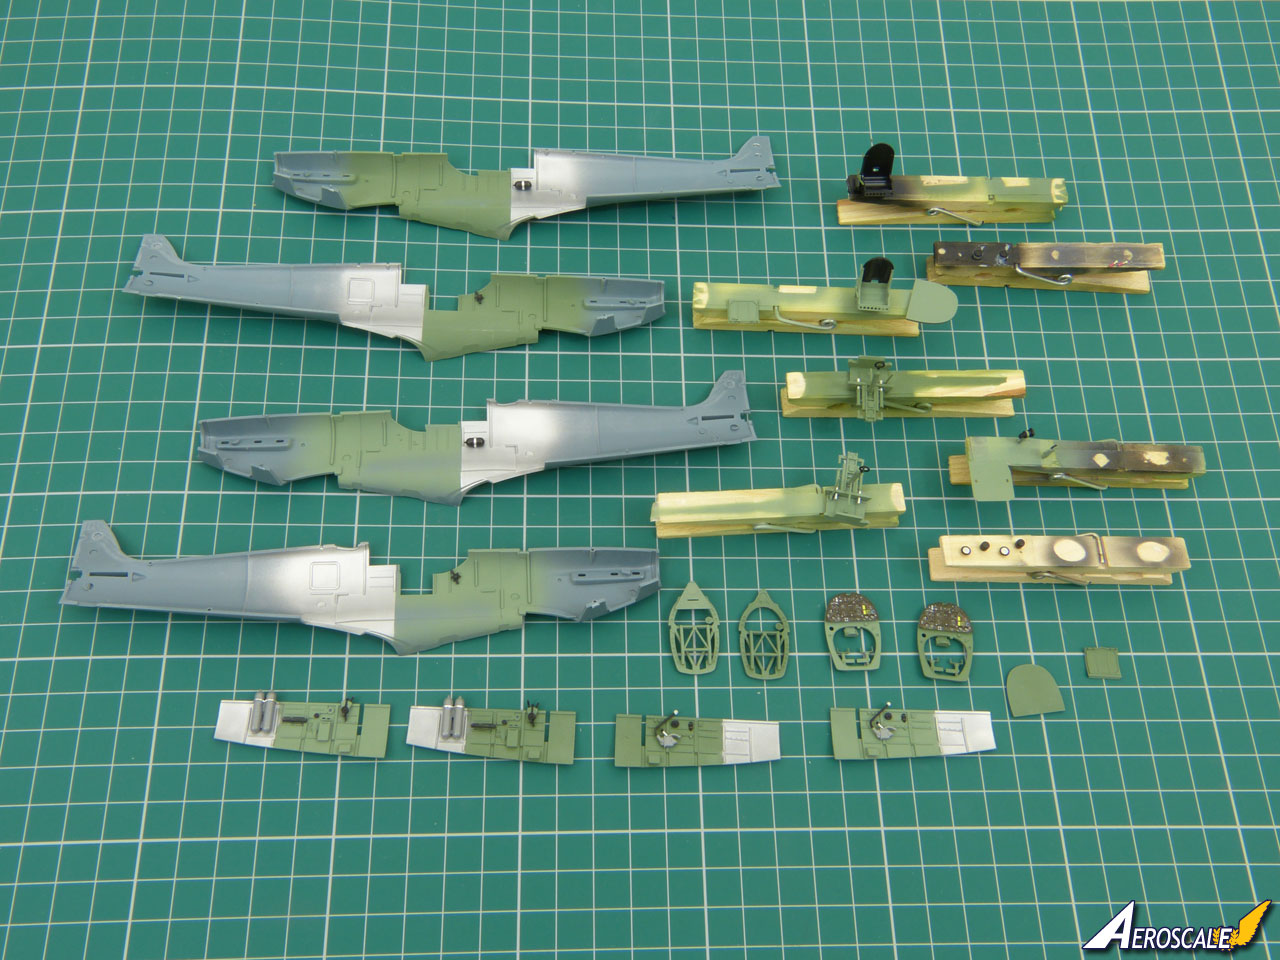
Just a quick update with a look at the cockpit parts in their basic finish before the coat of Klear - as always in my builds at this stage, looking a bit flat and lifeless:


It's interesting looking at the photo on my monitor - the difference between the two Grey-Greens is still quite evident (much more so than to the naked eye), despite a light coat of WEM over the Alclad II.

Anyway, back to the build. I didn't use my trusty Iwata TR-O to spray the Klear, instead opting for the Revolution HP-M1 - and its .3mm nozzle (as against .2mm on the TR-0) caught me off guard with the much greater flow rate! (Of course, you can wind it back - but I was in a bit of "I've started so I'll finish!" frame of mind, and ploughed on. If nothing else, it was a way to learn what I can get away with applying Klear... ) So, it definitely went on rather "quick and dirty" compared with how I'd normally spray it - but (hopefully) it should tighten up fine overnight in my paint drier... We'll find out in the morning.

If all's gone well, I'm on track for a good day's weathering and detailing tomorrow. If I screwed up, I think my target of finishing the build by Battle Of Britain Day just went out the window!

All the best

Rowan
Merlin
Staff MemberSenior Editor
AEROSCALE
#017
_VISITCOMMUNITY
United Kingdom
Joined: June 11, 2003
KitMaker: 17,582 posts
AeroScale: 12,795 posts
Posted: Saturday, September 05, 2020 - 08:45 PM UTC
Hi again

Well, the cold clear light of day reveals that I certainly needn't have worried about the heavy coat of Klear flooding the detail. Instead, while it's tightened up beautifully, the matt Grey Green has "swallowed" it to such an extent, I actually think it needs another coat to be on the safe side!

So, the first job today will be to spray more Klear and put the parts back in the drier for a couple of hours.

All the best

Rowan
Merlin
Staff MemberSenior Editor
AEROSCALE
#017
_VISITCOMMUNITY
United Kingdom
Joined: June 11, 2003
KitMaker: 17,582 posts
AeroScale: 12,795 posts
Posted: Sunday, September 06, 2020 - 03:31 AM UTC
Hi again

A quick test on an area that won't be visible showed the Klear hasn't cured sufficiently to apply oil paints safely, so I'll spray on another coat for luck and leave it overnight.

In order not to waste the day, instead of working on the interiors, I've cleaned up some of the other parts ready for later in the build.

All the best

Rowan
SteveAndrews
_VISITCOMMUNITY
England - South East, United Kingdom
Joined: August 16, 2010
KitMaker: 693 posts
AeroScale: 551 posts
Posted: Sunday, September 06, 2020 - 10:49 PM UTC
Hi Rowan,
Very nice work on the cockpits. It's interesting to see the different paints in use too. I feel you could use either - it depends on the level of weathering and the weathering techniques that come next.
I hope your Klear is dry soon.
Bye for now,
Steve.
M4A1Sherman
_VISITCOMMUNITY
New York, United States
Joined: May 02, 2013
KitMaker: 4,403 posts
AeroScale: 254 posts
Posted: Monday, September 07, 2020 - 01:09 AM UTC
Hello, Everyone!

Applying clear-coats can be a frustrating endeavor, at times. I've had good luck with TESTORS #1960 Lusterless Flat straight out of the "rattle-can" for years. A CAVEAT: Light mists are required, in a VERY well-ventilated area, or even OUTSIDE, if possible. I'm seriously thinking of switching to some sort of an acrylic in its stead.

OPINIONS WANTED, please. ANY and ALL are welcome!

The same goes for paints, since the TESTORS ENAMELS are becoming hard to find. I will miss them once they're gone...

VR, Dennis
M4A1Sherman
_VISITCOMMUNITY
New York, United States
Joined: May 02, 2013
KitMaker: 4,403 posts
AeroScale: 254 posts
Posted: Monday, September 07, 2020 - 01:31 AM UTC
Hello Again, Rowan & Everyone Else!

I've had that happen to me when I've applied a "heavy-handed" coat of clear, even with the TESTORS Lusterless Flat Clear. In fact, (on rare occasions), upon applying a second light, misted-on coat, I've found that the clear hasn't dried completely even after a few days. A week later, FINALLY, it had dried, but the sprayed surface had dried semi-flat, and even in some places, GLOSSY.

My cure was to relegate the offending rattle-can of clear to the garbage can, and try a fresh can of clear. That did the trick. If I haven't used the same can of clear in a while, I test it first. If the result is not "dead-flat", an entirely new can will be required. I've never tried flat acrylics, so I can't venture an opinion. My whole reasoning behind requiring a "dead-flat" surface is so that there is a "base" which offers a bit of a "bite" for my weathering powders/pastel powders to adhere to.

My thinking is of course, that I really don't care for washes, and over the years, this method has worked for me. Years ago, MICRO Products' various SEALERS had served me very well, but since MICRO changed their formulae and went to water-soluble clears, I found this range of their products to be very unsatisfactory. I still use their MICRO-SOL and MICRO-SET with a lot of confidence and satisfaction...

And, Rowan- GREAT progress with your Spit Cockpits! Would it be possible for you to provide us all with some "close-ups" of the details?

Again, Gents- Please, some help regarding acrylic paints and clears...

THANKS!

VR, Dennis
Merlin
Staff MemberSenior Editor
AEROSCALE
#017
_VISITCOMMUNITY
United Kingdom
Joined: June 11, 2003
KitMaker: 17,582 posts
AeroScale: 12,795 posts
Posted: Monday, September 07, 2020 - 07:38 AM UTC
Hi Dennis

I must admit I've never used aerosols on models, other than to apply primer on vacuforms before separating the parts from their sheet. EDIT: I tell I lie - I think I've used spray-can primer on some resin kits.

I know some modellers get great results, but I just never feel I have enough control of the paint flow with an aerosol - and moving back for a "mist coat" risks a pebble-dash finish with the paint partially drying before it hits the model.

So, it's always an airbrush for me - but, as I wrote previously, even switching between types can catch cause a trip up. Luckily, the original Klear is incredibly forgiving - I guess that's why there was such uproar when Johnson changed the formula in the UK. I stocked up with a few bottles while they were still available and have a fair supply remaining.

Don't worry - I'll take some close-ups before closing up the fuselage halves.

I'm afraid I can't really help when it comes to finishing with acrylics. The last time I did so was on Eduard's Fw 190D-9 - with LifeColors in that instance - I can't believe it was 10 years ago! Where does the time go?!...

All the best

Rowan
SteveAndrews
_VISITCOMMUNITY
England - South East, United Kingdom
Joined: August 16, 2010
KitMaker: 693 posts
AeroScale: 551 posts
Posted: Monday, September 07, 2020 - 06:12 PM UTC
Good morning folks,

On the subject of clear coats, I have to say that I try and avoid them now simply because I find the whole process hit and miss. Instead I add gloss or satin varnish to my paint (when I remember) to get a smooth surface for washes and decals. I tend to use Tamiya acrylics diluted with Levelling thinners to airbrush and recently I tried the new AK range. I paint details with acrylics - usually Vallejo but I'm also trying the new AK range of acrylics. Final weathering is done with oils and pastels and can give some interesting and authentic (I think) contrasts between matt dirty areas and shiny paint. So far it's served me well with no problems, but really I've only tried this approach on one kit. I hope that's not tempting fate.

Tally ho!

Steve.
magnusf
_VISITCOMMUNITY
Stockholm, Sweden
Joined: May 02, 2006
KitMaker: 1,953 posts
AeroScale: 1,902 posts
Posted: Monday, September 07, 2020 - 08:20 PM UTC
Friends! A trick for getting rattle can painting to work better: dunk the can in hot tap water (NOT BOILING FROM THE KETTLE! NOT!!!!) for five minutes before painting. It raises the pressure in the can and also "softens" the paint so that it both flows and settles better on the model.

I have done this for many years when priming my models (usually using Tamiya Fine White or Games Workshop Chaos Black) and also every now and then when using Tamiya cans for a silver paint job.

And finally: do this outside!


Magnus
M4A1Sherman
_VISITCOMMUNITY
New York, United States
Joined: May 02, 2013
KitMaker: 4,403 posts
AeroScale: 254 posts
Posted: Monday, September 07, 2020 - 11:04 PM UTC
THANK YOU, Magnus!

I had COMPLETELY FORGOTTEN that this is one of my "little tricks", also. The water should be warm to the touch, and THIS little "trick" DOES work splendidly! I find that the glossy clears are a bit harder to control as far as "orange peeling" etc, goes. Lacquer, you see. The "trick" with glossy clears is to start your spray pattern ahead of your subject and DO NOT let up on your finger-pressure until you've gone PAST your subject. This will give you a nice, uniform spray pattern over your subject.

NEVER go "too much" on your clears; they will "orange-peel" and "alligator-skin" on you, causing you no end of headaches. Again, the old adage, "Less is more", comes to the fore...

About 90% of my time, I like to spray my clears through one of my airbrushes, as most of you do too. My "rattle-can" flat clears are used only for small jobs, such as Cockpit components and figures.

My sin of omission; I meant to elaborate on this, but since we were only discussing Cockpits at this juncture, I didn't feel the need to mention airbrushing my clears. Airbrushes offer one so many more advantages over "rattle-can" paints and clears. I don't need to elaborate on this either, as most of us are already experienced in airbrushing...

Thanks Again, Magnus!

VR, Dennis
Merlin
Staff MemberSenior Editor
AEROSCALE
#017
_VISITCOMMUNITY
United Kingdom
Joined: June 11, 2003
KitMaker: 17,582 posts
AeroScale: 12,795 posts
Posted: Tuesday, September 08, 2020 - 08:37 AM UTC

Quoted Text

And finally: do this outside!


I'll definitely second this! One of my cans of primer spontaneously sprang a slow leak indoors earlier this year! I "knew" the smell, but couldn't place it straight away because I use aerosol paints so rarely. But, "modelling sense" told me to evacuate, because it was obviously REALLY unhealthy!

Once I'd finally found the culprit aerosol and put it outside, it took days before I could enter my workshop without developing a headache after only a few minutes.

All the best

Rowan
Merlin
Staff MemberSenior Editor
AEROSCALE
#017
_VISITCOMMUNITY
United Kingdom
Joined: June 11, 2003
KitMaker: 17,582 posts
AeroScale: 12,795 posts
Posted: Friday, September 11, 2020 - 07:03 AM UTC
Hi again

I think I'll have to admit defeat early in terms of my Battle of Britain Day deadline! I've been pottering along nicely - actually, using a pin wash for a change to speed up progress - but a sense of realism has to prevail at some point.

So my new target for Sept 15th is to have the basic airframes finished - and the Spits looking like Spitfires. If they can stand on their wheels, that'll be a bonus.

My next proper day at the workbench will be on Sunday, so I'll aim to get the cockpits finished and post some pics. Then it'll be "all hands on deck" to get the fuselages closed up and the flying surfaces fitted.

The Battle of Britain didn't "officially" end until the 31st of October - so I definitely want to meet that deadline!

All the best

Rowan
Merlin
Staff MemberSenior Editor
AEROSCALE
#017
_VISITCOMMUNITY
United Kingdom
Joined: June 11, 2003
KitMaker: 17,582 posts
AeroScale: 12,795 posts
Posted: Monday, September 14, 2020 - 07:50 AM UTC
Hi again

Despite a decent day at the workbench on Sunday, I doubt that anyone will be surprised to read that I'm behind schedule and won't have the Spits sitting on their wheels in time for tomorrow! There's no point rushing things to meet a self-imposed "deadline" and risking messing everything up.

So - the current state of play this evening is that the cockpits are installed and I'm ready to close up the fuselage halves and fit the wings and tailplanes.

The following pics will turn the clock back to yesterday morning before I assembled the cockpit "tubs".

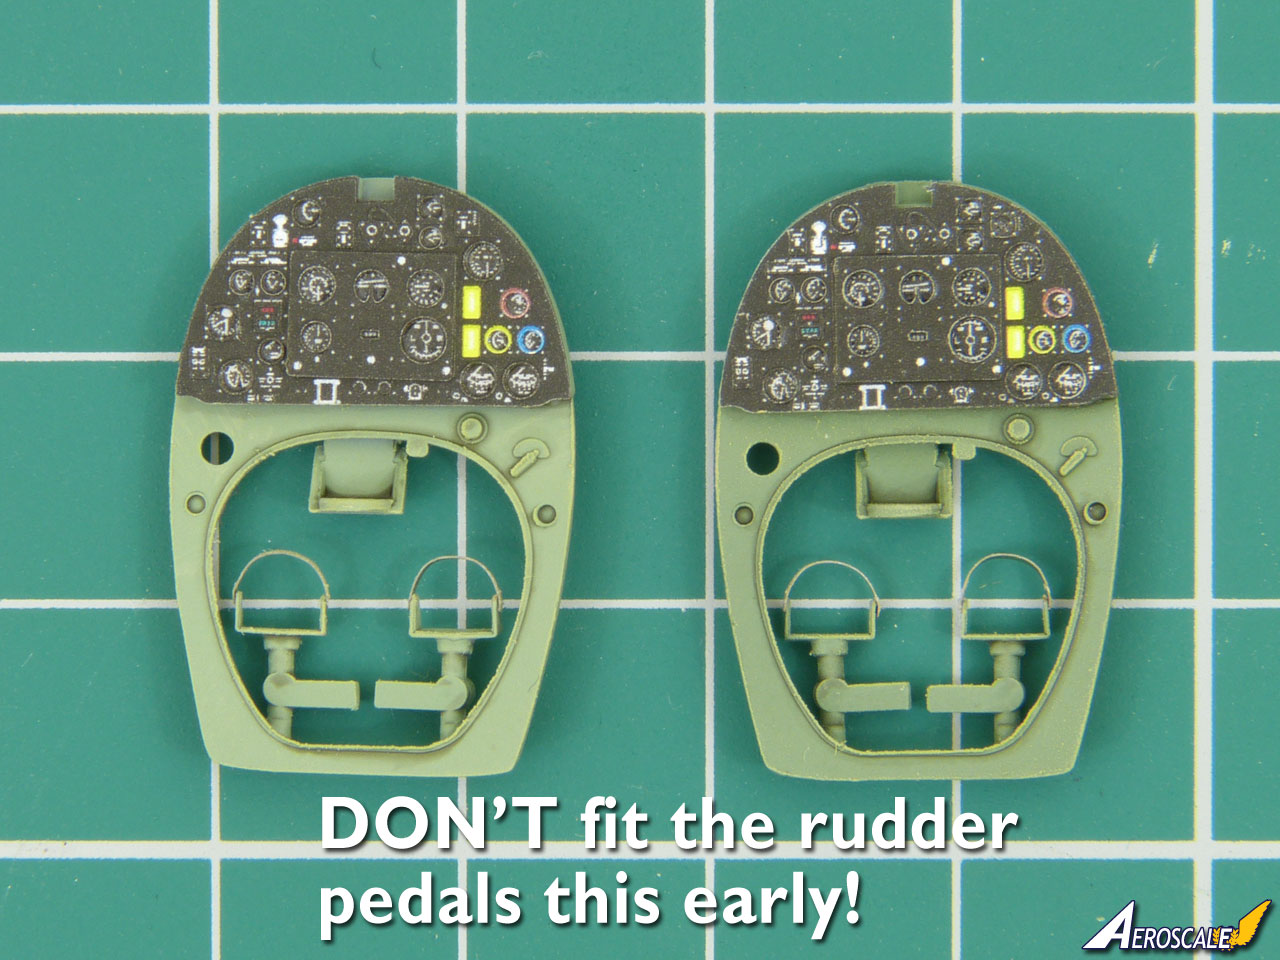
The first one is pretty crucial, because it highlights a c*ck-up that I made in not following the instructions in order to try to save time! Basically - you can't fit the rudder pedals until you've threaded the actuators (sub-assembly B) through the instrument panel frame (Part R22). If you install them early like I did, you'll only have to cut them free and re-install them afterwards:


It wasn't the end of the world - they fitted back neatly enough - but I really should have thought this through before attaching them early! Dohh!

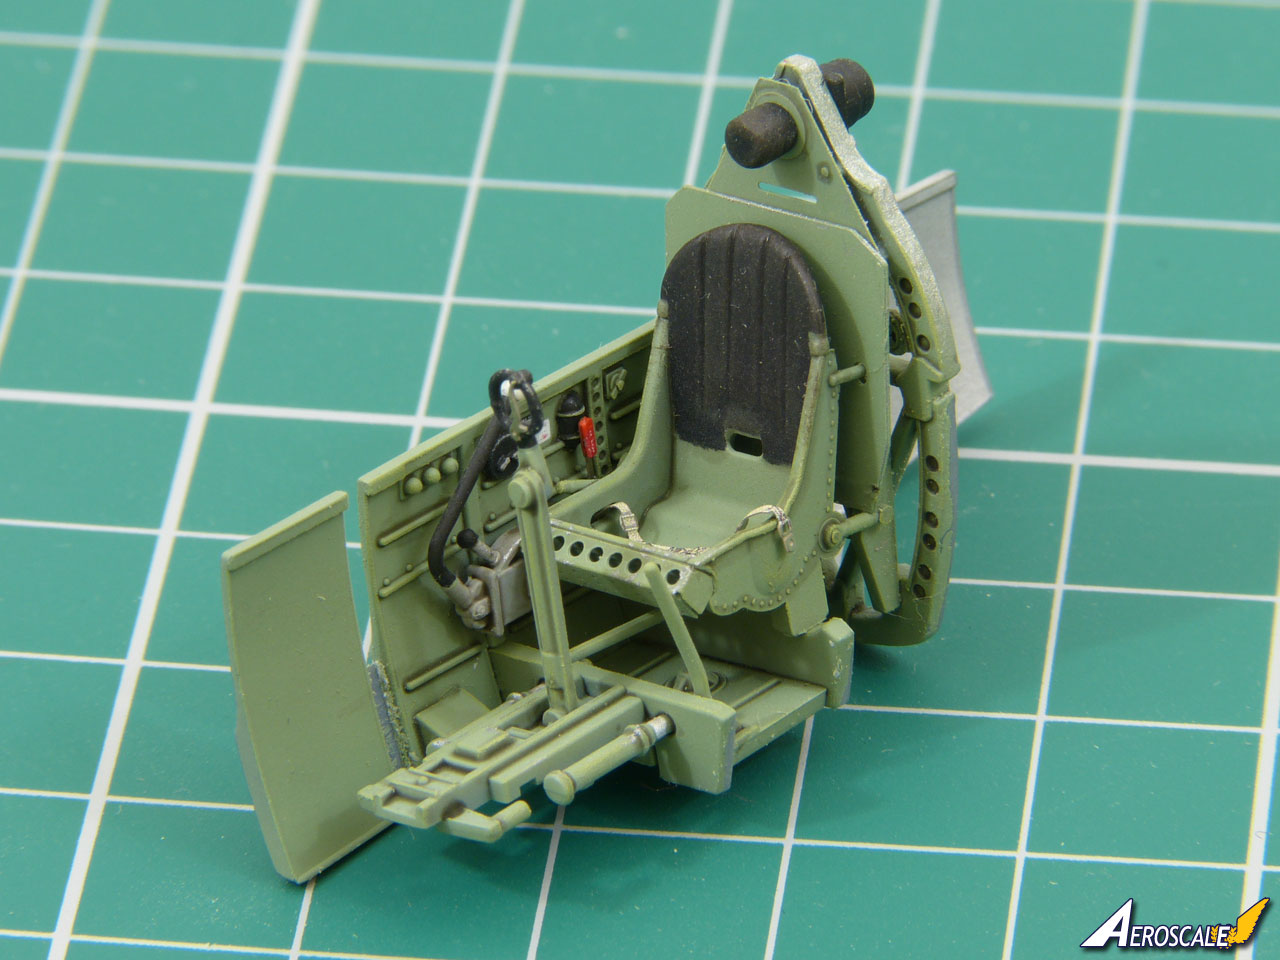
Next up - a look at the sidewalls and seat assemblies:


For the sidewall details, I've strayed from the kit painting instructions gone by the shots in Valiant Wings' Airframe & Miniature #12. This has a useful combination of vintage and restoration photos to help glean what's going on - and the shots of the very early Spitfire cockpits contained a few colour details that went counter to what I've done habitually.

Including the black seat on the pre-war machine:


It's a fun step into "unknown territory" for me - but period photos seem to back it up.

Lastly a dry-fit of the basic sub-assemblies and I real reminder for me to check for dust for taking photos! (The shot before was bad - but this is a shocker! ):


Thankfully, it was just surface dust - not trapped under the final clear coat.

So, the cockpit "tubs" are officially installed and there no turning back now... I just need to fit the shoulder harnesses and then close the fuselages. (You probably could install the harnesses later, but after my c*ck-up with the rudder pedals, I won't push my luck! ).

More soon, including final looks at the cockpits - I still want a quick tinker with pastels before sealing everything in...

Looking back at the cockpits, one thing I'd do differently would be to paint the natural metal rear sections first. I was always conscious of how easy it is to damage Alclad etc. when masking it, so I sprayed the Grey Green first. That was a bad choice: basically, wherever that went, it really effected the n/m and I was never totally happy with the result. So - lesson learnt and stored for next time.

It also underlined why I'm happier using oils for weathering than pin washes - I just get a subtler effect. Still, what's done is done - and it's only a model!

Take care and stay safe.

All the best

Rowan
AussieReg
Staff MemberAssociate Editor
AUTOMODELER
#007
_VISITCOMMUNITY
Victoria, Australia
Joined: June 09, 2009
KitMaker: 8,156 posts
AeroScale: 3,756 posts
Posted: Monday, September 14, 2020 - 10:18 AM UTC
Nice progress Rowan, looking good! Hopefully your mild case of congnitive dissonance with the black seat hasn't set you back too badly

Seeing those fuselages buttoned up soon will be great, a major milestone in any build.

Cheers, D
Merlin
Staff MemberSenior Editor
AEROSCALE
#017
_VISITCOMMUNITY
United Kingdom
Joined: June 11, 2003
KitMaker: 17,582 posts
AeroScale: 12,795 posts
Posted: Tuesday, September 15, 2020 - 06:12 AM UTC
Cheers Damian

Well, I reached that milestone this evening - not quite where I wanted to be at for Battle of Britain Day, but the fuselages are cemented shut and sitting in my paint dryer to make sure the cement really cures before proceeding tomorrow.

So, time for a last look at the cockpits before they were shut away:


I've left the Sutton shoulder harnesses "adjustable" - i.e. I can still tweak the length and sit of the straps with a pair of tweezers. And, as you can see, I haven't fitted the gunsights yet - it would be just asking for them to take a knock to install them this early.

All the best

Rowan
SteveAndrews
_VISITCOMMUNITY
England - South East, United Kingdom
Joined: August 16, 2010
KitMaker: 693 posts
AeroScale: 551 posts
Posted: Tuesday, September 15, 2020 - 11:00 PM UTC
Lovely work Rowan. I like your clean colour separation. And, you're making great progress on two kits at the same time so you're working at a good speed too. Impressive.