_GOTOBOTTOM
Early Aviation
Discuss World War I and the early years of aviation thru 1934.
Airfix 1/72 Fokker Eindecker EIII
Szmann
_VISITCOMMUNITY
Netherlands Antilles
Joined: September 02, 2014
KitMaker: 1,977 posts
AeroScale: 295 posts
Posted: Monday, October 22, 2018 - 01:54 PM UTC
Hi, guys!

I'm starting a "quick build" just to keep my production flowing. Subject: the (not so) new Airfix 1/72 Fokker Eindecker EIII. That's going to be my first WWI aircraft and my first encounter with the dreaded strings!


The first 2 1/2 steps completed and I reach to a halt. Not really the "blitz" build I was hoping for... The kit seems simple and easy to build - and it is, but it has a few places where I have considered it needs special attention


Under magnification I was able to see some minute seam lines which I later removed.

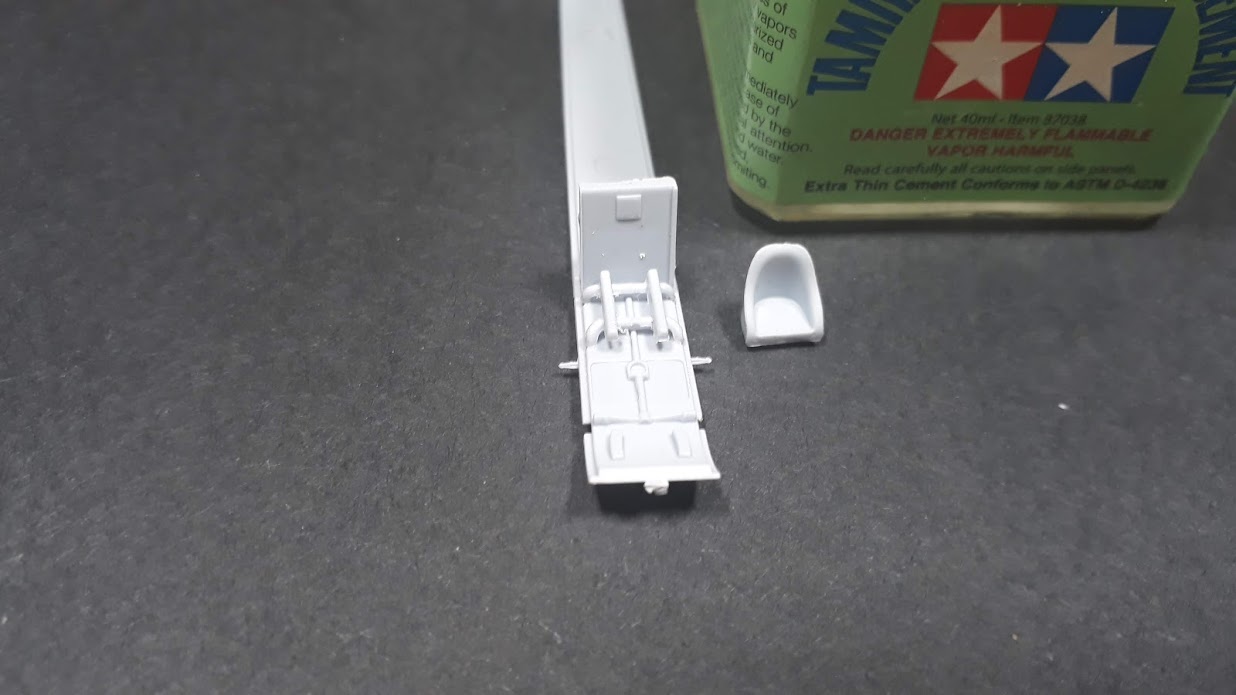
This thing is really small. For comparison, next to a Tamiya extra thin bottle. No, there's not a gallon bottle!


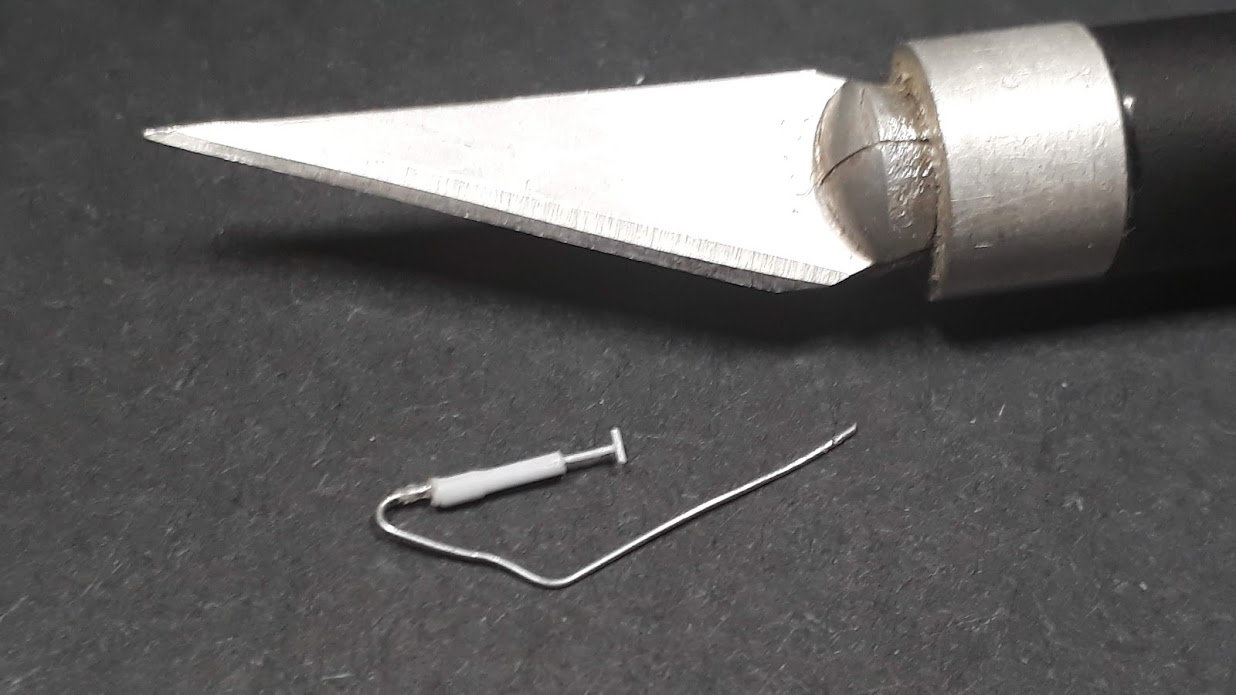
couldn't live with the paddle for yoke from the kit and I scratch build one:


I glued it in place before I lose it


From the cycle "nothing goes to waste, everything transforms", the former yoke, decapitated and truncated, has become the new fuel tank pressurizing pump:


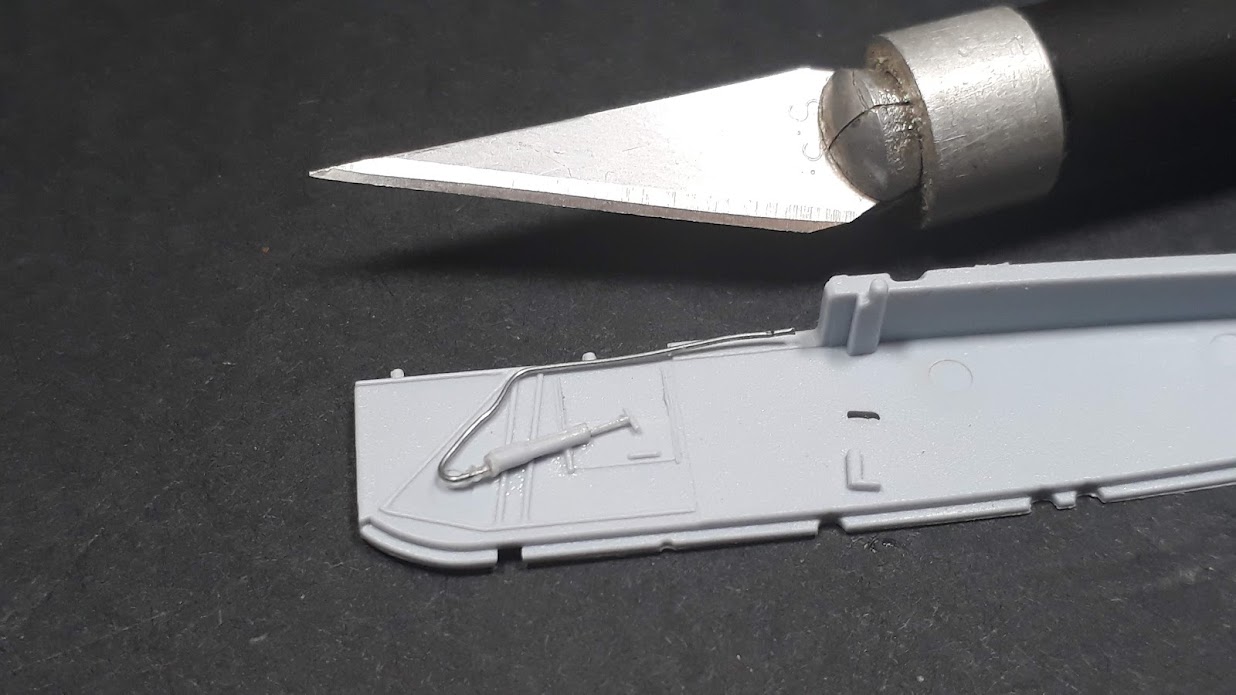
The "pump" glued in its place - the "fuel line" still not attached because I'm not sure yet how it's going to interfere with the rest of the cockpit:


I went ahead already and primed a few parts - more updates soon:
Thanks for following!
Cheers!
Gabriel
goodn8
_VISITCOMMUNITY
Berlin, Germany
Joined: October 12, 2008
KitMaker: 709 posts
AeroScale: 651 posts
Posted: Monday, October 22, 2018 - 09:55 PM UTC

Nicee - good start!

The scale is always challenging and more on WWI birds.

Looking foreward,

Th mas
LowFiveJoe_2
_VISITCOMMUNITY
Virginia, United States
Joined: December 28, 2017
KitMaker: 47 posts
AeroScale: 43 posts
Posted: Tuesday, October 23, 2018 - 12:53 AM UTC
Outstanding start! I will be following this build as I have just recently completed my first WWI build in 1/72. We must be crazy, right?
Szmann
_VISITCOMMUNITY
Netherlands Antilles
Joined: September 02, 2014
KitMaker: 1,977 posts
AeroScale: 295 posts
Posted: Tuesday, October 23, 2018 - 01:09 AM UTC
Thanks, Thomas!
I am rather lucky because all the cables were passing inside the side frames and were covered with the cockpit panels. the instrumentation was also minimal, so the interior was pretty much barren.

Joe, welcome aboard! Yes, it's not easy on my eyes and fingers, but I'm coming after a 1/35 Tamiya and I feel energized (and maybe over-confident )

UPDATE
The interior, propeller, pilot's seat and rudder primed with Mr. Surfacer 1500 thru my H&S airbrush .15mm@20psi. Now let me see how I'm gonna paint all those little things


Cheers!
Gabriel
Szmann
_VISITCOMMUNITY
Netherlands Antilles
Joined: September 02, 2014
KitMaker: 1,977 posts
AeroScale: 295 posts
Posted: Tuesday, October 23, 2018 - 12:18 PM UTC
UPDATE

I promise myself that I'm done with the scratch-building for this kit, but I couldn't help myself and added the connector rod between the rudder actuators and the tension mechanism:


I have sprayed the "wood" base with a mix of Homefront craft acrylics thinned with X20A, using my Ginza HP-B airbrush .2mm@20psi.


Same went for the propeller. I'm waiting for it to dry before applying "machined wood effects" with oils:


The rudder was sprayed with white gloss Rust-oleum enamel. Once dry and cured, it will be ready for applying the decals:


The pilot seat was painted with "leather brown" which I mixed myself from brown and red acrylics. I need to scratch some belts, since the kit does not provide them not even as decals:


Next steps will be detailing all the interior and adding the belts to the seat.

Thanks for following!
Cheers!
Gabriel
gastec
_VISITCOMMUNITY
Auckland, New Zealand
Joined: February 03, 2014
KitMaker: 1,042 posts
AeroScale: 136 posts
Posted: Tuesday, October 23, 2018 - 01:22 PM UTC
Gabriel. You'll find that there are no wood panels on the fuselage. Just canvas or aluminium. Have a look at the Wingnut Wings site which has instruction manuals to view with colour guides et .

Gary
Szmann
_VISITCOMMUNITY
Netherlands Antilles
Joined: September 02, 2014
KitMaker: 1,977 posts
AeroScale: 295 posts
Posted: Tuesday, October 23, 2018 - 01:57 PM UTC
Thanks, Gary!

Actually I am using as a guide the online instructions from Wingnut Wings. I mistook the "Fokker beige" call out on the first drawing on page 5 for wood panel.

Thank a lot for calling my attention and helping me avoid a mistake.

Cheers!
Gabriel
gastec
_VISITCOMMUNITY
Auckland, New Zealand
Joined: February 03, 2014
KitMaker: 1,042 posts
AeroScale: 136 posts
Posted: Tuesday, October 23, 2018 - 03:18 PM UTC
RussellE
#306
_VISITCOMMUNITY
Victoria, Australia
Joined: June 27, 2010
KitMaker: 3,959 posts
AeroScale: 598 posts
Posted: Wednesday, October 24, 2018 - 09:34 PM UTC
Hi Gabriel!

OOO! I have this kit in the stash and am keen to build it!

I love these new kits by Airfix and will be watching with interest.

Nice detailing by the way
Szmann
_VISITCOMMUNITY
Netherlands Antilles
Joined: September 02, 2014
KitMaker: 1,977 posts
AeroScale: 295 posts
Posted: Thursday, October 25, 2018 - 12:14 AM UTC

Quoted Text


OOO! I have this kit in the stash and am keen to build it!

I love these new kits by Airfix and will be watching with interest.

Nice detailing by the way


Thanks, Russel!

I'm glad to see you aboard!

Yes, it seems to me that Airfix are working hard to straighten up the things at their end - with very god results: better detail, very good molds, better instructions, and Cartograph decals. The side-opening box isn't all that brilliant and Humbrol only color calling - but these are minor inconveniences. And let's not forget the prices, more than decent!

It was a good move from you to buy this kit - if you don't go in super-detailing as I do, it makes a very nice "week-end" build.

Thanks again!
Cheers!
Gabriel
Szmann
_VISITCOMMUNITY
Netherlands Antilles
Joined: September 02, 2014
KitMaker: 1,977 posts
AeroScale: 295 posts
Posted: Thursday, October 25, 2018 - 01:27 PM UTC
Hi, guys!

UPDATE

I have mixed the "slate gray" recommended by Airfix. I've seen most of the modellers are actually using RLM02 out of convenience (the paint color is, indeed, very similar). In my case, I mixed it myself, using an older "bronze green" from my own distillery, ultramarine blue for black and white:


I ended up using acrylics (wet on wet technique + wash) for the propeller, and not oil paints as announced earlier:


Even #0 brushes are too big for the job!


WnW site calls for red primer for the fuel tank pressurizing pump and I have followed their advice:


The inferior parts of the cockpit detailed - the upper parts not even assembled yet :


However much I wanted to stay away of it, I couldn't avoid the use of enamels because the silver acrylic I have worth nothing. Can somebody recommend me a good silver acrylic (no Tamiya, please). Now I have to apply an acrylic clear coat before washes!

Thank you for following - more updates in the making!
Cheers!
Gabriel
RussellE
#306
_VISITCOMMUNITY
Victoria, Australia
Joined: June 27, 2010
KitMaker: 3,959 posts
AeroScale: 598 posts
Posted: Thursday, October 25, 2018 - 09:41 PM UTC

Quoted Text


Quoted Text


OOO! I have this kit in the stash and am keen to build it!

I love these new kits by Airfix and will be watching with interest.

Nice detailing by the way


Thanks, Russel!

I'm glad to see you aboard!

Yes, it seems to me that Airfix are working hard to straighten up the things at their end - with very god results: better detail, very good molds, better instructions, and Cartograph decals. The side-opening box isn't all that brilliant and Humbrol only color calling - but these are minor inconveniences. And let's not forget the prices, more than decent!

It was a good move from you to buy this kit - if you don't go in super-detailing as I do, it makes a very nice "week-end" build.

Thanks again!
Cheers!
Gabriel


Couldn't agree more Gabriel! Airfix are producing some top notch kits!

Pretty much my entire stash of aircraft models is comprised of new tool Airfix 1/72 aircraft (WW2 era of course). Each time they annouce a new 1/72 it usually finds its way into the stash somehow. Will be interesting to see what they announce at Telford...

Meanwhile your Eindecker is looking great. Adding the extra colours really makes the details pop!

Sorry I can't help out with the paints. Usually I'd just get out the trusty enamel silver (Yep Humbrol )
magnusf
_VISITCOMMUNITY
Stockholm, Sweden
Joined: May 02, 2006
KitMaker: 1,953 posts
AeroScale: 1,902 posts
Posted: Thursday, October 25, 2018 - 10:18 PM UTC
Gabriel! What a sweet build ! There shouldn't be more than a rather moderate amount of rigging on that one and it should also be easily accessible so don't worry too much about it !


Magnus
gastec
_VISITCOMMUNITY
Auckland, New Zealand
Joined: February 03, 2014
KitMaker: 1,042 posts
AeroScale: 136 posts
Posted: Thursday, October 25, 2018 - 10:37 PM UTC
Hand pump would be brass, not red.

Gary
Szmann
_VISITCOMMUNITY
Netherlands Antilles
Joined: September 02, 2014
KitMaker: 1,977 posts
AeroScale: 295 posts
Posted: Friday, October 26, 2018 - 01:50 AM UTC
Russel, I am becoming myself an Airfix collector; I buy much more than I can build . Yes, I have two excellent silver enamels, the Model Master and Krylon but I cannot find a good acrylic one. Maybe I'll try the Vallejo one with the next order...

Magnus, Thanks for support! The rigging diagram isn't all that scary, but lack of proper materials and experience compounded it's going to give me headaches for sure... I'm looking forward for trouble!

Gary, you must be right again! The (primer) red didn't make any sense for me. Somebody must be color blind by WnW or I need a guide to WnW guide. I guess the second option is more likely. And thank you so much for another well timed comment - I was just about to commit myself to clear coating the interior.

Thanks for following!
Cheers!
Gabriel
Szmann
_VISITCOMMUNITY
Netherlands Antilles
Joined: September 02, 2014
KitMaker: 1,977 posts
AeroScale: 295 posts
Posted: Friday, October 26, 2018 - 02:20 AM UTC
quick UPDATE

Thanks, Gary!


Gabriel
Szmann
_VISITCOMMUNITY
Netherlands Antilles
Joined: September 02, 2014
KitMaker: 1,977 posts
AeroScale: 295 posts
Posted: Sunday, October 28, 2018 - 08:57 PM UTC
Hi, guys!

UPDATE

I start dealing with the other details in the cockpit / engine area.
The front fuel tank, the instrument panel and the firewall assembled and primed:


The engine primed with Krylon black gloss enamel:


The seat harness made from Tamiya masking tape and steel wire (florist's wire):


The belts primed with Tamiya Surface Primer to add some texture and as preparation for painting with acrylics:


For its size, the engine has some nice detail:


Engine sprayed with Alclad II polished aluminum, followed by Alclad Aqua Gloss


Belts added to the seat:


The seat installed in its place:


An oil wash follows and closing the fuselage.

More updates in the making!
Cheers!
Gabriel
RussellE
#306
_VISITCOMMUNITY
Victoria, Australia
Joined: June 27, 2010
KitMaker: 3,959 posts
AeroScale: 598 posts
Posted: Sunday, October 28, 2018 - 09:41 PM UTC

Quoted Text

Russel, I am becoming myself an Airfix collector; I buy much more than I can build . Yes, I have two excellent silver enamels, the Model Master and Krylon but I cannot find a good acrylic one. Maybe I'll try the Vallejo one with the next order...

Magnus, Thanks for support! The rigging diagram isn't all that scary, but lack of proper materials and experience compounded it's going to give me headaches for sure... I'm looking forward for trouble!

Gary, you must be right again! The (primer) red didn't make any sense for me. Somebody must be color blind by WnW or I need a guide to WnW guide. I guess the second option is more likely. And thank you so much for another well timed comment - I was just about to commit myself to clear coating the interior.

Thanks for following!
Cheers!
Gabriel


Gabriel, amazing work with the seat belts!

Definitely taking notes for when I break mine out of the stash!

For the rigging I can't go past Ezy line: Drill a small hole with a #72 bit, place a drop of accelerator in it. Dab the end of the Ezy line in CA medium and then place in the hole. Repeat with the other end. This can be done with the line under tension too

Recommend a couple of practice runs on an old model til you get the hang of it
Szmann
_VISITCOMMUNITY
Netherlands Antilles
Joined: September 02, 2014
KitMaker: 1,977 posts
AeroScale: 295 posts
Posted: Sunday, October 28, 2018 - 10:04 PM UTC

Quoted Text

Gabriel, amazing work with the seat belts!

Definitely taking notes for when I break mine out of the stash!

For the rigging I can't go past Ezy line: Drill a small hole with a #72 bit, place a drop of accelerator in it. Dab the end of the Ezy line in CA medium and then place in the hole. Repeat with the other end. This can be done with the line under tension too

Recommend a couple of practice runs on an old model til you get the hang of it


Thanks, Russel!
Honestly, I find the buckles a little over-scale, but I didn't realized how small the seat is until I literally added the belts and I was completely drained by that time to re-do all the work But idea is working and next time I'm gonna do a better job.
I know about E-Z line and Uschi rigging threads, but my US supplier doesn't carry it. I've tried to add it to my last Amazon order, but that would have complicated way too much my logistics and the end price would have been completely unrealistic I have planed a trip in Europe for the Spring and I'm gonna come back loaded with Revell glue, Uschi line and Eastern European decals

Cheers!
Gabriel
RussellE
#306
_VISITCOMMUNITY
Victoria, Australia
Joined: June 27, 2010
KitMaker: 3,959 posts
AeroScale: 598 posts
Posted: Monday, October 29, 2018 - 08:23 AM UTC

Quoted Text


Quoted Text

Gabriel, amazing work with the seat belts!

Definitely taking notes for when I break mine out of the stash!

For the rigging I can't go past Ezy line: Drill a small hole with a #72 bit, place a drop of accelerator in it. Dab the end of the Ezy line in CA medium and then place in the hole. Repeat with the other end. This can be done with the line under tension too

Recommend a couple of practice runs on an old model til you get the hang of it


Thanks, Russel!
Honestly, I find the buckles a little over-scale, but I didn't realized how small the seat is until I literally added the belts and I was completely drained by that time to re-do all the work But idea is working and next time I'm gonna do a better job.
I know about E-Z line and Uschi rigging threads, but my US supplier doesn't carry it. I've tried to add it to my last Amazon order, but that would have complicated way too much my logistics and the end price would have been completely unrealistic I have planed a trip in Europe for the Spring and I'm gonna come back loaded with Revell glue, Uschi line and Eastern European decals

Cheers!
Gabriel


Hi Gabriel

These planes sure were tiny when compared to their WW2 counterparts. Adding details as you have is a challenge at this size/scale and you've done a great job on it.

For EZ-line you could try these guys at Red Roo Models They are my go-to guys for this stuff and maybe the postage won't be so bad to the Caribbean???

Meanwhile you're doing a fantastic job-makes me want to finish the KGV off even quicker and get into the " stash of little red boxes" in my garage ahh, but real life...
Vicious
_VISITCOMMUNITY
Queensland, Australia
Joined: September 04, 2015
KitMaker: 1,517 posts
AeroScale: 75 posts
Posted: Monday, October 29, 2018 - 09:11 AM UTC
WoW!...in 1/72 is amazing!

also BNA Models carry EZline and Ushi lines,for your scale i think Ushi made the super-fine line
Szmann
_VISITCOMMUNITY
Netherlands Antilles
Joined: September 02, 2014
KitMaker: 1,977 posts
AeroScale: 295 posts
Posted: Monday, October 29, 2018 - 01:16 PM UTC
Russel thank you for your moral support and for the will to help. I will sort it out before the next stringy thing for sure!

Vicious, thank you very much, Sir, and welcome aboard! Yep, not only the scale hurts my eyes, but also the original aircraft is a little bigger than my mountain bike !

UPDATE

I couldn't live with those huge (2mm) belt buckles and I made new ones from thinner copper wire. I chose the less invasive method of undoing the belts at the ends, extracting the old over-sized buckles and inserting new ones, more appropriate to the scale:


I rushed then to close the fuselage before I do something stupid again. The task wasn't as easy as it seems. The lower third was a little warped and the locator pins where the halves intersect the horizontal plane were a little off, and I still have a small step left between the sides on the dorsal flat surface (easy to address hopefully):


More updates follow!
Cheers!
Gabriel
RussellE
#306
_VISITCOMMUNITY
Victoria, Australia
Joined: June 27, 2010
KitMaker: 3,959 posts
AeroScale: 598 posts
Posted: Monday, October 29, 2018 - 09:30 PM UTC
Seeing it up against the bottle of extra thin just goes to show how small it is Gabriel!
goodn8
_VISITCOMMUNITY
Berlin, Germany
Joined: October 12, 2008
KitMaker: 709 posts
AeroScale: 651 posts
Posted: Monday, October 29, 2018 - 10:02 PM UTC
Very nice progress and detailing, Gabriel!
The buckles are looking much better now.

Though I'm a fan of stretched sprue in any variations, I used EZ-lines (hard to get here) on my first and only Bi-Plane build (1/48 ) after returned to the Hobby to find out how they work. And I can only recommend them for rigging (though they are flat, not round. What is hardly to see when stretched). Not sure if I would go for rigging buckles on that scale

Looking foreward to your build,
Th mas
Szmann
_VISITCOMMUNITY
Netherlands Antilles
Joined: September 02, 2014
KitMaker: 1,977 posts
AeroScale: 295 posts
Posted: Monday, October 29, 2018 - 11:09 PM UTC
Russel, the fuselage has the size of a disposable lighter and it's half wide. The worth of plastic in this kit is probably a few pennies but the engineering and detail are really good.

Thomas, Yes, the new buckles have more of a scale sence Thanks for sharing your experience with E-Z line. It's on my shopping list but the first incoming shipment isn't gonna be earlier than December... so in this build I'm going to use stretched sprue or synthetic hair. Either way, I'll try and make the turnbuckles from copper wire and the wire retainers (sleeves?) from stretched tube. The kit has also some nice raised pimples for rigging, suited for a butt fit but also can be used as guide for drilling to an angle. All that I need it's the smallest drill ever
Thanks for following up!

Cheers!
Gabriel
 _GOTOTOP