Build Academy's 1/72 P-47 Razorback
Alberta, Canada
Joined: January 19, 2008
KitMaker: 6,743 posts
AeroScale: 6,151 posts
Posted: Saturday, September 08, 2018 - 02:24 PM UTC
Sweet !

Moving right long on this one Thomas . Really like your work on the details .
PE belts , I airbrush them mostly . If I hand paint them I do this after they have been installed . I use Tamiya acrylic with a bit of future and apply very thin layers . Once fully dried I seal them with Future or Tamiya clear thinned with their lacquer thinner .
Terri
Berlin, Germany
Joined: October 12, 2008
KitMaker: 709 posts
AeroScale: 651 posts
Posted: Monday, September 17, 2018 - 08:36 AM UTC
Terri,
thank you so much for your kind words as they mean much to me!
The belts were airbrushed but after I finished the second try I recognized that I mistakenly used a/b cleaner to thin instead the right thinner (Vallejo acrylics). Maybe this was the major fault. So next time I'll give it another try.
Th

mas
Sometimes you need to distance yourself to see things clearly - Lao Tzu -
... in scale and in real life -T.
Berlin, Germany
Joined: October 12, 2008
KitMaker: 709 posts
AeroScale: 651 posts
Posted: Monday, September 17, 2018 - 08:37 AM UTC
Here's a little more progress, guys.
A small step for a man and probably for everything else...
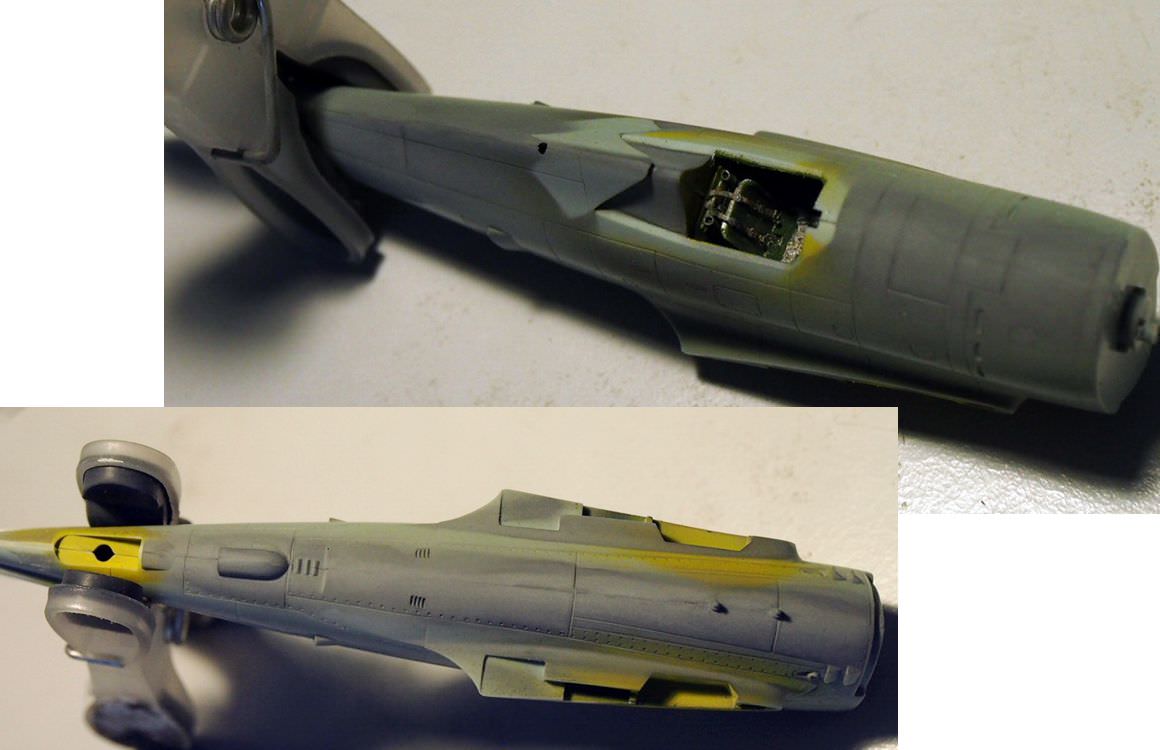
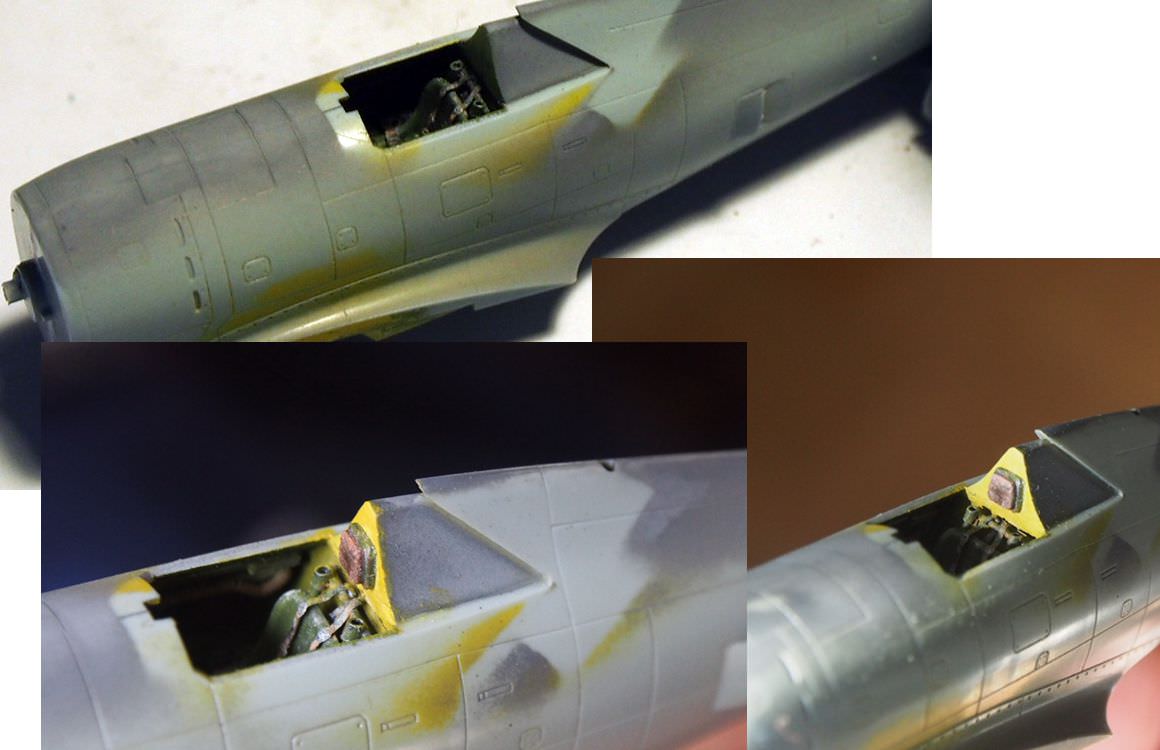
Painted the rearmost part of the cockpit aft. the canopy a darkish grey as some references point out (used ModelMaster gunship gray) but left the front part chromate-yellow (should give a nice math to the following checkers) and fixed the headrest.
Used the rest of the color for a first check of the fuselage seamlines after worked on them once.
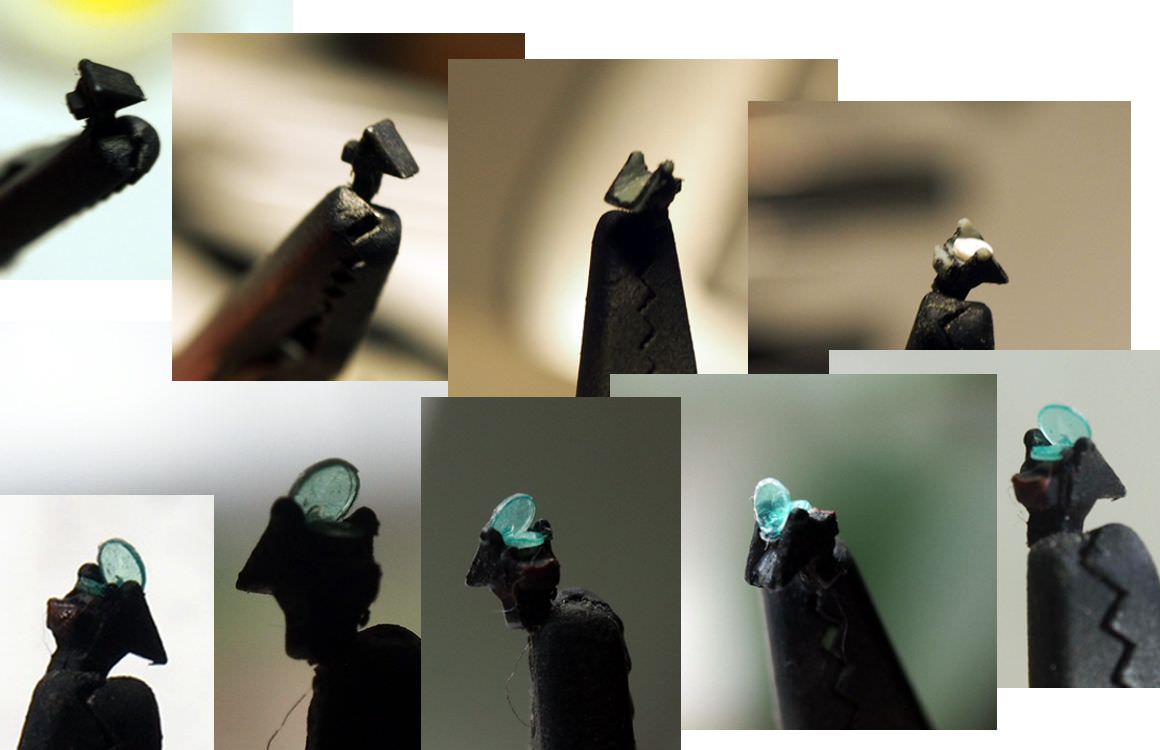
Looking at the kit's simple gunsight made me think how to improve that. Some surgery, adding a styrene disc and punched out another 2 from thin plastic (diameter 1.5 and 2 mmm)simulating glass. I like the green-blueish aspect, gives a contrast behind the canopy.
Maybe I also can manage to fix a armoured glass plate in front of it.
thanks for stopping by,
Th
mas
Sometimes you need to distance yourself to see things clearly - Lao Tzu -
... in scale and in real life -T.
Berlin, Germany
Joined: October 12, 2008
KitMaker: 709 posts
AeroScale: 651 posts
Posted: Sunday, September 23, 2018 - 04:00 AM UTC
Hi there!
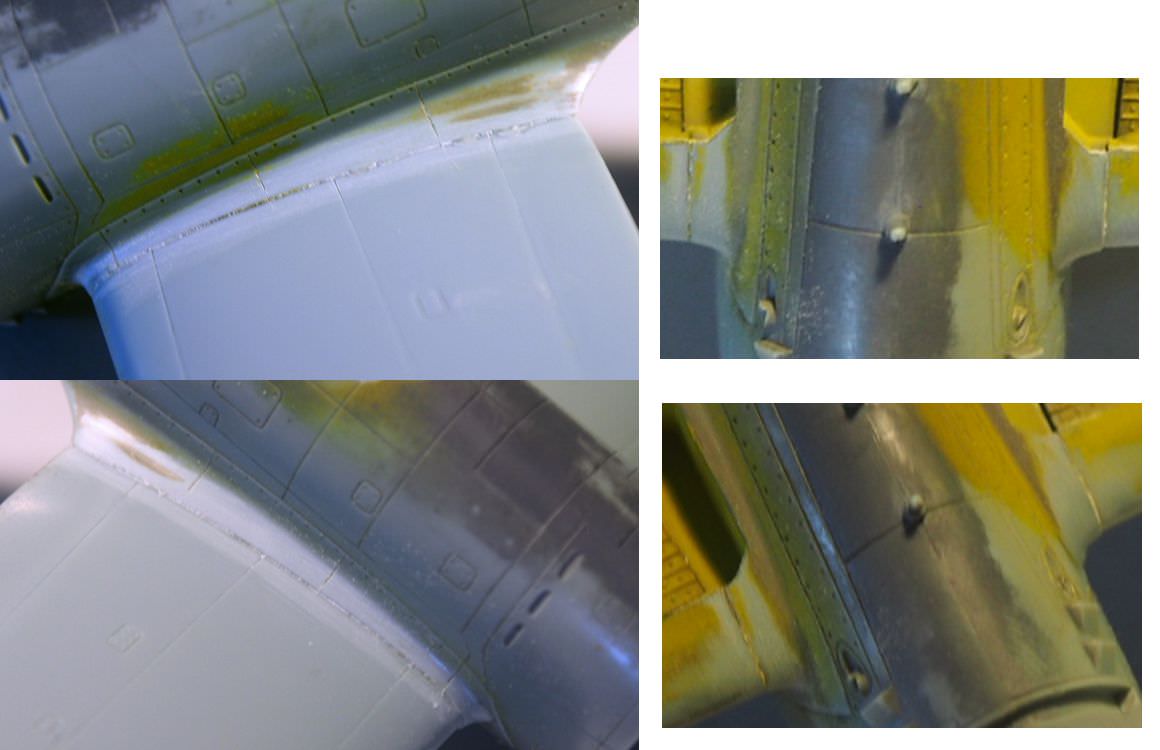
Meanwhile I got the wings on though the fitting needed some
rework and sanding on the upper and lower joints.
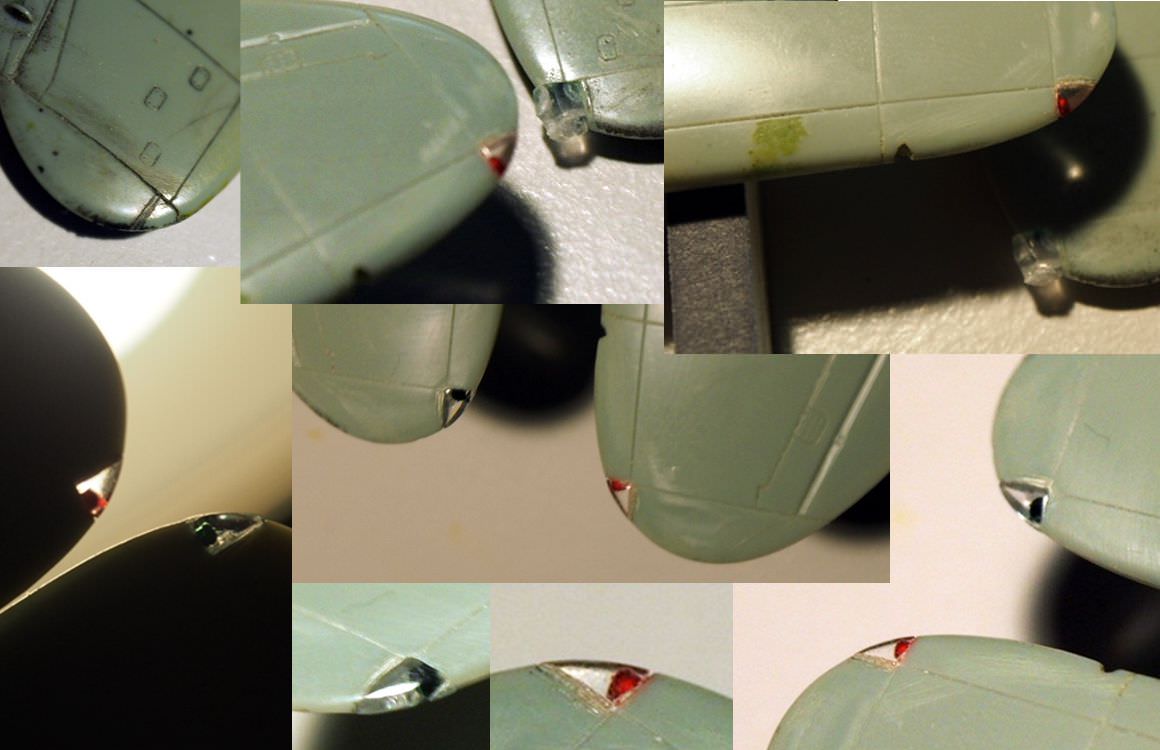
Before that, I replaced the molded wing lights with clear sprue.
Drilled out a tiny hole, filled with clear red/green, glued and sanded/polished. Quite happy how they turned out.
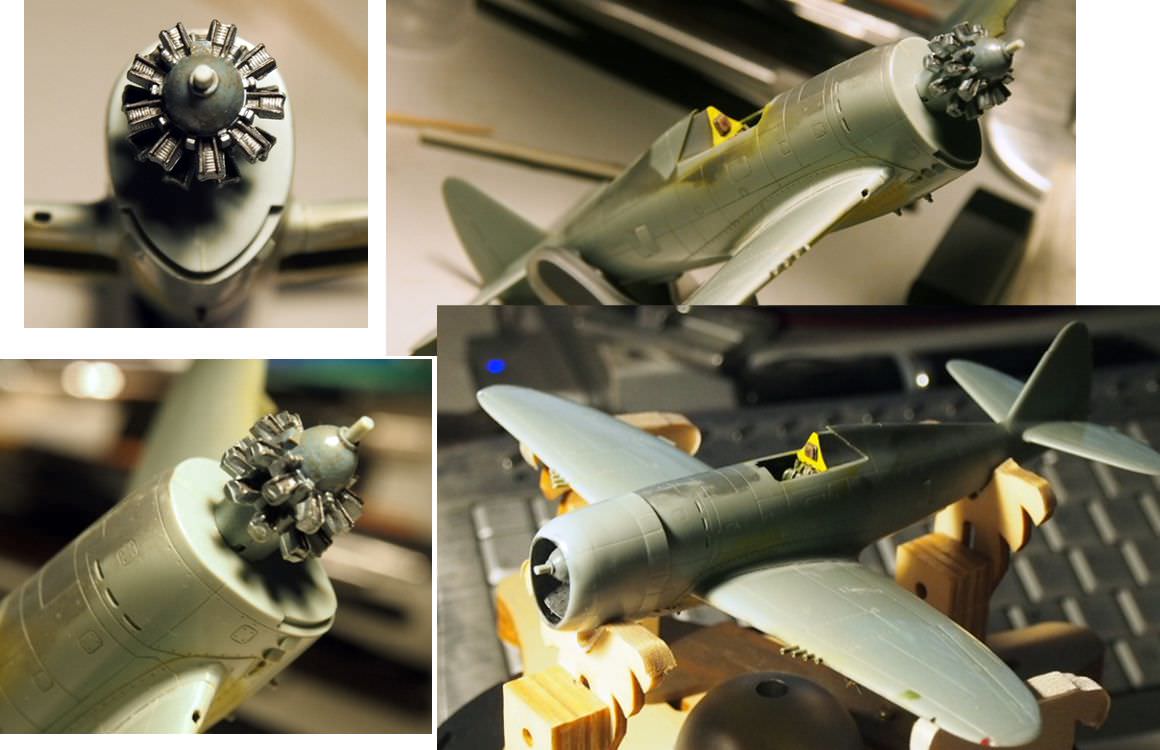
Now more assembly (cowling is just dryfitted)and hopefully the first primer and exterior color coats soon.
Th
mas
Sometimes you need to distance yourself to see things clearly - Lao Tzu -
... in scale and in real life -T.
Joel_W
 Associate Editor
New York, United States
Joined: December 04, 2010
KitMaker: 11,666 posts
AeroScale: 7,410 posts
Posted: Tuesday, September 25, 2018 - 02:17 AM UTC
Thomas,
Just got caught up with your build.
I'm just super impressed with how your PE seatbelts and harness turned out. Once painted, they look more then the part. The Pit really looks quite good, as does your IP. And those wing tip lights, you did an excellent job on improving them.
The ChopperMan
On my Workbench:
Monogram 1/24 scale 427 Shelby Cobra
Just Completed:
Beemax 1/24 scale BMW M3 E30 1992 Evolution II
Alberta, Canada
Joined: January 19, 2008
KitMaker: 6,743 posts
AeroScale: 6,151 posts
Posted: Wednesday, September 26, 2018 - 01:40 PM UTC
Must excellent

Terri
Stockholm, Sweden
Joined: May 02, 2006
KitMaker: 1,953 posts
AeroScale: 1,902 posts
Posted: Friday, September 28, 2018 - 06:08 PM UTC
Thomas! I lost track of you over the summer
! Beautiful work so far! Academy did a bunch of 1/72 kits during the 1990s that are really nice, I think I have a Thunderbolt in my stash and I've build both the Tempest and the P-51B.
Magnus
Press banner to the right to follow my trail to the new forums!
Berlin, Germany
Joined: October 12, 2008
KitMaker: 709 posts
AeroScale: 651 posts
Posted: Tuesday, October 02, 2018 - 04:49 AM UTC
ChopperMan 
,
Thank you very much Joel, for your more than kind judgement!
As I know that you're busy on the racing track side of modelling (I follow your fantastic Lotus build!) I really appreciate your visit.
Hope you stay tuned
Th
mas
Sometimes you need to distance yourself to see things clearly - Lao Tzu -
... in scale and in real life -T.
Berlin, Germany
Joined: October 12, 2008
KitMaker: 709 posts
AeroScale: 651 posts
Posted: Tuesday, October 02, 2018 - 04:50 AM UTC
Terri,
must welcome, thanks

!!
Th

mas
Sometimes you need to distance yourself to see things clearly - Lao Tzu -
... in scale and in real life -T.
Berlin, Germany
Joined: October 12, 2008
KitMaker: 709 posts
AeroScale: 651 posts
Posted: Tuesday, October 02, 2018 - 04:50 AM UTC
Magnus,
always a pleasure to see you around!
Your 72nd scale skills steadily impressed me (as your current beautiful
PZL-build does!)since I started at AEROSCALE and I'm very glad you like it.
I too have a few other Academy kits in 48 and 72 - realised the decal issues too late after purchasing but anytime I'll give the one or other a try.
Welcome,
Th
mas
Sometimes you need to distance yourself to see things clearly - Lao Tzu -
... in scale and in real life -T.
Berlin, Germany
Joined: October 12, 2008
KitMaker: 709 posts
AeroScale: 651 posts
Posted: Tuesday, October 02, 2018 - 04:51 AM UTC
Folks,
I'm moving ahead a bit.
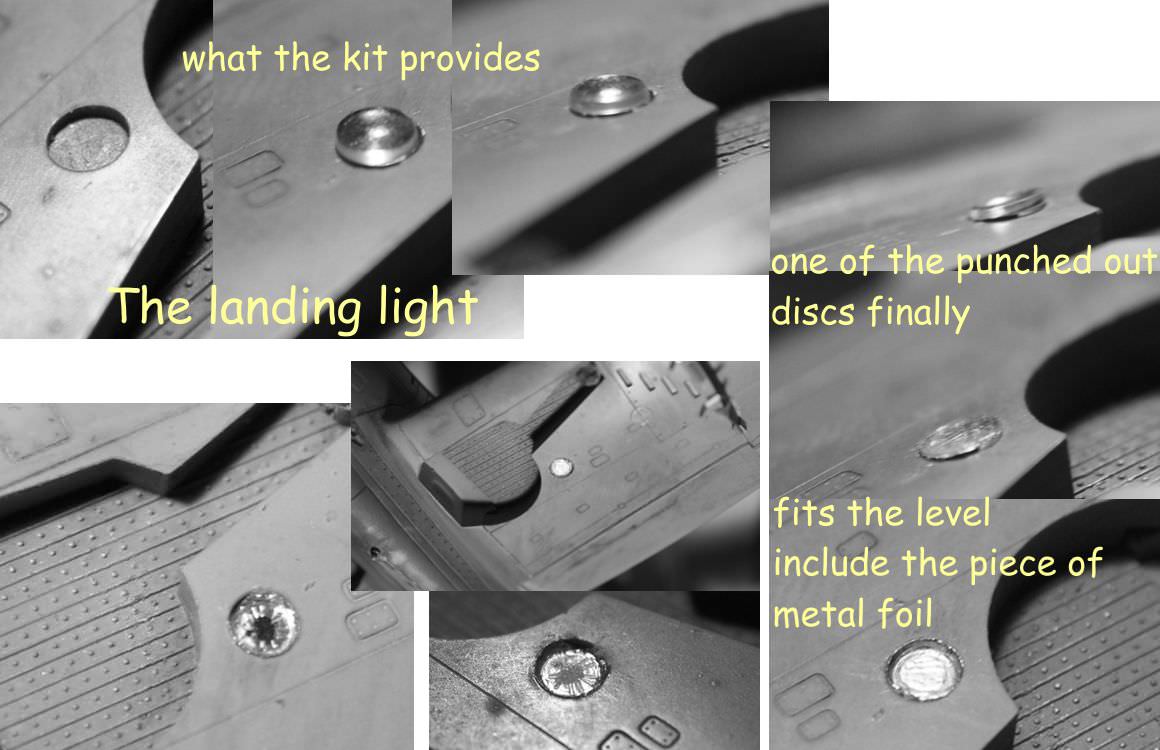
I got my eyes on the kit's solution of the main landing light, what should be a plain retracting lamp (as I find out at least?).
The kit offers an injected mold for a clear part that is much to bulged ansd prominent when insrted.
Try to resolve it quick'n easy I went for a clear flat punched out plastic disc and a thin aluminum foil as an inlay to get it levelled the wing's shape.
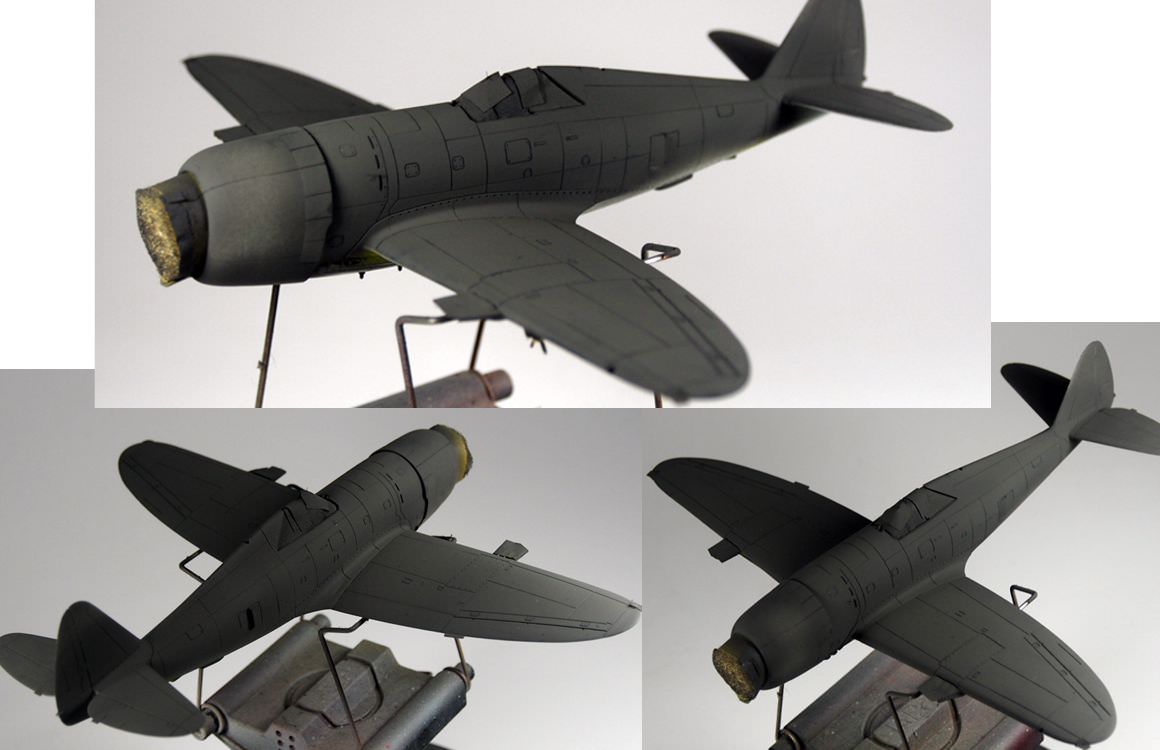
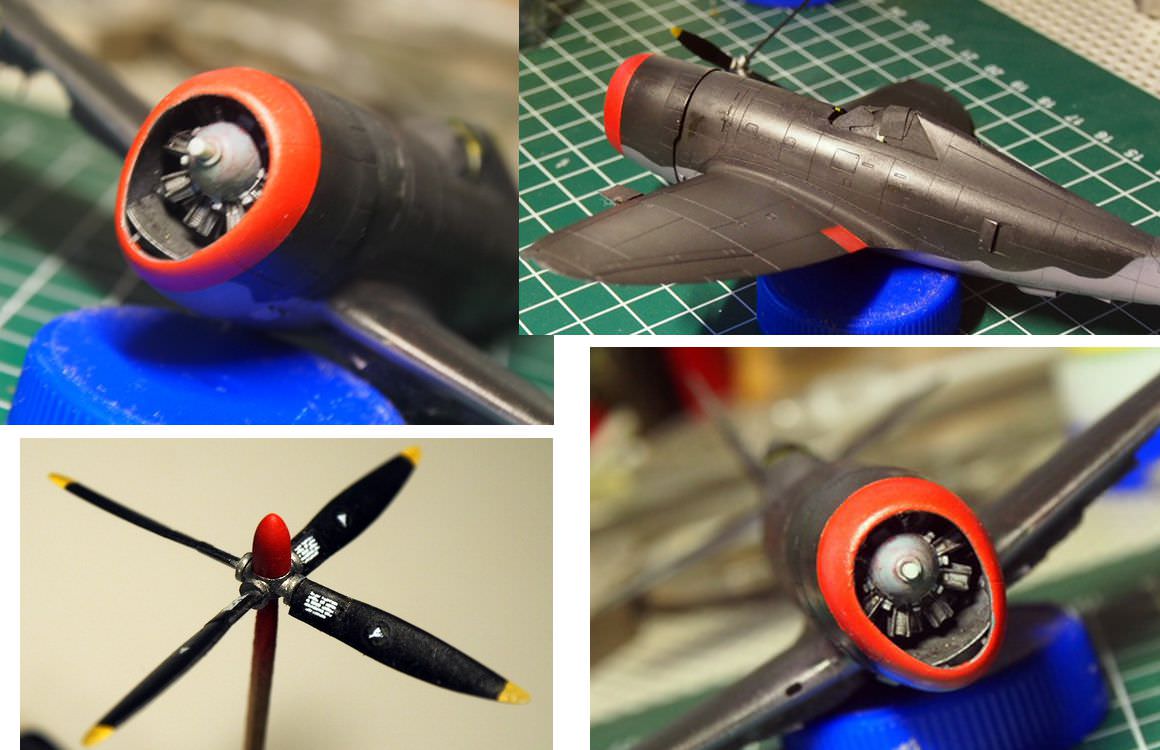
Closed the cowling with the engine in and gave a first color shot (Humbrol enamel "Olive Drab") on the top side, where I started. Recognized after the photos that I missed a proper color layer on the left cowling side - well, more layers will follow...
Thanks for having a look
Th
mas
Sometimes you need to distance yourself to see things clearly - Lao Tzu -
... in scale and in real life -T.

#306
Victoria, Australia
Joined: June 27, 2010
KitMaker: 3,959 posts
AeroScale: 598 posts
Posted: Tuesday, October 02, 2018 - 10:24 PM UTC
very nice progress Thomas

Stay home and build models!
In 1/72
Gloster Gladiator MkII for the Bi-planes Campaign
In 1/350
Airfix 1:350 Type 45 Destroyer
Berlin, Germany
Joined: October 12, 2008
KitMaker: 709 posts
AeroScale: 651 posts
Posted: Saturday, October 13, 2018 - 06:01 AM UTC
Thanks, Russ! Well guys, not much progress due to my spinal disc problems I suffer for some years now and why I can hardly sit a longer time. Made a decision now for a surgical treatment and will have it on Wednesday. So I'm back at the bench as soon as I can leave the hospital.
Meanwhile gave some more layers of the upper color and went for a random fading under the med sun on exposed areas by using a very much thinned mixture of the base color and the shown white and tan.
Didn't took care for the tailplane since it will be covered with the decals. After decaling I'll shot probably another light coats.
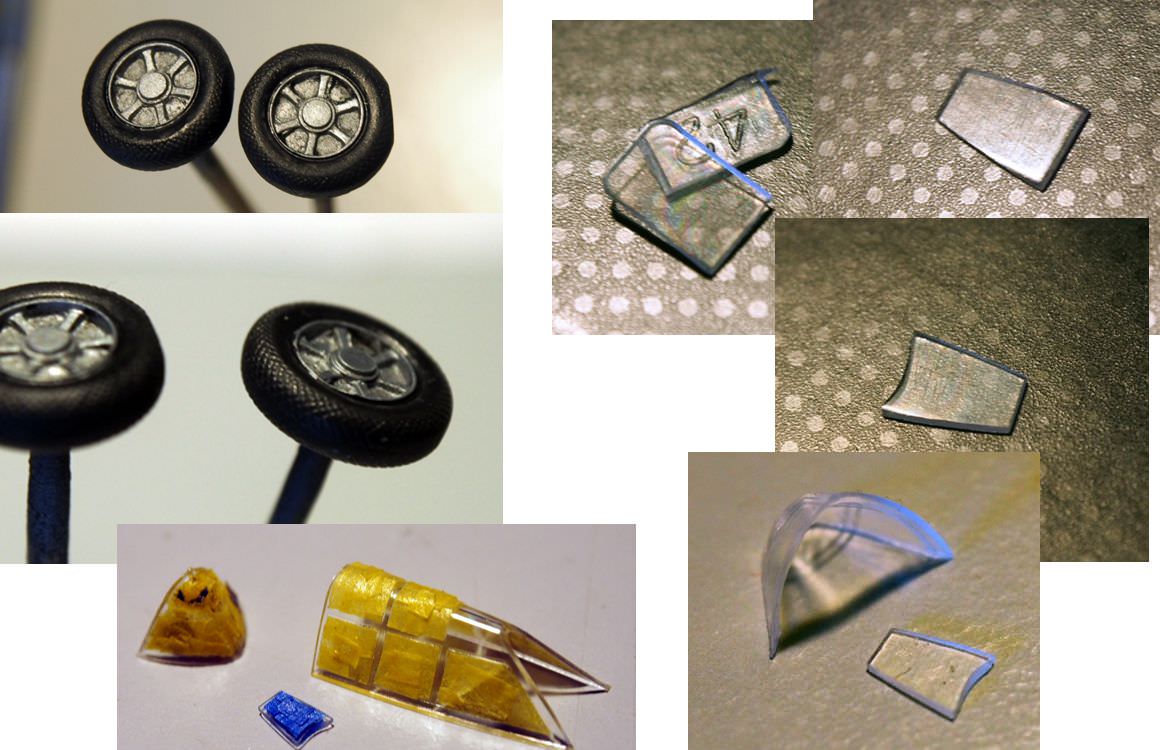
Also did the main whhels (except tire weathering) and scratched a piece of clear sprue to simulate the armoured glass plate under the canopy. Just masked to give a frame and masked he canopy as well.
Hope to see you back soon,
Th
mas
Sometimes you need to distance yourself to see things clearly - Lao Tzu -
... in scale and in real life -T.
#305
Christchurch, New Zealand
Joined: February 01, 2006
KitMaker: 1,673 posts
AeroScale: 1,517 posts
Posted: Saturday, October 13, 2018 - 08:47 AM UTC
Good luck Thomas! Outstanding build as per usual my friend! Love the fading you've done so far and I look forward to seeing you complete it.
I must admit to really liking Academy's kits they can be hit and miss in terms of detail and accuracy but for price point they really can't be beat.
Nordrhein-Westfalen, Germany
Joined: March 22, 2015
KitMaker: 671 posts
AeroScale: 614 posts
Posted: Monday, October 15, 2018 - 03:52 AM UTC
Hello Thomas,
all the best for You! Hope You will be back modelling soon!
Oliver
On the desk: Probably a Panzer III.
#424
Queensland, Australia
Joined: April 23, 2015
KitMaker: 4,648 posts
AeroScale: 1,938 posts
Posted: Saturday, October 20, 2018 - 09:09 AM UTC
Hi Thomas,
Your P-47 details look excellent! I'm sorry to hear about your back problem. I hope you are better soon!
Gaz
"Artillery adds dignity, to what would otherwise be an ugly brawl."
Frederick The Great
Berlin, Germany
Joined: October 12, 2008
KitMaker: 709 posts
AeroScale: 651 posts
Posted: Monday, October 22, 2018 - 09:35 PM UTC
Chris, Oliver and Gary,
thanks a lot guys for your kind words and whishes!
Back home from hospital and after the surgical intervention I'm actual feeling like I've been hit by a truck.
Yet far away from the bench as I still try to sit down rarely. Mainly lie down or walk a bit.
Try to recover, checking the threads here on the network and waiting to be able to move on with some more activity...
Cheers
Th

mas
Sometimes you need to distance yourself to see things clearly - Lao Tzu -
... in scale and in real life -T.
Berlin, Germany
Joined: October 12, 2008
KitMaker: 709 posts
AeroScale: 651 posts
Posted: Tuesday, November 06, 2018 - 03:46 AM UTC
Hi there, mates!
Here's only a very, very small update.
Planned masking and painting the underside but still can't sit down properly for this work. So decided to go on with some smaller stuff.
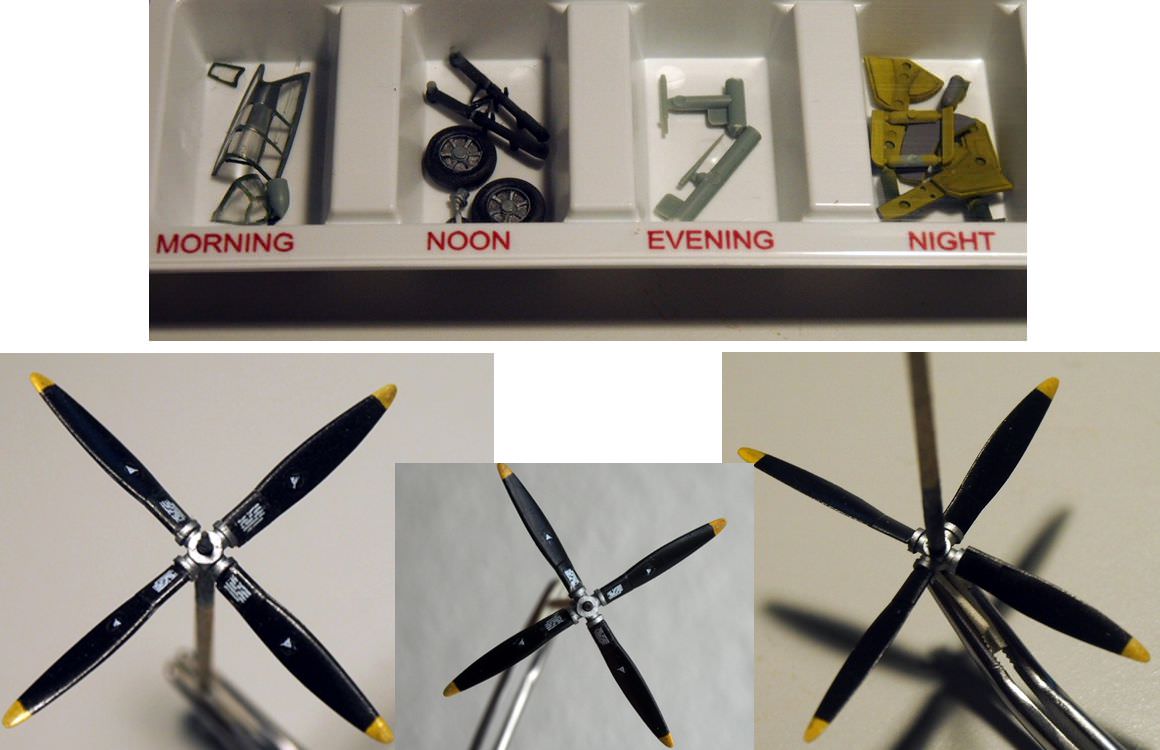
Prop was painted and satin covered (could need some more weathering?)and I had the first contact to the decals.
Mmmh, not sure about them - I'll keep reporting on them when it comes to the stage.
btw: I hate yellow tips ...

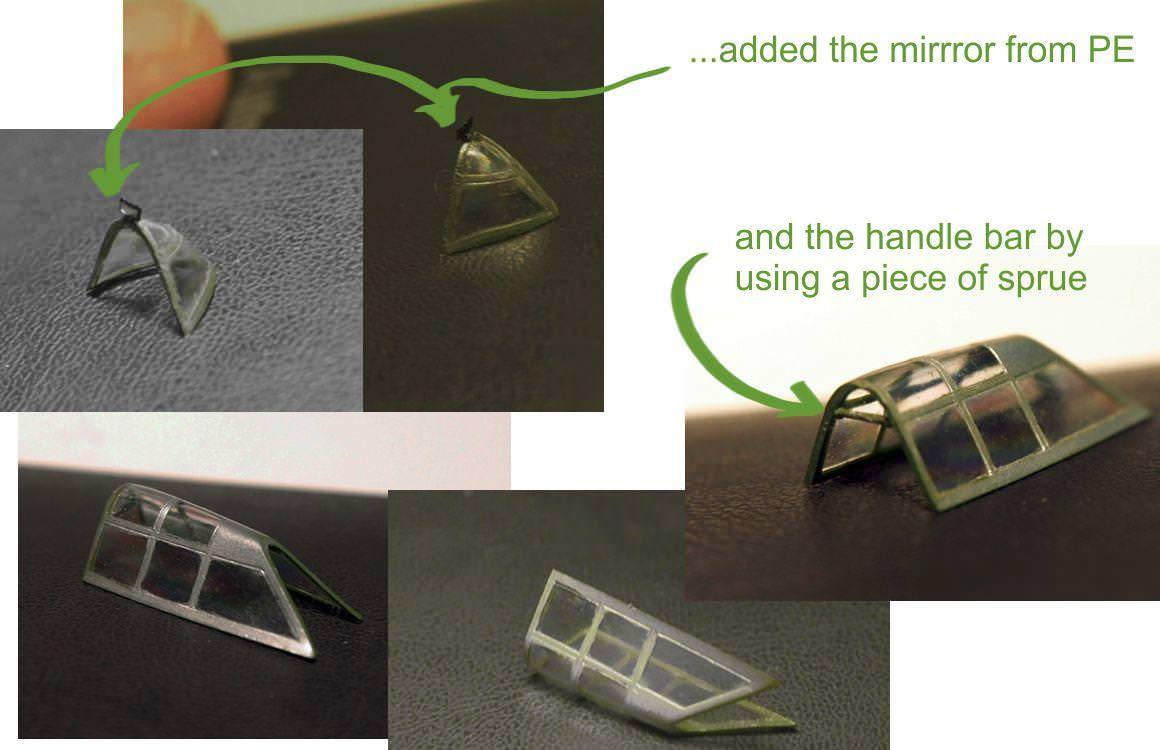
Also done the canopy (M.Master "olive" & "aluminum")and think, I will leave it mostly plain NMF. Added the mirror from the PE's and replicate the handle bar on the rear canopy, that is visible in many pics, with a piece of stretched sprue.
... and thanks to the hospital, that I own now a "daily to do box" ...

thanks for having a look,
Th
mas
Sometimes you need to distance yourself to see things clearly - Lao Tzu -
... in scale and in real life -T.
Auckland, New Zealand
Joined: October 25, 2005
KitMaker: 949 posts
AeroScale: 493 posts
Posted: Wednesday, November 07, 2018 - 09:08 AM UTC
Thomas,
Good to see you're up and about and hitting the bench again.
That T'bolt is really coming along and those little addition take it to the level.
Chris
"A Geek is someone who has found something more interesting than sex."
Neil Degrasse Tyson
Berlin, Germany
Joined: October 12, 2008
KitMaker: 709 posts
AeroScale: 651 posts
Posted: Monday, November 12, 2018 - 05:07 AM UTC
Chris,
thank you very much for the kind words, your visit is always appreciated!
Th
mas
Sometimes you need to distance yourself to see things clearly - Lao Tzu -
... in scale and in real life -T.
Berlin, Germany
Joined: October 12, 2008
KitMaker: 709 posts
AeroScale: 651 posts
Posted: Monday, November 12, 2018 - 05:08 AM UTC
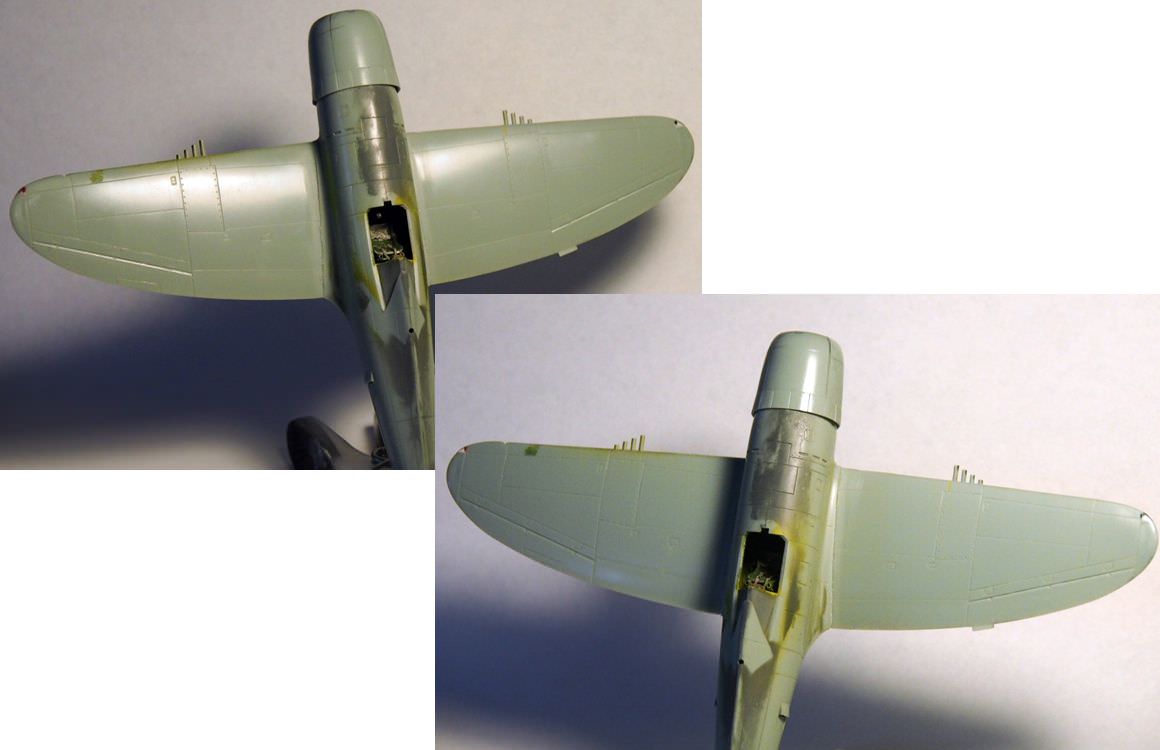
Well,
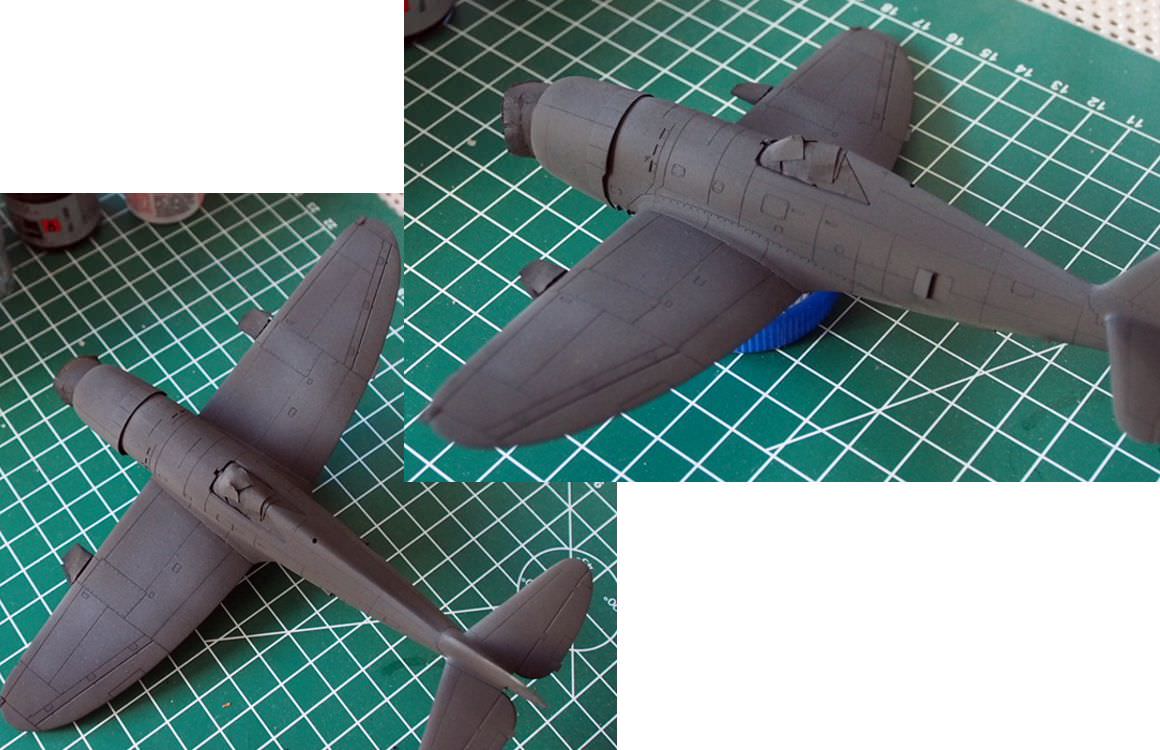
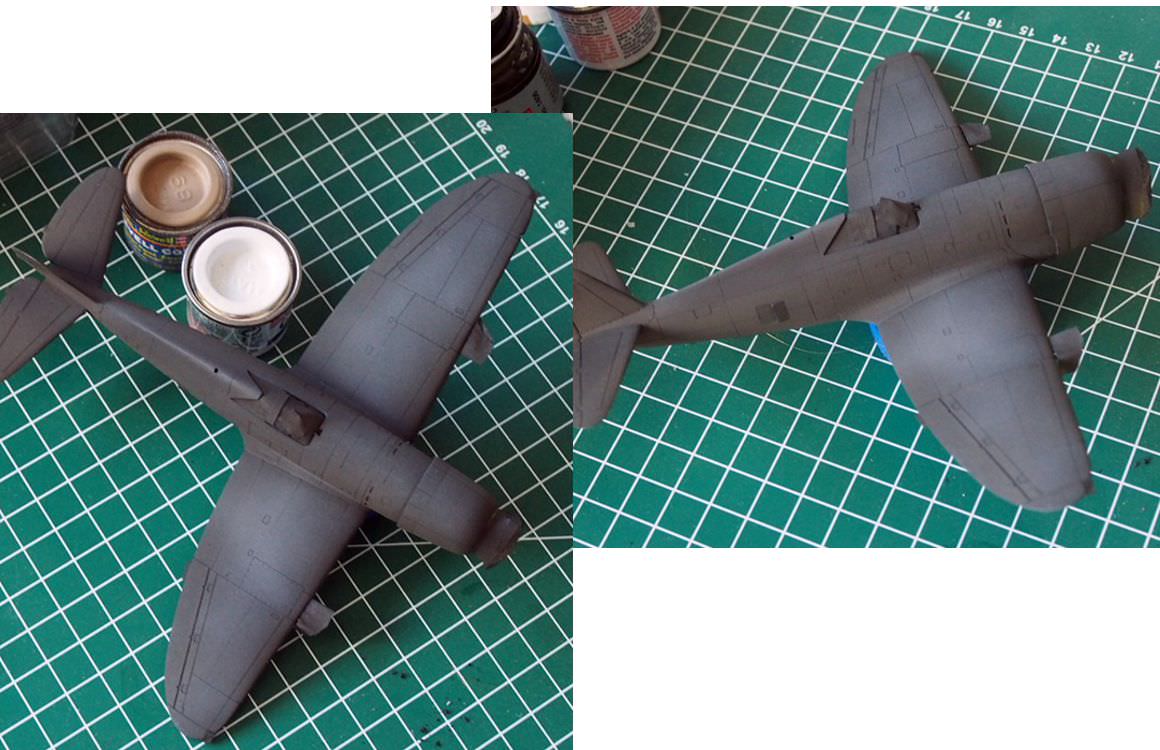
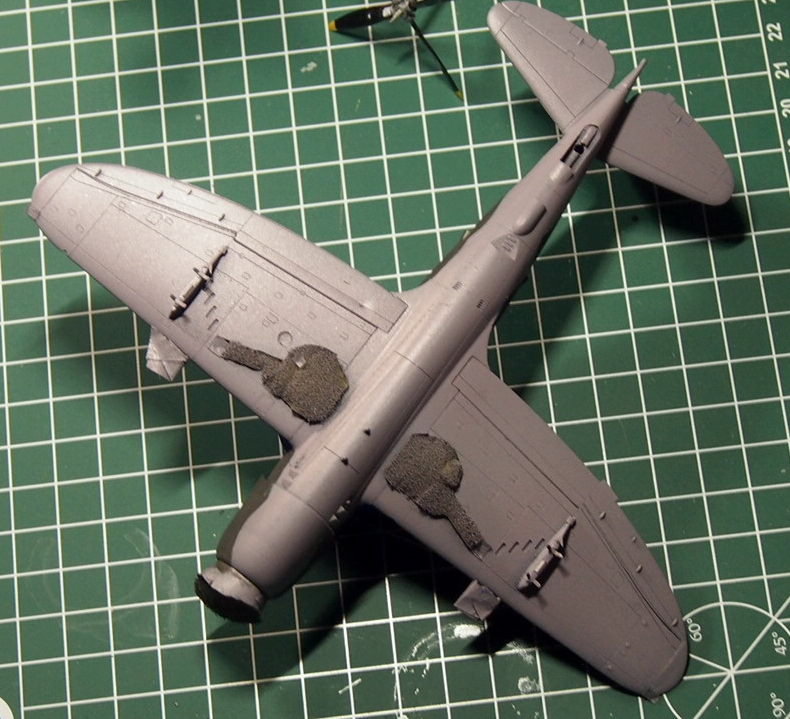
at least I got the underside masked, painted and demasked. Instead of enamels that I used on the top, I went on with Mr. Hobby's acrylic "neutral grey" over a coat of Vallejo primer.
Like to see how different surfaces will work with my weather effects later on.
Since I added 2 pieces of styrene scrap to the rear wheel well (to give a little interest and to cover the seam line
) it needs a repaint with int. color.
Now looking foreward to start the coating/decaling process but next I have to do the red areas.
Th
mas
Sometimes you need to distance yourself to see things clearly - Lao Tzu -
... in scale and in real life -T.
#424
Queensland, Australia
Joined: April 23, 2015
KitMaker: 4,648 posts
AeroScale: 1,938 posts
Posted: Monday, November 12, 2018 - 05:33 AM UTC
"Artillery adds dignity, to what would otherwise be an ugly brawl."
Frederick The Great
Berlin, Germany
Joined: October 12, 2008
KitMaker: 709 posts
AeroScale: 651 posts
Posted: Monday, November 12, 2018 - 06:26 AM UTC
Thanks for your visit, Gary!
Always nice to see you around and on the network. Seen your recent
Stalingrad campaign proposal; sounds iteresting with a good mixture. Thinking about it...
Th

mas
Sometimes you need to distance yourself to see things clearly - Lao Tzu -
... in scale and in real life -T.
Berlin, Germany
Joined: October 12, 2008
KitMaker: 709 posts
AeroScale: 651 posts
Posted: Saturday, November 17, 2018 - 12:22 AM UTC
Hi folks!
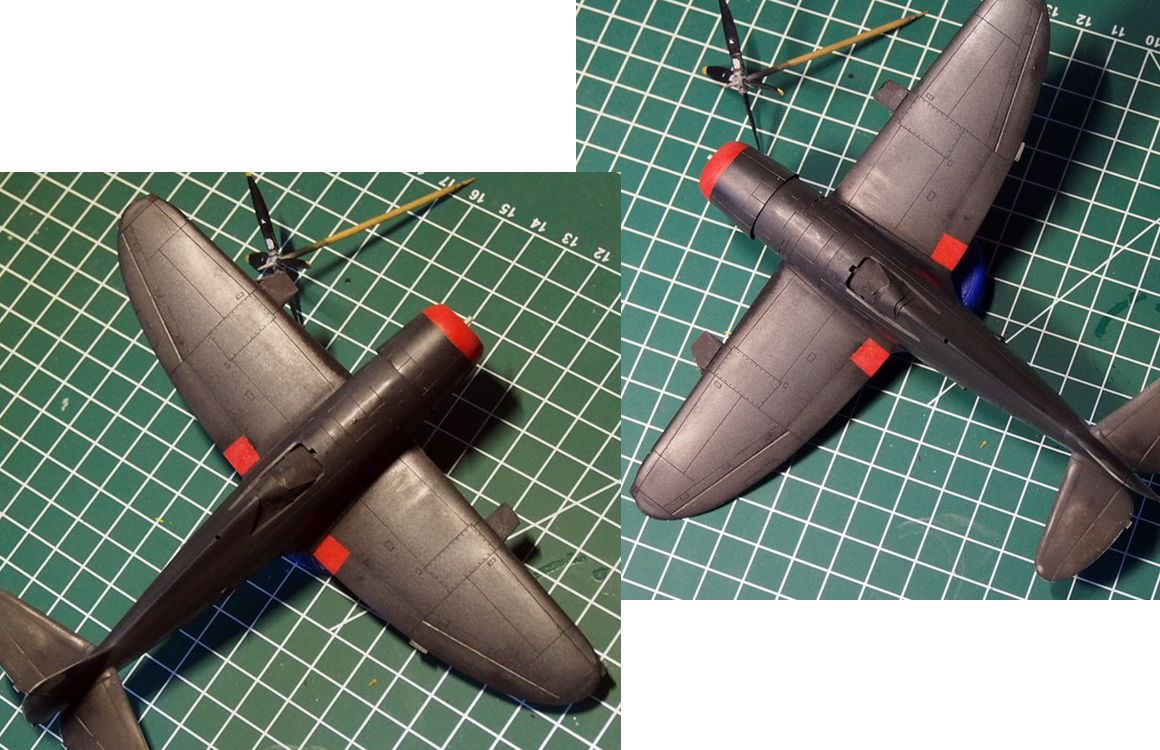
Red parts are airbrushed and the whole got a slight cover
with a Vallejo clear/semi mixture coat to protect the paint. Prop hub was fixed.
Later I realised a few overspray, hopefully I can blend it while processing. Now on to the decal work.
Th
mas
Sometimes you need to distance yourself to see things clearly - Lao Tzu -
... in scale and in real life -T.
Berlin, Germany
Joined: October 12, 2008
KitMaker: 709 posts
AeroScale: 651 posts
Posted: Saturday, November 17, 2018 - 08:29 AM UTC
A quick update ...

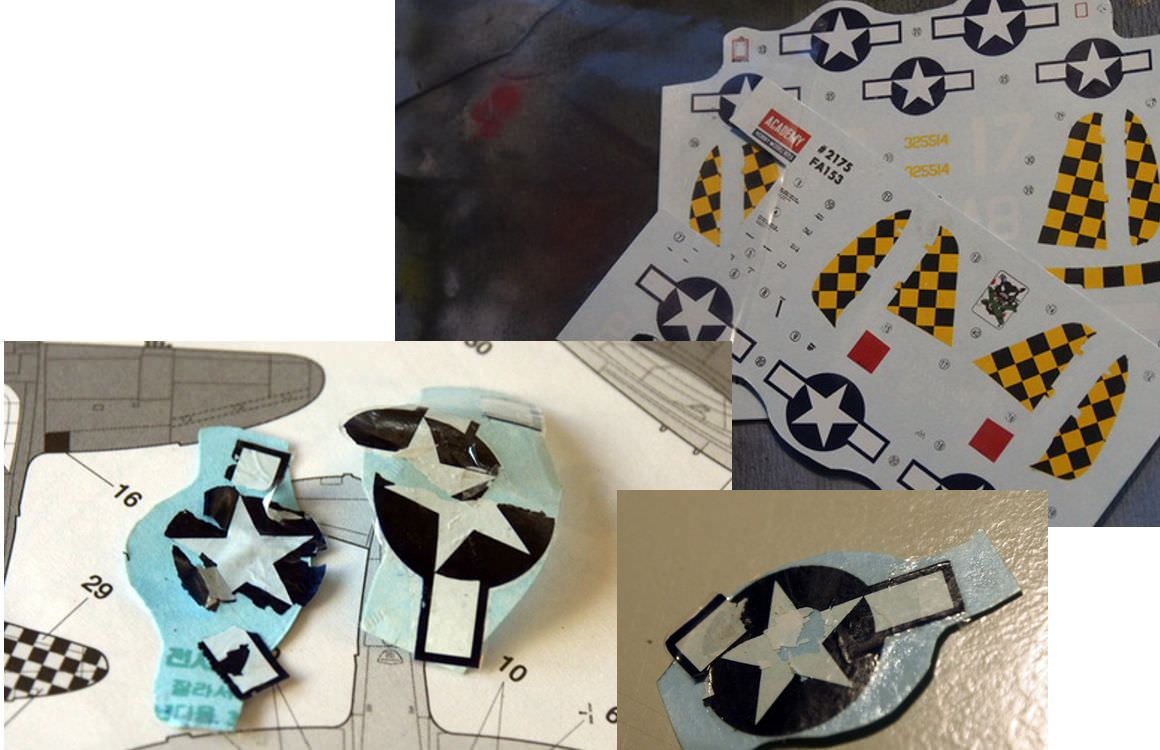
Unfortunately this looks like it will end up as a total mess.
Did anybody said: "Academy decals are fairly thick"?
I suffer now from the complete opposite. They're fragile as hell
and useless. Was not noticable on the smaller ones. Not many insignias left on the sheet

.
After the first two cracked easily (only soaked in aqua dest. & 1 drop dish washer) I stopped and gave all the others on the sheet 2 coats of Microscale's Liq. Decal Film. Left it drying proper. You can recognise a thin film - but that doesen't solve the Problem.
So at least I can try cutting each decal in pieces to have smaller and less stressed surfaces...

hope this will continue
Th
mas
Sometimes you need to distance yourself to see things clearly - Lao Tzu -
... in scale and in real life -T.


