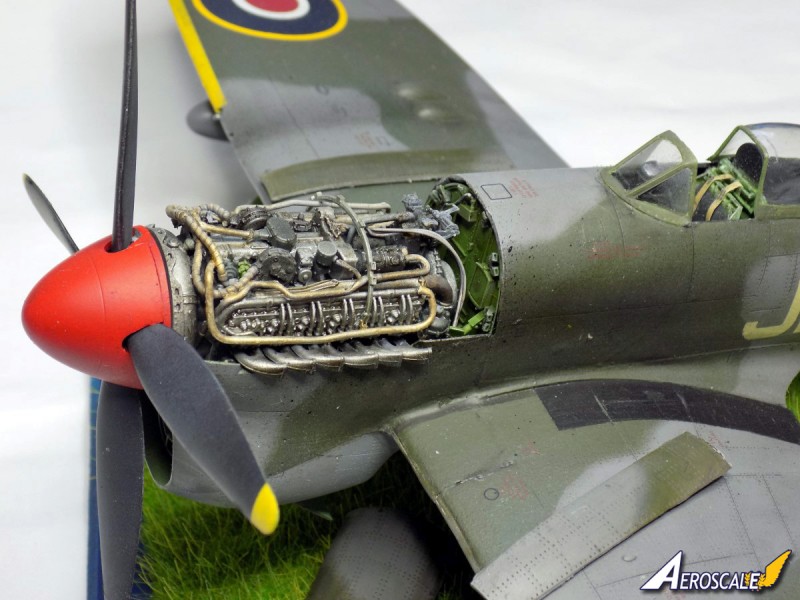
_GOTOBOTTOM
World War II: Great Britain
Aircraft of Great Britain in WWII.
Hosted by Rowan Baylis
SH 1/32nd Hawker Tempest MK.V
betheyn
Staff MemberSenior Editor
AEROSCALE
#019
_VISITCOMMUNITY
England - South East, United Kingdom
Joined: October 14, 2004
KitMaker: 4,560 posts
AeroScale: 2,225 posts
Posted: Wednesday, August 02, 2017 - 03:46 PM UTC
Special Hobby via Rowan have sent in their second boxing of the Hi Tech Tempest Mk.V kit, and being rather stupid I opened the box, whilst supposedly working on other reviews, and the inevitable happened, I started it .
Its all SH fault as they included a gorgeous looking resin engine in this boxing, which just cries out to be built, so I did, and with Rowans double build of the earlier Tempests having stalled I just thought what the hell, lets just dive in .
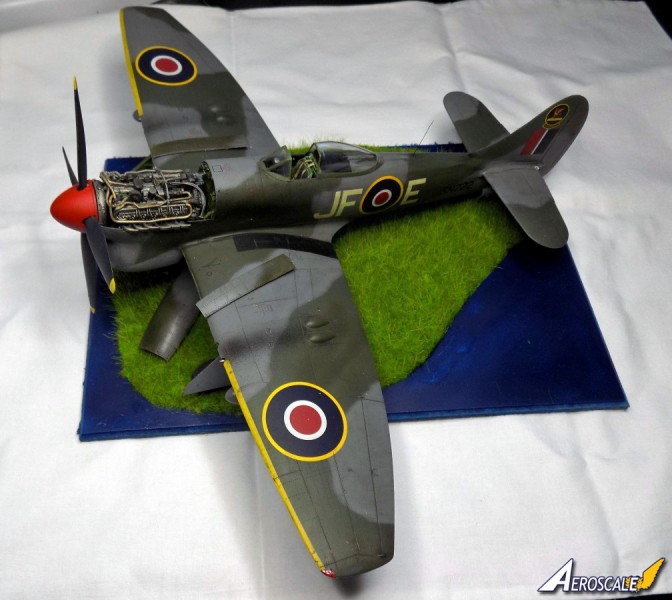
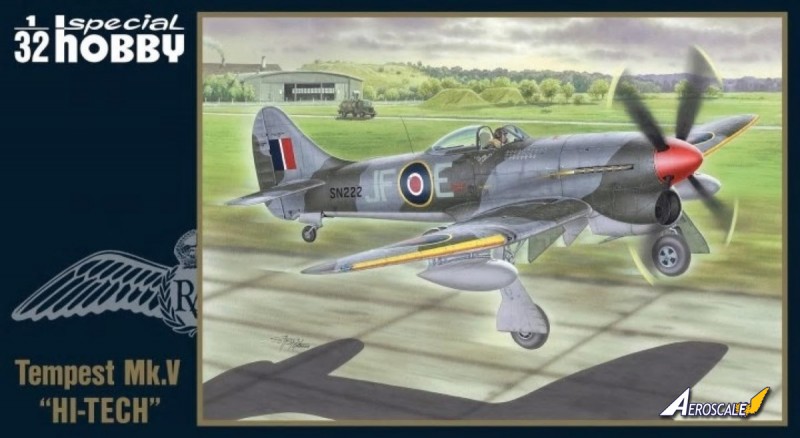
Anyhoo, the customary boxart and info,
Kit - Tempest MK.V "Hi Tech"
Item No - SH 32070
Price - £70 ish

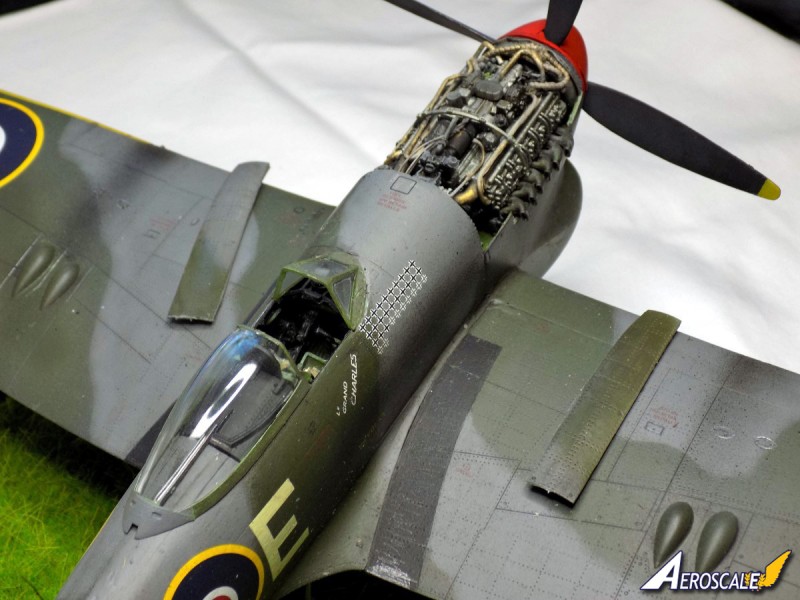
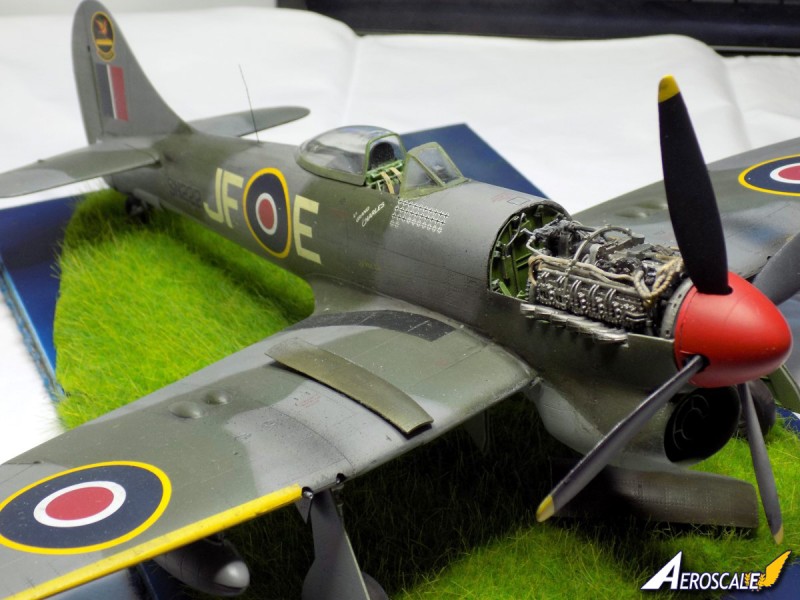
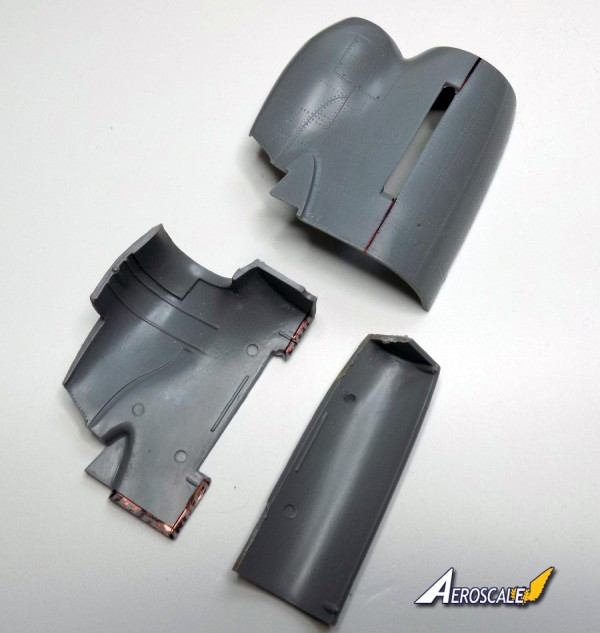
The first job to do (about halfway through the instruction booklet btw) was get the front of the aircraft ready for the inclusion of the resin engine, so the cowling panels need to be cut off and a groove around the edge of the lower front needs channeling out.

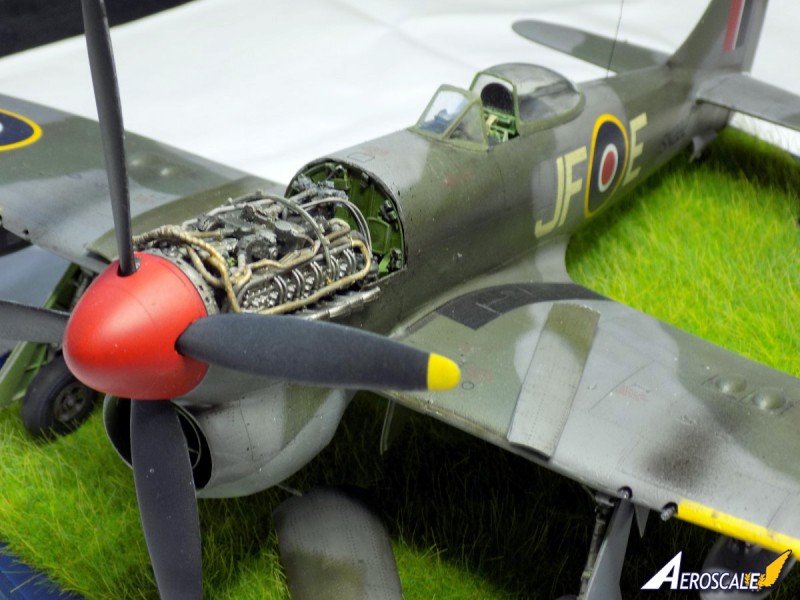
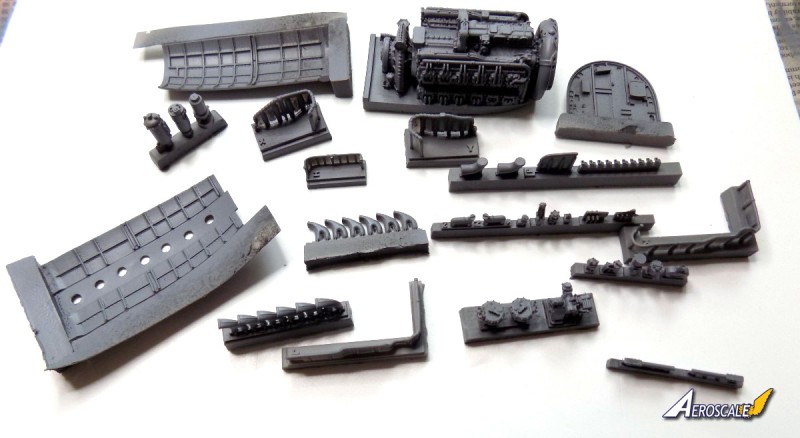
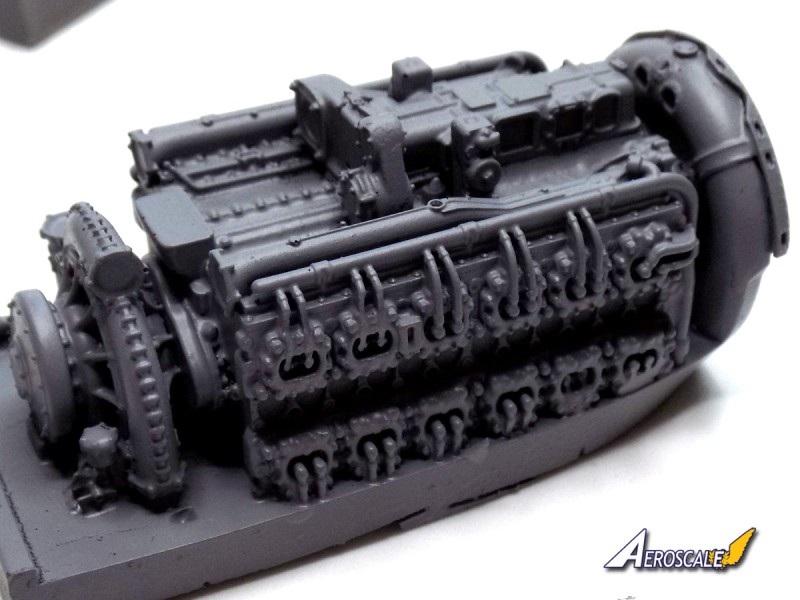
Then comes the best bit, the engine.
This is made up of quite a few resin parts, and is beautifully detailed.


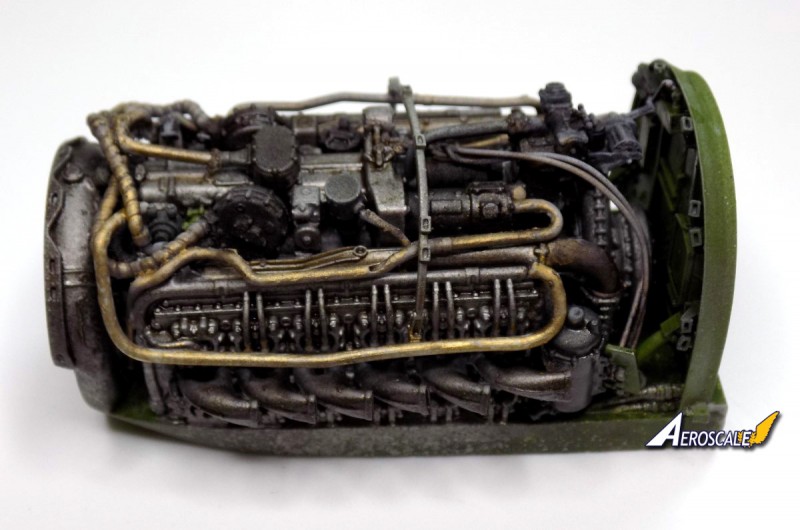
Built up and painted, with some wiring (not included in kit).

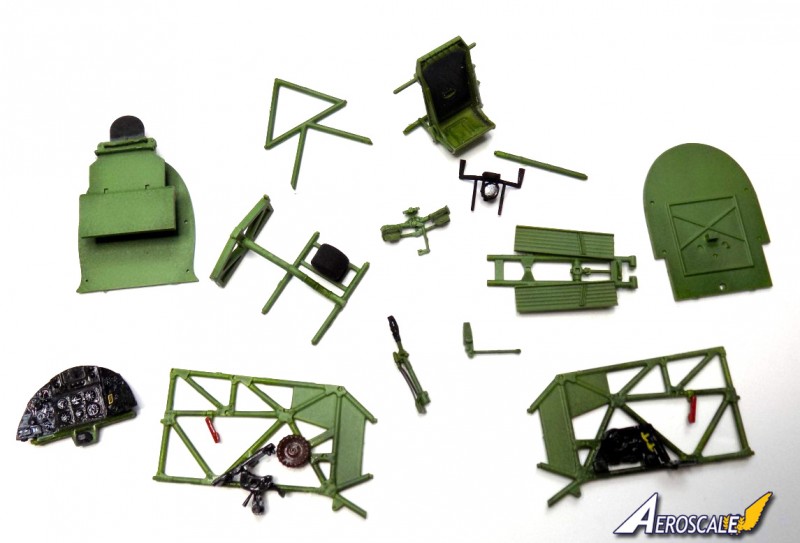
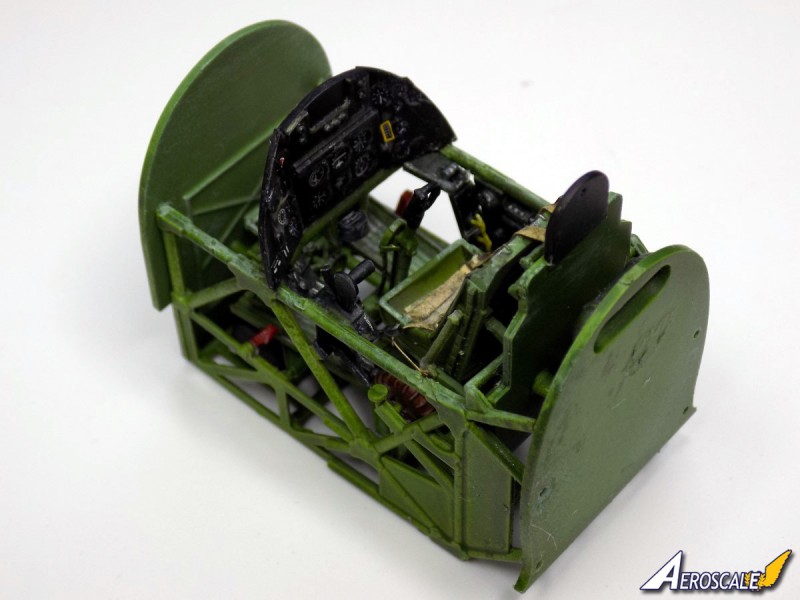
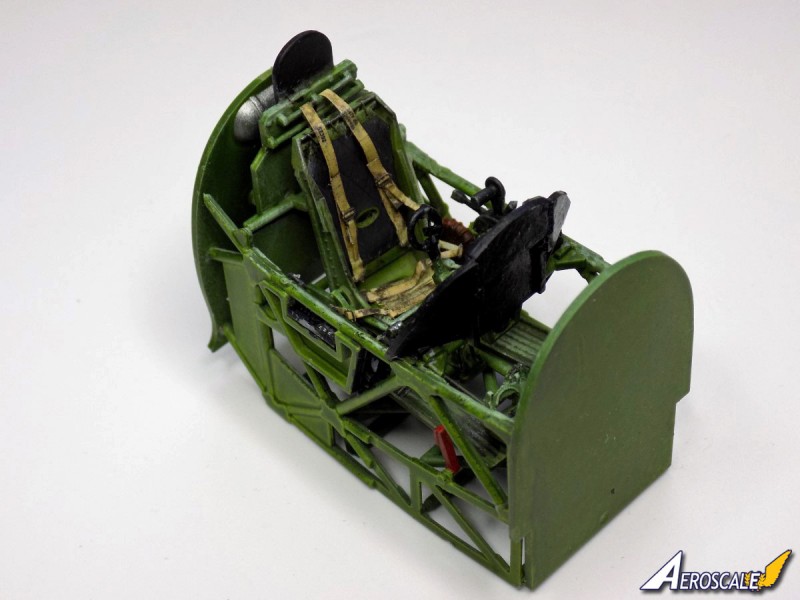
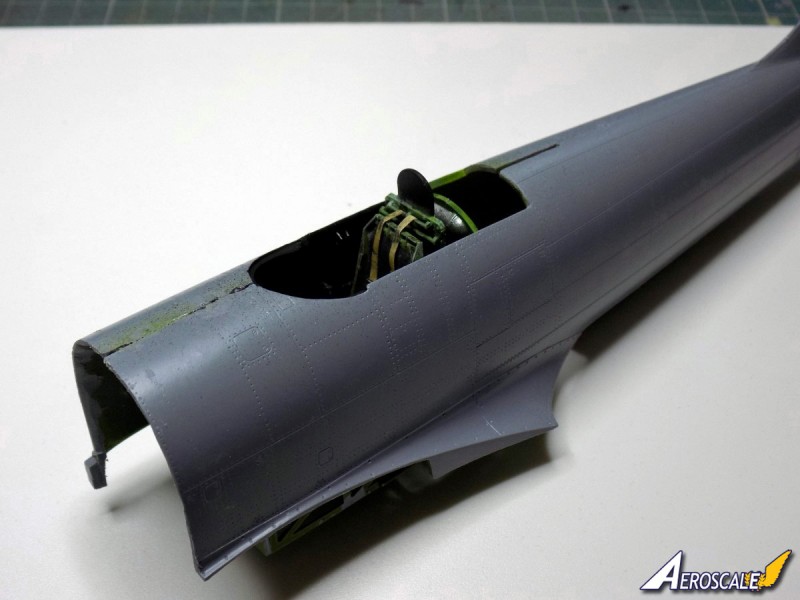
With the engine built up, I think I had best go back to the beginning of the instructions and build the cockpit.
So stayed tuned .
Andy
litespeed
Staff MemberNews Reporter
AEROSCALE
_VISITCOMMUNITY
England - North West, United Kingdom
Joined: October 15, 2009
KitMaker: 1,976 posts
AeroScale: 1,789 posts
Posted: Thursday, August 03, 2017 - 01:42 AM UTC
Looking good there Andy
AussieReg
Staff MemberAssociate Editor
AUTOMODELER
#007
_VISITCOMMUNITY
Victoria, Australia
Joined: June 09, 2009
KitMaker: 8,156 posts
AeroScale: 3,756 posts
Posted: Thursday, August 03, 2017 - 05:30 AM UTC
Yep, following this one. Very nice start!

Cheers, D
Scrodes
_VISITCOMMUNITY
Ontario, Canada
Joined: July 22, 2012
KitMaker: 771 posts
AeroScale: 763 posts
Posted: Thursday, August 03, 2017 - 06:15 AM UTC
What colour did you use for the plumbing on the engine? Specifically which paint - it looks great.
Mecenas
Joined: December 23, 2007
KitMaker: 1,596 posts
AeroScale: 1,275 posts
Posted: Thursday, August 03, 2017 - 10:29 AM UTC
Hi Andy!
Generaly speaking opening any model box, if you have other things to do, is never very smart...

Just keep the pace now, you're on the right track. Your current progress looks great.
betheyn
Staff MemberSenior Editor
AEROSCALE
#019
_VISITCOMMUNITY
England - South East, United Kingdom
Joined: October 14, 2004
KitMaker: 4,560 posts
AeroScale: 2,225 posts
Posted: Thursday, August 03, 2017 - 11:59 AM UTC

Quoted Text

Looking good there Andy


Quoted Text

Yep, following this one. Very nice start!

Cheers, D


Thanks guys, glad to have you along.

Quoted Text

What colour did you use for the plumbing on the engine? Specifically which paint - it looks great.


That would be AK's Xtreme Metal Brass, sprays really nice, and can be brushed on with a couple of coats.

Quoted Text

Hi Andy!
Generaly speaking opening any model box, if you have other things to do, is never very smart...

Just keep the pace now, you're on the right track. Your current progress looks great.


Thanks Michal.
Yep, wasn't the cleverest idea I had .
Plodding on slowly with the cockpit, and considering how many parts there are and the some bits are rather fiddly, it is a most enjoyable build so far.
Andy
betheyn
Staff MemberSenior Editor
AEROSCALE
#019
_VISITCOMMUNITY
England - South East, United Kingdom
Joined: October 14, 2004
KitMaker: 4,560 posts
AeroScale: 2,225 posts
Posted: Thursday, August 10, 2017 - 02:58 AM UTC
Well I'm slowly making progress.
Cockpit parts sub assemblies.

Cockpit together


The fabric HGW harness, although very nice is a right fiddly thing to put together, took me most of a day.
Andy
Merlin
Staff MemberSenior Editor
AEROSCALE
#017
_VISITCOMMUNITY
United Kingdom
Joined: June 11, 2003
KitMaker: 17,582 posts
AeroScale: 12,795 posts
Posted: Saturday, August 12, 2017 - 06:27 PM UTC
Nice work Andy!

Both the engine and cockpit are looking really good. I didn't sneak a look at the engine before sending the kit on to you - and seeing it here, I can understand why you're so impressed.

All the best

Rowan
betheyn
Staff MemberSenior Editor
AEROSCALE
#019
_VISITCOMMUNITY
England - South East, United Kingdom
Joined: October 14, 2004
KitMaker: 4,560 posts
AeroScale: 2,225 posts
Posted: Sunday, September 10, 2017 - 02:21 AM UTC

Quoted Text

Nice work Andy!

Both the engine and cockpit are looking really good. I didn't sneak a look at the engine before sending the kit on to you - and seeing it here, I can understand why you're so impressed.

All the best

Rowan


Thanks Rowan. I'm glad you didn't look at the engine before you sent it, otherwise I might not of got it .
Well I haven't had much time to work on this for a couple of weeks, but I have managed to do some work.
The front of the fuselage halves need the moulded on firewall removed, for fitting the resin engine. Not too bad to do, but you will need to test fit the resin engine before committing to gluing the fuselage halves together.

Fuselage together, a little seam work needs doing mainly on the front as the fit is very tight.

Next up is the undercarriage bays and attaching the wings.
Andy
betheyn
Staff MemberSenior Editor
AEROSCALE
#019
_VISITCOMMUNITY
England - South East, United Kingdom
Joined: October 14, 2004
KitMaker: 4,560 posts
AeroScale: 2,225 posts
Posted: Wednesday, October 04, 2017 - 08:25 PM UTC
Well after starting this two months ago, I finally got a good run at the beast over the last three days, such a good run I finished it.


An enjoyable build, and well recommended if you fancy a Tempest in 1/32nd scale.
Now to find somewhere to put the big beastie .
Andy
Merlin
Staff MemberSenior Editor
AEROSCALE
#017
_VISITCOMMUNITY
United Kingdom
Joined: June 11, 2003
KitMaker: 17,582 posts
AeroScale: 12,795 posts
Posted: Wednesday, October 04, 2017 - 08:40 PM UTC
Hi Andy

Wow! That's stunning! Great job!

All the best

Rowan
betheyn
Staff MemberSenior Editor
AEROSCALE
#019
_VISITCOMMUNITY
England - South East, United Kingdom
Joined: October 14, 2004
KitMaker: 4,560 posts
AeroScale: 2,225 posts
Posted: Saturday, October 07, 2017 - 09:26 PM UTC
Thanks Rowan.
I have ordered a CMK pilot and a PJ miniatures ground crew to go with it, so as soon as they turn up, they will get painted and I will post some more pics.
Andy
Mecenas
Joined: December 23, 2007
KitMaker: 1,596 posts
AeroScale: 1,275 posts
Posted: Sunday, October 08, 2017 - 11:10 AM UTC
That's a big push, I shall learn this technique.

Great model Andy. It looks that when you already deal with all these interior and engine details further assebly process is rather straightforward.
betheyn
Staff MemberSenior Editor
AEROSCALE
#019
_VISITCOMMUNITY
England - South East, United Kingdom
Joined: October 14, 2004
KitMaker: 4,560 posts
AeroScale: 2,225 posts
Posted: Monday, October 09, 2017 - 02:45 AM UTC

Quoted Text

That's a big push, I shall learn this technique.

Great model Andy. It looks that when you already deal with all these interior and engine details further assebly process is rather straightforward.


Thanks Michal, it was a big push, one that I had too do or it would have never been finished .
Once the major surgery is done, its a pretty easy build. The only exception is the two inserts for the leading edge wing roots that need coaxing into position then sanding. Why SH did this heaven knows.
Andy
greif8
_VISITCOMMUNITY
Bayern, Germany
Joined: January 17, 2006
KitMaker: 673 posts
AeroScale: 492 posts
Posted: Thursday, October 12, 2017 - 08:45 PM UTC
First rate build Andy. The engine looks very, very nice and really stands out.

Ernest
betheyn
Staff MemberSenior Editor
AEROSCALE
#019
_VISITCOMMUNITY
England - South East, United Kingdom
Joined: October 14, 2004
KitMaker: 4,560 posts
AeroScale: 2,225 posts
Posted: Saturday, October 14, 2017 - 04:15 PM UTC

Quoted Text

First rate build Andy. The engine looks very, very nice and really stands out.

Ernest


Thanks Ernest, the engine does really set the kit off, and was the main reason it hit the bench before anything else.
Andy
 _GOTOTOP