Building the Airfix 1:24th Typhoon

#029
England - East Midlands, United Kingdom
Joined: December 23, 2005
KitMaker: 6,249 posts
AeroScale: 3,270 posts
Posted: Thursday, November 03, 2016 - 09:04 PM UTC
For a change from painting "stars n bars" I thought it was about time I got the big Tiffie that I purchased a couple of years ago onto the bench.
I'm pretty much going OOB on this, with the addition of seatbelts and some cockpit details. No scratchbuilding and only the top area of the engine exposed.
Off we go then,
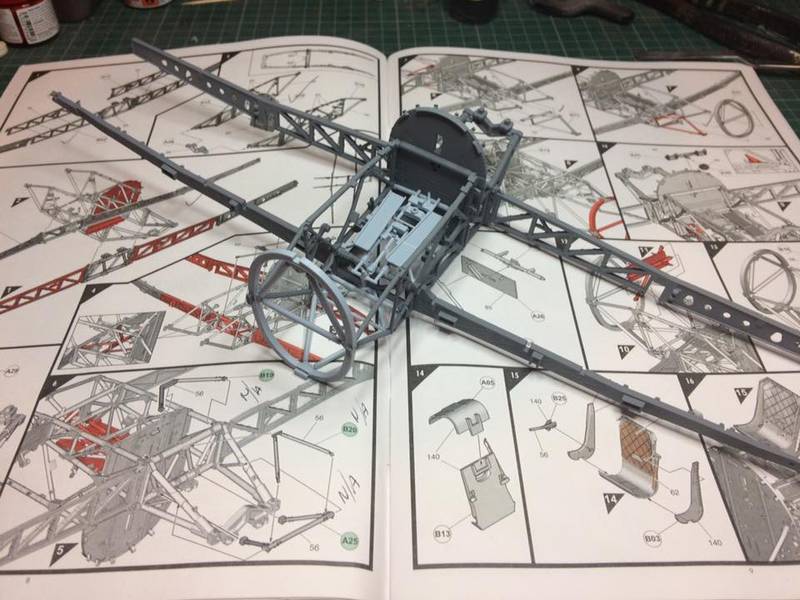
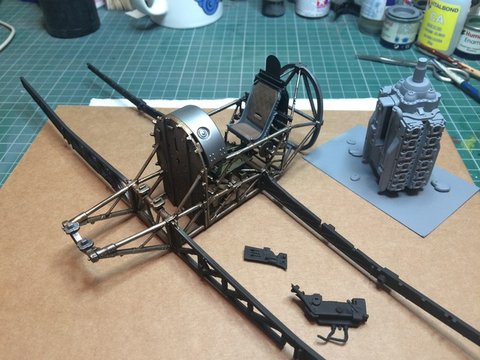
First few sections of the instructions complete.
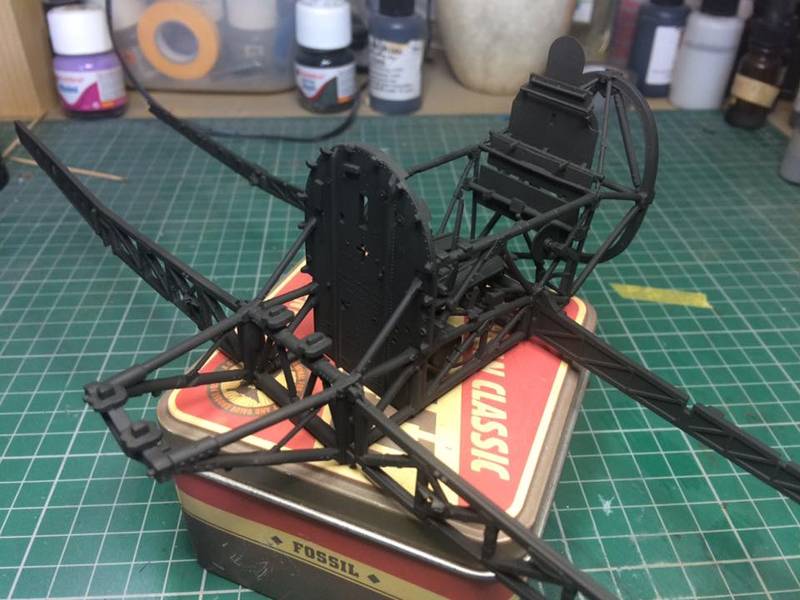
And then everything gets a base coat of my scale black.
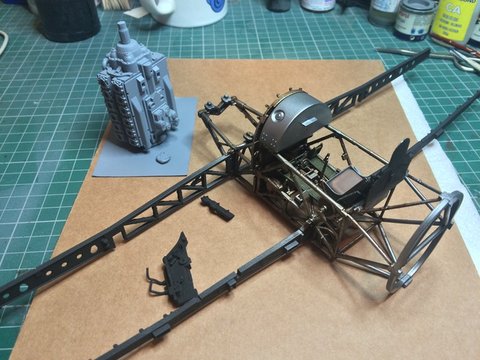
Time to do a bit of research and see how the colours on this area are going to end up as there appears to be a few differences of opinion around this.( What a surprise)

It's not the same, better, but not the same...
Joel_W
 Associate Editor
New York, United States
Joined: December 04, 2010
KitMaker: 11,666 posts
AeroScale: 7,410 posts
Posted: Friday, November 04, 2016 - 12:09 AM UTC
Nigel,
this should be an excellent build with your skills. I'm pulling up a chair, and will be following the Tiffie till it's conclusion.
Joel
On my Workbench:
Monogram 1/24 scale 427 Shelby Cobra
Just Completed:
Beemax 1/24 scale BMW M3 E30 1992 Evolution II
#522
New Jersey, United States
Joined: January 20, 2013
KitMaker: 1,460 posts
AeroScale: 1,443 posts
Posted: Friday, November 04, 2016 - 03:50 PM UTC
Good heavens! There are a lot of parts going into this in 1/24! By the time you're done you'll know the a/c inside and out. I will follow with interest.
On my Workbench: 1/48 B-17F Luscious Lady (with H.G. Barnes and Karl Hauffe - Research) and with Contributions from the late Arthur T. Babiarz, Jr.
Two Special Hobby AF-2 Guardians, one AF-2W, and one AS-2S
England - South East, United Kingdom
Joined: September 15, 2004
KitMaker: 4,728 posts
AeroScale: 1,351 posts
Posted: Friday, November 04, 2016 - 04:12 PM UTC
Quoted Text
Time to do a bit of research and see how the colours on this area are going to end up as there appears to be a few differences of opinion around this.( What a surprise)
Nice one Nige, too big for me but I'm still following along. Now as for the colours, since Hawker painted their frame work silver and did not leave it natural metal I would go with a scaled silver finish on the frame.
On the bench...
Italeri A129 Mangusta
British Bulldog Spitfire theme build
betheyn
Senior Editor #019
England - South East, United Kingdom
Joined: October 14, 2004
KitMaker: 4,560 posts
AeroScale: 2,225 posts
Posted: Friday, November 04, 2016 - 09:11 PM UTC
I shall enjoy watching this, and seeing how it all goes together, as I have one in the stash.
BTW Happy Birthday mate.
Andy

It's not the same, better, but not the same...
England - South East, United Kingdom
Joined: March 07, 2005
KitMaker: 868 posts
AeroScale: 690 posts
Posted: Friday, November 04, 2016 - 11:07 PM UTC
..been tempted to have a go at this one too..but the price has to be right, if anyone knows where they can be purchased for not much, I'm all ears. Reckon you'll finish this by Christmas then Nige...? Christmas 2017 I mean..?!
Merlin
Senior Editor #017
United Kingdom
Joined: June 11, 2003
KitMaker: 17,582 posts
AeroScale: 12,795 posts
Posted: Saturday, November 05, 2016 - 01:18 AM UTC
Quoted Text
Reckon you'll finish this by Christmas then Nige...? Christmas 2017 I mean..?!
Hi Neil
Christmas 2017?! - Nige is getting this ready for Telford later this month!

Nice one Nige - I'll definitely be following this build.

I must admit the new car-door Tiffie has me tempted, but I've got more than enough to keep me busy, so my wallet's safe (for a while at least...).
All the best
Rowan
BEWARE OF THE FEW...
As I grow older, I regret to say that a detestable habit of thinking seems to be getting a hold of me. - H. Rider Haggard
AussieReg
Associate Editor #007
Victoria, Australia
Joined: June 09, 2009
KitMaker: 8,156 posts
AeroScale: 3,756 posts
Posted: Saturday, November 05, 2016 - 09:20 AM UTC
I'm on board for this journey, this will look great displayed beside the big Jug !
Cheers, D
ON the bench
Revell 1/24 '53 Corvette (building as '54)
Revell 1/24 BMW 507 Coupe and Cabrio
Italeri 1/48 Me262 B-1a/U1 Nightfighter
Monogram 1/24 '57 Chevy Nomad
Dragon 1/350 USS Frank Knox DD-742
Holdfast
President #056
England - South West, United Kingdom
Joined: September 30, 2002
KitMaker: 8,581 posts
AeroScale: 4,913 posts
Posted: Saturday, November 05, 2016 - 12:52 PM UTC
About time
Quoted Text
Reckon you'll finish this by Christmas then Nige...? Christmas 2017 I mean..?!
Christmas 2017! more like 2020

Yep the cockpit doesn't need much else and the only thing needed on the engine is wiring.
Make sure that the engine is seated correctly or you may have issues with the cowling panels, tolerances are impressively tight. The under rear fuselage is good but you may find that you think that you have to trim something, you don't. Follow the instructions and everything goes really well
We can have a chat about this stuff at Telford?
MAL the MASK
BULLDOG # 6 (President)
BEWARE OF THE FEW
Sappers: First in, last out. (UBIQUE)
It's not the same, better, but not the same.
#029
England - East Midlands, United Kingdom
Joined: December 23, 2005
KitMaker: 6,249 posts
AeroScale: 3,270 posts
Posted: Sunday, November 06, 2016 - 03:00 AM UTC
Will do,
See you at the weekend guys
It's not the same, better, but not the same...
Ontario, Canada
Joined: July 22, 2012
KitMaker: 771 posts
AeroScale: 763 posts
Posted: Sunday, November 06, 2016 - 04:13 AM UTC
I cannot say enough nice things about the Brassin wheels and the Master Caster rockets - I know they're expensive, but having bought a set I am amazed by the quality.
I also have the Airscale instruments, which are beautiful.
And ICYMI - there's an update to the instructions on the Airfix website, clarification on a step.
Matt Odom
I've been known to build a few things
#029
England - East Midlands, United Kingdom
Joined: December 23, 2005
KitMaker: 6,249 posts
AeroScale: 3,270 posts
Posted: Saturday, December 03, 2016 - 11:26 PM UTC
Been steadily plodding on with this in between working on the big Tamiya Mustang.
Hardest part seems to be figuring out what bits to leave off depending on how many sections of engine cowling the modeller wants to fit.
It's not the same, better, but not the same...
#029
England - East Midlands, United Kingdom
Joined: December 23, 2005
KitMaker: 6,249 posts
AeroScale: 3,270 posts
Posted: Thursday, December 15, 2016 - 04:45 AM UTC
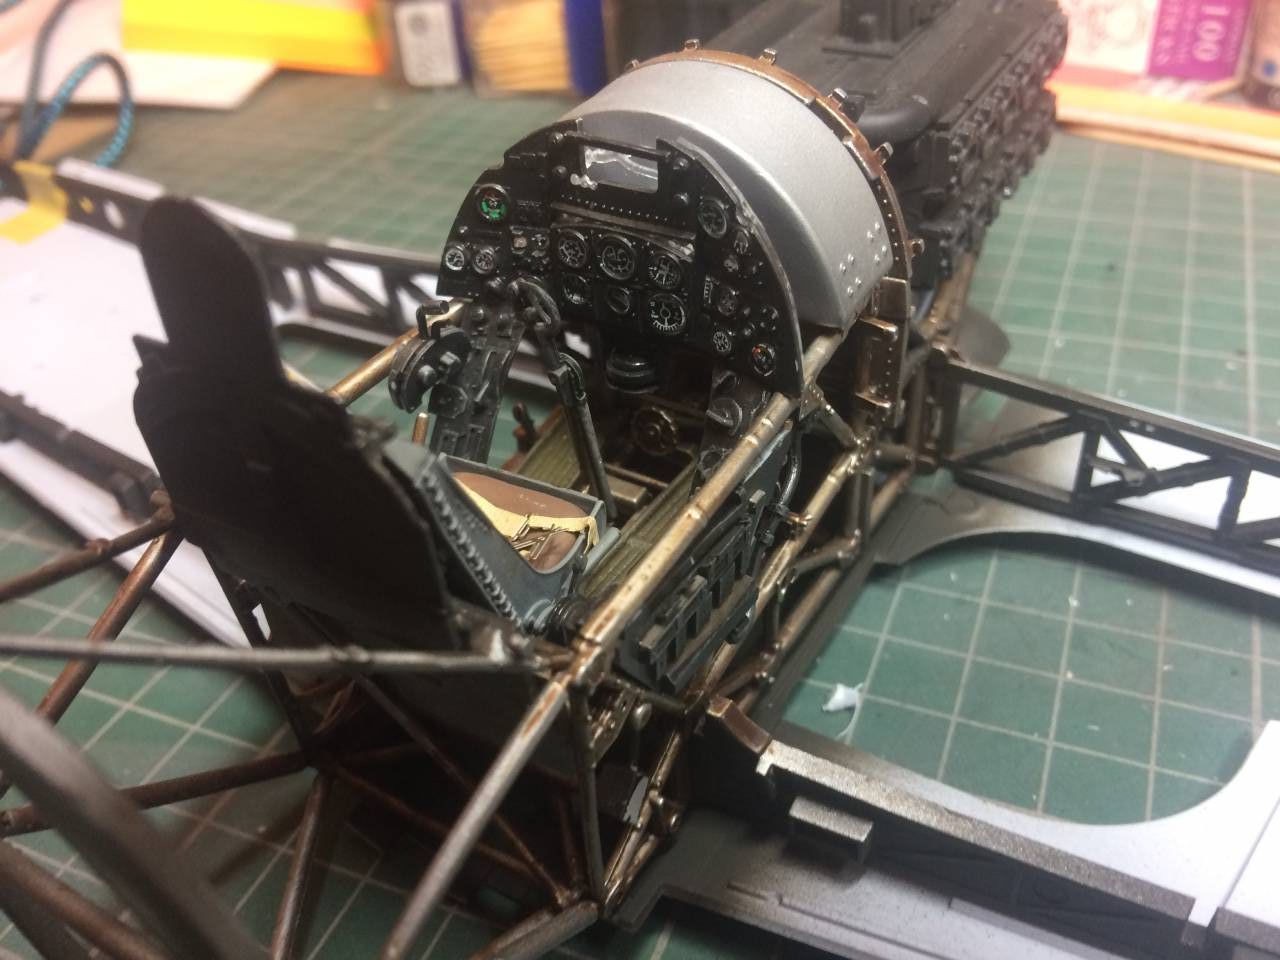
Not had much time this week to spend on the Tiffie.
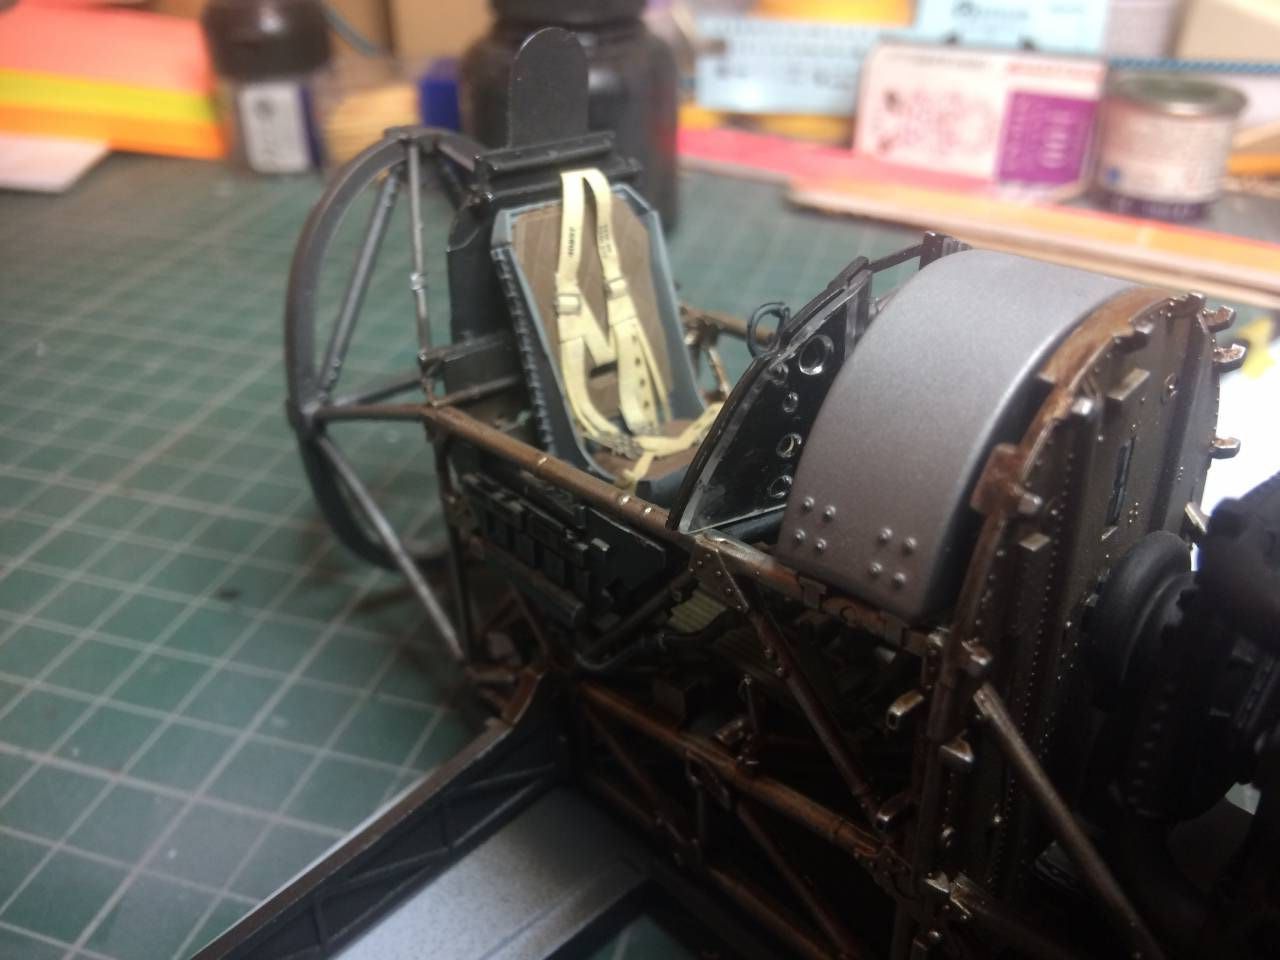
Seatbelts and instrument panels always take forever with me and this is no exception.
Just got the lap belts to finish and then I can fit the seat before moving onto the instruments and side panels.
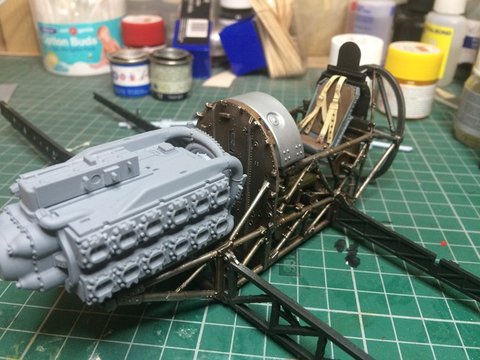
Inbetween the cockpit and steadily painting the markings on the Tamiya Mustang Ive made a start on the engine too.
It's not the same, better, but not the same...
AussieReg
Associate Editor #007
Victoria, Australia
Joined: June 09, 2009
KitMaker: 8,156 posts
AeroScale: 3,756 posts
Posted: Thursday, December 15, 2016 - 05:18 AM UTC
Looks awesome Nige, great work.
Cheers, D
ON the bench
Revell 1/24 '53 Corvette (building as '54)
Revell 1/24 BMW 507 Coupe and Cabrio
Italeri 1/48 Me262 B-1a/U1 Nightfighter
Monogram 1/24 '57 Chevy Nomad
Dragon 1/350 USS Frank Knox DD-742
#029
England - East Midlands, United Kingdom
Joined: December 23, 2005
KitMaker: 6,249 posts
AeroScale: 3,270 posts
Posted: Thursday, October 26, 2017 - 03:41 AM UTC
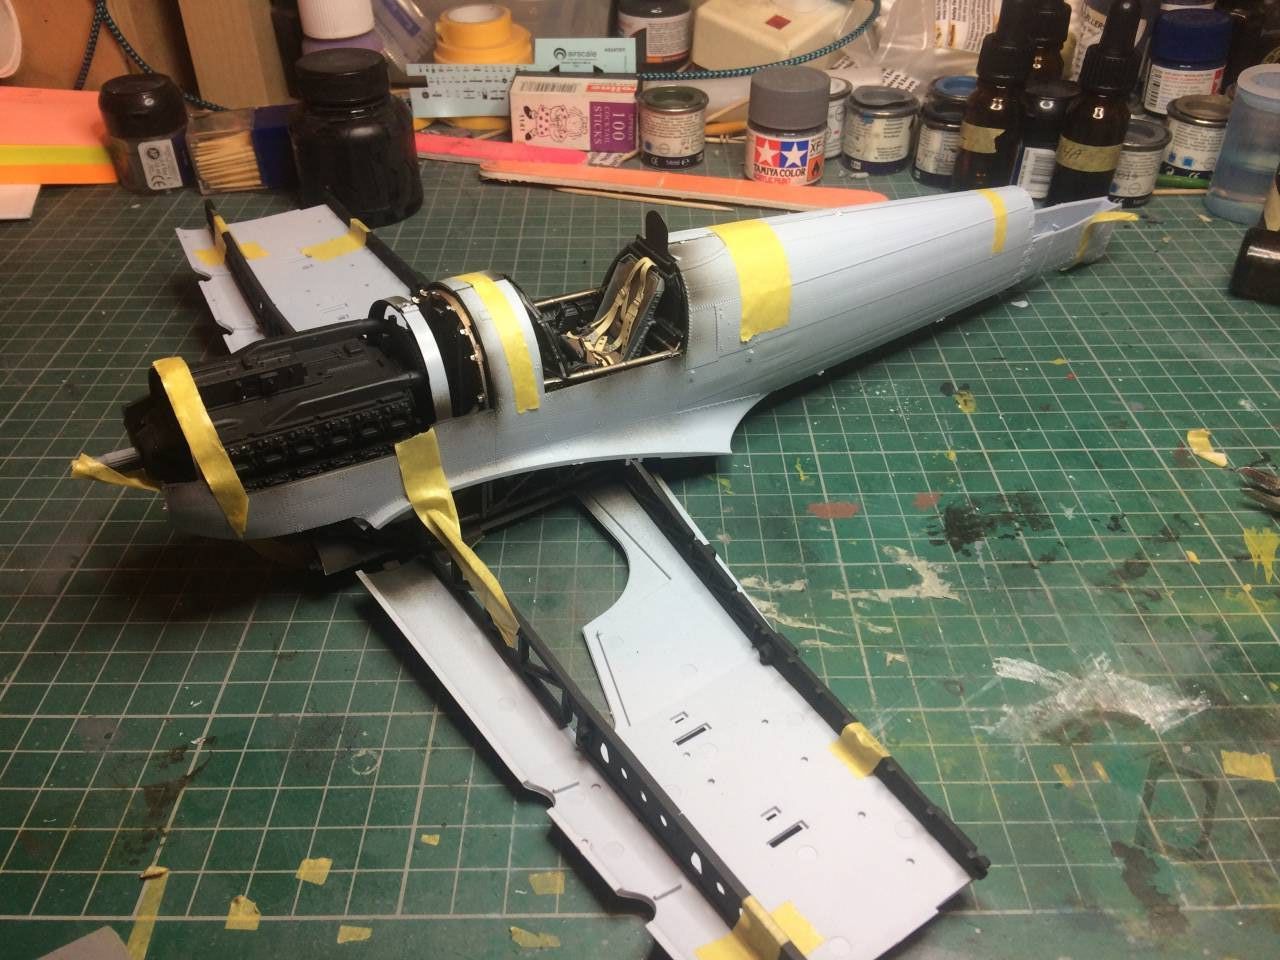
So now the Tamiya Mustang is finished and I'm adding the last bits and pieces onto a P-47 build I've finally got some more done on the big Tiffie and the build is getting a new lease of life after being bogged down in seatbelts and instrument panel doldrums.
A test fit onto the wing base and it'll soon be time to decide what version I'm going to build so I can drill the locating holes for the ordnance.
It's not the same, better, but not the same...
Ontario, Canada
Joined: July 22, 2012
KitMaker: 771 posts
AeroScale: 763 posts
Posted: Thursday, October 26, 2017 - 09:22 PM UTC
Hey Nige - which harness did you use? The RB one?
Matt Odom
I've been known to build a few things
Bayern, Germany
Joined: January 17, 2006
KitMaker: 673 posts
AeroScale: 492 posts
Posted: Saturday, October 28, 2017 - 02:49 PM UTC
The cockpit and engine thus far, look the biz Nigel.
Ernest
TimReynaga
Associate Editor California, United States
Joined: May 03, 2006
KitMaker: 2,500 posts
AeroScale: 318 posts
Posted: Saturday, October 28, 2017 - 09:16 PM UTC
Nigel,
That Tiffy cockpit looks so nice it seems almost a shame to shut it up inside the fuselage - great work!

Joel_W
Associate Editor New York, United States
Joined: December 04, 2010
KitMaker: 11,666 posts
AeroScale: 7,410 posts
Posted: Saturday, October 28, 2017 - 10:28 PM UTC
Nig,
The cockpit looks great. Outstanding job on those belts and harness.
Joel
On my Workbench:
Monogram 1/24 scale 427 Shelby Cobra
Just Completed:
Beemax 1/24 scale BMW M3 E30 1992 Evolution II
#029
England - East Midlands, United Kingdom
Joined: December 23, 2005
KitMaker: 6,249 posts
AeroScale: 3,270 posts
Posted: Monday, November 06, 2017 - 03:24 AM UTC
Thanks everyone.
I can't remember exactly which harness set I used but its one of the fabric ones. Really nice and well worth the extra.
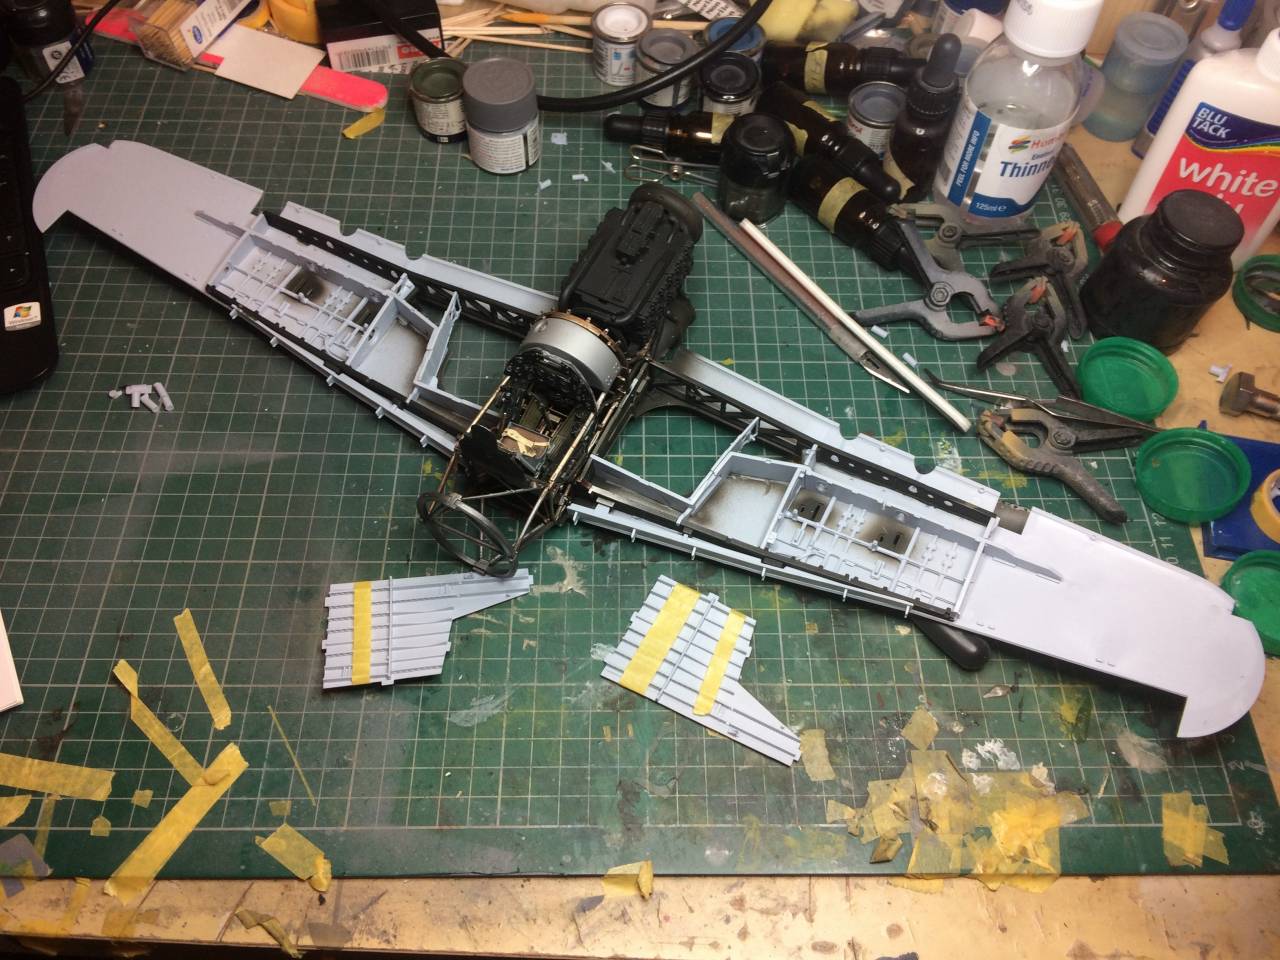
Since the last post I've got some more done.
The wheel wells have been built up and painted since I took this photo. Once the masking tape that's holding them in place while the glue cures is removed I'll post another photo.
I've also decided to finish it as a bomb carrying version.
It's not the same, better, but not the same...
Alberta, Canada
Joined: January 19, 2008
KitMaker: 6,743 posts
AeroScale: 6,151 posts
Posted: Monday, November 06, 2017 - 05:16 AM UTC
Beautiful work to date Nigel
Terri
#029
England - East Midlands, United Kingdom
Joined: December 23, 2005
KitMaker: 6,249 posts
AeroScale: 3,270 posts
Posted: Monday, November 06, 2017 - 06:38 PM UTC
Thanks Terri
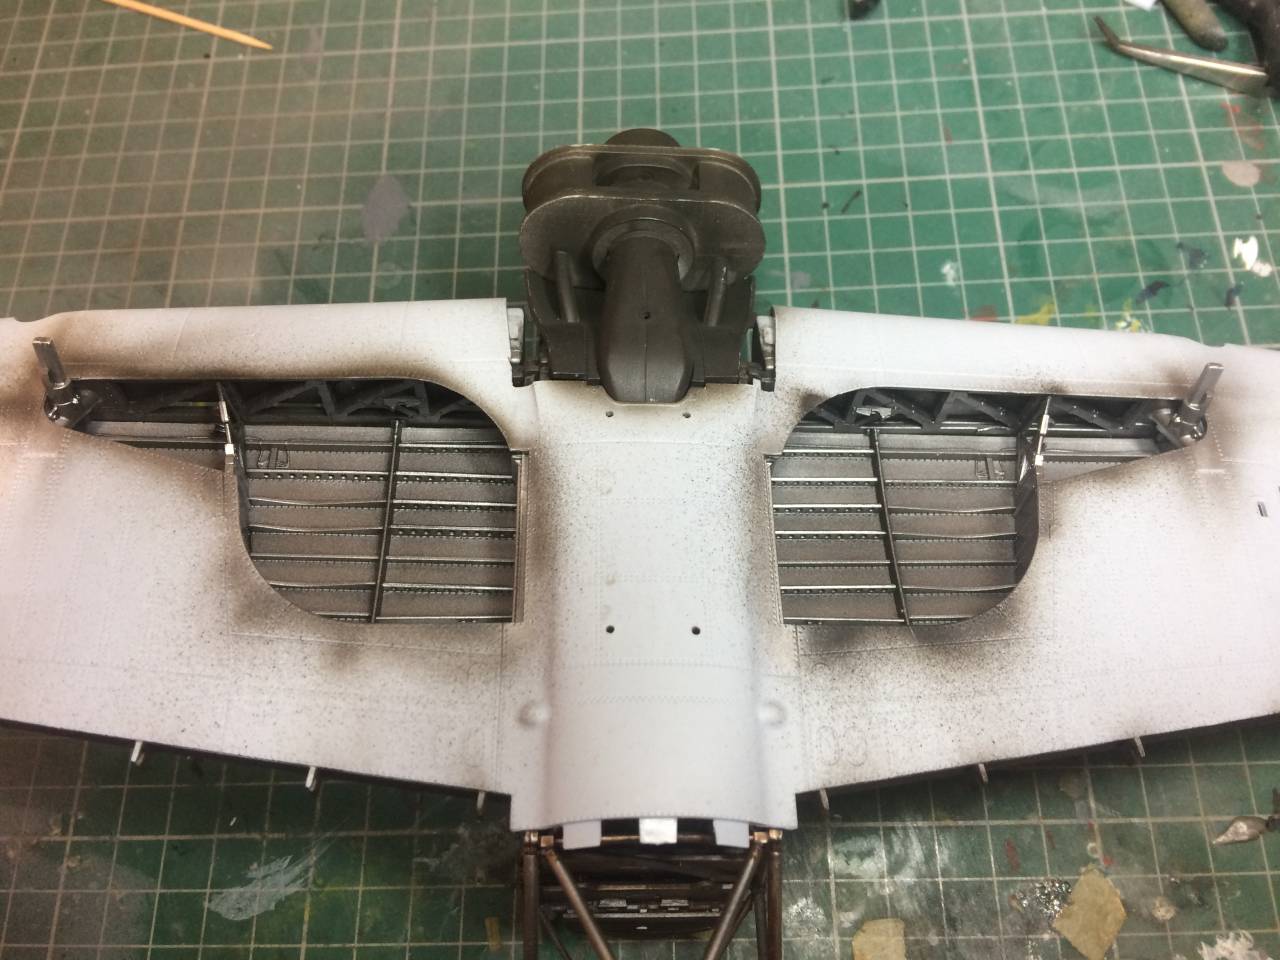
More progress.
Wheel bays closed up
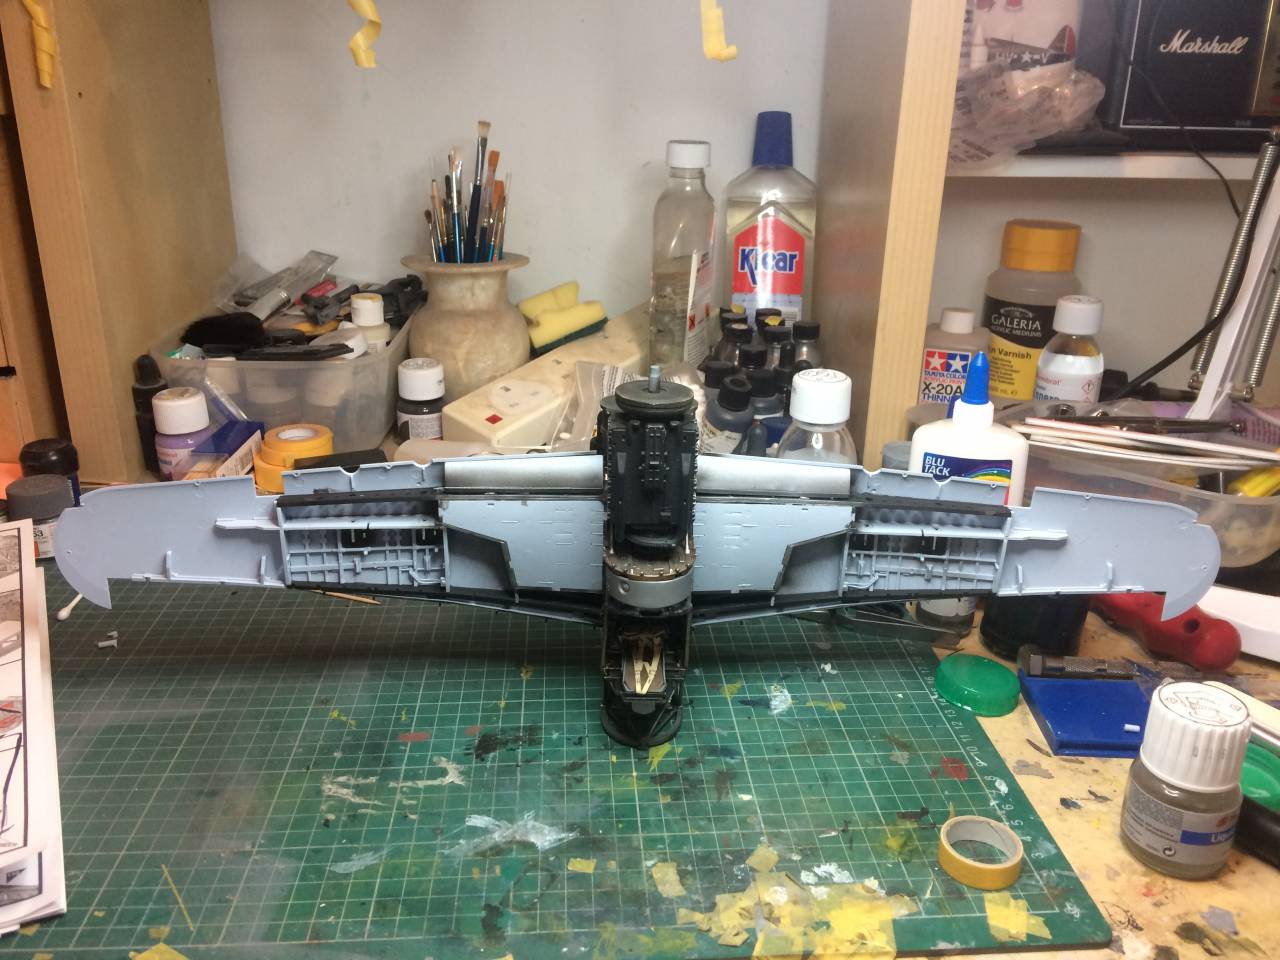
Just the guns to attach and then the top sections of the wings can go on.
It's not the same, better, but not the same...
Joel_W
Associate Editor New York, United States
Joined: December 04, 2010
KitMaker: 11,666 posts
AeroScale: 7,410 posts
Posted: Tuesday, November 07, 2017 - 01:35 AM UTC
Nigel,
Those wheel wells really do look rather good.
Joel
On my Workbench:
Monogram 1/24 scale 427 Shelby Cobra
Just Completed:
Beemax 1/24 scale BMW M3 E30 1992 Evolution II
Bayern, Germany
Joined: January 17, 2006
KitMaker: 673 posts
AeroScale: 492 posts
Posted: Tuesday, November 07, 2017 - 01:53 AM UTC
Awesome work on the wheel wells Nigel. Was it difficult to align the parts?
Ernest
#306
Victoria, Australia
Joined: June 27, 2010
KitMaker: 3,959 posts
AeroScale: 598 posts
Posted: Tuesday, November 07, 2017 - 03:37 AM UTC
Lovely work on the cockpit and wheel wells Nigel
Following along with interest
Stay home and build models!
In 1/72
Gloster Gladiator MkII for the Bi-planes Campaign
In 1/350
Airfix 1:350 Type 45 Destroyer


