

Air Campaigns
Want to start or join a group build? This is where to start.
Want to start or join a group build? This is where to start.
Hosted by Frederick Boucher, Michael Satin
OFFICIAL: Soviet Phoenix Campaign

c4willy

#305

Joined: February 01, 2006
KitMaker: 1,673 posts
AeroScale: 1,517 posts

Posted: Saturday, January 14, 2017 - 07:18 AM UTC
When I made the quip about who'd produce a 1/32 scale version of the Polikarpov I-153 I hadn't realised that Sliver Wings already had! But at $201.00 NZD I think that's going to have to wait.

BlackWidow

Joined: August 09, 2009
KitMaker: 1,732 posts
AeroScale: 1,336 posts
Posted: Saturday, January 14, 2017 - 03:34 PM UTC
Chris, no scale model kit is worth so much hard earned money. That are about 135 Euros, which is far beyond my wallet .... 
Anyway, first steps are made for Irina's bird. This little engine consists of 48 parts. Still needs to be painted, mainly black. I really hope it will fit in the nacelle later ....


Have a nice Sunday!
Torsten
Anyway, first steps are made for Irina's bird. This little engine consists of 48 parts. Still needs to be painted, mainly black. I really hope it will fit in the nacelle later ....
Have a nice Sunday!
Torsten

MichaelSatin


Joined: January 19, 2008
KitMaker: 3,909 posts
AeroScale: 2,904 posts
Posted: Saturday, January 14, 2017 - 08:31 PM UTC
Quoted Text
Another 1/32nd scale kit Micheal? And in resin to boot? Amazing!
Alas, I think Chris is right, I've bitten off more than I can chew what with all the other campaigns I'm in. I believe I'm shifting my build and, literally, down-scaling a bit. This seems a little more reasonable, but still interesting:


I still have two left. I've already done the type 24 and have a separate boxing of the type 10, so I think I'll go with either the 17 or 18 for this campaign.
Enjoying watching what everyone else is doing so far!
Michael


drabslab
Joined: September 28, 2004
KitMaker: 2,186 posts
AeroScale: 1,587 posts

Posted: Sunday, January 15, 2017 - 01:55 PM UTC
Quoted Text
Chris, no scale model kit is worth so much hard earned money. That are about 135 Euros, which is far beyond my wallet ....
Anyway, first steps are made for Irina's bird. This little engine consists of 48 parts. Still needs to be painted, mainly black. I really hope it will fit in the nacelle later ....
Have a nice Sunday!
Torsten
Very nice engine.
But how do you plan to paint this now that it is completely assembled? It seems impossible to me that all those different engine and frame parts must have the same color?


Bigrip74
Joined: February 22, 2008
KitMaker: 5,026 posts
AeroScale: 2,811 posts

Posted: Sunday, January 15, 2017 - 10:04 PM UTC
Michael, I see lots of parts for a small airplane. How easy or fast will this I-16 be?
Bob
Bob
MichaelSatin
Joined: January 19, 2008
KitMaker: 3,909 posts
AeroScale: 2,904 posts
Posted: Monday, January 16, 2017 - 12:35 AM UTC
Quoted Text
Michael, I see lots of parts for a small airplane. How easy or fast will this I-16 be?
Bob
Not to worry Bob, don't forget there are enough parts for two airplanes there (plus some extras). There were originally three in the box and I've already built one, so I know it's not a bad build at all.
Michael
Bigrip74
Joined: February 22, 2008
KitMaker: 5,026 posts
AeroScale: 2,811 posts
Posted: Wednesday, January 18, 2017 - 07:16 AM UTC
Attached the LG then taped the canopy and primed all ready for paint if the weather here will cooperate.


mrockhill
Joined: June 17, 2009
KitMaker: 566 posts
AeroScale: 507 posts

Posted: Wednesday, January 18, 2017 - 08:21 AM UTC
Been making progress on my yak-3. The fuselage is all buttoned up and her wings are on. The wing fuselage joint fit up perfectly

I opened up the gun troughs in the upper cowling and used some brass tube to make some blast tubes. The cowl piece itself was slightly oversized but easily sanded in.
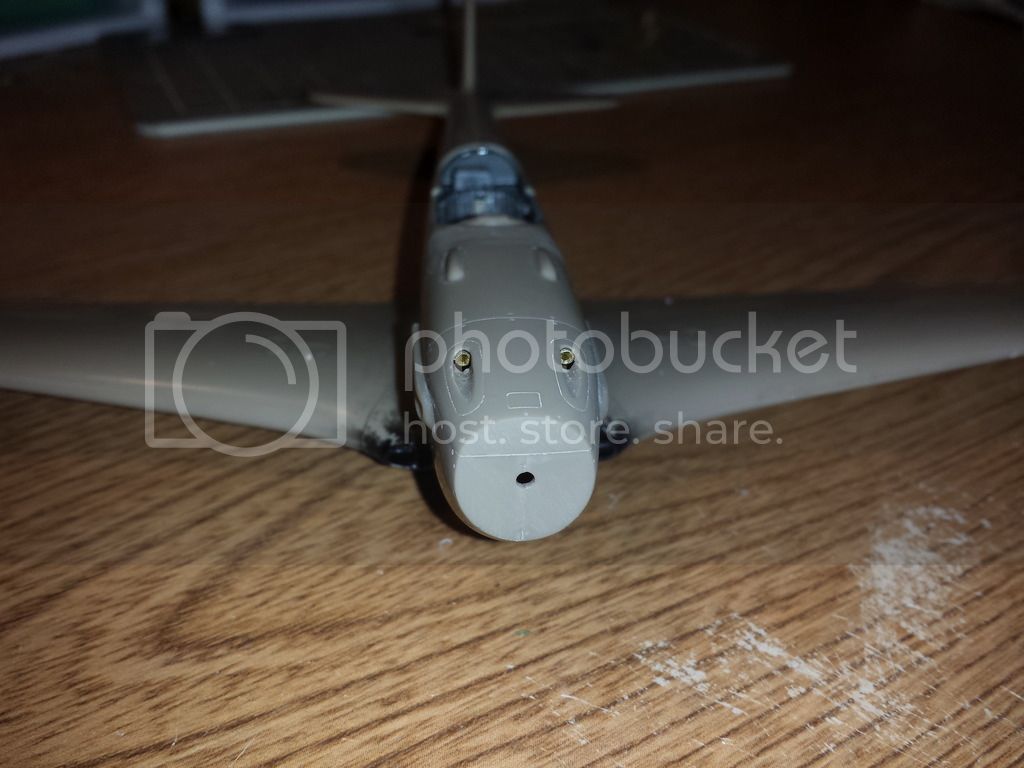
Next up will be to fit up the lower radiator housing,fab up some new trim tabs and hollow out the exhausts.
I opened up the gun troughs in the upper cowling and used some brass tube to make some blast tubes. The cowl piece itself was slightly oversized but easily sanded in.
Next up will be to fit up the lower radiator housing,fab up some new trim tabs and hollow out the exhausts.

Shrimpman

Joined: August 14, 2016
KitMaker: 148 posts
AeroScale: 123 posts
Posted: Wednesday, January 18, 2017 - 06:00 PM UTC
Mike, can I ask you what glue are you using for the brass tubes? I have had to build two exhaust tubes for my Po-2 as they were oddly missing (I found out different ICM Po-2 kits do have this part though). Anyway I have shaped them, but when I tried to stick them together with cyanoacrylate superglue, the bond was so weak it broke on touch.
Bigrip74
Joined: February 22, 2008
KitMaker: 5,026 posts
AeroScale: 2,811 posts
Posted: Wednesday, January 18, 2017 - 08:37 PM UTC
Mike, both the cockpit and nose look good.
mrockhill
Joined: June 17, 2009
KitMaker: 566 posts
AeroScale: 507 posts
Posted: Thursday, January 19, 2017 - 08:55 AM UTC
Hi shrimpman! In this case I did use CA and alot of it. I initially glued it down and got the attitude set and then flooded around it. The surface was rough too, I had to thin it out so the tubes would show through the troughs. In your case you might consider trying a 2 part epoxy. You can also try roughing up the contact surfaces or give the glue something to dry and grab on to.
Bob thanks for the compliments, Im really enjoying this build. Ive never built a yak before and I cant stop admiring its different looks. I see your 7V is coming along well! I have a couple of ICM's yak-7s in my stash, it nice to see one coming together.
Bob thanks for the compliments, Im really enjoying this build. Ive never built a yak before and I cant stop admiring its different looks. I see your 7V is coming along well! I have a couple of ICM's yak-7s in my stash, it nice to see one coming together.
c4willy
#305
Joined: February 01, 2006
KitMaker: 1,673 posts
AeroScale: 1,517 posts
Posted: Friday, January 20, 2017 - 02:31 PM UTC
Whilst I've got several other builds under way for other campaigns I'm still working on the Chaika. I've got it mostly complete although I won't progress any further till the photoetch parts for the cowl front and wing bracing turns up from mother Russia. So here's where I'm up to, it's been an easy enjoyable build that I've had fun with.


Scuse the resin dust I've been furiously sanding resin parts for the Pacific Coast Models Hawker Hurricane I'm building for one of those "other" campaigns.
Scuse the resin dust I've been furiously sanding resin parts for the Pacific Coast Models Hawker Hurricane I'm building for one of those "other" campaigns.
Bigrip74
Joined: February 22, 2008
KitMaker: 5,026 posts
AeroScale: 2,811 posts
Posted: Friday, January 20, 2017 - 10:13 PM UTC
Chris, those wings look nice a aligned and the desk looks cleaner than mine.
Bob
Bob
c4willy
#305
Joined: February 01, 2006
KitMaker: 1,673 posts
AeroScale: 1,517 posts
Posted: Saturday, January 21, 2017 - 12:30 AM UTC
Hi Bob thanks but looks can be deceiving the bottom wings deviate slightly not easily seen in the pics but there. My bench just seems clean Bob because I tidied up before taking these pics. However I've not seen your bench so it may well be more of a clutter than mine. I'me working on building a man cave outside of the house (Shed) so I can get back some room and organise myself a little better. (And my wife will be ecstatic to get my uh "stuff" out of the house her words are stronger)

Bigrip74
Joined: February 22, 2008
KitMaker: 5,026 posts
AeroScale: 2,811 posts
Posted: Saturday, January 21, 2017 - 12:34 AM UTC
Chris, all I could do was laugh after reading the wife comment. Many well wishes on your man cave completion don't forget the vent fan.
Bob
Bob
Shrimpman
Joined: August 14, 2016
KitMaker: 148 posts
AeroScale: 123 posts
Posted: Saturday, January 21, 2017 - 04:42 PM UTC
Good one! My entire working space is about 3 square feet of a living room table. Wife not too happy. Anyway, I've mae some progress on my Po-2. I've managed to attach he wings, I was realy dreading that step, but all went well, I did not break any struts and somehow managed not to mess up my paintwork, which is a huge success for me. I followed your advice: I attached the fuselage struts first, and placed the top wing to get the right angle, carefully aligned the wing and let it harden. Then I took the top wing off, attached the wing struts to the bottom wing and pushed them further to the sides and then, whole wing struts were still soft, I glued in the top wings to the fixed fuselage struts and then I pushed the wing struts into to holes in the top wing. I have had trouble with the decals, they turned out extremely thin and much more brittle than I expected and sadly one of the red stars broke to pieces when I applied them. I managed to rescue that by pushing the broken pieces together and painting on the mising bits. Now it's time for the strings, and there's a lot of them, and the engine. It's not a great build, but so far I am very happy with myself, I made much fewer bad mistakes than on my previous models and my technique must have improved a lot, so far I have not broken any pieces, while few months before when I worked on ICM model, I spent more time fixing broken parts then building the plane.


BlackWidow
Joined: August 09, 2009
KitMaker: 1,732 posts
AeroScale: 1,336 posts
Posted: Saturday, January 21, 2017 - 06:24 PM UTC
Bob, nice work on your Yak 7. I have the same kit here twice, 1 in winter camo with skis and a summer version with wheels. But I haven't tackeled both kits yet.
Shrimpman, nice "sewing machine" there. That's how the Wehrmacht called this aircraft when the "Night Witches" came in with them to disturb.
Anyway, I have also some progress on my Peschka. Wings and gondolas are ready and the interior is painted with Dark Grey 378 from Revell. The engine is airbrushed with Black 8 also from Revell. Now comes the detail painting ....
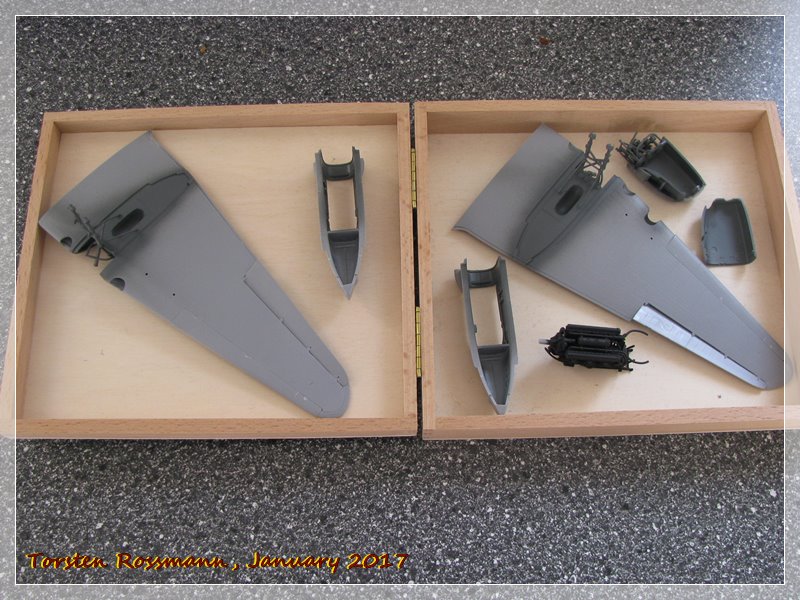


Next steps will be assembling and painting the fuselage. Still a long way to go ....
Have a nice Sunday!
Torsten
Shrimpman, nice "sewing machine" there. That's how the Wehrmacht called this aircraft when the "Night Witches" came in with them to disturb.
Anyway, I have also some progress on my Peschka. Wings and gondolas are ready and the interior is painted with Dark Grey 378 from Revell. The engine is airbrushed with Black 8 also from Revell. Now comes the detail painting ....
Next steps will be assembling and painting the fuselage. Still a long way to go ....
Have a nice Sunday!
Torsten
MichaelSatin
Joined: January 19, 2008
KitMaker: 3,909 posts
AeroScale: 2,904 posts
Posted: Saturday, January 21, 2017 - 07:20 PM UTC
Shrimpman: Very well done indeed! You're on the way for sure!
Torsten: Looking good my friend!
Michael
Torsten: Looking good my friend!
Michael
c4willy
#305
Joined: February 01, 2006
KitMaker: 1,673 posts
AeroScale: 1,517 posts
Posted: Friday, January 27, 2017 - 03:03 PM UTC
Looking damn fine Shrimpman the Po-2 is coming along very nicely.
Torsten the engine looks bloody good! That's a very good looking kit gonna have to add this to my "must get" list.
Torsten the engine looks bloody good! That's a very good looking kit gonna have to add this to my "must get" list.
BlackWidow
Joined: August 09, 2009
KitMaker: 1,732 posts
AeroScale: 1,336 posts
Posted: Friday, January 27, 2017 - 06:39 PM UTC
Yes, you should do that, Chris! It's really a fine kit and I'm amazed about the fitting. Comes close to Tamiya. I can only congratulate Zvezda for this kit. My only worries at the moment are how the engine will fit in the nacelle. I'll see ....
Right now I work on the fuselage interior and the bomb bay. 435 parts want to be glued together .... Hopefully I can throw some paint on it tomorrow and show some photos next week then.
Torsten
Right now I work on the fuselage interior and the bomb bay. 435 parts want to be glued together .... Hopefully I can throw some paint on it tomorrow and show some photos next week then.
Torsten
Bigrip74
Joined: February 22, 2008
KitMaker: 5,026 posts
AeroScale: 2,811 posts
Posted: Friday, January 27, 2017 - 07:49 PM UTC
Shrimpman, I have passed that kit many times because it is a bi-plane, but you make it look easy. Nice job.
Torsten, "DITTO" what Chris stated. Nice looking kit and the engines are eye catchers.
Bob
Torsten, "DITTO" what Chris stated. Nice looking kit and the engines are eye catchers.
Bob
Shrimpman
Joined: August 14, 2016
KitMaker: 148 posts
AeroScale: 123 posts
Posted: Sunday, January 29, 2017 - 04:09 AM UTC
Finally, my Po-2 is finished! This is my best model yet and it's been a great build, although very exhausting at times. I need an Airfix now to recover. It does not look as great and clean as your planes, but I am still very proud of myself. I have scratch-built some parts, including the ammo crates. I've learned a lot, I can see progress, I did not mess up as bad as I usually do, even though the rigging got me cursing a little.


MichaelSatin
Joined: January 19, 2008
KitMaker: 3,909 posts
AeroScale: 2,904 posts
Posted: Sunday, January 29, 2017 - 04:54 AM UTC
I think it looks great SM!
Michael
Michael

Lakota
#123
Joined: November 17, 2008
KitMaker: 1,202 posts
AeroScale: 292 posts
Posted: Sunday, January 29, 2017 - 05:14 AM UTC
Great job Shrimpman. That is one sweet model.
Take care,
Don "Lakota"
Take care,
Don "Lakota"
c4willy
#305
Joined: February 01, 2006
KitMaker: 1,673 posts
AeroScale: 1,517 posts
Posted: Monday, January 30, 2017 - 01:39 PM UTC
Hi Shrimpman awesome work buddy your Po-2 looks ready to take off and harass some Germans.
 |

WEB HOSTING BY


Copyright ©2021 AeroScale and Kitmaker Network, a subsidiary of Silver Star Enterprises
All Rights Reserved. Please read our Conditions of Use and Privacy Policy.
All Rights Reserved. Please read our Conditions of Use and Privacy Policy.