Air Campaigns
Want to start or join a group build? This is where to start.
OFFICIAL: The Sign of the Four Campaign
BoiseBlade
#523
_VISITCOMMUNITY
Idaho, United States
Joined: February 28, 2014
KitMaker: 342 posts
AeroScale: 250 posts
Posted: Thursday, June 23, 2016 - 01:26 AM UTC
Roland,

You are correct changes came after Korea to deck crew.
But I have this book and others as well and they state "Purple as fueling. They did not have "Grapes" in WWII in any accounts that I could find. I know, who knew osprey could make mistakes.
I think the old adage is in play hear, Don't believe anything you hear and only half of what you see.
Or as we said in the NAVY: "In God we trust, all others bring data."

From Naval History and Heritage Command website.
"The red color is no mistake as the crewmen that wear this color are usually near very hazardous things or situations. Ordnance handlers deal with building, moving and mounting weapons and arming the air wing’s aircraft.
Fuel handlers, crash and salvage crews also wear red.

Also an account from "Before it’s too Late" – Dave Harrelson
“When I first went on the Lexington I was asked if I wanted to push airplanes or fuel them. There was no doubt about what I wanted. I figured A fuel hose is a lot lighter than an airplane.” When asked what he wore on deck he stated, “I wore a red shirt and skull cap. The hearing protection was simply ear plugs.”

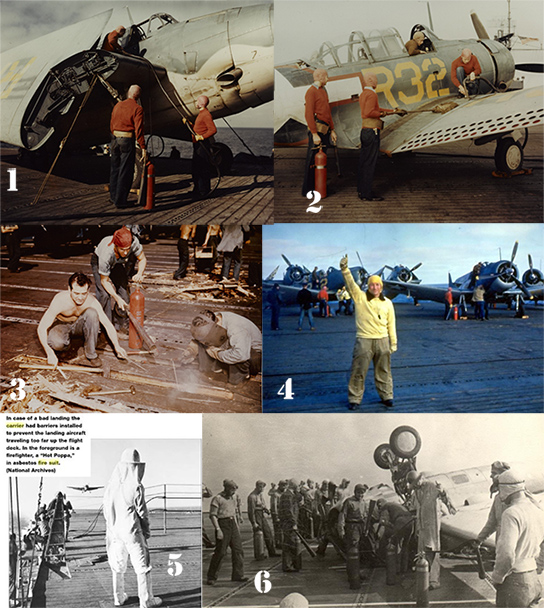
Also from the Naval History and Heritage Command website these images I also copied the Descriptions for you.

1) Title: Aircraft Refueling Crew, Grumman TBF-1, circa 1943
Caption: Aircraft Refueling Crew in red caps and jerseys refuel a Grumman TBF-1 on the flight deck of a training escort carrier, circa Mid-1943. Note Team Man standing by with fire extinguisher. Planes are refueled as soon as possible after landing, and the "Smoking Lamp" is out throughout the ship during exercise.
Description: color
Catalog #: 80-G-K-2643
Copyright Owner: National Archives

2)Title: Refueling Detail, Douglas SBD, circa 1943
Caption: Refueling Detail (red caps and jerseys) refueling a Douglas SBD, on the flight deck of a training escort carrier, circa mid-1943. Detail consists of hose man, swab man, and fire extinguisher (CO2) man. Plane captain (brown cap and jersey) is in the cockpit.
Description: color
Catalog #: 80-G-K-2642
Copyright Owner: National Archives

3) Title: Flight Deck Repair Party
Caption: At work on an aircraft carrier. Note fire extinguisher ready to put out any fires causes by welding near the wooden deck. Ship maybe USS YORKTOWN -CV -10
Description:
Catalog #: 80-G-K-4809
Copyright Owner: NARA

4) Title: DOUGLAS SBD - 5 "DAUNTLESS" Aircraft
Caption: Receives maintenance on an aircraft carrier flight deck, circa 1943-44. Photo was taken prior to April 1944.
Description:
Catalog #: 80-G-K-13690
Copyright Owner: National Archives

5) A "Hot Papa" I am trying to find specific information on if they were their own group or were Reds as well.
Their main job was to get pilots out of burning AC.

6) A General Motors FM-2 "Wildcat" fighter upended after a barrier crash on board USS Sable (IX-81), during pilot training in the Great Lakes, May 1945. Another FM-2 is flying past in top center
The USS Sable was a training carrier at Great lakes (Old Passenger Steamer SS Greater Buffalo) I know BW images a hard to tell color but Guy at left holding Extinguisher looks like a red as well.

Hope this helps. BTW you can download the color images from the site in Low, Medium and High Quality.

And yes I know the Caps look brownish in the photos but if you get the larger ones you can tell they are RED, just a real ugly red.

Namabiiru
Staff MemberAssociate Editor
MODEL SHIPWRIGHTS
#399
_VISITCOMMUNITY
Rhode Island, United States
Joined: March 05, 2014
KitMaker: 2,888 posts
AeroScale: 307 posts
Posted: Thursday, June 23, 2016 - 02:30 AM UTC
Incremental progress on the Flak 43.

Pre-pre-shade of AK Portland Stone followed by pre-shade of AV German Grey on the gun assembly and Armor Red-Brown on everything else.


AussieReg
Staff MemberAssociate Editor
AUTOMODELER
#007
_VISITCOMMUNITY
Victoria, Australia
Joined: June 09, 2009
KitMaker: 8,156 posts
AeroScale: 3,756 posts
Posted: Thursday, June 23, 2016 - 03:15 AM UTC
Excellent paint job mark, looks good.

Roland, your dio idea is great, really coming together, and obviously creating a lot of interest. I'm looking forward to more progress pics.

Cheers, D
duckdawgs
_VISITCOMMUNITY
California, United States
Joined: August 01, 2010
KitMaker: 143 posts
AeroScale: 55 posts
Posted: Thursday, June 23, 2016 - 11:41 AM UTC
Thanks Jeff for the info & great pics. I couldn't find any pictures of 'grapes' in WW2 or Korea either, but I did find some pictures of 'grapes' fueling some jets around the mid 70's. Now that I know the red shirts were used in crash/salvage, the arresting gear figure will now be a redshirt, mainly cause it gives me a good reason to have the color red in my diorama... As far as the hot pappas go I just so happen to have a figure in my stash that I can convert into one, its wearing some kind of hazmat suit, but that one will be in my 'Crashed Corsair pt2' diorama along with white shirts medical teams and a couple of senior officers. I plan on having all the colors represented in that project. Thanks for the picture of the lifebelt too, I found some great photos of some on google. I've always wondered what that was. 
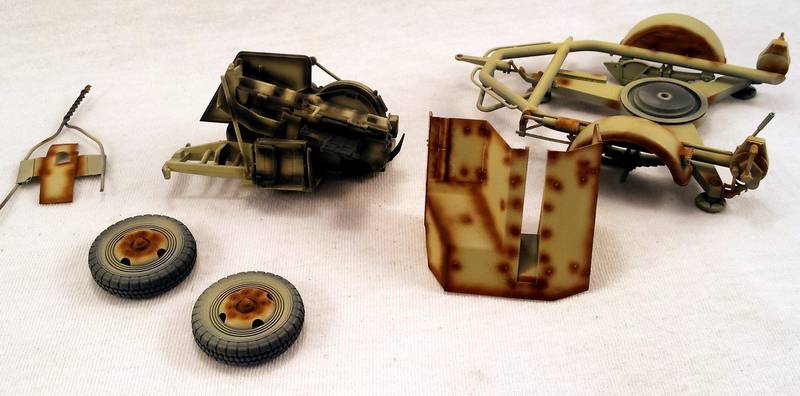
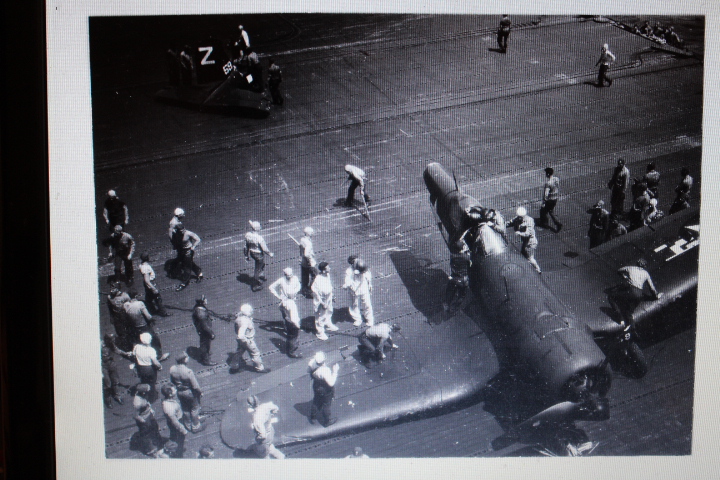
You can't see it in this picture but the guy in the lower left corner is wearing a lifebelt showing the two tubes in the rear. The picture was originally from a website VBF-85.com, and on the site you can click on this image (and others) and get super zoom on chosen parts of the image. This guy is wearing a shirt that says 'arresting gear crew'. As for the "tail section' dio I have no actual build photos yet as its still in layout & concept stage. The tractor still has to be built and I will be super detailing that also, the tractor was actually the original idea for starting this particular diorama. But some genius at Aeroscale decided to suggest this "Sign of the Four" campaign and now here I am I still have to purchase a contour gauge so I can start making the internal ribbing, start collecting plastic/metal sheets, plastic beams, and rods/bars/tubes. I hope I can do one figure a week, than use the remaining months building the tail section and the tractor, but with life and two toddler sons running around I've got to be really creative budgeting my modeling time Hope everybody else's projects are going smoothly also. Happy modeling
BoiseBlade
#523
_VISITCOMMUNITY
Idaho, United States
Joined: February 28, 2014
KitMaker: 342 posts
AeroScale: 250 posts
Posted: Thursday, June 23, 2016 - 06:14 PM UTC
Great Roland!
I will be happily watching your builds on both.
These are excellent ideas for dioramas and I look forward to watching them come together.
Sometime in the future I may have to take your work as an example and do a Navy AC diorama myself. I have not done one before. Actually I have only done a few dioramas so far. I need to start doing more.
SaxonTheShiba
_VISITCOMMUNITY
United States
Joined: February 01, 2009
KitMaker: 1,233 posts
AeroScale: 663 posts
Posted: Friday, June 24, 2016 - 11:41 PM UTC
Everybody's projects look great thus far. I started my Monogram 1/48th scale F-4D. I used the kit cockpit but added metal wiring to the WSO's panel. Also, I added straps to the seats which were made from lead foil. Photo etch buckles were added to the straps as well. The cockpit was given a wash of Pledge Floor Wax which was tinted with black paint. I actually closed the fuselage up this afternoon but don't have a photo yet. More to follow!!!

Best wishes,


Ian


GazzaS
#424
_VISITCOMMUNITY
Queensland, Australia
Joined: April 23, 2015
KitMaker: 4,648 posts
AeroScale: 1,938 posts
Posted: Saturday, June 25, 2016 - 02:27 AM UTC
Ian,
Nice looking pit. Good job on those ejection seat handles.

Gaz
SaxonTheShiba
_VISITCOMMUNITY
United States
Joined: February 01, 2009
KitMaker: 1,233 posts
AeroScale: 663 posts
Posted: Saturday, June 25, 2016 - 02:38 AM UTC
Thanks, Gary. Actually drew on the black with a Micron Ink Pen.

Best wishes,

Ian
BoiseBlade
#523
_VISITCOMMUNITY
Idaho, United States
Joined: February 28, 2014
KitMaker: 342 posts
AeroScale: 250 posts
Posted: Saturday, June 25, 2016 - 02:55 AM UTC
Ian,

You really did an nice job on that Monogram cockpit.
It looks really good.
SaxonTheShiba
_VISITCOMMUNITY
United States
Joined: February 01, 2009
KitMaker: 1,233 posts
AeroScale: 663 posts
Posted: Saturday, June 25, 2016 - 02:58 AM UTC
Thanks Jeff. A little TLC can do wonders for an old Monogram war dog.

Best wishes,

Ian
Namabiiru
Staff MemberAssociate Editor
MODEL SHIPWRIGHTS
#399
_VISITCOMMUNITY
Rhode Island, United States
Joined: March 05, 2014
KitMaker: 2,888 posts
AeroScale: 307 posts
Posted: Saturday, June 25, 2016 - 04:41 PM UTC
That pilot's office is truly impressive!

SaxonTheShiba
_VISITCOMMUNITY
United States
Joined: February 01, 2009
KitMaker: 1,233 posts
AeroScale: 663 posts
Posted: Saturday, June 25, 2016 - 05:05 PM UTC
Thank you Mark!

Best wishes,

Ian
Stoker
_VISITCOMMUNITY
Nova Scotia, Canada
Joined: February 07, 2015
KitMaker: 58 posts
AeroScale: 19 posts
Posted: Sunday, June 26, 2016 - 05:57 AM UTC
Hi Everybody

Have some progress on my Canuck. Did some painting on the cockpit and wheel wells. Finally started to get gluing things together today,mostly fit together good with the exception of around the engine intakes.

Next up is some filling and sanding before I put the pieces together.

Ron
AussieReg
Staff MemberAssociate Editor
AUTOMODELER
#007
_VISITCOMMUNITY
Victoria, Australia
Joined: June 09, 2009
KitMaker: 8,156 posts
AeroScale: 3,756 posts
Posted: Sunday, June 26, 2016 - 08:58 AM UTC
Ian, lovely work on the office. As you said, a little TLC and the old Monogram kits can really shine!

Ron, nice start to the Hobby Craft kit, looking forward to this one coming together. I haven't seen many Canucks built up, its a nice looking design.

Cheers, D
bomber14
_VISITCOMMUNITY
New Jersey, United States
Joined: February 02, 2015
KitMaker: 330 posts
AeroScale: 286 posts
Posted: Sunday, June 26, 2016 - 09:08 AM UTC
i'm a little late in signing up but here is my entry. my favorite U.S. fighter the corsair.this is an korean war era f4u-4. it is one of the first kits i bought, sitting in my closet for at least 15 yrs.it then has sat on a shelf under my bench for about a year before i finally started it about a week ago.my intention is to do something i never attempted before, add a electric motor to it an pose it in flight, possibly firing a rocket. my fallback is to make a prop blur type of prop if the motor does not work.

here is the version i want to do. the hobbyboss kit has the same decal in it but it has white and brown bands on the cowl. this kit shows just a white band. does anyone know which is correct?

and here is what i have done so far. just have to figure out a way to mount the motor. there were no rockets in the kit so i plan to use some from the parts box.

joe
AussieReg
Staff MemberAssociate Editor
AUTOMODELER
#007
_VISITCOMMUNITY
Victoria, Australia
Joined: June 09, 2009
KitMaker: 8,156 posts
AeroScale: 3,756 posts
Posted: Sunday, June 26, 2016 - 07:18 PM UTC
Wings together, nacelles fitted quite well with only a little bit of carving and trimming to match the profile of the wing.


Once again I used my home made styrene&cement putty to clean up the slightly gappy joins.

Cheers, D
GazzaS
#424
_VISITCOMMUNITY
Queensland, Australia
Joined: April 23, 2015
KitMaker: 4,648 posts
AeroScale: 1,938 posts
Posted: Monday, June 27, 2016 - 02:45 AM UTC
Some nice wheel well detail there, Damian.

Interesting to see that Corsair with an E-motor in it.

Gaz
Namabiiru
Staff MemberAssociate Editor
MODEL SHIPWRIGHTS
#399
_VISITCOMMUNITY
Rhode Island, United States
Joined: March 05, 2014
KitMaker: 2,888 posts
AeroScale: 307 posts
Posted: Monday, June 27, 2016 - 04:00 AM UTC
Some record shots of the Flak 43 before I move on to the next phase:


I'm quite pleased with the finish on this one--I think it is as close to the look I set out to achieve as I have ever been able to pull off. Unfortunately, in order to maintain continuity with my original plan to show this in tow behind an SdKfz 251 I'm going to next have to cover most of it with mud and dirt.

SaxonTheShiba
_VISITCOMMUNITY
United States
Joined: February 01, 2009
KitMaker: 1,233 posts
AeroScale: 663 posts
Posted: Monday, June 27, 2016 - 05:08 AM UTC
Mark---That finish is simply beautiful. Really nicely done.

Damian---Looking forward to the rest of your Privateer. Those are beautiful birds.

Joe--Great to see a Corsair. In answer to your question, I believe that should be a dark brown ring behind the white on the cowling. I have the original Trumpeter 1/32 scale Dash Four which was produced with a Aeromaster/Cartograf sheet and the snake scheme was one of the options. It clearly shows a white and brown cowling in the schematics.

Best wishes,


Ian
SaxonTheShiba
_VISITCOMMUNITY
United States
Joined: February 01, 2009
KitMaker: 1,233 posts
AeroScale: 663 posts
Posted: Monday, June 27, 2016 - 05:18 AM UTC
Joe, this may illustrate things better.

Regards,

Ian

GazzaS
#424
_VISITCOMMUNITY
Queensland, Australia
Joined: April 23, 2015
KitMaker: 4,648 posts
AeroScale: 1,938 posts
Posted: Monday, June 27, 2016 - 05:57 AM UTC
Mark,
Great weathering on the flak!

Gaz
testpro
#383
_VISITCOMMUNITY
Ohio, United States
Joined: November 22, 2012
KitMaker: 36 posts
AeroScale: 3 posts
Posted: Monday, June 27, 2016 - 06:23 AM UTC
hello all. this is my first campaign. so here is my model of choice M4A3 Early 75 mm. ok how do I add photos to this? a little confused.
bomber14
_VISITCOMMUNITY
New Jersey, United States
Joined: February 02, 2015
KitMaker: 330 posts
AeroScale: 286 posts
Posted: Monday, June 27, 2016 - 08:03 AM UTC

Quoted Text

Joe, this may illustrate things better.

Regards,

Ian


thanks Ian. brown it will be. i like the white/brown better anyway. don't know why hasegawa didn't include rockets in the kit. they also have the wrong pilot figure. he is clearly in WWII garb when the decals and box art show korean war timeframe. i think i will trade heads with a standing korean war pilot wearing a helmet.
bomber14
_VISITCOMMUNITY
New Jersey, United States
Joined: February 02, 2015
KitMaker: 330 posts
AeroScale: 286 posts
Posted: Monday, June 27, 2016 - 08:07 AM UTC

Quoted Text

hello all. this is my first campaign. so here is my model of choice M4A3 Early 75 mm. ok how do I add photos to this? a little confused.


hi ron. what i do is click the image tab below on the right. highlight and delete all type between the two img tabs and cu/paste your image between them.
took me a while to figure it out too.
joe
Namabiiru
Staff MemberAssociate Editor
MODEL SHIPWRIGHTS
#399
_VISITCOMMUNITY
Rhode Island, United States
Joined: March 05, 2014
KitMaker: 2,888 posts
AeroScale: 307 posts
Posted: Monday, June 27, 2016 - 04:34 PM UTC
Ian, Gaz; Thanks for the kind words.

Ron, Check out this forum thread on uploading and pasting photos: https://archive.kitmaker.net/forums/120940&page=1

The simplest way to add a photo from the gallery to a forum post is to click the icon to the right of the "Linked Thumbnail" box, copy the contents of the "HTML Code" box, and post that directly into your post.