British Columbia, Canada
Joined: September 03, 2009
KitMaker: 6,965 posts
AeroScale: 6,247 posts
Posted: Friday, February 26, 2016 - 11:57 PM UTC
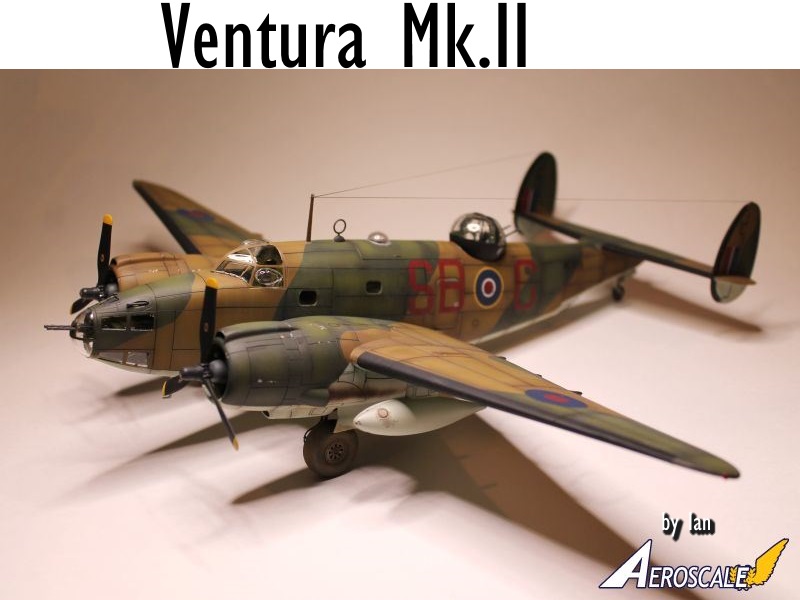
Ian has a nice fresh take on the Revell Ventura.
 Link to Item
If you have comments or questions please post them here.
Thanks!
When once you have tasted flight you will walk the Earth with your eyes turned skyward.
For there you have been, and there you will always long to return.
-Leonardo Da Vinci
SgtRam
 Editor-at-Large
#197
Ontario, Canada
Joined: March 06, 2011
KitMaker: 3,971 posts
AeroScale: 511 posts
Posted: Saturday, February 27, 2016 - 12:32 AM UTC
Great looking build, and great paint job.
United States
Joined: February 01, 2009
KitMaker: 1,233 posts
AeroScale: 663 posts
Posted: Saturday, February 27, 2016 - 01:03 AM UTC
Thanks for the kind words, Kevin. I have been waiting for this kit for years.
Best wishes,
Ian


It is a fact that under equal conditions, large-scale battles and whole wars are won by troops which have a strong will for victory, clear goals before them, high moral standards, and devotion to the banner under which they go into battle.
-Georgy Zhukov
European Union
Joined: August 09, 2009
KitMaker: 1,732 posts
AeroScale: 1,336 posts
Posted: Saturday, February 27, 2016 - 01:54 AM UTC
Well built and a nice paint job on this model, Ian. Thanks for sharing your work, though I would have loved to see a photo from the underside. Here in Germany Revell comes out with the kit this year and I'm really happy about it. Wonder what decals they offer. I have the ones you used already from Hannants. Was it difficult to mask, paint and install the top turret?
Torsten
My campaigns for 2020:
MiGs - Done !
The Big Three - Done !
65 years Bundeswehr - Done !
40 years Leopard 2 - Done !
Land Lease - Done !
United States
Joined: February 01, 2009
KitMaker: 1,233 posts
AeroScale: 663 posts
Posted: Saturday, February 27, 2016 - 02:05 AM UTC
Torsten, thanks for the compliment. The masks supplied with the kit were first rate so that helped a lot with the turret. The masks went on well but the instructions regarding what pieces go where on the turret were a little complicated. The turret halves fit great but the bottom of the turret had tabs to fit in the notches in the fuselage. The fit between the tabs and the notches was horrible so I ended up removing the tabs and enlarging the hole in the fuselage for the turret to fit. It was then secured with white glue. Sorry for the lack of an underside shot. I had already rigged it and was having logistical difficulty in getting a good shot over the background, upside down, without breaking it.

I am glad to see this kit is supposed to be released overseas, FINALLY. Hopefully RoG will supply some good decal options for their version too.
Best wishes,
Ian
It is a fact that under equal conditions, large-scale battles and whole wars are won by troops which have a strong will for victory, clear goals before them, high moral standards, and devotion to the banner under which they go into battle.
-Georgy Zhukov
United States
Joined: February 21, 2015
KitMaker: 36 posts
AeroScale: 36 posts
Posted: Saturday, February 27, 2016 - 07:07 AM UTC
Very nicely done. Excellent paint job, a great looking model.
United States
Joined: February 01, 2009
KitMaker: 1,233 posts
AeroScale: 663 posts
Posted: Saturday, February 27, 2016 - 07:56 AM UTC
Thanks for the kind words. Hope you are well, Burt.
Best wishes,
Ian
It is a fact that under equal conditions, large-scale battles and whole wars are won by troops which have a strong will for victory, clear goals before them, high moral standards, and devotion to the banner under which they go into battle.
-Georgy Zhukov
AussieReg
Associate Editor #007
Victoria, Australia
Joined: June 09, 2009
KitMaker: 8,156 posts
AeroScale: 3,756 posts
Posted: Saturday, February 27, 2016 - 02:12 PM UTC
Beautiful build and I love the paint work.
Cheers, D
ON the bench
Revell 1/24 '53 Corvette (building as '54)
Revell 1/24 BMW 507 Coupe and Cabrio
Italeri 1/48 Me262 B-1a/U1 Nightfighter
Monogram 1/24 '57 Chevy Nomad
Dragon 1/350 USS Frank Knox DD-742
United States
Joined: February 01, 2009
KitMaker: 1,233 posts
AeroScale: 663 posts
Posted: Saturday, February 27, 2016 - 06:52 PM UTC
Damian, thanks for looking and commenting. Glad you liked it.
Best wishes,
Ian
It is a fact that under equal conditions, large-scale battles and whole wars are won by troops which have a strong will for victory, clear goals before them, high moral standards, and devotion to the banner under which they go into battle.
-Georgy Zhukov
#482
United States
Joined: February 08, 2015
KitMaker: 83 posts
AeroScale: 14 posts
Posted: Saturday, February 27, 2016 - 09:01 PM UTC
Beautiful! Excellent job, Ian.
United States
Joined: February 01, 2009
KitMaker: 1,233 posts
AeroScale: 663 posts
Posted: Saturday, February 27, 2016 - 09:02 PM UTC
Thanks Bob!
Best wishes,
Ian
It is a fact that under equal conditions, large-scale battles and whole wars are won by troops which have a strong will for victory, clear goals before them, high moral standards, and devotion to the banner under which they go into battle.
-Georgy Zhukov
Joel_W
Associate Editor New York, United States
Joined: December 04, 2010
KitMaker: 11,666 posts
AeroScale: 7,410 posts
Posted: Sunday, February 28, 2016 - 07:28 AM UTC
Ian,
What an absolutely fantastic build of a rather difficult and complex kit. I've been thinking of one day sooner then later to build this variant as well, but keeping the kit basically stock as you've found that Revell has corrected most of the major issues.
I'm particularly impressed with how you corrected the missing two greenhouse glass blisters. One would never know that you made those corrections, as they look molded on.
Your British paint camo scheme matches up quite well with my references. Very nicely done. Weathering isn't overly done, leaving one with the impression of a rather well maintained operational aircraft.
I do feel your frustration with those 4 piece bomb bay doors, brackets, and mounting brackets. They nearly drove me nuts. Quite fiddly to say the least. But having them closed really adds to the overall sleekness of the aircraft's lines.
And Ian, I certainly do want to thank you for your most kind and sincere words about my PV-1 and build blog. It means quite a lot to me that fellow members would even consider taking the time to mention it.
Joel
On my Workbench:
Monogram 1/24 scale 427 Shelby Cobra
Just Completed:
Beemax 1/24 scale BMW M3 E30 1992 Evolution II
United States
Joined: February 01, 2009
KitMaker: 1,233 posts
AeroScale: 663 posts
Posted: Sunday, February 28, 2016 - 07:53 AM UTC
Thanks for the kind words, Joel! I must say, seeing your Ventura did certainly inspire me to get this one done because my project was drifting into "hangar queen" territory. As luck would have it, I think a company in the UK just released an aftermarket canopy with the blisters molded on. Hopefully that will save some modellers from the "cutting and blending" method.
Best wishes,
Ian
It is a fact that under equal conditions, large-scale battles and whole wars are won by troops which have a strong will for victory, clear goals before them, high moral standards, and devotion to the banner under which they go into battle.
-Georgy Zhukov
Cordoba, Argentina
Joined: January 27, 2011
KitMaker: 268 posts
AeroScale: 264 posts
Posted: Sunday, February 28, 2016 - 05:15 PM UTC
Scotland, United Kingdom
Joined: May 11, 2015
KitMaker: 768 posts
AeroScale: 656 posts
Posted: Sunday, February 28, 2016 - 06:02 PM UTC
Your paint scheme is top notch; i'm impressed by the variation in colour especially the mottled green. Is this the effect you achieved with the Tamiya smoke post shade? It certainly breaks up the monotony of large areas of flat colour.
Pax & Pallets: Revell 1/48 Dakota
Terrible Teens : Revell 1/48 F15E Strike Eagle
Airfix IV : Airfix 1.72 Vulcan
United States
Joined: February 01, 2009
KitMaker: 1,233 posts
AeroScale: 663 posts
Posted: Sunday, February 28, 2016 - 09:02 PM UTC
Diego---Thank you!
Paul----The finish is essentially layered post shading. As I apply each layer of the camo, I post shade with a lightened shade of the base color. The Sky Type S post shade was created by lightening it with white. The brown and green post shade tint was created by lightening both colors with yellow. I like to use yellow rather than white because the white makes things more greyish. The Tamiya Smoke was used to shade the panel lines after they had been drawn with the Micron Pen. Thanks for looking and commenting.
Best wishes,
Ian
It is a fact that under equal conditions, large-scale battles and whole wars are won by troops which have a strong will for victory, clear goals before them, high moral standards, and devotion to the banner under which they go into battle.
-Georgy Zhukov


