

Busy working away on the remaining flaps today but looking into other areas i want to get reference for.
Found this fantastic resource - a set of panoramic photos inside "Just Jane" :
https://www.haraldjoergens.com/panoramas/lancaster/
It's too difficult knowing exactly what modifications were made to each aircraft unless you have good reference of the exact plane you're building so i'll pick and choose my battles!
Hosted by Rowan Baylis
Building Tamiya's 1/48 Lancaster

KelticKnot

Joined: May 11, 2015
KitMaker: 768 posts
AeroScale: 656 posts
Posted: Monday, February 22, 2016 - 04:47 PM UTC


greif8

Joined: January 17, 2006
KitMaker: 673 posts
AeroScale: 492 posts

Posted: Tuesday, February 23, 2016 - 12:34 PM UTC
Very nice scratch building and modifications thus far Paul.
KelticKnot
Joined: May 11, 2015
KitMaker: 768 posts
AeroScale: 656 posts
Posted: Tuesday, February 23, 2016 - 10:30 PM UTC
Thanks Ernest, I'm pretty new to the dark arts of scratchbuilding. I'm making it all up as I go! 
I've managed to get in some good time so far this week :
I've managed to get in some good time so far this week :

GazzaS

#424

Joined: April 23, 2015
KitMaker: 4,648 posts
AeroScale: 1,938 posts

Posted: Tuesday, February 23, 2016 - 11:09 PM UTC
Wow, Paul, you're really cruising along at a tedious task and making it look great!
Gary
Gary
KelticKnot
Joined: May 11, 2015
KitMaker: 768 posts
AeroScale: 656 posts
Posted: Thursday, February 25, 2016 - 07:00 PM UTC
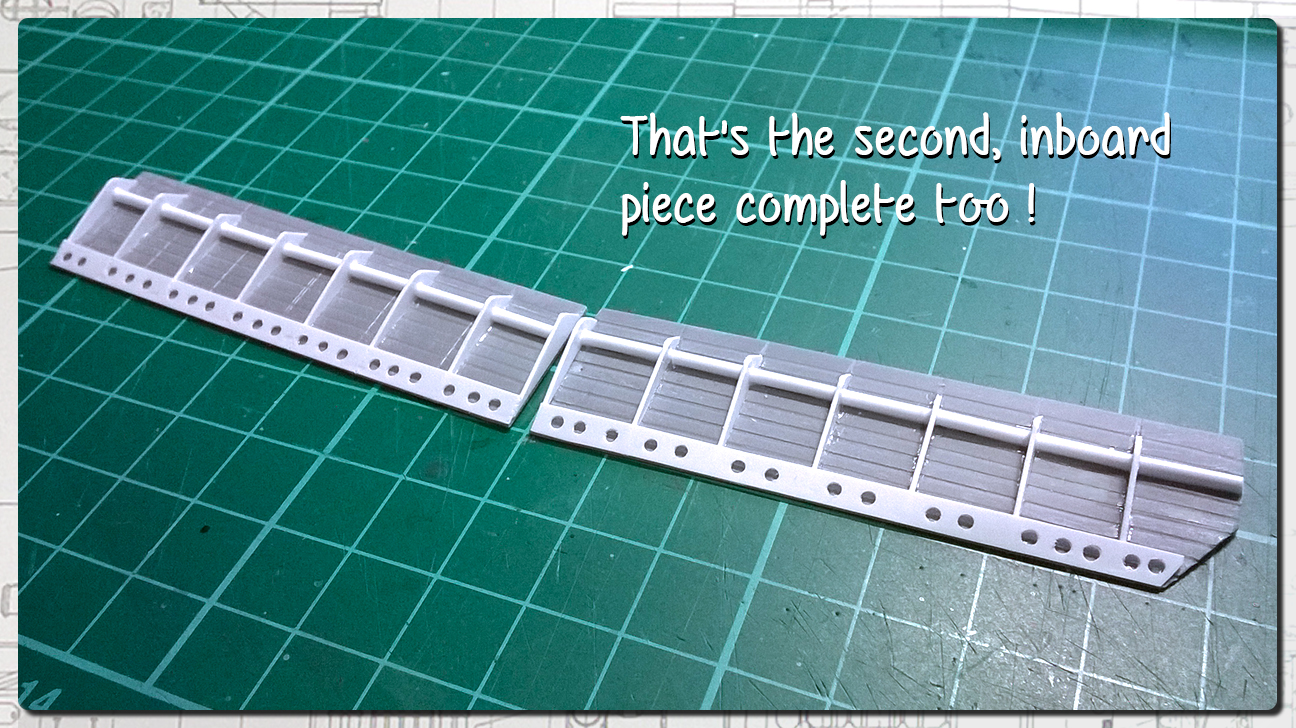
Yes, i'm really pleased that i managed to complete one wing's worth of flaps. Its a small but significant milestone!
I'll leave the other side for now and come back to it later when it doesn't feel so much like repetition.
Onwards!
I'll leave the other side for now and come back to it later when it doesn't feel so much like repetition.
Onwards!
greif8
Joined: January 17, 2006
KitMaker: 673 posts
AeroScale: 492 posts
Posted: Friday, February 26, 2016 - 02:54 PM UTC
For someone "making it up as I go along" your scratchbuilding looks first rate Paul.  I like the quality of your photos to, I can never get my "in progress" build to look that good.
I like the quality of your photos to, I can never get my "in progress" build to look that good. KelticKnot
Joined: May 11, 2015
KitMaker: 768 posts
AeroScale: 656 posts
Posted: Tuesday, March 01, 2016 - 10:37 PM UTC
Thanks Ernest, i have a lot of trouble with lighting the photos well and avoiding glare on the plastic but I'm not really doing anything special, its just a camera phone on basic settings unless it's really close where I switch to macro.
KelticKnot
Joined: May 11, 2015
KitMaker: 768 posts
AeroScale: 656 posts
Posted: Tuesday, March 01, 2016 - 10:38 PM UTC
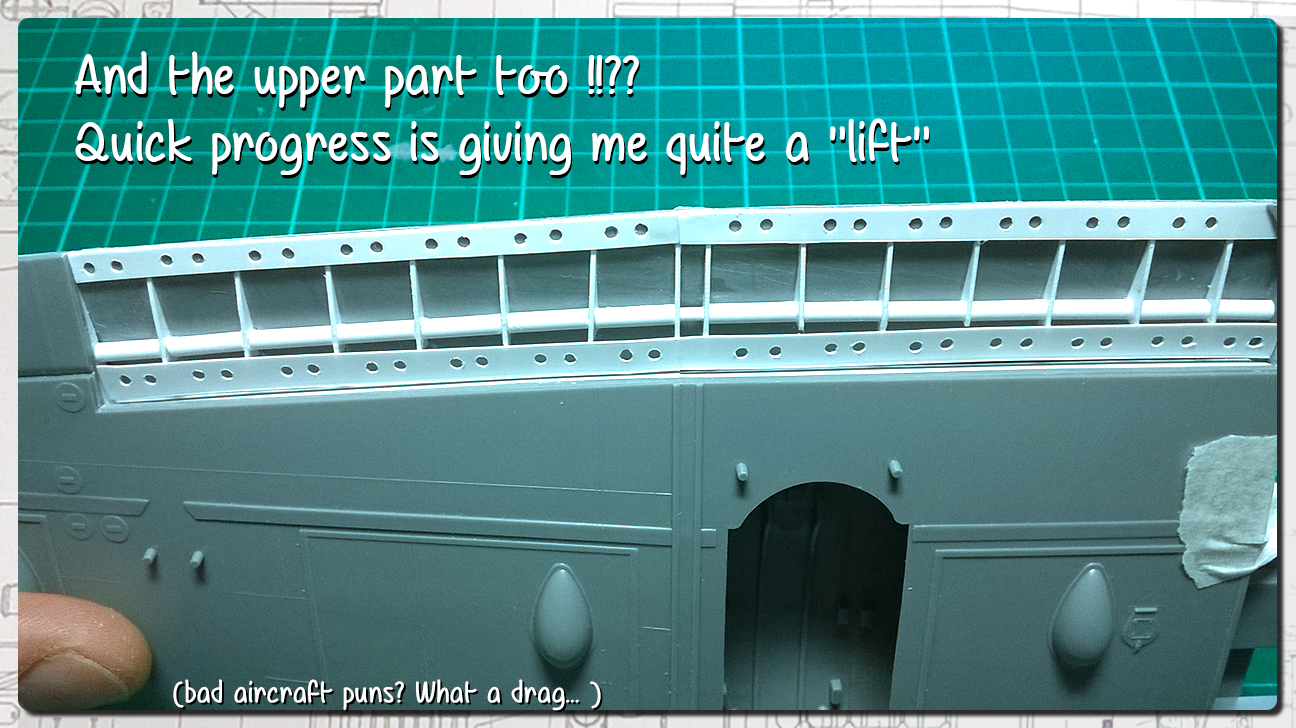
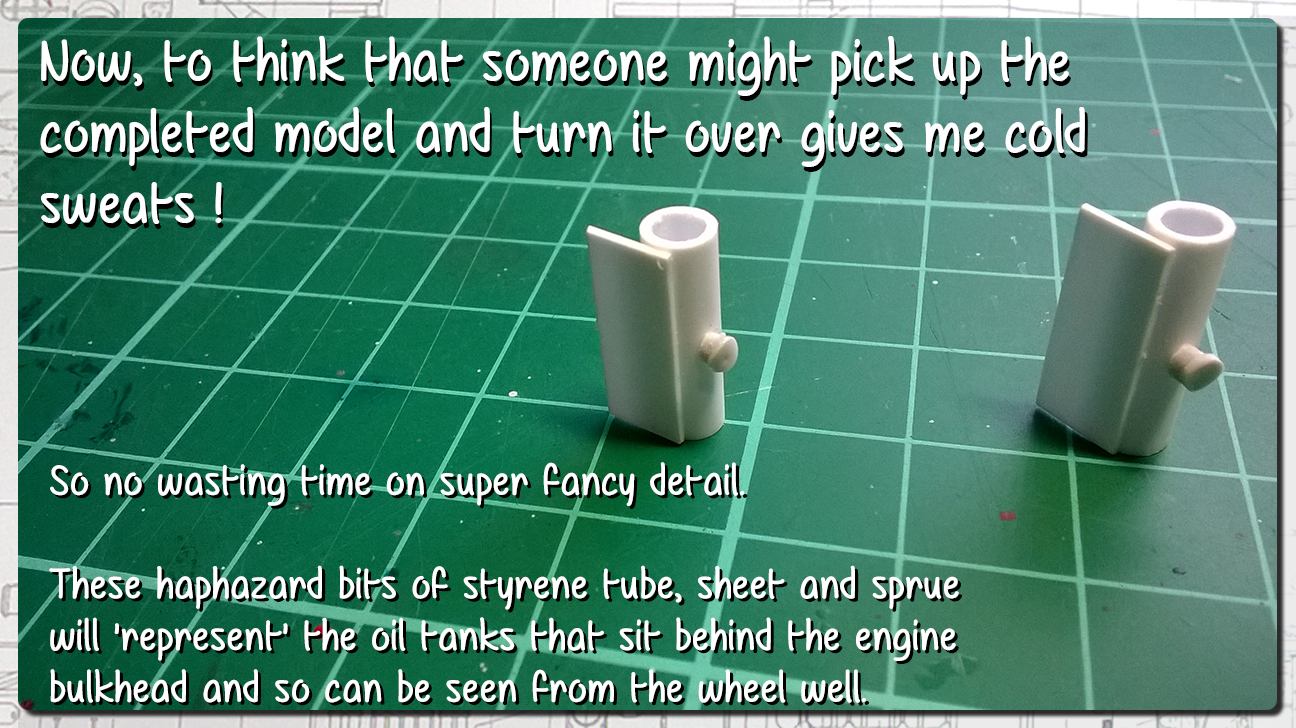
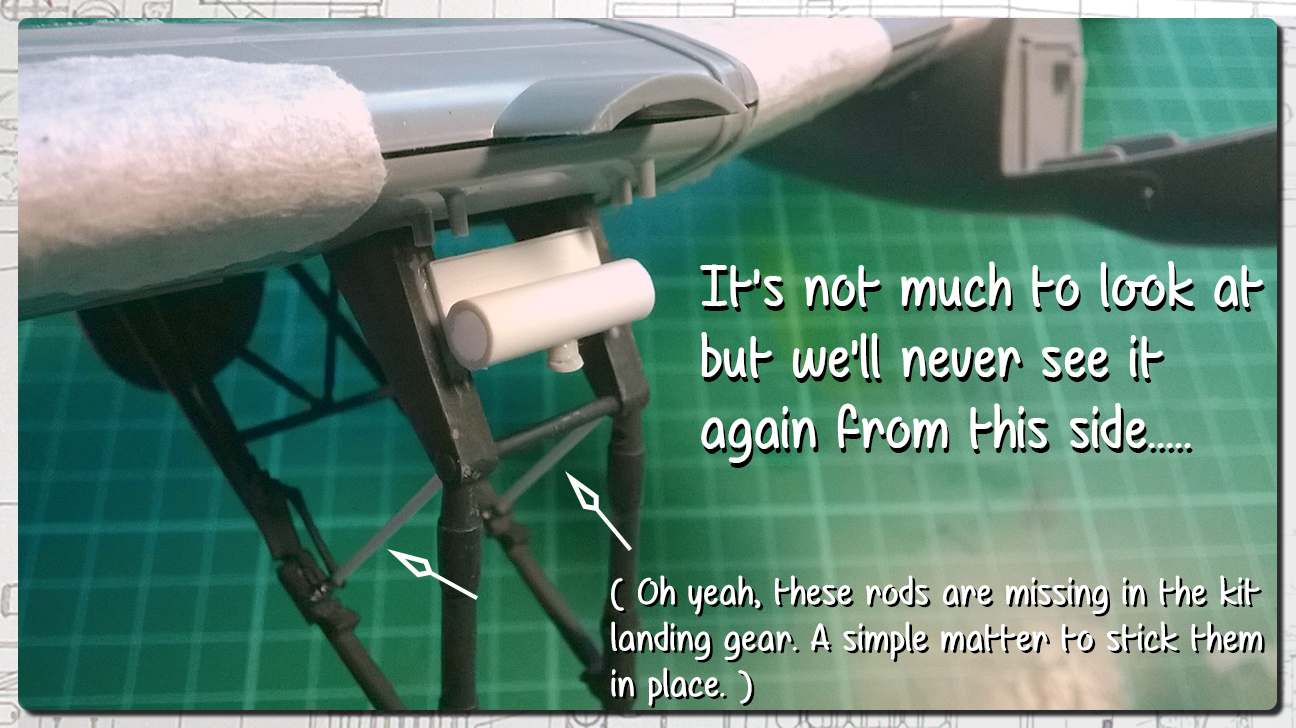
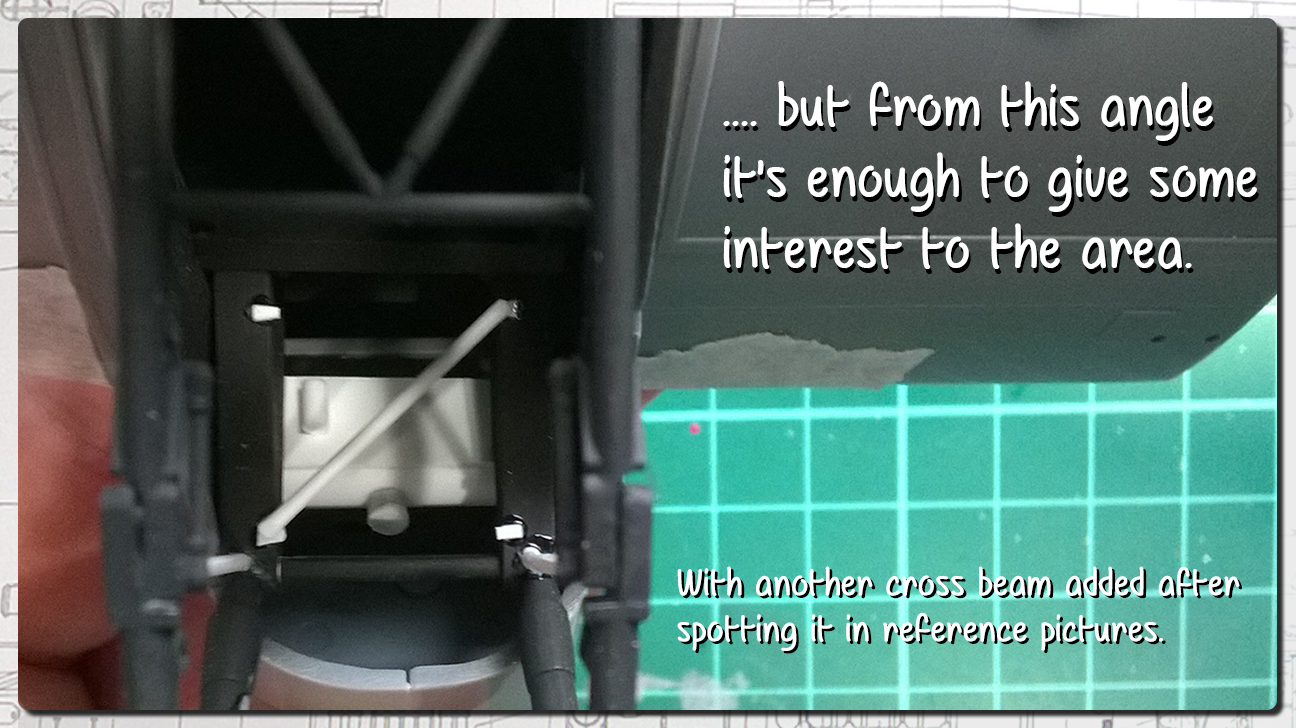
Progress

Twentecable

Joined: September 13, 2003
KitMaker: 339 posts
AeroScale: 244 posts
Posted: Tuesday, March 01, 2016 - 11:51 PM UTC
Impressive build. I hope you have room to show it off when finished!
Its been so long ago (13 years) since I upgraded a model (old DML Hummel) with styrene & co. Would like to do that again but just dont have the mind to it yet... who knows.. Inspiring work!
gr TC
Its been so long ago (13 years) since I upgraded a model (old DML Hummel) with styrene & co. Would like to do that again but just dont have the mind to it yet... who knows.. Inspiring work!
gr TC
KelticKnot
Joined: May 11, 2015
KitMaker: 768 posts
AeroScale: 656 posts
Posted: Wednesday, March 02, 2016 - 03:45 AM UTC
Thanks for looking Lars.
Last time I was modelling was easily twenty five years ago and it never entered my head to modify a model. Back then I stuck the kit together, brush painted it with one shade of colour and stuck the decals on. No shading or clear coat even! (heck, the internet wasn't even available for reference!)
I'm really enjoying the "new" hobby that I've rediscovered in the last year!
GazzaS
#424
Joined: April 23, 2015
KitMaker: 4,648 posts
AeroScale: 1,938 posts
Posted: Wednesday, March 02, 2016 - 10:51 AM UTC
Quoted Text
Thanks for looking Lars.
Last time I was modelling was easily twenty five years ago and it never entered my head to modify a model. Back then I stuck the kit together, brush painted it with one shade of colour and stuck the decals on. No shading or clear coat even! (heck, the internet wasn't even available for reference!)
I'm really enjoying the "new" hobby that I've rediscovered in the last year!
Paul,
Your level of improvements are impressive. I'm like you in rediscovering model building. I have to admit that I haven't been this happy in years.
Gary

Redhand

#522

Joined: January 20, 2013
KitMaker: 1,460 posts
AeroScale: 1,443 posts
Posted: Wednesday, March 02, 2016 - 03:23 PM UTC
Man, this is some daring and creative stuff you're doing here with this open-flap option. And
What!? The degree of planning and execution you show here is worthy of a multi-model vet. With this kind of talent, how did you stay away from the hobby? Seriously. It took me years to become basically satisfied with my work once I restarted about 12 years ago, that after a 15 year hiatus.
Quoted Text
Last time I was modelling was easily twenty five years ago and it never entered my head to modify a model.
What!? The degree of planning and execution you show here is worthy of a multi-model vet. With this kind of talent, how did you stay away from the hobby? Seriously. It took me years to become basically satisfied with my work once I restarted about 12 years ago, that after a 15 year hiatus.

KelticKnot
Joined: May 11, 2015
KitMaker: 768 posts
AeroScale: 656 posts
Posted: Wednesday, March 02, 2016 - 03:56 PM UTC
Thank you so much for the kind words guys but if I'm showing some kind of skill then I give most of the credit to the Aeroscale community for providing me with fantastic inspiration and ideas.
So far I'm not doing anything that hasn't been seen before in other builds of this kit. Wait till you see what I'm planning if I can possibly pull it off
Quoted Text
Man, this is some daring and creative stuff you're doing here with this open-flap option.
So far I'm not doing anything that hasn't been seen before in other builds of this kit. Wait till you see what I'm planning if I can possibly pull it off
greif8
Joined: January 17, 2006
KitMaker: 673 posts
AeroScale: 492 posts
Posted: Wednesday, March 02, 2016 - 05:54 PM UTC
Your build is continuing to impress Paul. Very nice work!
Ernest
Ernest
SGTJKJ

#041

Joined: July 20, 2006
KitMaker: 10,069 posts
AeroScale: 3,788 posts

Posted: Wednesday, March 02, 2016 - 06:12 PM UTC
Great work, Paul. You are really adding some nice details and features that will set your Lancaster apart.
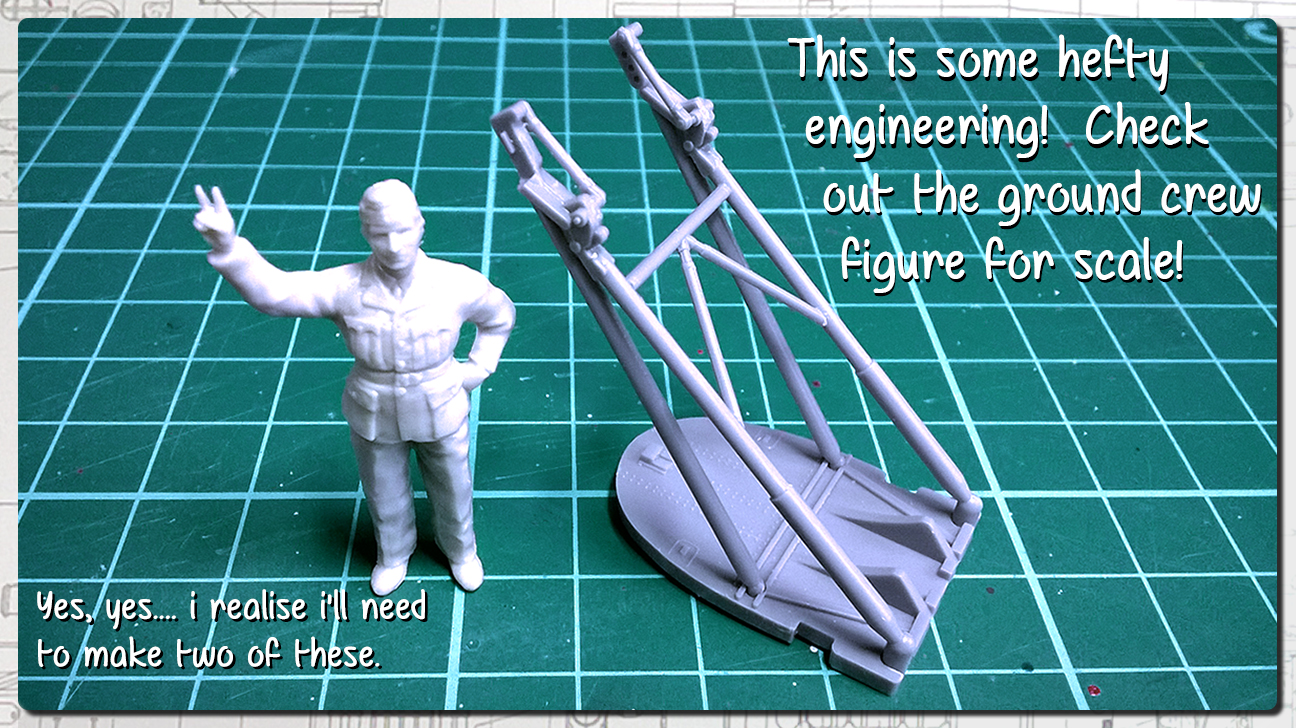
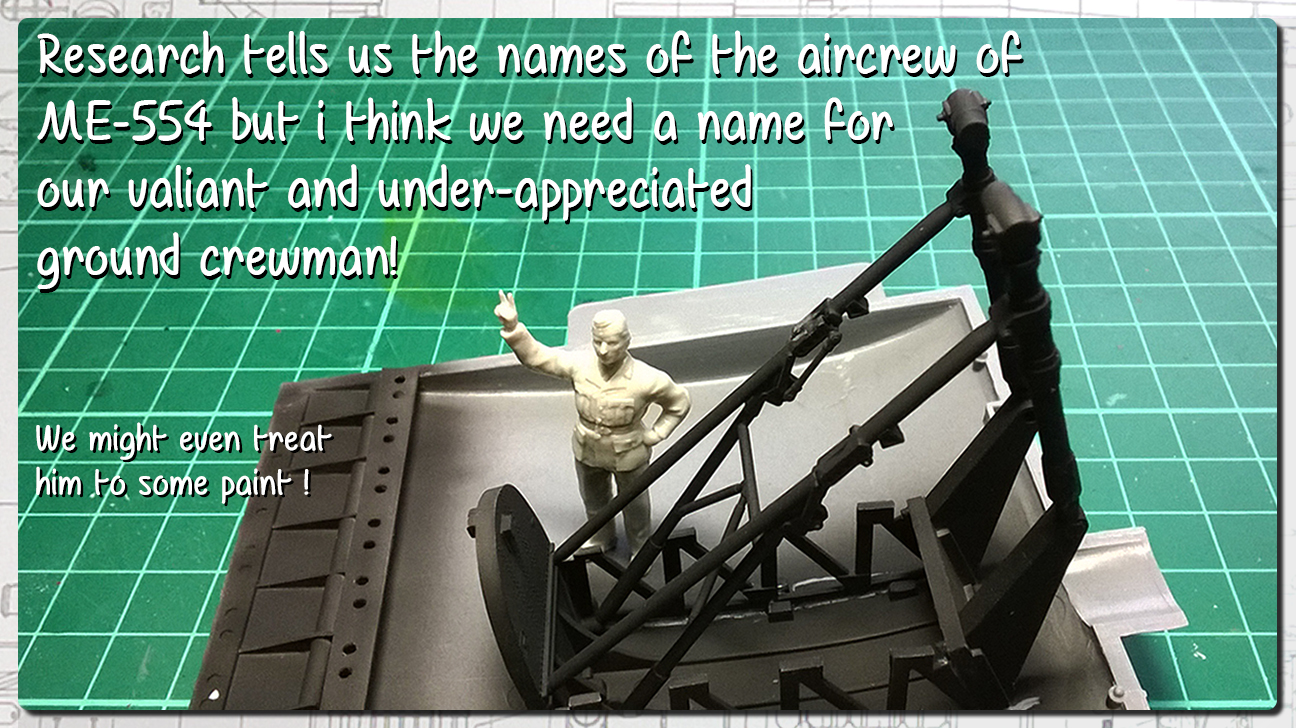
Your ground crew man looks surprisingly German. Should we call him Hans?
Looking forward to see more
Your ground crew man looks surprisingly German. Should we call him Hans?
Looking forward to see more

KelticKnot
Joined: May 11, 2015
KitMaker: 768 posts
AeroScale: 656 posts
Posted: Wednesday, March 02, 2016 - 08:43 PM UTC
Quoted Text
Your ground crew man looks surprisingly German. Should we call him Hans?
Ah that's hilarious!
Are you trying to sabotage our Duel by slipping a Luftwaffe spy into my support staff? Joel_W
Joined: December 04, 2010
KitMaker: 11,666 posts
AeroScale: 7,410 posts
Posted: Wednesday, March 02, 2016 - 10:30 PM UTC
Paul,
I'm truly impressed with your scratch building skills. It's like you've been modeling for years. The inside of the flaps is just outstanding work. Neat, clean, and well planned/executed
Joel
I'm truly impressed with your scratch building skills. It's like you've been modeling for years. The inside of the flaps is just outstanding work. Neat, clean, and well planned/executed
Joel

KelticKnot
Joined: May 11, 2015
KitMaker: 768 posts
AeroScale: 656 posts
Posted: Thursday, March 03, 2016 - 02:10 PM UTC
Wow guys, I'm embarrassed to get such praise.
It's a great motivator to keep the project going at full tilt though so thank you all
It's a great motivator to keep the project going at full tilt though so thank you all
KelticKnot
Joined: May 11, 2015
KitMaker: 768 posts
AeroScale: 656 posts
Posted: Thursday, March 03, 2016 - 09:09 PM UTC
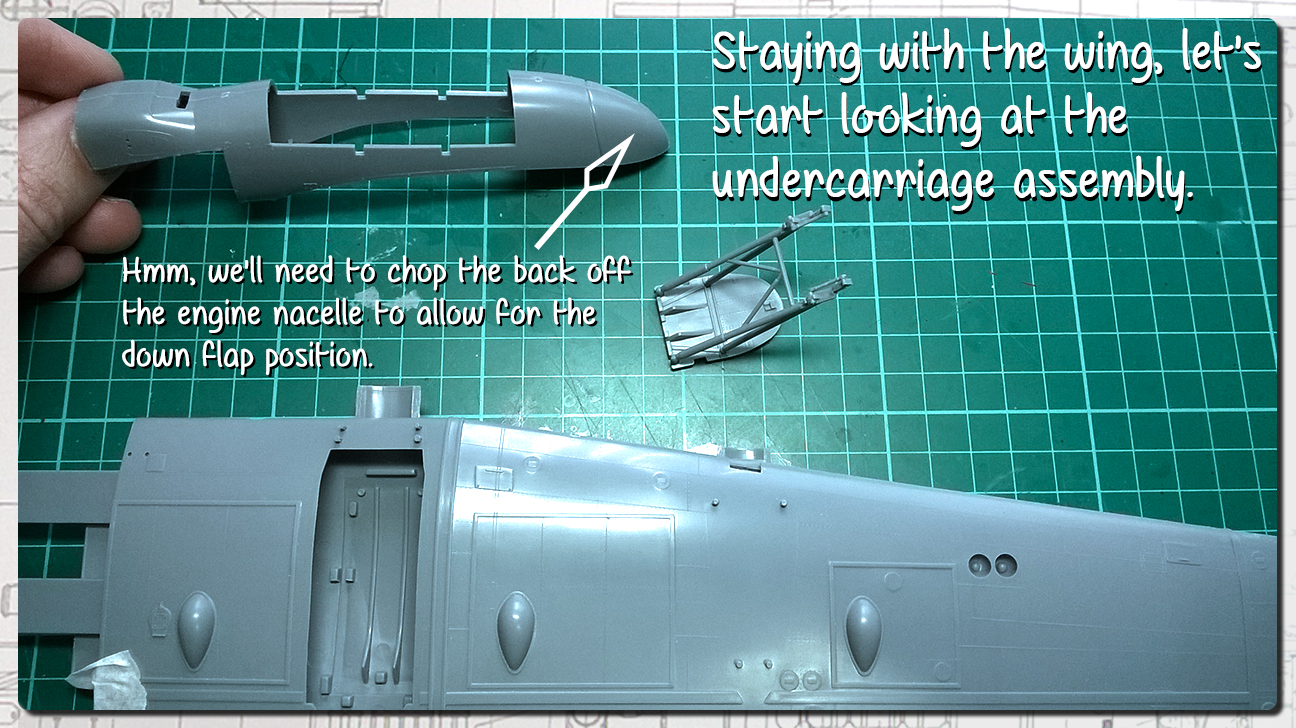
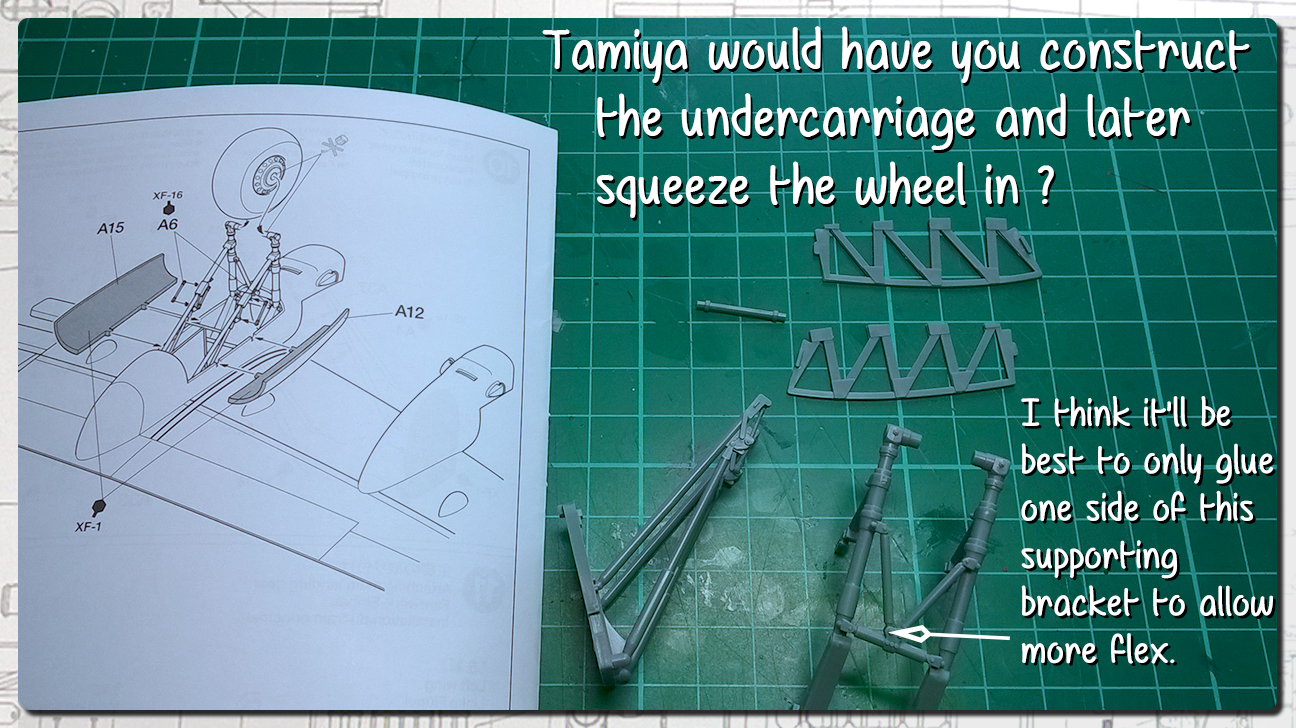
Forging ahead with the port wing and it's associated bit and pieces
greif8
Joined: January 17, 2006
KitMaker: 673 posts
AeroScale: 492 posts
Posted: Sunday, March 06, 2016 - 12:49 PM UTC
Your work continues to impress Paul, absolutely first rate.
KelticKnot
Joined: May 11, 2015
KitMaker: 768 posts
AeroScale: 656 posts
Posted: Thursday, March 10, 2016 - 08:17 PM UTC
Just a small update today

KelticKnot
Joined: May 11, 2015
KitMaker: 768 posts
AeroScale: 656 posts
Posted: Thursday, March 10, 2016 - 11:50 PM UTC
Okay, so I've been toying with an idea since the start and have decided to go for it! It's not as if I'll make this kit again.
I'm going to detail the entire inner fuselage.
What's that I hear you cry? "What's the point in that when you won't see it????"
Well my friends, the plan is to cut away the entire top of the fuselage!
It struck me that there is a very convenient line down the length of the body where the camo meets the black sides.
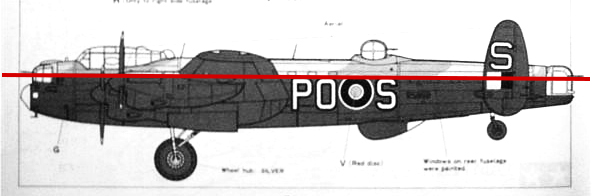
I can make a cut which shouldn't be too obvious when the parts are closed together, and be able to lift the top off to show inside. The gun turrets at either end will be nice and visible too.
Of course, this means a massive amount of scratchbuilding but it ought to be fun ! (?)
I'm going to detail the entire inner fuselage.
What's that I hear you cry? "What's the point in that when you won't see it????"
Well my friends, the plan is to cut away the entire top of the fuselage!
It struck me that there is a very convenient line down the length of the body where the camo meets the black sides.
I can make a cut which shouldn't be too obvious when the parts are closed together, and be able to lift the top off to show inside. The gun turrets at either end will be nice and visible too.
Of course, this means a massive amount of scratchbuilding but it ought to be fun ! (?)
GazzaS
#424
Joined: April 23, 2015
KitMaker: 4,648 posts
AeroScale: 1,938 posts
Posted: Friday, March 11, 2016 - 02:00 AM UTC
Paul,
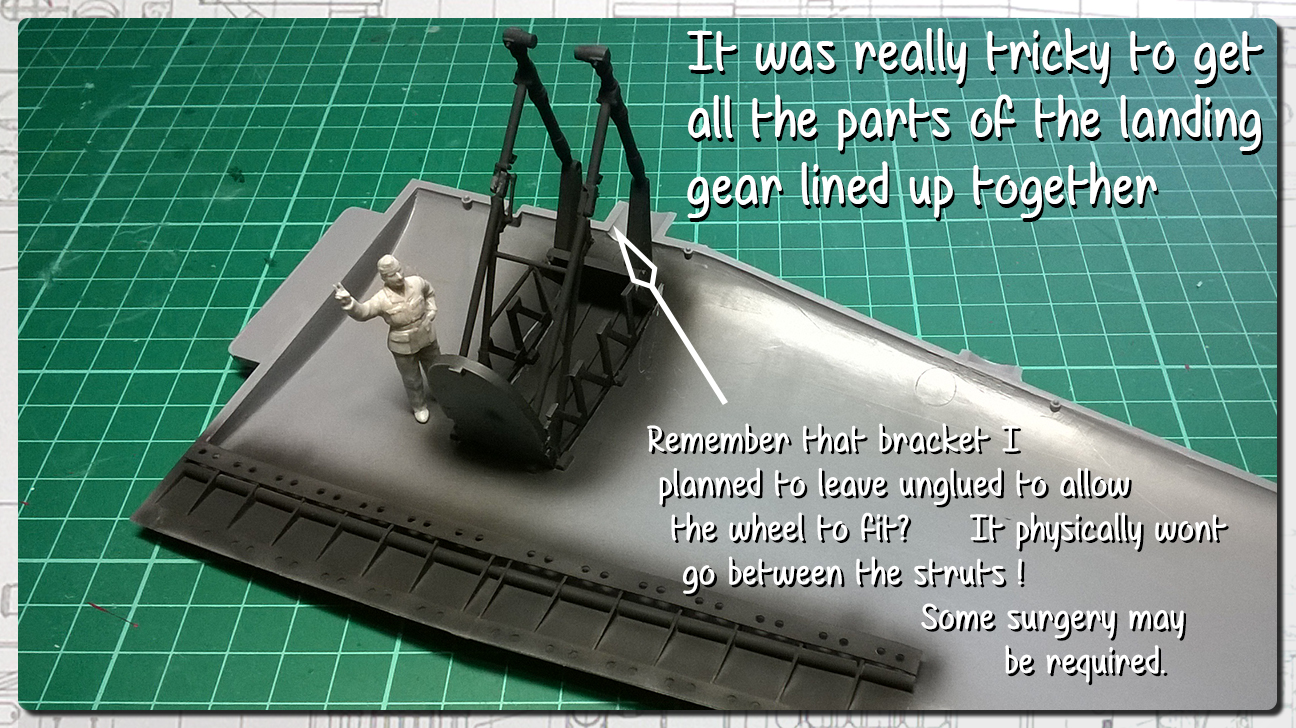
Your landing gear and Hans look great! I'm impressed by your plan to make the top removable.
Gary
Your landing gear and Hans look great! I'm impressed by your plan to make the top removable.
Gary
Joel_W
Joined: December 04, 2010
KitMaker: 11,666 posts
AeroScale: 7,410 posts
Posted: Friday, March 11, 2016 - 09:07 PM UTC
Paul,
The anodized landing gear vs. the dead flat black really adds detail especially with weathering. A viewer would just glance or go right by a black undercarriage, but will stop and checkout one in natural weathered metal.
I do have my concerns about cutting off the top of the fuselage to display a detailed interior. The level of detail can vary greatly, and time needed and spent can become a major issue. Just checkout Brian's B-17F build. He's detailing on a master level, and he's into year 3 and still not done with the interior. Do you have a overall master plan to what you're planning to accomplish?
Joel
KelticKnot
Joined: May 11, 2015
KitMaker: 768 posts
AeroScale: 656 posts
Posted: Saturday, March 12, 2016 - 06:59 PM UTC
Hey Joel, thanks for the comments.
As far as the interior details go these are the major areas to be worked on....
The internal structure : floor from the back of the bomb bay to the rear turret door. Naturally, all the ribbing too.
Then the extras : The ammunition bins and the long feed belts to the rear turret.
Crew rest bed, Flare dispener and chemical toilet
Adding detail to front and rear turret. (Mid upper turret will be removed as per modifications for Tallboy bomb loadout.)
Then its a matter of adding the smaller details such as flares, oxygen tanks, stuff in the bomb aimers area, nothing too big here although i understand it all takes time
The significant problem as i see it will be removing the nice structure that Tamiya provides to hold the wings together.
It's sturdy and locks the wings together inside the fuselage however if i open it all up that all needs to go and be replaced by the two wing spars that run across the fuselage.
I've given this a lot of thought and i genuinely feel i can do it within the time limit of the campaign (end of the year)
Watch this space!
 |

WEB HOSTING BY


Copyright ©2021 AeroScale and Kitmaker Network, a subsidiary of Silver Star Enterprises
All Rights Reserved. Please read our Conditions of Use and Privacy Policy.
All Rights Reserved. Please read our Conditions of Use and Privacy Policy.