


Air Campaigns
Want to start or join a group build? This is where to start.
Want to start or join a group build? This is where to start.
Hosted by Frederick Boucher, Michael Satin
OFFICIAL: A Very Civil Campaign

Jessie_C


Joined: September 03, 2009
KitMaker: 6,965 posts
AeroScale: 6,247 posts

Posted: Friday, November 13, 2015 - 12:29 AM UTC
You'll really enjoy building that one, Raj

tinbanger
Joined: February 04, 2008
KitMaker: 2,507 posts
AeroScale: 1,814 posts

Posted: Friday, November 13, 2015 - 02:32 AM UTC
Welcome Raj
Looking forward to your build.

Looking forward to your build.


iflytb20

#501

Joined: August 25, 2009
KitMaker: 292 posts
AeroScale: 194 posts

Posted: Wednesday, November 18, 2015 - 03:52 PM UTC
Thanks for the campaign Richard. Hope I don't stuff it 
@Jessie
It was your review which made me buy this kit.
Halfway through the build and i'm loving it
@Jessie
It was your review which made me buy this kit.
Halfway through the build and i'm loving it


V2Phantom

Joined: December 26, 2008
KitMaker: 288 posts
AeroScale: 195 posts
Posted: Tuesday, November 24, 2015 - 07:33 PM UTC
Now that some of my other GBs are making progress, it is time to start work on my NASA F-8C. One of the first things that I need to do is to understand what changes need to be made to the Platz kit to convert it from a F-8E as molded to a F-8C. Fortunately, not much is required! Perhaps the main thing to change on the kit is to delete the massive refueling bump that is molded on the side of the left fuselage. I marked the hump in pencil as seen in this photo:

I have also gone ahead and eliminated the small warning antenna/bump at the top end of the tail.
Now to do some grinding and rescribing!
Have fun modeling
Mike

I have also gone ahead and eliminated the small warning antenna/bump at the top end of the tail.
Now to do some grinding and rescribing!
Have fun modeling
Mike
V2Phantom
Joined: December 26, 2008
KitMaker: 288 posts
AeroScale: 195 posts
Posted: Friday, November 27, 2015 - 08:56 PM UTC
My session with MR Files and MR Sandpaper went fairly well. I managed to eliminate the large refueling hump without too much collateral damage. However, removing this plastic resulted in the fuselage being rather thin at this location. The surface plastic was thin enough after sanding to almost see through this are from the reverse side. I strengthened the fuselage by adding a big glob of 5 Minute Epoxy on the inside. You can just about see the epoxy in this photo.

After smoothing the external surface and rescribing, here is the complete external side of the fuselage. Voila, no refueling hump!

Have fun modeling
Mike

After smoothing the external surface and rescribing, here is the complete external side of the fuselage. Voila, no refueling hump!

Have fun modeling
Mike
tinbanger
Joined: February 04, 2008
KitMaker: 2,507 posts
AeroScale: 1,814 posts
Posted: Friday, November 27, 2015 - 10:39 PM UTC
Nice work Mike!
Back after two weeks away, time to get my model build Mojo going!
Back after two weeks away, time to get my model build Mojo going!

SaxonTheShiba
Joined: February 01, 2009
KitMaker: 1,233 posts
AeroScale: 663 posts

Posted: Friday, November 27, 2015 - 11:20 PM UTC
Well done, Mike. That looks like a really nice kit.
Best wishes,
Ian
Best wishes,
Ian
SaxonTheShiba
Joined: February 01, 2009
KitMaker: 1,233 posts
AeroScale: 663 posts
Posted: Friday, November 27, 2015 - 11:36 PM UTC
I was able to make some good progress on the #18 during Thanksgiving break. The plane was painted in Sea Blue with International Orange trim. The photos of the actual airplane indicated a gloss finish with very heavy exhaust stains. The stains were sprayed on with Tamiya Deck Tan. Fluid leaks from the panel lines were added over top of the exhaust stains with CREATEFX Oil Wash. The plane was then gloss coated with Pledge Floor Wax and I decaled it this morning. The markings went on flawlessly. The white stripe on the wing was not provided in the decals so I cut that from the invasions stripes on the Trumpeter C-47 sheet from the spares book. Once the decals set up, I will add another coat of Floor Wax and then flat coat the exhaust stains.
Regards,
Ian


Regards,
Ian


V2Phantom
Joined: December 26, 2008
KitMaker: 288 posts
AeroScale: 195 posts
Posted: Monday, November 30, 2015 - 08:38 PM UTC
Ian
Outstanding!! The color scheme for your race plane is great. I have a few race planes in my stash for future builds and I think I may need to add this one to the list. Your finish is excellent! I can't wait to see the completed model.
Have fun modeling
Mike
Outstanding!! The color scheme for your race plane is great. I have a few race planes in my stash for future builds and I think I may need to add this one to the list. Your finish is excellent! I can't wait to see the completed model.
Have fun modeling
Mike

Kilo_Uniform

Joined: July 03, 2015
KitMaker: 280 posts
AeroScale: 141 posts
Posted: Monday, November 30, 2015 - 09:42 PM UTC
Ian,
#18 Rocks!!
Awesome colour contrast between the blue and orange. Decals also look awesome.
Excellent work - can't wait to see it finished.
Regards,
Kobus
#18 Rocks!!
Awesome colour contrast between the blue and orange. Decals also look awesome.
Excellent work - can't wait to see it finished.
Regards,
Kobus

tatbaqui

#040

Joined: May 06, 2007
KitMaker: 2,713 posts
AeroScale: 65 posts

Posted: Saturday, December 05, 2015 - 05:49 AM UTC
Nice work on the Corsair, Ian!
I haven't started as yet, and while looking for suitable materials to make my jeepney frame, I saw this at the LHS:
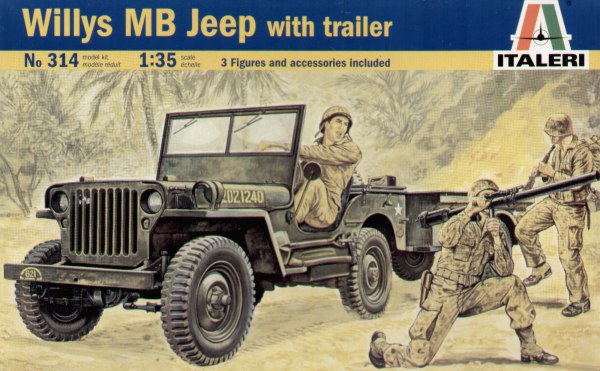
So I decided to get and use this as the base kit instead of the ambulance jeep I posted earlier -- seems a waste to bin the stretcher and other stuff that came with it, so I'll save it for another build. Hope to make a start during the holidays.
Cheers,
Tat
I haven't started as yet, and while looking for suitable materials to make my jeepney frame, I saw this at the LHS:
So I decided to get and use this as the base kit instead of the ambulance jeep I posted earlier -- seems a waste to bin the stretcher and other stuff that came with it, so I'll save it for another build. Hope to make a start during the holidays.
Cheers,
Tat
SaxonTheShiba
Joined: February 01, 2009
KitMaker: 1,233 posts
AeroScale: 663 posts
Posted: Saturday, December 05, 2015 - 06:16 AM UTC
Tat---Thanks!!! Looking forward to your Jeepney. That is a great subject to model. Colorful too!!
Kobus----Thanks! The decals really laid down nicely with no silvering. The white really held up well over the Sea Blue.
Mike----Thank for the kind words. This was really a fun build. It was nice to do a high gloss pristine finish instead of my usual sea-salt battered Hornets and Tomcats.
I just applied the final gloss coat over the airplane. Once that dries I will flat out the exhaust stains and get the canopy and prop on.
Best wishes,
Ian
tinbanger
Joined: February 04, 2008
KitMaker: 2,507 posts
AeroScale: 1,814 posts
Posted: Sunday, December 06, 2015 - 02:57 AM UTC
Great build Ian!
Looking forward to completed photos
I am trying to get going again after a relaxed week in Jamaica
Looking forward to completed photos
I am trying to get going again after a relaxed week in Jamaica
SaxonTheShiba
Joined: February 01, 2009
KitMaker: 1,233 posts
AeroScale: 663 posts
Posted: Sunday, December 06, 2015 - 07:07 AM UTC
Quoted Text
Great build Ian!
Looking forward to completed photos
I am trying to get going again after a relaxed week in Jamaica
Thanks Richard! I actually finished the plane today so I will shoot some thread/gallery photos this week and get everything posted. Hope you had a good trip to Jamaica!!!
Best wishes,
Ian

nico37

Joined: May 23, 2011
KitMaker: 651 posts
AeroScale: 181 posts

Posted: Sunday, December 06, 2015 - 07:06 PM UTC
Hi all,
well, i'll not be able to sculpt the fig i planed for this campaign, not enough time , but i could do a model, so am i allowed to change for this one ?

It's a rough one but it needs less of times than a complete fig to sculpt and paint.
cheers
nico
well, i'll not be able to sculpt the fig i planed for this campaign, not enough time , but i could do a model, so am i allowed to change for this one ?

It's a rough one but it needs less of times than a complete fig to sculpt and paint.
cheers
nico
SaxonTheShiba
Joined: February 01, 2009
KitMaker: 1,233 posts
AeroScale: 663 posts
Posted: Friday, December 11, 2015 - 04:06 AM UTC
Well, I am calling this one done. This is Race# 18 as it looked in the 1947 Cleveland Air Races. At this time, it was raced as a stock F2G-1 Super Corsair, flown by Ron Puckett. It features the short carb intake, tall rudder and standard wingtips. I used Pledge Floor wax for the gloss top coat and went over the exhaust stains with a Testors flat coat. This was really a very fun build even though it was a limited run kit. I have two posted in the gallery as well. I will be looking forward to everybody's projects in this thread and will check in as the updates are posted.
Best wishes and happy CIVIL modeling.
Ian


Best wishes and happy CIVIL modeling.
Ian


tinbanger
Joined: February 04, 2008
KitMaker: 2,507 posts
AeroScale: 1,814 posts
Posted: Friday, December 11, 2015 - 04:55 AM UTC
Quoted Text
Hi all,
well, i'll not be able to sculpt the fig i planed for this campaign, not enough time , but i could do a model, so am i allowed to change for this one ?
It's a rough one but it needs less of times than a complete fig to sculpt and paint.
cheers
nico
Welcome Nico
Go for it, lots of time left to build .
tinbanger
Joined: February 04, 2008
KitMaker: 2,507 posts
AeroScale: 1,814 posts
Posted: Friday, December 11, 2015 - 04:57 AM UTC
"Well, I am calling this one done. This is Race# 18 as it looked in the 1947 Cleveland Air Races."
Very nice build great job Ian!
Thank you for joining this campaign!
Very nice build great job Ian!
Thank you for joining this campaign!
SaxonTheShiba
Joined: February 01, 2009
KitMaker: 1,233 posts
AeroScale: 663 posts
Posted: Friday, December 11, 2015 - 05:49 AM UTC
Thanks Richard! I was glad I got to participate. I will be looking forward to everybody's campaign entries.
Best wishes,
Ian
Best wishes,
Ian

dcandal

Joined: September 07, 2006
KitMaker: 918 posts
AeroScale: 688 posts

Posted: Friday, December 11, 2015 - 06:57 PM UTC
Hi all,
I´m going to begin this campaign with a 1/25 Revell ´56 Ford Pickup,

I´m going to begin this campaign with a 1/25 Revell ´56 Ford Pickup,

tinbanger
Joined: February 04, 2008
KitMaker: 2,507 posts
AeroScale: 1,814 posts
Posted: Saturday, December 12, 2015 - 04:10 AM UTC
Welcome to the campaign Daniel.
nico37
Joined: May 23, 2011
KitMaker: 651 posts
AeroScale: 181 posts
Posted: Sunday, December 13, 2015 - 03:04 PM UTC
Quoted Text
Quoted TextHi all,
well, i'll not be able to sculpt the fig i planed for this campaign, not enough time , but i could do a model, so am i allowed to change for this one ?
It's a rough one but it needs less of times than a complete fig to sculpt and paint.
cheers
nico
Welcome Nico
Go for it, lots of time left to build .
Hi, that's very cool, many thanks Richard
cheers
nico
dcandal
Joined: September 07, 2006
KitMaker: 918 posts
AeroScale: 688 posts
Posted: Monday, December 14, 2015 - 05:20 AM UTC
Beginig the Ford 56.
I had started with the engine.


I had started with the engine.


nico37
Joined: May 23, 2011
KitMaker: 651 posts
AeroScale: 181 posts
Posted: Monday, December 14, 2015 - 02:42 PM UTC
Hi all,
Congrats Ian, your model is very nice
Here is mine, which dragged all the tears from my eyes when i opened the box .... ...... :


And the worst thing i ever saw on a model :


The wings assembly is expected to be very very fun :


well well well ...... so go on !
cheers
nico
Congrats Ian, your model is very nice
Here is mine, which dragged all the tears from my eyes when i opened the box ....
...... :


And the worst thing i ever saw on a model :


The wings assembly is expected to be very very fun :


well well well ...... so go on !
cheers
nico
V2Phantom
Joined: December 26, 2008
KitMaker: 288 posts
AeroScale: 195 posts
Posted: Monday, December 14, 2015 - 09:05 PM UTC
There are some great builds in this campaign! I love the variety of modeling subjects. I have a small update on my F-8C build. I decided to not risk it being a tail sitter, so I used this build as an excuse to try the Liquid Gravity brand of small lead (?) beads. I walled off the cockpit area and then poured some of the beads in the small area underneath the cockpit. I set them in place using super glue. It does not look like much weight, so perhaps this bit of work was in vain. I'll know when I get the model assembled and sitting on its legs!

Have fun modeling
Mike

Have fun modeling
Mike
 |

WEB HOSTING BY


Copyright ©2021 AeroScale and Kitmaker Network, a subsidiary of Silver Star Enterprises
All Rights Reserved. Please read our Conditions of Use and Privacy Policy.
All Rights Reserved. Please read our Conditions of Use and Privacy Policy.