OFFICIAL: WWII Fixed Gear Campaign
New York, United States
Joined: March 08, 2010
KitMaker: 3,662 posts
AeroScale: 174 posts
Posted: Saturday, November 28, 2015 - 12:26 AM UTC
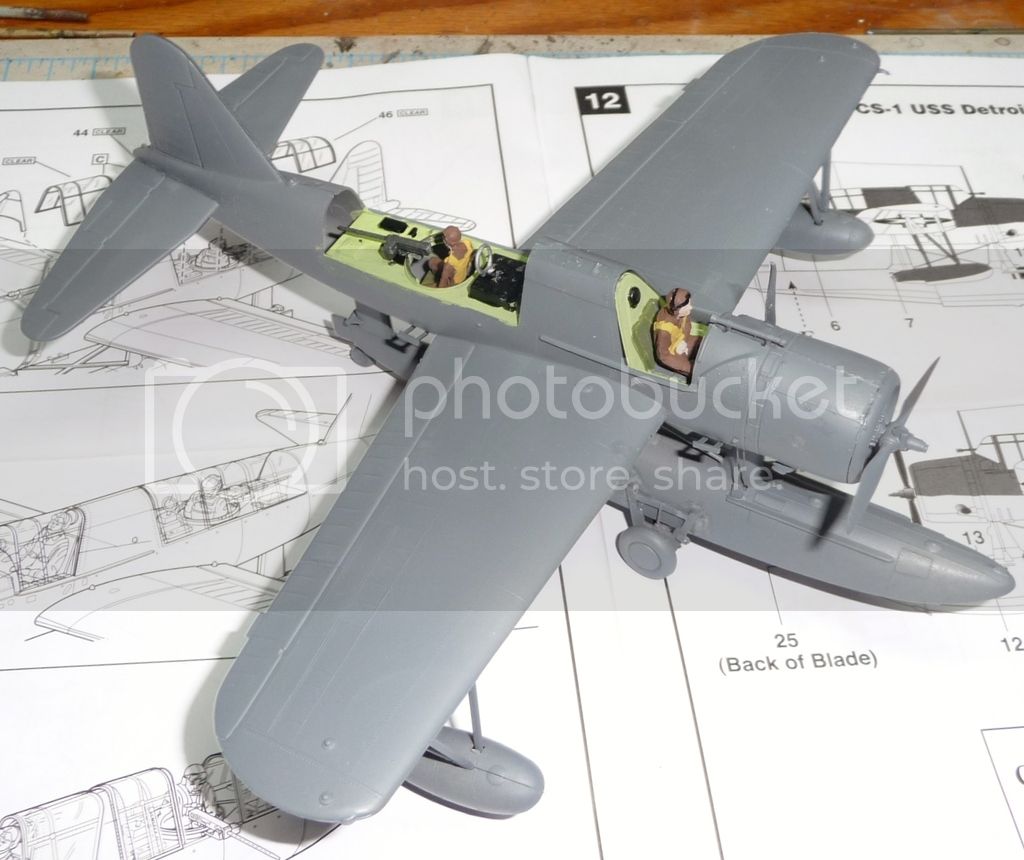
Some nice looking stuff guys I ready for paint
Active Campaigns on the bench:
Operation Fall Gelb - Pz.Kpfw. IV Ausf. C
Engineering the Future - M-26 Recovery Vehicle
115 Campaigns completed

#305
Christchurch, New Zealand
Joined: February 01, 2006
KitMaker: 1,673 posts
AeroScale: 1,517 posts
Posted: Sunday, November 29, 2015 - 08:09 AM UTC
New York, United States
Joined: March 08, 2010
KitMaker: 3,662 posts
AeroScale: 174 posts
Posted: Sunday, November 29, 2015 - 04:55 PM UTC
Thanks Chris, I threw some paint at her over the weekend and the seam is still pretty visible

Guess I'm gonna have to brake out the putty and file

Active Campaigns on the bench:
Operation Fall Gelb - Pz.Kpfw. IV Ausf. C
Engineering the Future - M-26 Recovery Vehicle
115 Campaigns completed
California, United States
Joined: October 10, 2012
KitMaker: 204 posts
AeroScale: 52 posts
Posted: Monday, November 30, 2015 - 07:57 AM UTC
Quoted Text
Thanks Chris, I threw some paint at her over the weekend and the seam is still pretty visible Guess I'm gonna have to brake out the putty and file
I know the feeling kind of stalled on mine because of all the puttying I need to do.
#305
Christchurch, New Zealand
Joined: February 01, 2006
KitMaker: 1,673 posts
AeroScale: 1,517 posts
Posted: Monday, November 30, 2015 - 12:55 PM UTC
It's what happens when you join to pieces of plastic together Sal.... it's either good or it's a tragedy, I never seem to get anything in between. Got some seams on my Bf109K-4 build to fill but they're not to bad fortunately.
#523
Idaho, United States
Joined: February 28, 2014
KitMaker: 342 posts
AeroScale: 250 posts
Posted: Thursday, December 03, 2015 - 10:38 PM UTC
Chris,
How is the Pipistrello coming along?
I liked the camo pattern you used and been waiting to see it decaled up.
BTW which brand and paint color did you used for the interior?
Jeff D
#305
Christchurch, New Zealand
Joined: February 01, 2006
KitMaker: 1,673 posts
AeroScale: 1,517 posts
Posted: Thursday, December 03, 2015 - 11:06 PM UTC
Hi Jeff the colour is Humbrol 120 enamel with an acrylic wash to provide shadows. Funnily enough Jeff that's exactly what I was in the process of doing last night still got a few more to apply but it looks good, pics to follow soon!
#305
Christchurch, New Zealand
Joined: February 01, 2006
KitMaker: 1,673 posts
AeroScale: 1,517 posts
Posted: Friday, December 04, 2015 - 01:58 PM UTC
AussieReg
 Associate Editor
#007
Victoria, Australia
Joined: June 09, 2009
KitMaker: 8,156 posts
AeroScale: 3,756 posts
Posted: Friday, December 04, 2015 - 05:28 PM UTC
The markings look good Chris, nice work.
Cheers, D
ON the bench
Revell 1/24 '53 Corvette (building as '54)
Revell 1/24 BMW 507 Coupe and Cabrio
Italeri 1/48 Me262 B-1a/U1 Nightfighter
Monogram 1/24 '57 Chevy Nomad
Dragon 1/350 USS Frank Knox DD-742
#305
Christchurch, New Zealand
Joined: February 01, 2006
KitMaker: 1,673 posts
AeroScale: 1,517 posts
Posted: Saturday, December 05, 2015 - 05:37 AM UTC
Thanks D! Yeah they settled down really well and look pretty good on.
Berlin, Germany
Joined: October 12, 2008
KitMaker: 709 posts
AeroScale: 651 posts
Posted: Sunday, December 06, 2015 - 02:21 AM UTC
Very good work here, guys!
Jeff: fantastic detailing on the PZL - wait to see more...
Chris: nice progress on your decals, looks good!
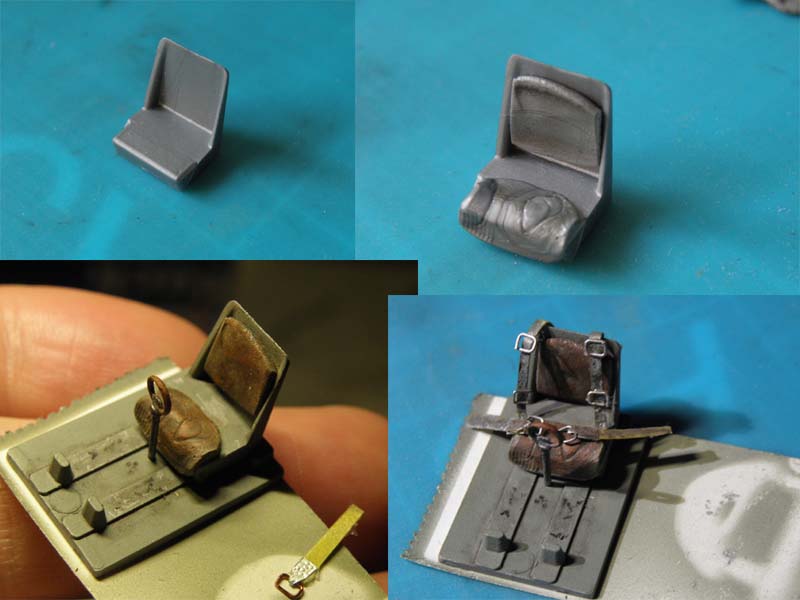
I managed to get a little bench time and move on a bit on my Bristol Bulldog. The moulded cockpit and seat is very poor, so I try to give it a more busy look. Added cushions from squeezed sprue (one slipped aside after pilots exit); but with the self made belts I'm not fully happy and still not sure (so I not fixed them yet). Shall I use them or leave it without? OK, I could buy AM etched ones - but I don't


Thomas
Sometimes you need to distance yourself to see things clearly - Lao Tzu -
... in scale and in real life -T.
#523
Idaho, United States
Joined: February 28, 2014
KitMaker: 342 posts
AeroScale: 250 posts
Posted: Sunday, December 06, 2015 - 10:45 PM UTC
Chris,
The markings look Nice! Io amo aerei italiani!!!
Thomas,
I think the belts look good. Once placed into the fuselage I sure they will be fine.
Tom Stepniowski
Where's the Lublin?
New Brunswick, Canada
Joined: December 25, 2009
KitMaker: 44 posts
AeroScale: 11 posts
Posted: Monday, December 07, 2015 - 10:12 AM UTC
For this campaign I am building the 1/48 scale Eduard Limited Edition of the Avia B-534 in Slovak WWII Service (kit #1146).


Thanks
New York, United States
Joined: March 08, 2010
KitMaker: 3,662 posts
AeroScale: 174 posts
Posted: Tuesday, December 08, 2015 - 06:56 PM UTC
Active Campaigns on the bench:
Operation Fall Gelb - Pz.Kpfw. IV Ausf. C
Engineering the Future - M-26 Recovery Vehicle
115 Campaigns completed
#305
Christchurch, New Zealand
Joined: February 01, 2006
KitMaker: 1,673 posts
AeroScale: 1,517 posts
Posted: Wednesday, December 09, 2015 - 11:47 AM UTC
Thanks Sal .... I've just got to do a little painting on the engine covers and some detail painting of the oil radiators under the wings then it's time for a little gentle weathering.
New York, United States
Joined: March 08, 2010
KitMaker: 3,662 posts
AeroScale: 174 posts
Posted: Friday, December 18, 2015 - 10:30 PM UTC
Active Campaigns on the bench:
Operation Fall Gelb - Pz.Kpfw. IV Ausf. C
Engineering the Future - M-26 Recovery Vehicle
115 Campaigns completed
Quebec, Canada
Joined: June 23, 2008
KitMaker: 414 posts
AeroScale: 364 posts
Posted: Saturday, December 19, 2015 - 02:18 AM UTC
I think it needs a little dirt and grime, just a bit - my motto is "Less is more"
New York, United States
Joined: March 08, 2010
KitMaker: 3,662 posts
AeroScale: 174 posts
Posted: Saturday, December 19, 2015 - 07:42 AM UTC
Quoted Text
I think it needs a little dirt and grime, just a bit - my motto is "Less is more"
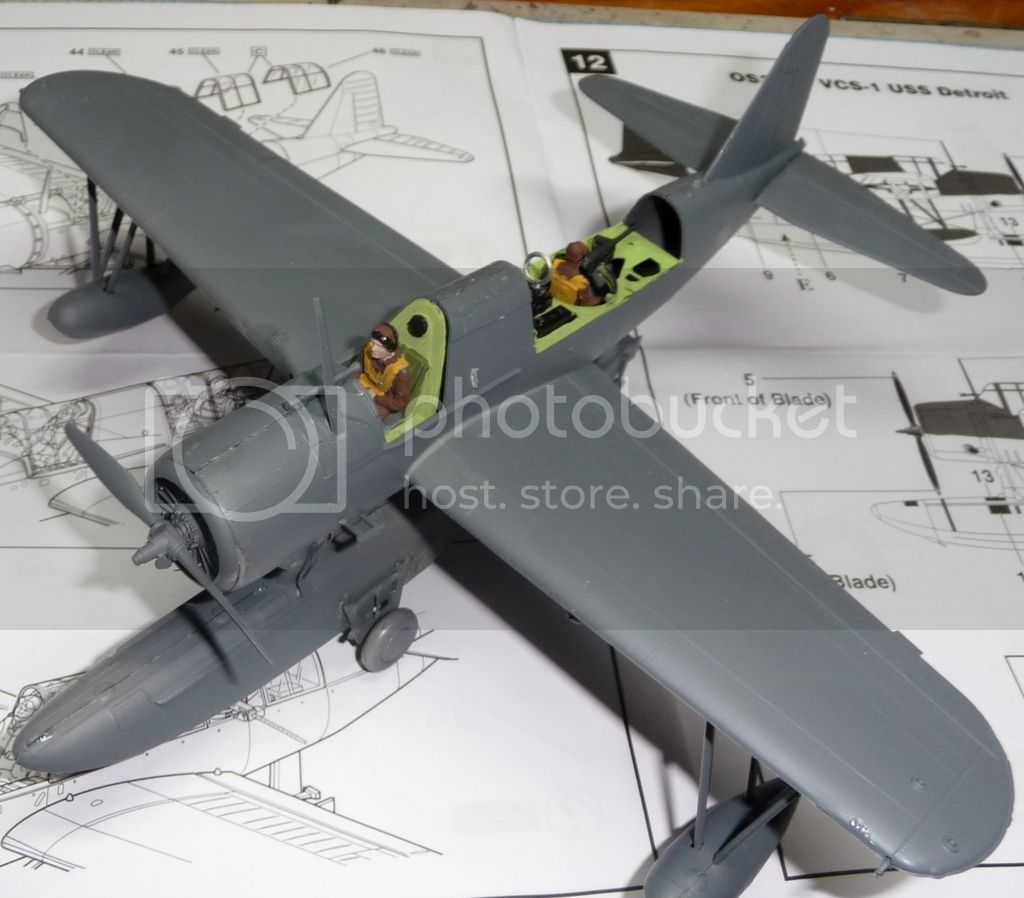
Thanks for the comment Richard as you can tell from the photo I'm an Armor guy how do you add dirt nod grim to a seaplane

Active Campaigns on the bench:
Operation Fall Gelb - Pz.Kpfw. IV Ausf. C
Engineering the Future - M-26 Recovery Vehicle
115 Campaigns completed
#305
Christchurch, New Zealand
Joined: February 01, 2006
KitMaker: 1,673 posts
AeroScale: 1,517 posts
Posted: Saturday, December 19, 2015 - 07:52 AM UTC
Hi Sal principle is the same as armour in a sense pin washes and weathering pigments. However the single biggest thing is usually an overall wash to highlight recessed panel lines .... uhmmmmm if it has any? Walk ways get worn to bare metal in heavy use scenarios, cockpit sills also showed wear, same with seats.
Exhaust staining where the exhausts exit the aircraft as well, if you can find pictures of operational aircraft they will be invaluable to show you where that staining should go and how it looked, what shape it was etc.
Aerodynamics play a large part in how dirt and grime accumulate on aircraft, the way the air flowed around and over the aircraft etc.
See not hard at all! LOL
Quebec, Canada
Joined: June 23, 2008
KitMaker: 414 posts
AeroScale: 364 posts
Posted: Saturday, December 19, 2015 - 05:54 PM UTC
If I were you I'd add a litle streaking to break up the uniformity of colour on the wings and to tone down the bright white of the insignias. Some dirt around the walkways on the wings, a little paintchipping on the cockpit framing, some dirt on the floats - think about the environment where the aircraft was used.
By suggesting this I am in no way criticising the model - it turned out beautifully. Well done.
New York, United States
Joined: March 08, 2010
KitMaker: 3,662 posts
AeroScale: 174 posts
Posted: Monday, December 21, 2015 - 06:24 PM UTC
Quoted Text
By suggesting this I am in no way criticising the model - it turned out beautifully. Well done.
Richard, no offense taken constructive criticism helps me improve

A google search resulted in a lot of color pictures of birds in museums that are freshly pained
I did find a few color shot of the real deal so I went to work adding some of your suggestions
Just added a light wash to it and waiting for it to dry so hopfully some photos later. Thanks for the suggestions
Active Campaigns on the bench:
Operation Fall Gelb - Pz.Kpfw. IV Ausf. C
Engineering the Future - M-26 Recovery Vehicle
115 Campaigns completed
New York, United States
Joined: March 08, 2010
KitMaker: 3,662 posts
AeroScale: 174 posts
Posted: Wednesday, December 23, 2015 - 06:39 AM UTC
Active Campaigns on the bench:
Operation Fall Gelb - Pz.Kpfw. IV Ausf. C
Engineering the Future - M-26 Recovery Vehicle
115 Campaigns completed
Quebec, Canada
Joined: June 23, 2008
KitMaker: 414 posts
AeroScale: 364 posts
Posted: Wednesday, December 23, 2015 - 07:25 AM UTC
Lovely. It really looks the part now!

I'll be starting my entry soon - a Hawker Fury Mk. 1. It's the Airfix 1/48 kit.
Merry Christmas.
Berlin, Germany
Joined: October 12, 2008
KitMaker: 709 posts
AeroScale: 651 posts
Posted: Friday, December 25, 2015 - 10:54 AM UTC
Sal: Very good work, now it looks much more realistic with your added weathering. Congrats for finishing this campaign so quick.
Thomas
Sometimes you need to distance yourself to see things clearly - Lao Tzu -
... in scale and in real life -T.
New York, United States
Joined: March 08, 2010
KitMaker: 3,662 posts
AeroScale: 174 posts
Posted: Saturday, December 26, 2015 - 02:14 AM UTC
Active Campaigns on the bench:
Operation Fall Gelb - Pz.Kpfw. IV Ausf. C
Engineering the Future - M-26 Recovery Vehicle
115 Campaigns completed