

Tim,
The bottom weathering looks really very well done. From what I can see it's a random faded pattern. I've been experimenting with that technique, and done right, it's the closest I've yet to come to a realistic form of weathering and paint fading.
Joel
Cold War (1950-1974)
Discuss the aircraft modeling subjects during the Cold War period.
Discuss the aircraft modeling subjects during the Cold War period.
Hosted by Tim Hatton
Viggen JA 37 build
Joel_W

Joined: December 04, 2010
KitMaker: 11,666 posts
AeroScale: 7,410 posts
Posted: Thursday, March 12, 2015 - 04:50 AM UTC


litespeed


Joined: October 15, 2009
KitMaker: 1,976 posts
AeroScale: 1,789 posts
Posted: Saturday, March 14, 2015 - 02:11 AM UTC
Thanks Joel, your comments are much appreciated.
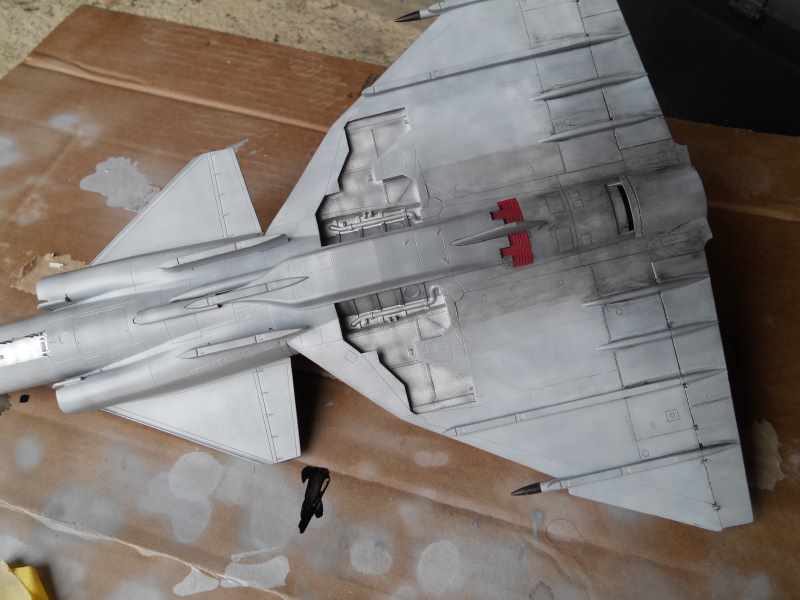
I have had a good few sessions with the airbrush, this time concentrating on the upper surfaces. As with the under surface I used a few shades of grey progressing from dark to light. I did mask some of the panels protecting the grey primer for the first two applications of colour. I also used some of the under surface grey to lighten a few panels as well. Heavily thinned Tamiya paint was used throughout.
After everything was dry I applied a few coats of Klear and then I highlighted some of the panel lines with the Tamiya thinner I use to clean my brushes. If you look at any images of the Viggen in the two tone grey, you will quickly see how dirty these beasts can become.
Not too far from finishing.

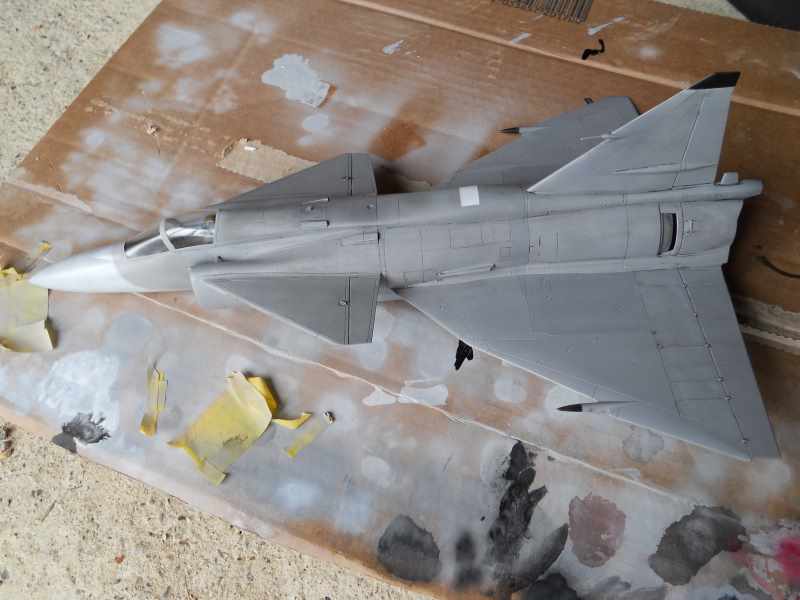
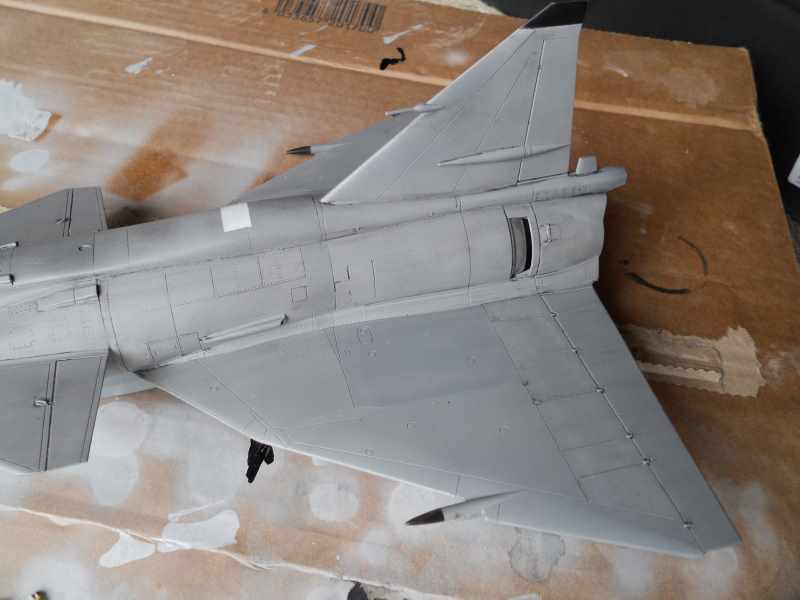
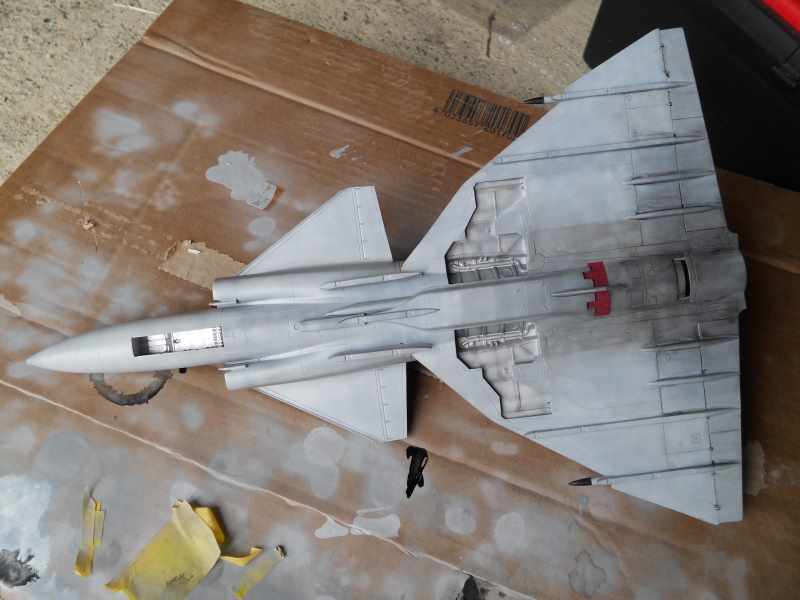
To be continued ..
I have had a good few sessions with the airbrush, this time concentrating on the upper surfaces. As with the under surface I used a few shades of grey progressing from dark to light. I did mask some of the panels protecting the grey primer for the first two applications of colour. I also used some of the under surface grey to lighten a few panels as well. Heavily thinned Tamiya paint was used throughout.
After everything was dry I applied a few coats of Klear and then I highlighted some of the panel lines with the Tamiya thinner I use to clean my brushes. If you look at any images of the Viggen in the two tone grey, you will quickly see how dirty these beasts can become.
Not too far from finishing.
To be continued ..

magnusf

Joined: May 02, 2006
KitMaker: 1,953 posts
AeroScale: 1,902 posts
Posted: Saturday, March 14, 2015 - 02:29 AM UTC
The weathering is coming along really nicely!

Magnus
Magnus
litespeed
Joined: October 15, 2009
KitMaker: 1,976 posts
AeroScale: 1,789 posts
Posted: Saturday, March 14, 2015 - 02:33 AM UTC
Thanks Magnus
Painting and weathering is not usually my strong point, but I'm really enjoying painting this beauty. The trick with weathering is knowing when to stop.
tim
Painting and weathering is not usually my strong point, but I'm really enjoying painting this beauty. The trick with weathering is knowing when to stop.
tim
magnusf
Joined: May 02, 2006
KitMaker: 1,953 posts
AeroScale: 1,902 posts
Posted: Saturday, March 14, 2015 - 02:43 AM UTC
With a Viggen, you have quite a margin before you reach "too much" !
Magnus
! Magnus
litespeed
Joined: October 15, 2009
KitMaker: 1,976 posts
AeroScale: 1,789 posts
Posted: Saturday, March 14, 2015 - 02:58 AM UTC
 your right there magnus...
 tim
Joel_W
Joined: December 04, 2010
KitMaker: 11,666 posts
AeroScale: 7,410 posts
Posted: Saturday, March 14, 2015 - 04:40 AM UTC
Tim,
Outstanding weathering on the topside. From the pictures I've seen, you really can't over weather the two tone gray scheme.
Joel
Outstanding weathering on the topside. From the pictures I've seen, you really can't over weather the two tone gray scheme.
Joel

JPTRR

#051
Joined: December 21, 2002
KitMaker: 7,772 posts
AeroScale: 3,175 posts
Posted: Saturday, March 14, 2015 - 06:04 AM UTC
Tim,
Wow! That is some weathered gray! Excellent!
Wow! That is some weathered gray! Excellent!

litespeed
Joined: October 15, 2009
KitMaker: 1,976 posts
AeroScale: 1,789 posts
Posted: Monday, March 16, 2015 - 02:47 AM UTC
Thanks Joel and Fred you have made my day 
Just started decaling the beast this evening. I think it will take me a couple of evenings to complete the process.
tim
Just started decaling the beast this evening. I think it will take me a couple of evenings to complete the process.
tim
Joel_W
Joined: December 04, 2010
KitMaker: 11,666 posts
AeroScale: 7,410 posts
Posted: Monday, March 16, 2015 - 06:50 PM UTC
Tim,
I've heard some horror stories about those big wing numbers as they are kind of translucent. Hopefully, your decals will behave a lot better.
Joel
I've heard some horror stories about those big wing numbers as they are kind of translucent. Hopefully, your decals will behave a lot better.
Joel
litespeed
Joined: October 15, 2009
KitMaker: 1,976 posts
AeroScale: 1,789 posts
Posted: Tuesday, March 17, 2015 - 04:40 AM UTC
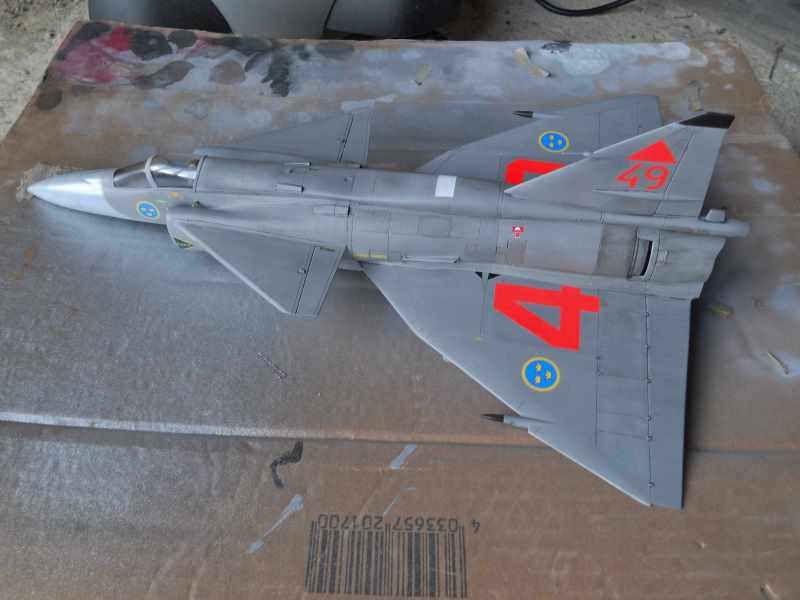
I must admit Joel I was a little dubious about using the large numbers on the wing. I was thinking about making some masks and painting the numbers on. This being an out of the box build means that I had to find out how the decals would perform. I was very pleasantly surprised how well the large decals went on. Yes I used a lot of Microsol, I think I flooded the area around the numbers four times. Yes they are also very bright, but they are supposed to be hi visibility. Colour density over the grey is very good and there is no evidence of the carrier film. I have noticed a little silvering on the numbers on the tail fin, but this is possibly because I have not applied enough Microsol. I have only applied decals to the upper area and the sides of the model so far.
tim

tim
Joel_W
Joined: December 04, 2010
KitMaker: 11,666 posts
AeroScale: 7,410 posts
Posted: Tuesday, March 17, 2015 - 06:07 PM UTC
Tim,
The big numbers look great. Nothing like the issues an problems my buddy had on ARC with his build. Maybe it was just a bad patch of decals. Anyway, yours looks great. Once sealed and a light over wash to blend everything together, they'll look just like weathered paint.
Joel
The big numbers look great. Nothing like the issues an problems my buddy had on ARC with his build. Maybe it was just a bad patch of decals. Anyway, yours looks great. Once sealed and a light over wash to blend everything together, they'll look just like weathered paint.
Joel
litespeed
Joined: October 15, 2009
KitMaker: 1,976 posts
AeroScale: 1,789 posts
Posted: Sunday, March 22, 2015 - 01:10 AM UTC
Hi all
I have been really busy these last few days, so I have not had much opportunity to work on the Viggen. It was pretty grim here today weather wise, so I had the perfect opportunity to get my head down and finish applying the decals on the lower surfaces of the Viggen. The image does not show the stencils at all, but there is a great deal of them. I have to say it was a very tedious task, but we would be moaning if all the stencils were not included on the sheet. As with the decals applied earlier the rest of the decals responded very well to Microsol.
To be continued

bdanie6
Joined: November 09, 2008
KitMaker: 615 posts
AeroScale: 459 posts

Posted: Sunday, March 22, 2015 - 03:25 AM UTC
Hi Tim, I've been watching your build from the beginning since the Viggen has always been one of my favorite jets.
Personally I'd have done the splinter scheme, but you've done a great job with the grays. The weathering looks fantastic as do the decals.
As usual Tim, great job
Later
Personally I'd have done the splinter scheme, but you've done a great job with the grays. The weathering looks fantastic as do the decals.
As usual Tim, great job
Later
Joel_W
Joined: December 04, 2010
KitMaker: 11,666 posts
AeroScale: 7,410 posts
Posted: Monday, March 23, 2015 - 01:27 AM UTC
Tim,
Yep, you can't see the stencils in the bottom picture no matter how hard I try. How close is the stencil color to the paint color?
Joel
Yep, you can't see the stencils in the bottom picture no matter how hard I try. How close is the stencil color to the paint color?
Joel
litespeed
Joined: October 15, 2009
KitMaker: 1,976 posts
AeroScale: 1,789 posts
Posted: Tuesday, March 24, 2015 - 05:50 AM UTC
There is a reason why I selected the grey finish for the JA 37 bdanie6. Special Hobby will be releasing the strike version the AJ-37 so I will purchase this and finish it in the four colour splinter scheme. I think Tarangus is releasing the two seat version: SK 37 and this also features the four colour splinter scheme. I also like the dirty look of the JA 37 and just fancied the appearance more. There seems to be an alternative disruptive finish sported by some JA 37s, which looks like broad black stripes over grey. Incidentally Twobobs has a rather spectacular release if you fancy a bit of colour on your Viggen.
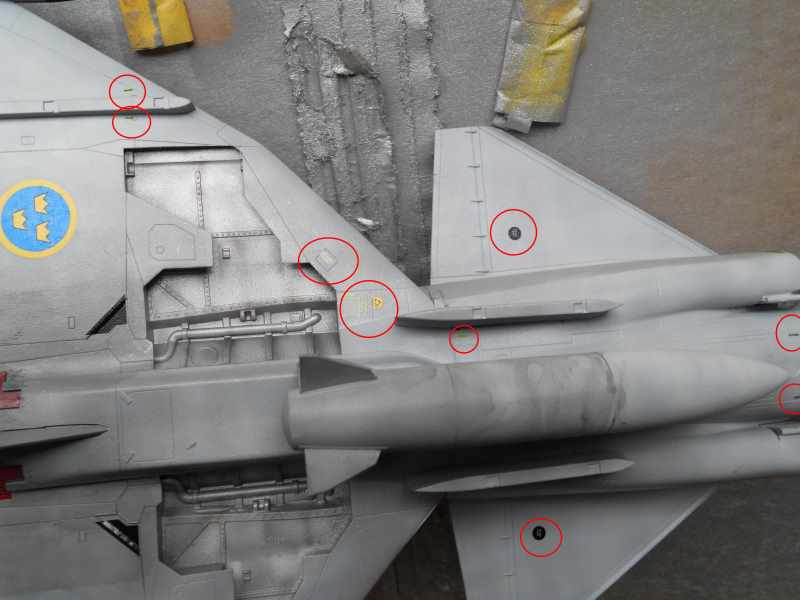
Joel I have taken a close up of part of the underside of the Viggen to show some of the stencils. I thought I had nearly finished applying them. But there are many more for the weapon pylons, happy days!!!
Well as you can see from the image below, I have added the fuel tank. Like the rest of the aircraft it is heavily weathered.
To be continued
magnusf
Joined: May 02, 2006
KitMaker: 1,953 posts
AeroScale: 1,902 posts
Posted: Tuesday, March 24, 2015 - 11:22 AM UTC
Tim! The one with the disruptive black lines was really a display paint job, there was just one from F16 at Uppsala. It also had the "Mustang motif" from the J 26/P-51 era of the 1940ies prominently painted under the belly.
For operational schemes you are pretty much stuck with either grey or splinter (I'll be along for the ride when you do that one ).
Magnus
For operational schemes you are pretty much stuck with either grey or splinter (I'll be along for the ride when you do that one
). Magnus
litespeed
Joined: October 15, 2009
KitMaker: 1,976 posts
AeroScale: 1,789 posts
Posted: Wednesday, March 25, 2015 - 01:49 AM UTC
Hi Magnus
Many thanks for the info, it saved me a few hours trying to find more images of Viggens with stripy camouflage. I was becoming dubious about the camouflage scheme as none of the kit or decal companies were offering it as an option.
tim
Many thanks for the info, it saved me a few hours trying to find more images of Viggens with stripy camouflage. I was becoming dubious about the camouflage scheme as none of the kit or decal companies were offering it as an option.
tim
magnusf
Joined: May 02, 2006
KitMaker: 1,953 posts
AeroScale: 1,902 posts
Posted: Wednesday, March 25, 2015 - 02:48 AM UTC
It's actually a bit embarrassing that they designed a display paint scheme that people think is a camouflage ! Not really Red Arrows-style...
As for decals they might have been done by Red Bolt who did Alps-printed decals about ten years ago or so.
Magnus
! Not really Red Arrows-style...As for decals they might have been done by Red Bolt who did Alps-printed decals about ten years ago or so.
Magnus
Joel_W
Joined: December 04, 2010
KitMaker: 11,666 posts
AeroScale: 7,410 posts
Posted: Wednesday, March 25, 2015 - 03:18 AM UTC
Tim,
Thanks for the close up. It makes a big difference for these very old tired eyes.
Joel
Thanks for the close up. It makes a big difference for these very old tired eyes.
Joel
litespeed
Joined: October 15, 2009
KitMaker: 1,976 posts
AeroScale: 1,789 posts
Posted: Wednesday, March 25, 2015 - 05:14 AM UTC
Magnus there have been some stunning demo aircraft in the Swedish AF. Also you have a heritage flight that is the envy of a lot of countries.
No problem Joel. I can hardly see them either, and I know where they are
tim
No problem Joel. I can hardly see them either, and I know where they are
tim
litespeed
Joined: October 15, 2009
KitMaker: 1,976 posts
AeroScale: 1,789 posts
Posted: Thursday, March 26, 2015 - 02:11 AM UTC
Hi all
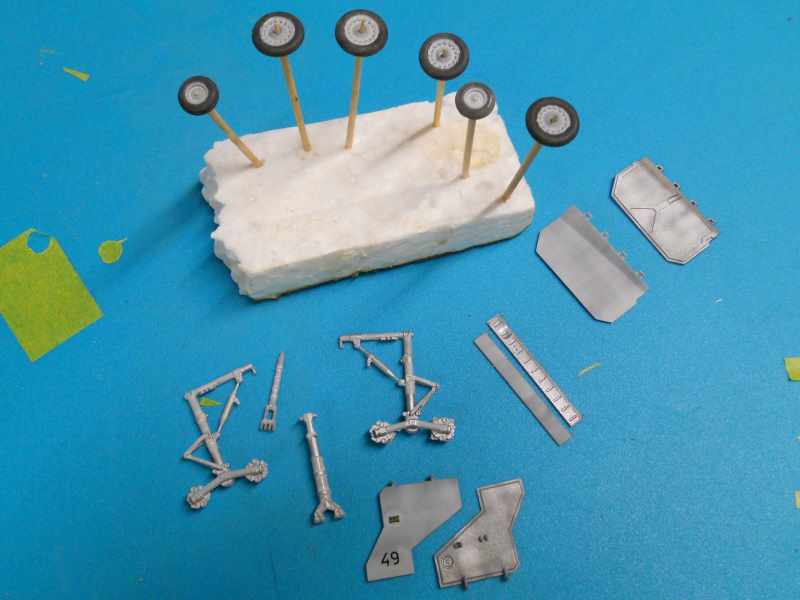
I have made some progress painting the parts for the undercarriage. The doors I painted alongside the airframe a while back. There are a lot of parts for the undercarriage as you can see from the images below.
To be continued .

I have made some progress painting the parts for the undercarriage. The doors I painted alongside the airframe a while back. There are a lot of parts for the undercarriage as you can see from the images below.
To be continued .
magnusf
Joined: May 02, 2006
KitMaker: 1,953 posts
AeroScale: 1,902 posts
Posted: Thursday, March 26, 2015 - 02:21 AM UTC
Just the easy part left now: sticking them all together!
Magnus
Magnus
litespeed
Joined: October 15, 2009
KitMaker: 1,976 posts
AeroScale: 1,789 posts
Posted: Thursday, March 26, 2015 - 02:31 AM UTC
Funny I was just thinking it was a bit rash showing images of the undercarriage parts Magnus. If it all becomes to much putting it all together perhaps folk will notice if I left a few bits off. Then again there is always the rug monster lurking underneath my workbench, it has a particular fondness for anything plastic and small screws...
tim
tim
Joel_W
Joined: December 04, 2010
KitMaker: 11,666 posts
AeroScale: 7,410 posts
Posted: Thursday, March 26, 2015 - 04:52 AM UTC
Quoted Text
Funny I was just thinking it was a bit rash showing images of the undercarriage parts Magnus. If it all becomes to much putting it all together perhaps folk will notice if I left a few bits off. Then again there is always the rug monster lurking underneath my workbench, it has a particular fondness for anything plastic and small screws...
tim
Tim,
The 1st time I saw the landing gear built up, I was quite impressed at just how complex it is. Looking forward to seeing yours assembled and ready for installation.
Just keep that Carpet monster at bay. Believe me I know 1st hand just how hungry they tend to be this time of the year.
Joel
 |

WEB HOSTING BY


Copyright ©2021 AeroScale and Kitmaker Network, a subsidiary of Silver Star Enterprises
All Rights Reserved. Please read our Conditions of Use and Privacy Policy.
All Rights Reserved. Please read our Conditions of Use and Privacy Policy.