Tom's Talon (Trumpeter 1/48th kit).
England - South West, United Kingdom
Joined: October 12, 2012
KitMaker: 19 posts
AeroScale: 10 posts
Posted: Sunday, January 04, 2015 - 10:11 PM UTC
Hi I'm Tom.
This is my blog of my very first build of a scale model of any type. I am being helped by my good friend Mal Mayfield (Holdfast).
As I am very new to the hobby I have very few tools so I am borrowing some of Mal's. As I obviously don't have an airbrush and Mal is reluctant to let me use his pride and joy

I will be completely hand painting this model.
So the progress so far:
Ontario, Canada
Joined: February 04, 2008
KitMaker: 2,507 posts
AeroScale: 1,814 posts
Posted: Monday, January 05, 2015 - 12:12 AM UTC
Welcome Tom and good luck with your first model aircraft!

" The Die Hards"
43rd MIDDLESEX REGIMENT
MACHINE GUN CORPS
XXX CORP
The most effective way to do it, is to do it.
- Amelia Earhart
Joel_W
 Associate Editor
New York, United States
Joined: December 04, 2010
KitMaker: 11,666 posts
AeroScale: 7,410 posts
Posted: Monday, January 05, 2015 - 01:15 AM UTC
Tom,
Welcome to the hobby and to Aeroscale, You're really going to like it here.
Knowing Mal, you're way ahead of the learning curve. Does that mean you're not allowed to use decals?
Joel
On my Workbench:
Monogram 1/24 scale 427 Shelby Cobra
Just Completed:
Beemax 1/24 scale BMW M3 E30 1992 Evolution II
England - South West, United Kingdom
Joined: October 12, 2012
KitMaker: 19 posts
AeroScale: 10 posts
Posted: Monday, January 05, 2015 - 03:44 AM UTC
Decales why not I am going to learn how to put decales to put on it

Holdfast
President 
#056
England - South West, United Kingdom
Joined: September 30, 2002
KitMaker: 8,581 posts
AeroScale: 4,913 posts
Posted: Monday, January 05, 2015 - 10:34 AM UTC
Quoted Text
Welcome Tom and good luck with your first model aircraft!
Not just Tom's first model aircraft but first model period!

Quoted Text
Knowing Mal, you're way ahead of the learning curve. Does that mean you're not allowed to use decals?
Joel

You don't know me very well then Joel!
AS much as I hate decals the plan is to get Tom to a point where he can pick a kit and build it himself. So although he could use my air brush he isn't likely to have one himself, in the foreseeable future; so hence he will be hand painting and so he will need to use the decals. That is a skill he also needs to learn although we are planning a Red Arrows Hawk that will necessarily need to be air brushed
Tom will be around today so he should be able to post more pictures later, hopefully showing some paint

Nice work so far Tom, but a long way to go yet. Keep it up and you should get this finished for the show
MAL the MASK
BULLDOG # 6 (President)
BEWARE OF THE FEW
Sappers: First in, last out. (UBIQUE)
It's not the same, better, but not the same.
Joel_W
Associate Editor New York, United States
Joined: December 04, 2010
KitMaker: 11,666 posts
AeroScale: 7,410 posts
Posted: Monday, January 05, 2015 - 07:50 PM UTC
Mal,
I see. Plastic Modeling 101. Tom's in good hands for sure. Hand painting is an art, but it's long process done right with each coat allowed to dry, then rubbed out. I've seen a few Videos of Japanese masters doing some incrediable work this way.
Joel
On my Workbench:
Monogram 1/24 scale 427 Shelby Cobra
Just Completed:
Beemax 1/24 scale BMW M3 E30 1992 Evolution II
Holdfast
President #056
England - South West, United Kingdom
Joined: September 30, 2002
KitMaker: 8,581 posts
AeroScale: 4,913 posts
Posted: Monday, January 05, 2015 - 08:27 PM UTC
Well I don't know about Tom being in good hands as far as hand brushing is concerned, I do very little hand brushing and I didn't really learn the art before starting with an air brush, although I do understand the concept, I think. There will be no attempt to replicate any Japanese masters of the art, just getting the paint on in a reasonable manner will be a great step I think
MAL the MASK
BULLDOG # 6 (President)
BEWARE OF THE FEW
Sappers: First in, last out. (UBIQUE)
It's not the same, better, but not the same.
England - South West, United Kingdom
Joined: October 12, 2012
KitMaker: 19 posts
AeroScale: 10 posts
Posted: Monday, January 05, 2015 - 09:23 PM UTC
As this is my very first model and the very first time that I have painted one, I am certainly not expecting to be able to paint anything like a reasonably experienced modeller. But I will give it my best shot
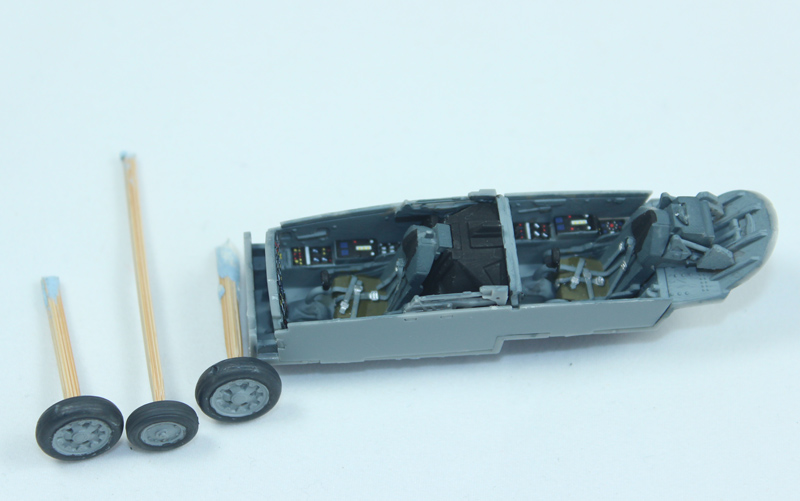
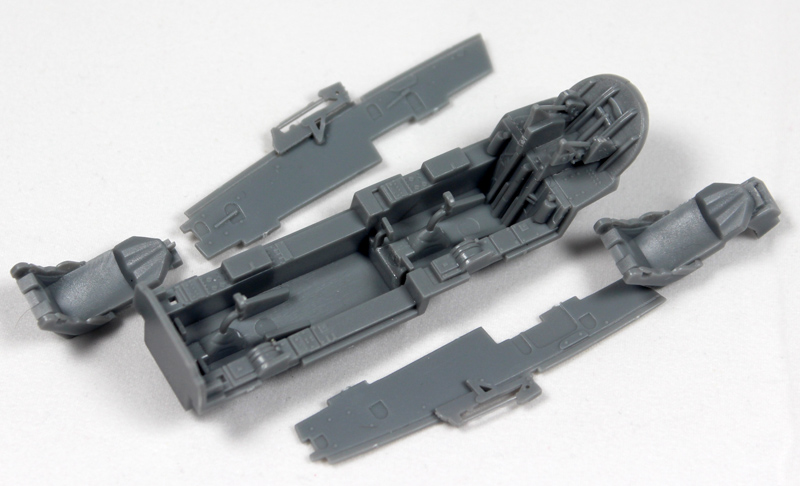
I have managed little more construction and I have begun the painting of the cockpit:
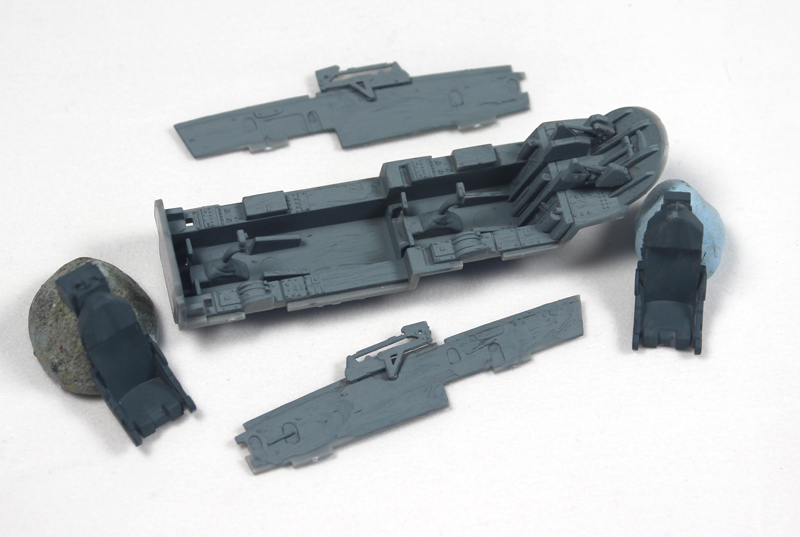
As I was not able to get the specified colours I have used Revel paints numbers 57 and 79
Ontario, Canada
Joined: March 29, 2010
KitMaker: 1,151 posts
AeroScale: 985 posts
Posted: Monday, January 05, 2015 - 11:57 PM UTC
Don't worry Tom specific colours are overrated! Looks great. Ask Mal about drybrushing. It's the first best trick for cockpits.
Holdfast
President #056
England - South West, United Kingdom
Joined: September 30, 2002
KitMaker: 8,581 posts
AeroScale: 4,913 posts
Posted: Tuesday, January 06, 2015 - 12:00 PM UTC
Quoted Text
Don't worry Tom specific colours are overrated! Looks great. Ask Mal about drybrushing. It's the first best trick for cockpits.
Yes Richard, as a first project I'm trying to make sure that Tom enjoys this build and is encouraged to do more, so exact colours are not going to be an issue. A dry brushing lesson is on the cards, but may be a technique to far for this build.
There is another aim to posting here as it helps Tom with written English (although I am clearly not the best teacher!
) and also a bit of photography thrown in.
Tom joined the Bulldogs (THe KitMaker IPMS club) and he and I are the only West Country members so we attend any shows in this neck of the woods to fly the KitMaker flag. There is actually only one show and that is in September and Tom is working towards showing off his handy work there
Tom, nice going mate, especially with those tiny blades (canopy breakers?) on top of the seats
MAL the MASK
BULLDOG # 6 (President)
BEWARE OF THE FEW
Sappers: First in, last out. (UBIQUE)
It's not the same, better, but not the same.
Auckland, New Zealand
Joined: October 25, 2005
KitMaker: 949 posts
AeroScale: 493 posts
Posted: Wednesday, January 07, 2015 - 01:57 PM UTC
Hi Tom Welcome.
Welcome to the wonderful world of model building,its a little like golf,one played you startgoung for that perfect round or in the modelling world the perfect build.
I see you are going with brush painting,I suggest where possible consider rattle cans its alot easier and no brush marks. I use Tamiya and the have the bulk of the major aircraft colours covered.
Please please please say you are going with a NASA scheme.
(I live in hope).
Chris
"A Geek is someone who has found something more interesting than sex."
Neil Degrasse Tyson
MichaelSatin
Campaigns Administrator Colorado, United States
Joined: January 19, 2008
KitMaker: 3,909 posts
AeroScale: 2,904 posts
Posted: Wednesday, January 07, 2015 - 06:21 PM UTC
Tom,
Welcome to the madness! Just be careful, studies have shown that it's addictive; no one can build just one!
On Kitmaker and AeroScale we have online group builds called "Campaigns". They're an opportunity for modelers who share similar interests to build to a specific theme, share pictures of their builds, and discuss techniques and so forth. While you have an excellent tutor already in Mal, there's a campaign going on right now called the
Hairy Stick Campaign for models that are hand painted with a paint brush, like you're doing. Your build looks like it's eligible to me! You might want to click on the link and check it out. You can joint up and continue your build log, but link it to the campaign and maybe get some more hints and tips (as well as attracting more interest in your log). No pressure, just an idea.
Keep up the good work and welcome to our little slice of paradise!
Michael

On the bench:
Sorta depends on your definition of "on the bench"...
England - South West, United Kingdom
Joined: October 12, 2012
KitMaker: 19 posts
AeroScale: 10 posts
Posted: Thursday, January 15, 2015 - 07:48 PM UTC
Quoted Text
Hi Tom Welcome.
Welcome to the wonderful world of model building,its a little like golf,one played you startgoung for that perfect round or in the modelling world the perfect build.
I see you are going with brush painting,I suggest where possible consider rattle cans its alot easier and no brush marks. I use Tamiya and the have the bulk of the major aircraft colours covered.
Please please please say you are going with a NASA scheme.
(I live in hope).
Chris
Hi Chris, thanks for the welcome, I do play golf so I do know what you are talking about.
Thanks for the advice but I won't be using rattle cans
I won't be going with a NASA scheme, I will be using the kit decals
HI Michael, I have joined the campaign, thanks
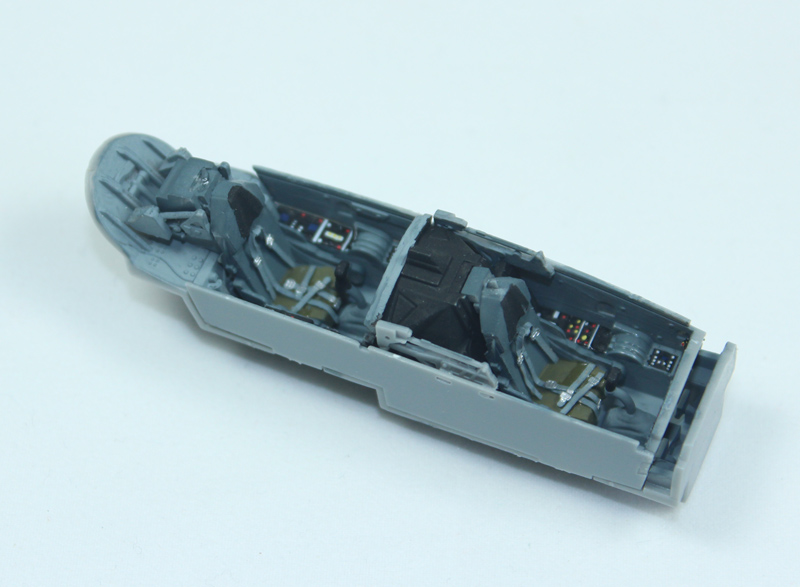
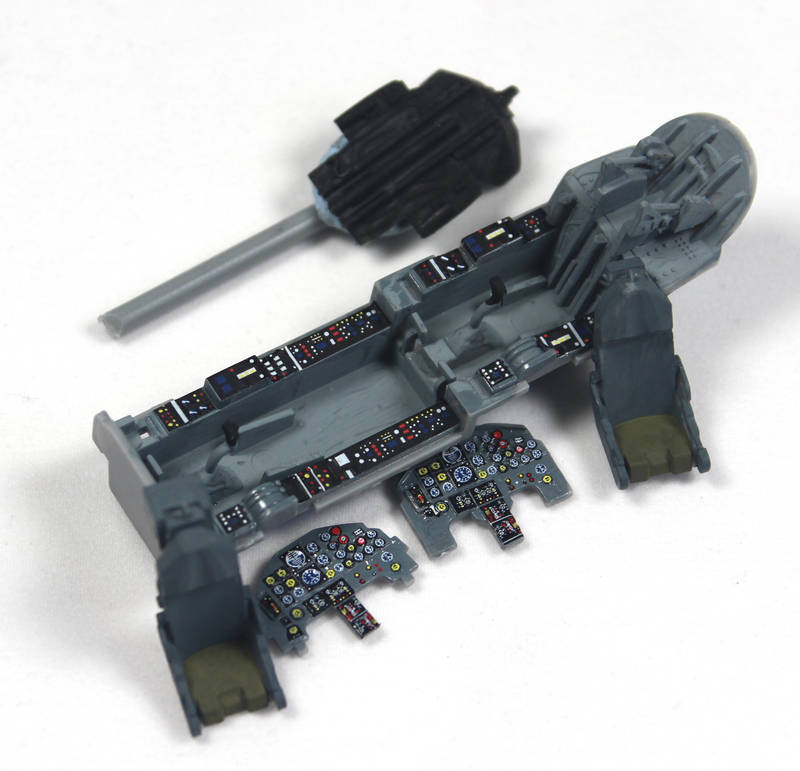
I have put the decals on the cockpit and I have also painted the seats and used matt varnish on the decals.
This is my latest photo:
Holdfast
President #056
England - South West, United Kingdom
Joined: September 30, 2002
KitMaker: 8,581 posts
AeroScale: 4,913 posts
Posted: Thursday, January 15, 2015 - 08:59 PM UTC
Yep no rattle cans, as they cost too much and Tom needs to learn brush painting as this is the way that he will be painting all of his models in the future. As said before, he would be welcome to use my airbrush set up but that would be very practical when Tom is building by himself. He will only be using kit decals as he doesn't need to spend money on aftermarket stuff.
The decals for the side consoles are a bit odd in that, in the front office, they actually go under the rear coming! Anyway, I showed Tom how to gloss the area first, he brushed on Klear, the decals were applied, which was Tom's first time applying them so I had to give him a hand. As you know applying decals over raised instruments is not the easiest of things for your first bout of decalling ever! Mr Mark Setter setting solution was applied and when that was dry an acrylic matt coat was brushed on. No matt coat was applied to the instrument faces as the application of gloss afterwards to just the instrument was going to prove difficult. With the comings in place you will get the effect of the instrument glass shinning anyway. The seat cushions were painted as were the PE belts.
Nice one Tom, keep up the good work, not long before we can close up the fuselage, maybe a couple of more sessions
MAL the MASK
BULLDOG # 6 (President)
BEWARE OF THE FEW
Sappers: First in, last out. (UBIQUE)
It's not the same, better, but not the same.
North Carolina, United States
Joined: November 28, 2005
KitMaker: 2,216 posts
AeroScale: 1,080 posts
Posted: Saturday, January 17, 2015 - 06:34 AM UTC
Tom, I've been building for years. I have to say that your first ever model looks much better than anything I have turned out recently. You are light years ahead of where I was when just beginning. That cockpit looks superb!
Keep up the good work!

"Those who would give up Essential Liberty
to purchase a little Temporary Safety,
deserve neither Liberty nor Safety."
Benjamin Franklin
England - South West, United Kingdom
Joined: October 12, 2012
KitMaker: 19 posts
AeroScale: 10 posts
Posted: Sunday, January 25, 2015 - 10:24 PM UTC
I have done the more painting on my model I have done the seats belts today with MAL mayfield the cockpit is nearly done got to put the fuser large together but I am going to put more pichures of the cockpit on Friday lunch time its getting there for the camborn show in September this year
Holdfast
President #056
England - South West, United Kingdom
Joined: September 30, 2002
KitMaker: 8,581 posts
AeroScale: 4,913 posts
Posted: Monday, January 26, 2015 - 01:03 PM UTC
Yes nicely done Tom, but there are still a few belts to go on the front seat and then there is the rear seat to do
The rear instrument panel is in along with the front ejection seat mount; so when the belts are on and the seats and the side walls are on it will be time to get the cockpit tube in to the fuselage halves and get them joined. It won't then be very long before the external painting can start
Tom did take a photo but we ran out of time to post it, so we will do that on Friday. Our build days are Monday and Friday
MAL the MASK
BULLDOG # 6 (President)
BEWARE OF THE FEW
Sappers: First in, last out. (UBIQUE)
It's not the same, better, but not the same.
Joel_W
Associate Editor New York, United States
Joined: December 04, 2010
KitMaker: 11,666 posts
AeroScale: 7,410 posts
Posted: Monday, January 26, 2015 - 08:49 PM UTC
Tom
Congrats on your cockpit to date. Both instrument panels really look quite good, actually they look better then quite good. And all the side consuls are well done, with no sloppy edges. You're making excellent progress.
Joel
On my Workbench:
Monogram 1/24 scale 427 Shelby Cobra
Just Completed:
Beemax 1/24 scale BMW M3 E30 1992 Evolution II
#041
Kobenhavn, Denmark
Joined: July 20, 2006
KitMaker: 10,069 posts
AeroScale: 3,788 posts
Posted: Wednesday, January 28, 2015 - 11:53 PM UTC
Nice cockpit, Tom! The decals are really adding nice color and detail to the cockpit.
Looking forward to see more
Campaign'oholic - 252+ campaigns completed
England - North West, United Kingdom
Joined: September 03, 2011
KitMaker: 608 posts
AeroScale: 31 posts
Posted: Thursday, January 29, 2015 - 01:14 AM UTC
Hi Tom,
(and hi Mal over your shoulder).
Great work so far mate, nice clean and precise.
I don't want to say you are in good hands.
Mal's are like precision shovels !
.
Hope you are enjoying the results as well as the process mate.
Well done.
This is a great partnership in the making, I know Mal is a great encouragment to anyone new or experienced, but I know he'll also shrug that compliment off.
I'm looking forward to the next installment
Happy modelling.
Paul
It's not wether the glass is half full or half empty that counts, what's important is who should already be ordering the next round.
What kind of dumbass fool asks rhetorical questions anyway ?
Holdfast
President #056
England - South West, United Kingdom
Joined: September 30, 2002
KitMaker: 8,581 posts
AeroScale: 4,913 posts
Posted: Monday, February 02, 2015 - 01:00 PM UTC
Tom has made quite a bit more progress, we meet Mondays and Fridays at 13.30 for Tom to do a bit more on his model. We seem to run out of time to get anything posted but we aim to post the results so far on Friday.
I have spoken to Tom and he is OK with me telling you this; he suffers from ADHD (Attention Deficit and Hyperactive Disorder). So he does find some of the model building process difficult. However he does enjoy it, which is the whole point of the exercise. I am also hoping to help him with his writing and photography skills. I must say that he is very good at Darts, pool, football and golf
Just to clear up a couple of points, I applied most of the decals for the cockpit; as Toms first kit these were just a bit too much for his first introduction to decals I have also applied the PE seat belts as trying PE in your first ever kit is far too daunting. Tom however did all of the painting. He even masks off the head boxes on the seats to paint the black. The test for Tom will be the exterior painting of the fuselage as its going to be black!
Quoted Text
This is a great partnership in the making, I know Mal is a great encouragment to anyone new or experienced, but I know he'll also shrug that compliment off.
Well thanks Paul
MAL the MASK
BULLDOG # 6 (President)
BEWARE OF THE FEW
Sappers: First in, last out. (UBIQUE)
It's not the same, better, but not the same.
JPTRR
Managing Editor #051
Tennessee, United States
Joined: December 21, 2002
KitMaker: 7,772 posts
AeroScale: 3,175 posts
Posted: Monday, February 02, 2015 - 07:41 PM UTC
Tom,
Your cockpit is exceptional! I look forward to your next progress post.
If they demand your loyalty, give them integrity; if they demand integrity, give them your loyalty.--Col John Boyd, USAF
Any plan where you lose your hat is a bad plan.
England - South West, United Kingdom
Joined: October 12, 2012
KitMaker: 19 posts
AeroScale: 10 posts
Posted: Thursday, February 05, 2015 - 09:57 PM UTC
Joel_W
Associate Editor New York, United States
Joined: December 04, 2010
KitMaker: 11,666 posts
AeroScale: 7,410 posts
Posted: Thursday, February 05, 2015 - 10:48 PM UTC
Tom,
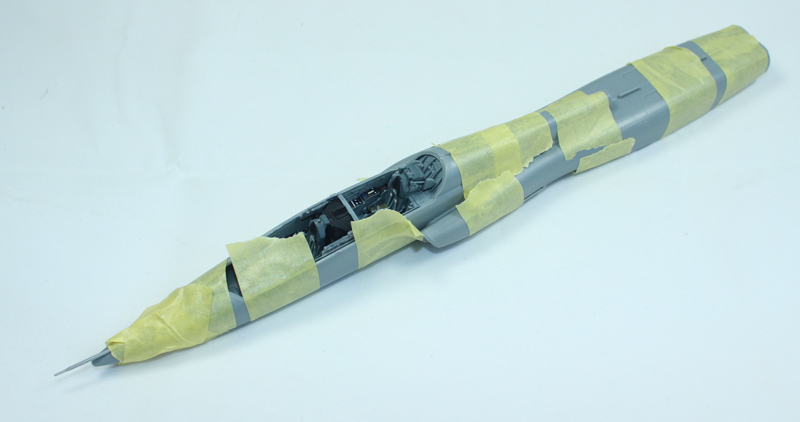
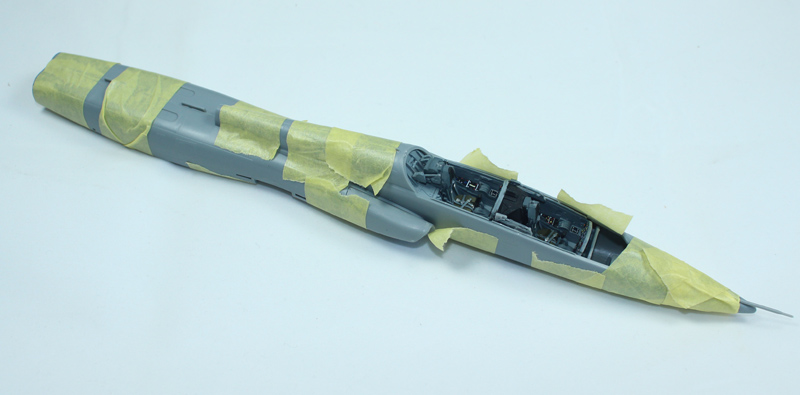
Excellent progress to date, as your cockpit really looks quite well done. Gluing up the fuselage halves is certainly a major accomplishment in your 1st build.
Joel
On my Workbench:
Monogram 1/24 scale 427 Shelby Cobra
Just Completed:
Beemax 1/24 scale BMW M3 E30 1992 Evolution II
Holdfast
President #056
England - South West, United Kingdom
Joined: September 30, 2002
KitMaker: 8,581 posts
AeroScale: 4,913 posts
Posted: Wednesday, February 11, 2015 - 12:43 PM UTC
Yes the Talon is moving on.
We didn't get anything done on Monday as there were more important things to deal with. Tom will visit Sappers rest tomorrow afternoon and he will have the fin and canopies on, and maybe the wings but there is a little filling and sanding that will need doing so the wings will wait until that is done, to make handling easier
MAL the MASK
BULLDOG # 6 (President)
BEWARE OF THE FEW
Sappers: First in, last out. (UBIQUE)
It's not the same, better, but not the same.