Air Campaigns
Want to start or join a group build? This is where to start.
OFFICIAL: Hairy Stick Campaign
Thudius
_VISITCOMMUNITY
Uusimaa, Finland
Joined: October 22, 2012
KitMaker: 1,194 posts
AeroScale: 19 posts
Posted: Tuesday, January 06, 2015 - 08:57 PM UTC

Quoted Text

Kimmo, after veiwing your build I think that I will change my entry to an armor kit. I will look at the stash tonight to see what is available.

Bob


Welcome to the dark side, we have cookies. But seriously, armour is a great way to get your hairy brush techniques in order and for testing new materials and so on. Any mistakes can simply be weathered out

Kimmo
Bigrip74
_VISITCOMMUNITY
Texas, United States
Joined: February 22, 2008
KitMaker: 5,026 posts
AeroScale: 2,811 posts
Posted: Tuesday, January 06, 2015 - 09:25 PM UTC
Kimmo, I usually brush paint my armor since I dont think that after weathering, and filters an airbursh does not matter.

Bob
Thudius
_VISITCOMMUNITY
Uusimaa, Finland
Joined: October 22, 2012
KitMaker: 1,194 posts
AeroScale: 19 posts
Posted: Tuesday, January 06, 2015 - 09:48 PM UTC
I tend to agree Bob. I used to have an airbrush but no compressor so I'd just use it for overall coverage and the most basic of camos. Now I don't have a dedicated space so no stinky, slow drying stuff and no more airbrush or even rattle cans. I'm finding Vallejos to be very good for all my painting needs, still have to figure out a good soft edge technique though, and pigments for filters etc. Practice practice practice.

Kimmo
Bigrip74
_VISITCOMMUNITY
Texas, United States
Joined: February 22, 2008
KitMaker: 5,026 posts
AeroScale: 2,811 posts
Posted: Wednesday, January 07, 2015 - 12:11 AM UTC

Quoted Text

I tend to agree Bob. I used to have an airbrush but no compressor so I'd just use it for overall coverage and the most basic of camos. Now I don't have a dedicated space so no stinky, slow drying stuff and no more airbrush or even rattle cans. I'm finding Vallejos to be very good for all my painting needs, still have to figure out a good soft edge technique though, and pigments for filters etc. Practice practice practice.

Kimmo


I have found that if i thin my Tamiya acrylics about at 25% thinner to paint it will brush on very well.

Bob
tinbanger
_VISITCOMMUNITY
Ontario, Canada
Joined: February 04, 2008
KitMaker: 2,507 posts
AeroScale: 1,814 posts
Posted: Wednesday, January 07, 2015 - 07:24 AM UTC
Cockpit painted:-

All_You_Can_Kit
_VISITCOMMUNITY
Jakarta Raya, Indonesia
Joined: August 22, 2012
KitMaker: 599 posts
AeroScale: 29 posts
Posted: Thursday, January 08, 2015 - 05:09 PM UTC
After viewing many works of all of you guys (majorly in armored vehicle), I'm not too sure whether I still able to participate in this campaign since my entry will be 4 WW II German troop figures in 1/35 scale.. Thanks for your response and I hope I still able to join since the primary rule is: put the airbrush down and just use the hairy brush, right? Thanks

Sincerely


Garry
Bigrip74
_VISITCOMMUNITY
Texas, United States
Joined: February 22, 2008
KitMaker: 5,026 posts
AeroScale: 2,811 posts
Posted: Thursday, January 08, 2015 - 07:26 PM UTC
Ricky, that would be a good entry and I know that others would like to see those figures. So join in with your 4 WW II German troop figures.

Bob
Thudius
_VISITCOMMUNITY
Uusimaa, Finland
Joined: October 22, 2012
KitMaker: 1,194 posts
AeroScale: 19 posts
Posted: Thursday, January 08, 2015 - 07:46 PM UTC
Another good session today, along with a few oh dear discoveries. First off, I got the track guards glued on after thinning down the edges by roughly half for a better scale appearance. A little bit of sanding was needed to get a good sit over the final drive bulges and a wee bit of filler. I got the return roller mounts on after and the tow brackets. The turret got most of the remaining details added as well. The first oh dear moment was actually discovered during my second session when I went to fit the turret onto the hull. The little round hatch has bolt detail that interferes with the turret. I cut off the locking tabs on the turret thinking they were part of the problem to be on the safe side, but nope, just the bolts. So today I shaved them down, problem solved. The next oh dears cropped up with a rather major omission for the gun barrel, there's no recuperator housing. Granted, it would be mostly hidden behind the bolt-on armour, except the armour bolts onto the housing. Sigh. The next oh dear is the etch armour strip below the mantlet. It won't curve to fit because Hobby Boss forgot to take into account that the turret is a sloping cylinder and should have a slight radius rather than being a perfect rectangle. The end result is a piece of stand off armour that doesn't look terribly out of place, but is most definitely wrong. I might have been able to get the curve bent a little tighter so it would sit closer, but it seemed to want to sit nicely like this so I left it. One other slight niggle with the gun/mantlet is that the barrel isn't keyed so you need to eyeball the fit to make sure it sits level horizontally for the searchlight and armour to mount nicely. I think I'll be able to squeeze in at least one more session while I wait for the mailman next week.


Kimmo
DaveCox
_VISITCOMMUNITY
England - South East, United Kingdom
Joined: January 11, 2003
KitMaker: 4,307 posts
AeroScale: 272 posts
Posted: Friday, January 09, 2015 - 04:50 PM UTC
More progress this week. The main body is now finshed, engine next


tinbanger
_VISITCOMMUNITY
Ontario, Canada
Joined: February 04, 2008
KitMaker: 2,507 posts
AeroScale: 1,814 posts
Posted: Friday, January 09, 2015 - 05:56 PM UTC
Nice clean build Dave!
DaveCox
_VISITCOMMUNITY
England - South East, United Kingdom
Joined: January 11, 2003
KitMaker: 4,307 posts
AeroScale: 272 posts
Posted: Saturday, January 10, 2015 - 09:48 PM UTC
Today's progress (well, day and a half....).


I hate doing the exhausts on F1 cars - it's like knitting spaghetti. Some parts haven't been painted (shock absorbers), but sometimes I reckon that a strong joint is better than strict accuracy. When it's finished no-one except me will notice.

Bushioka
_VISITCOMMUNITY
Oregon, United States
Joined: January 13, 2014
KitMaker: 107 posts
AeroScale: 105 posts
Posted: Saturday, January 10, 2015 - 11:54 PM UTC
So here's my entry for the campaign, KP Models' 1/72 Avia B.35 'Advanced Czechoslovak Fighter'. Since it was a prototype at the time of the German annexation, it'll be what if no matter what. As such this is a good opportunity to use my Slovak Air Force markings from Blue Rider.

Thudius
_VISITCOMMUNITY
Uusimaa, Finland
Joined: October 22, 2012
KitMaker: 1,194 posts
AeroScale: 19 posts
Posted: Sunday, January 11, 2015 - 06:58 PM UTC
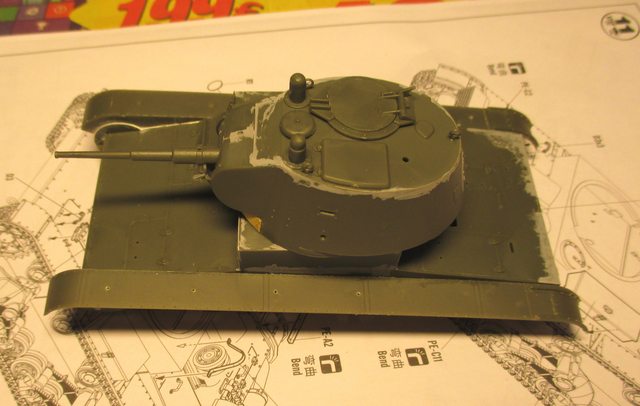
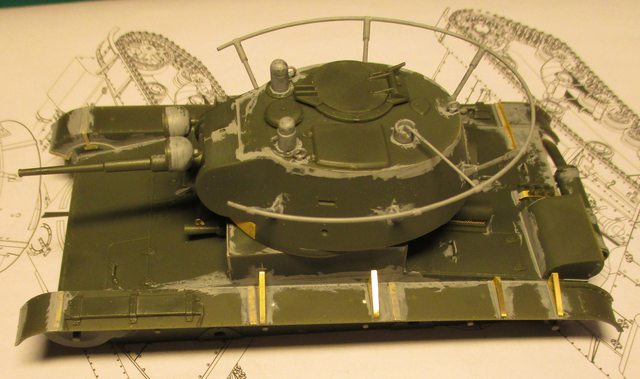
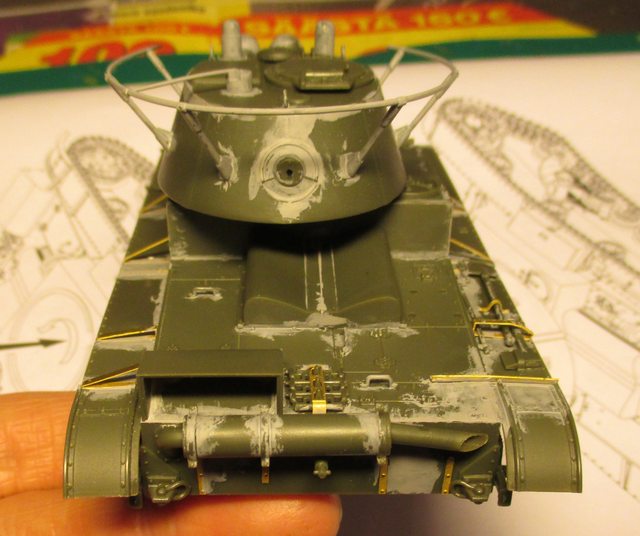
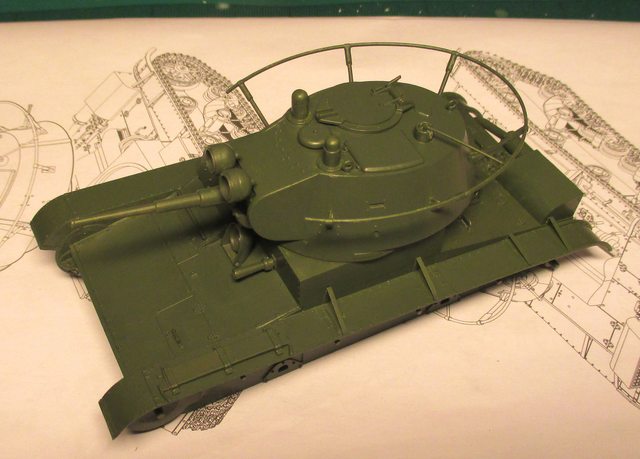
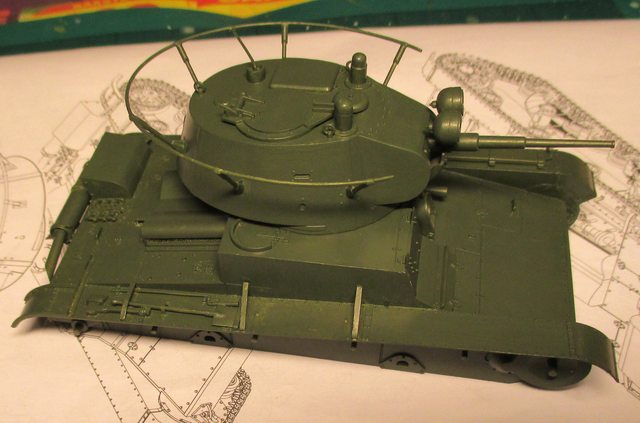
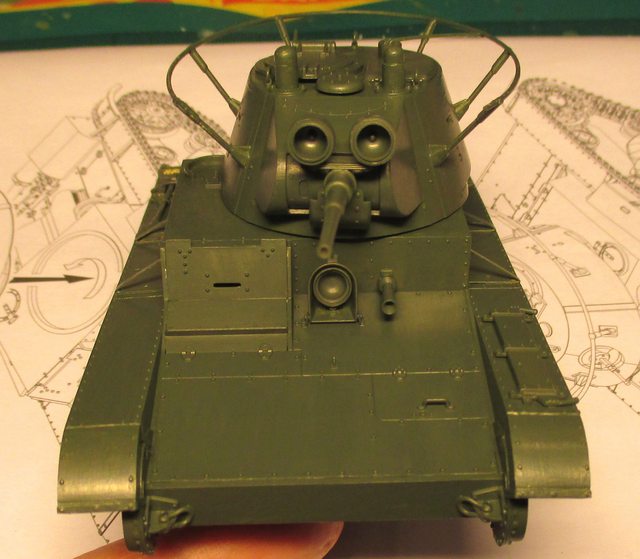
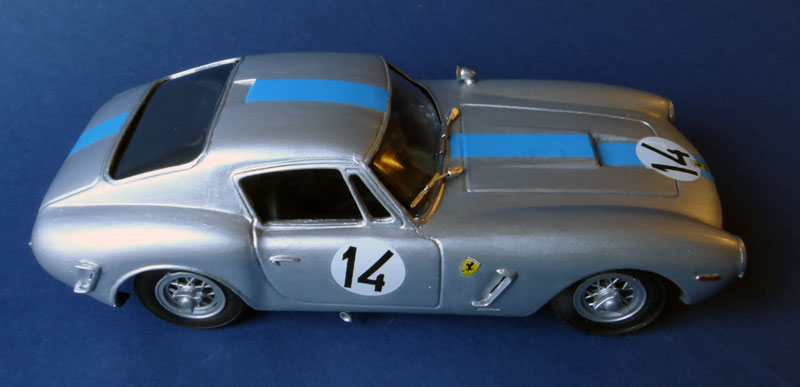
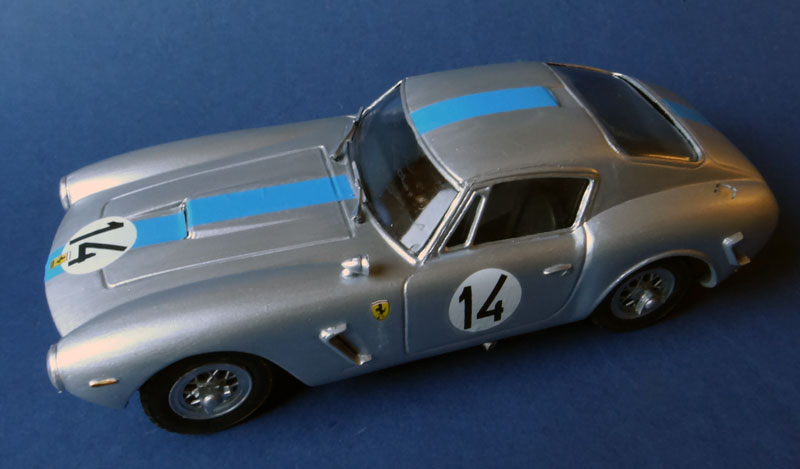
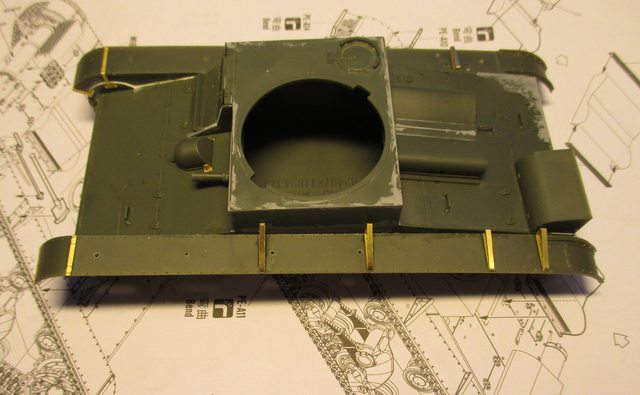
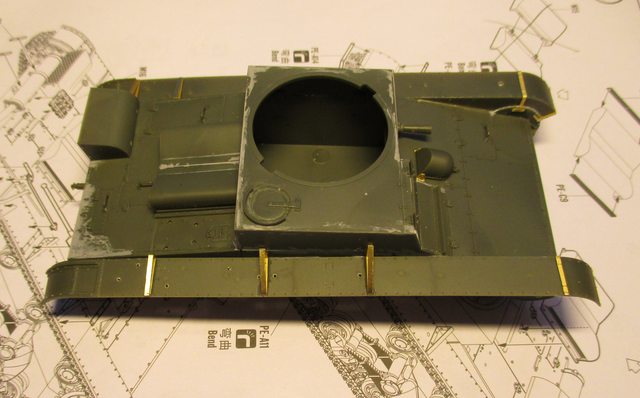
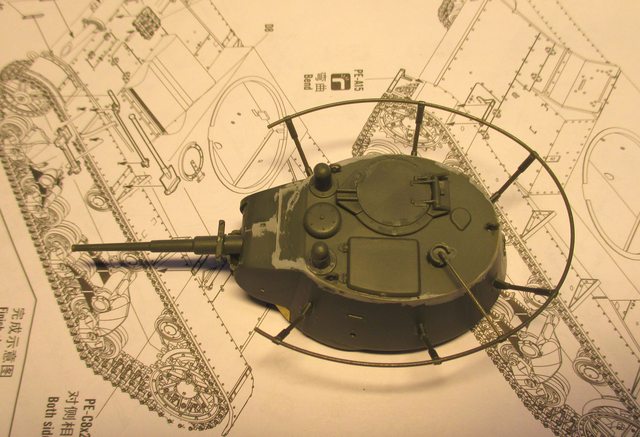
More progress, etch, antenna and some bits and bobs. Today's major task was getting the antenna off the sprue and in place. It went better than expected. Clean up the mold seams as best you can while it is still attached to the sprue, a very gentle scrape was plenty to remove the seam. If your blade is digging, replace it. There are quite a few attachment points so extreme care is needed. Do not attempt to remove it from the sprue with cutters, I can guarantee you will at best warp, or at worst, snap a frame. Support your cuts and slice with a single edged razor blade or very sharp chisel blade, don't worry about getting a clean cut, trim after. Gluing in place was a breeze, even without locating pins. I'll let this set and then go back and do some final sanding/scraping.

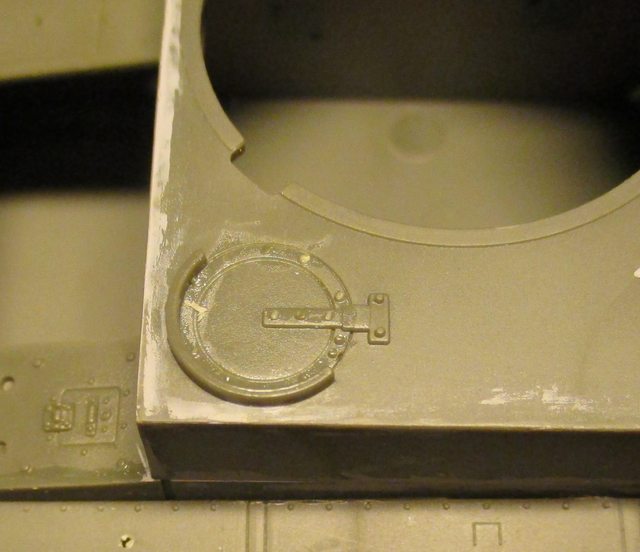
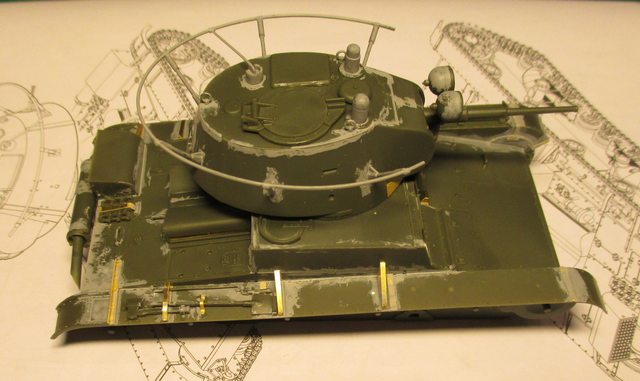
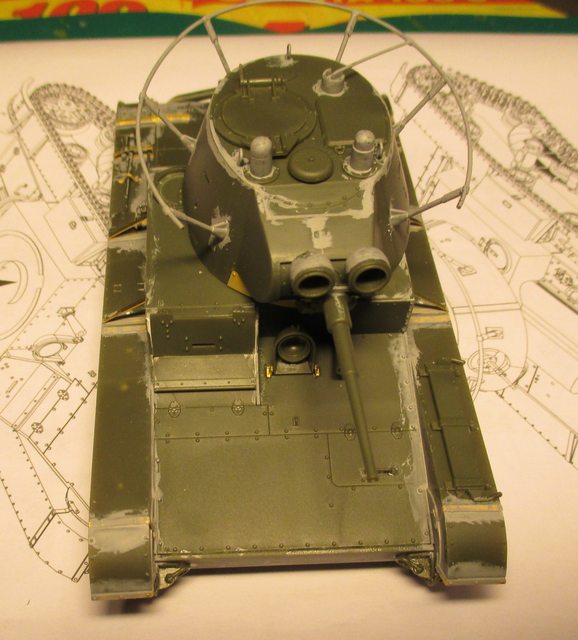
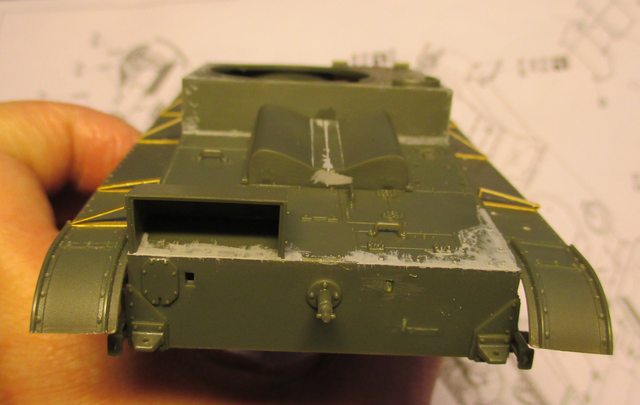
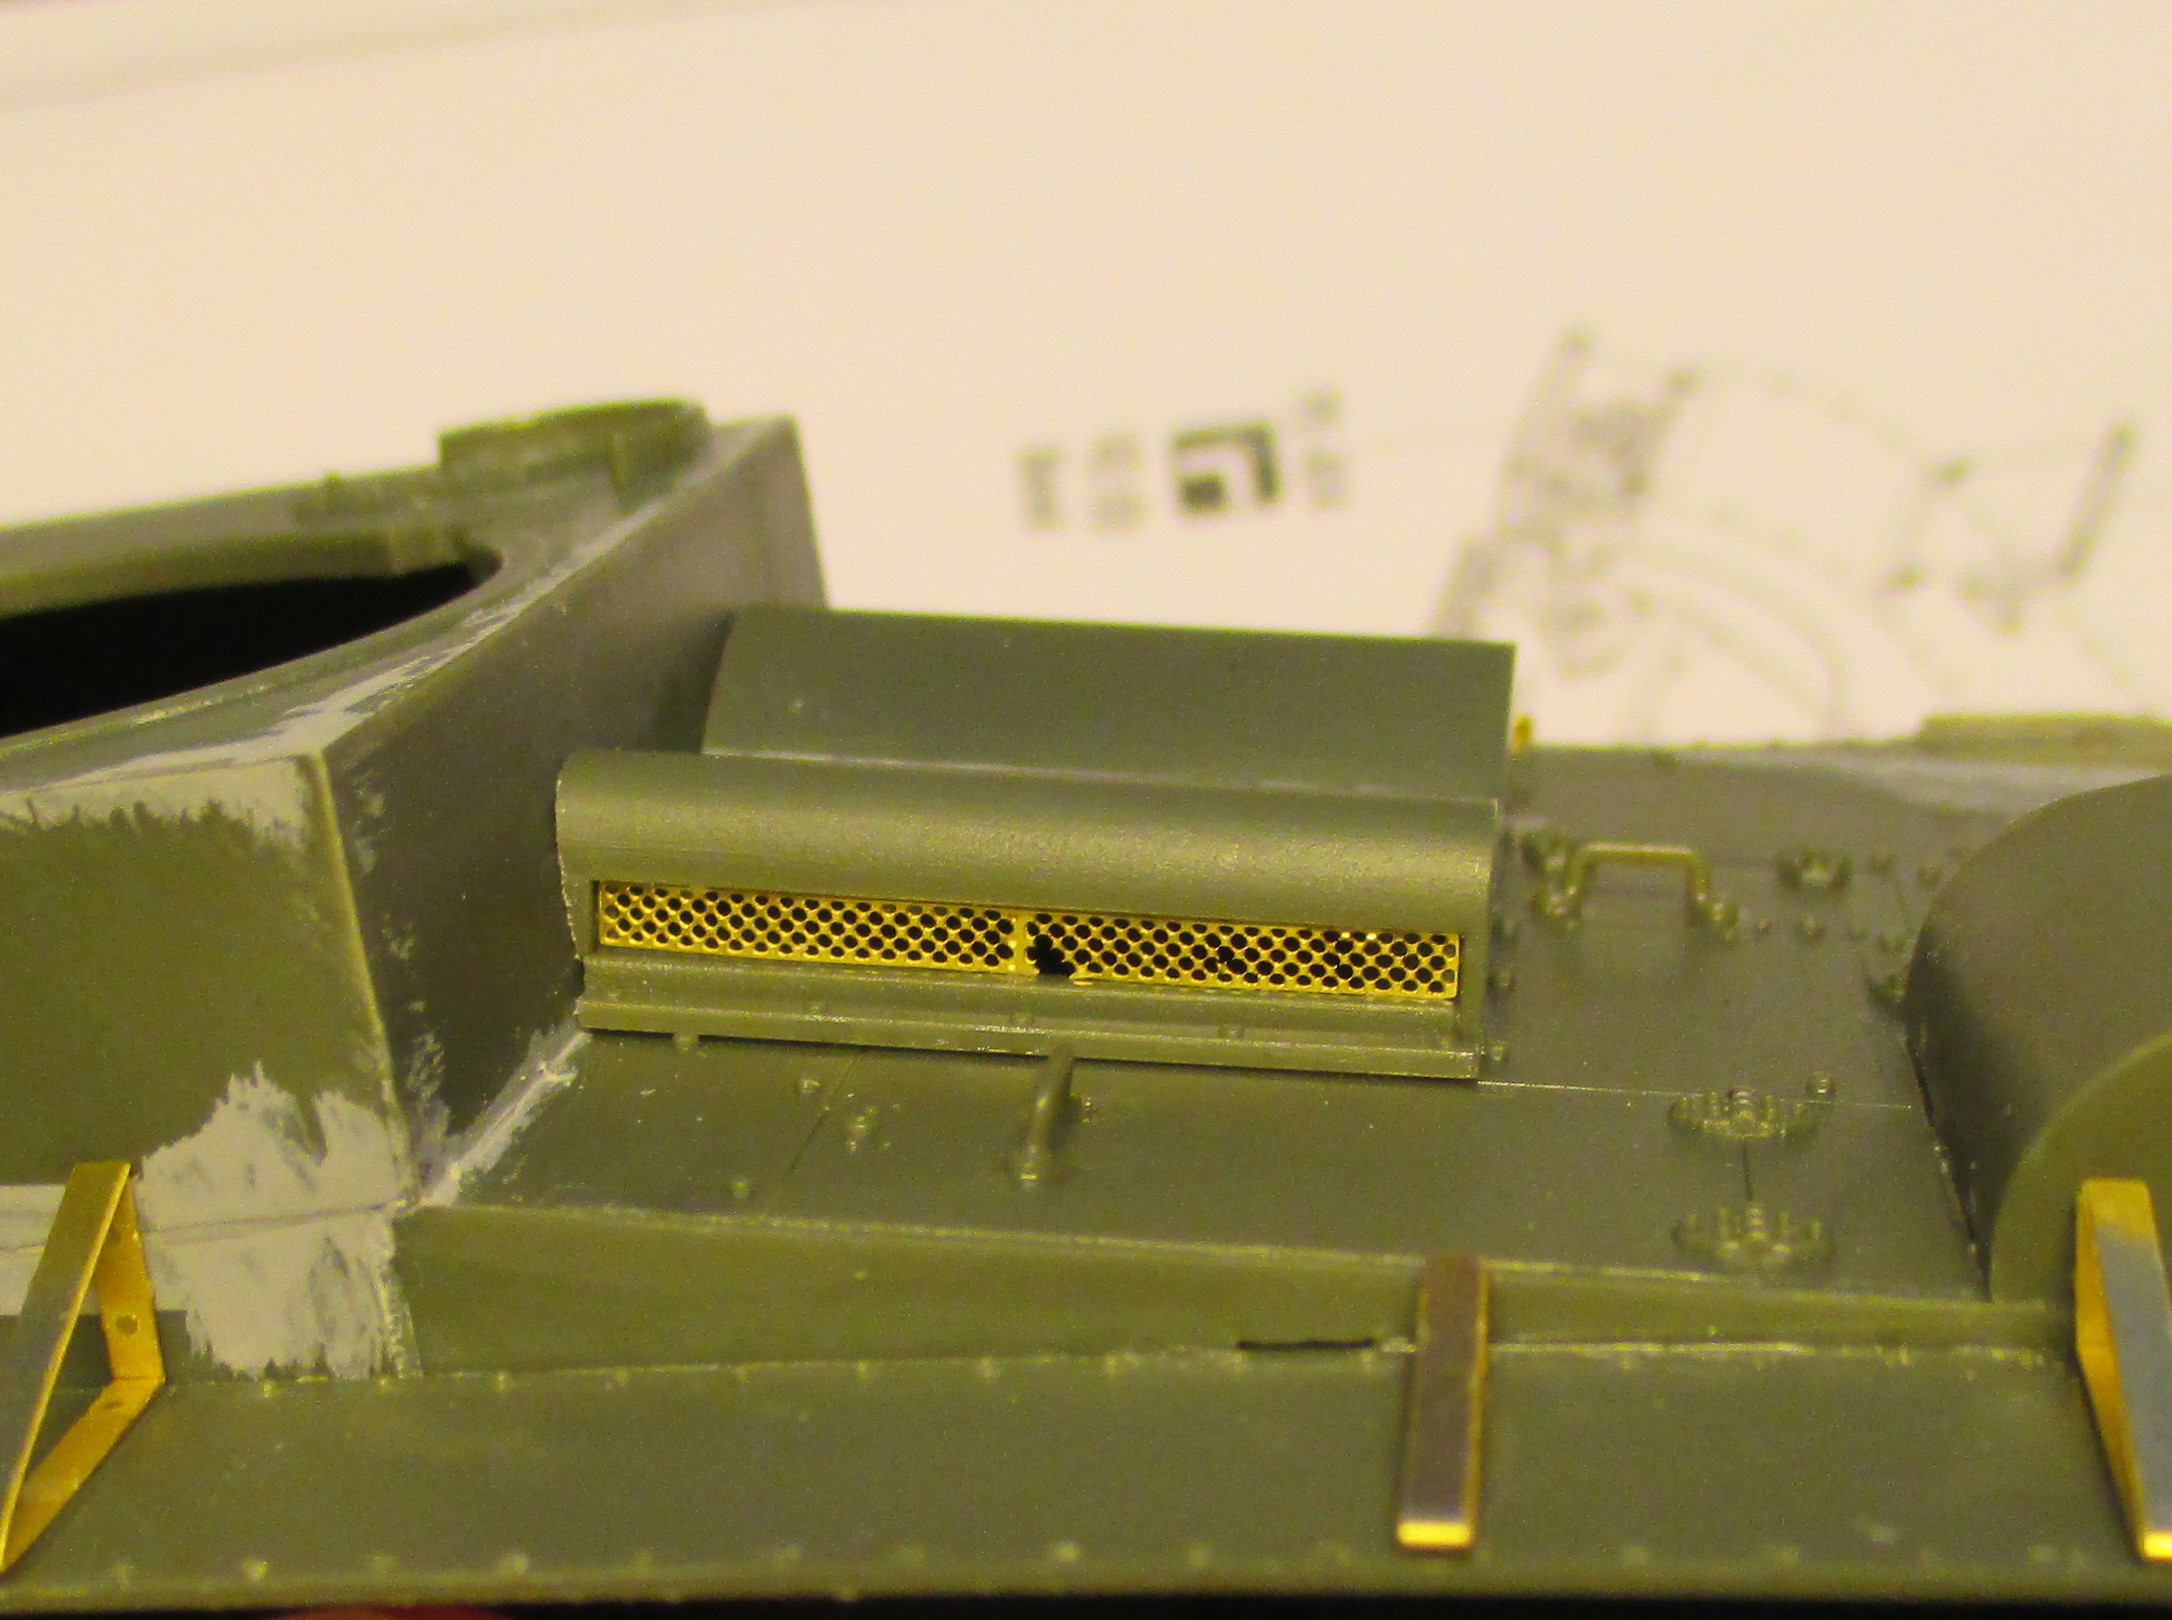
Turning to the etch, the fender brackets and supports went on easily enough, with the front brackets being a little tricky to get bent nice and tight over the contours of the drive covers. I find it best to tack the part in place with regular liquid cement, then seal with super glue when dealing with small parts. Sometimes I only use liquid cement, press the part into softened plastic and it grabs quite well. Vallejo primer also makes sure that stuff stays put. One minor headache with the screens, as you can see, one got damaged. These screens are way too fine for trimming and filing, even removing them induces a kink. They should have been made a bit thicker, and with a wider frame. They will bend no matter how careful you are, be forewarned. If I hadn't been fouling the air with my curses, I should have realized I could have put the damaged one on the other side where it would be partially hidden by the jack. I may have put it in upside down to boot.

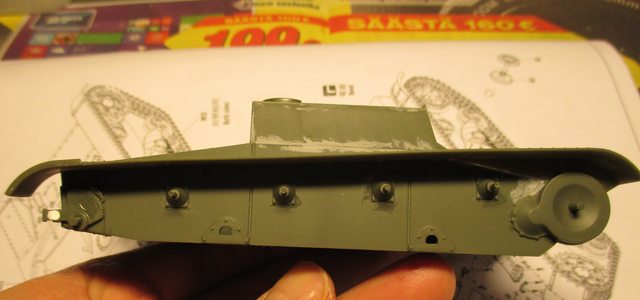
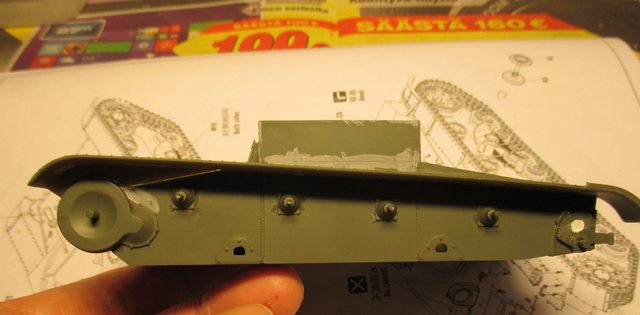
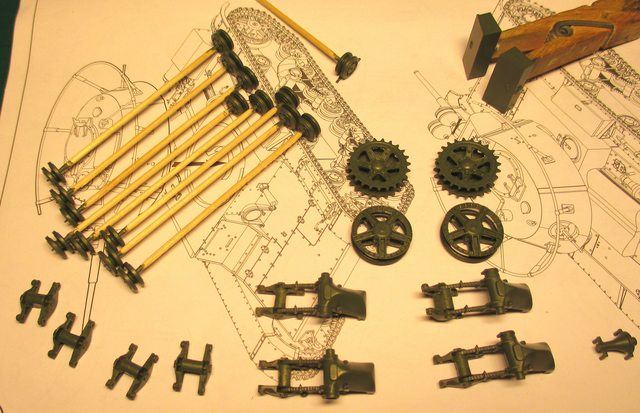
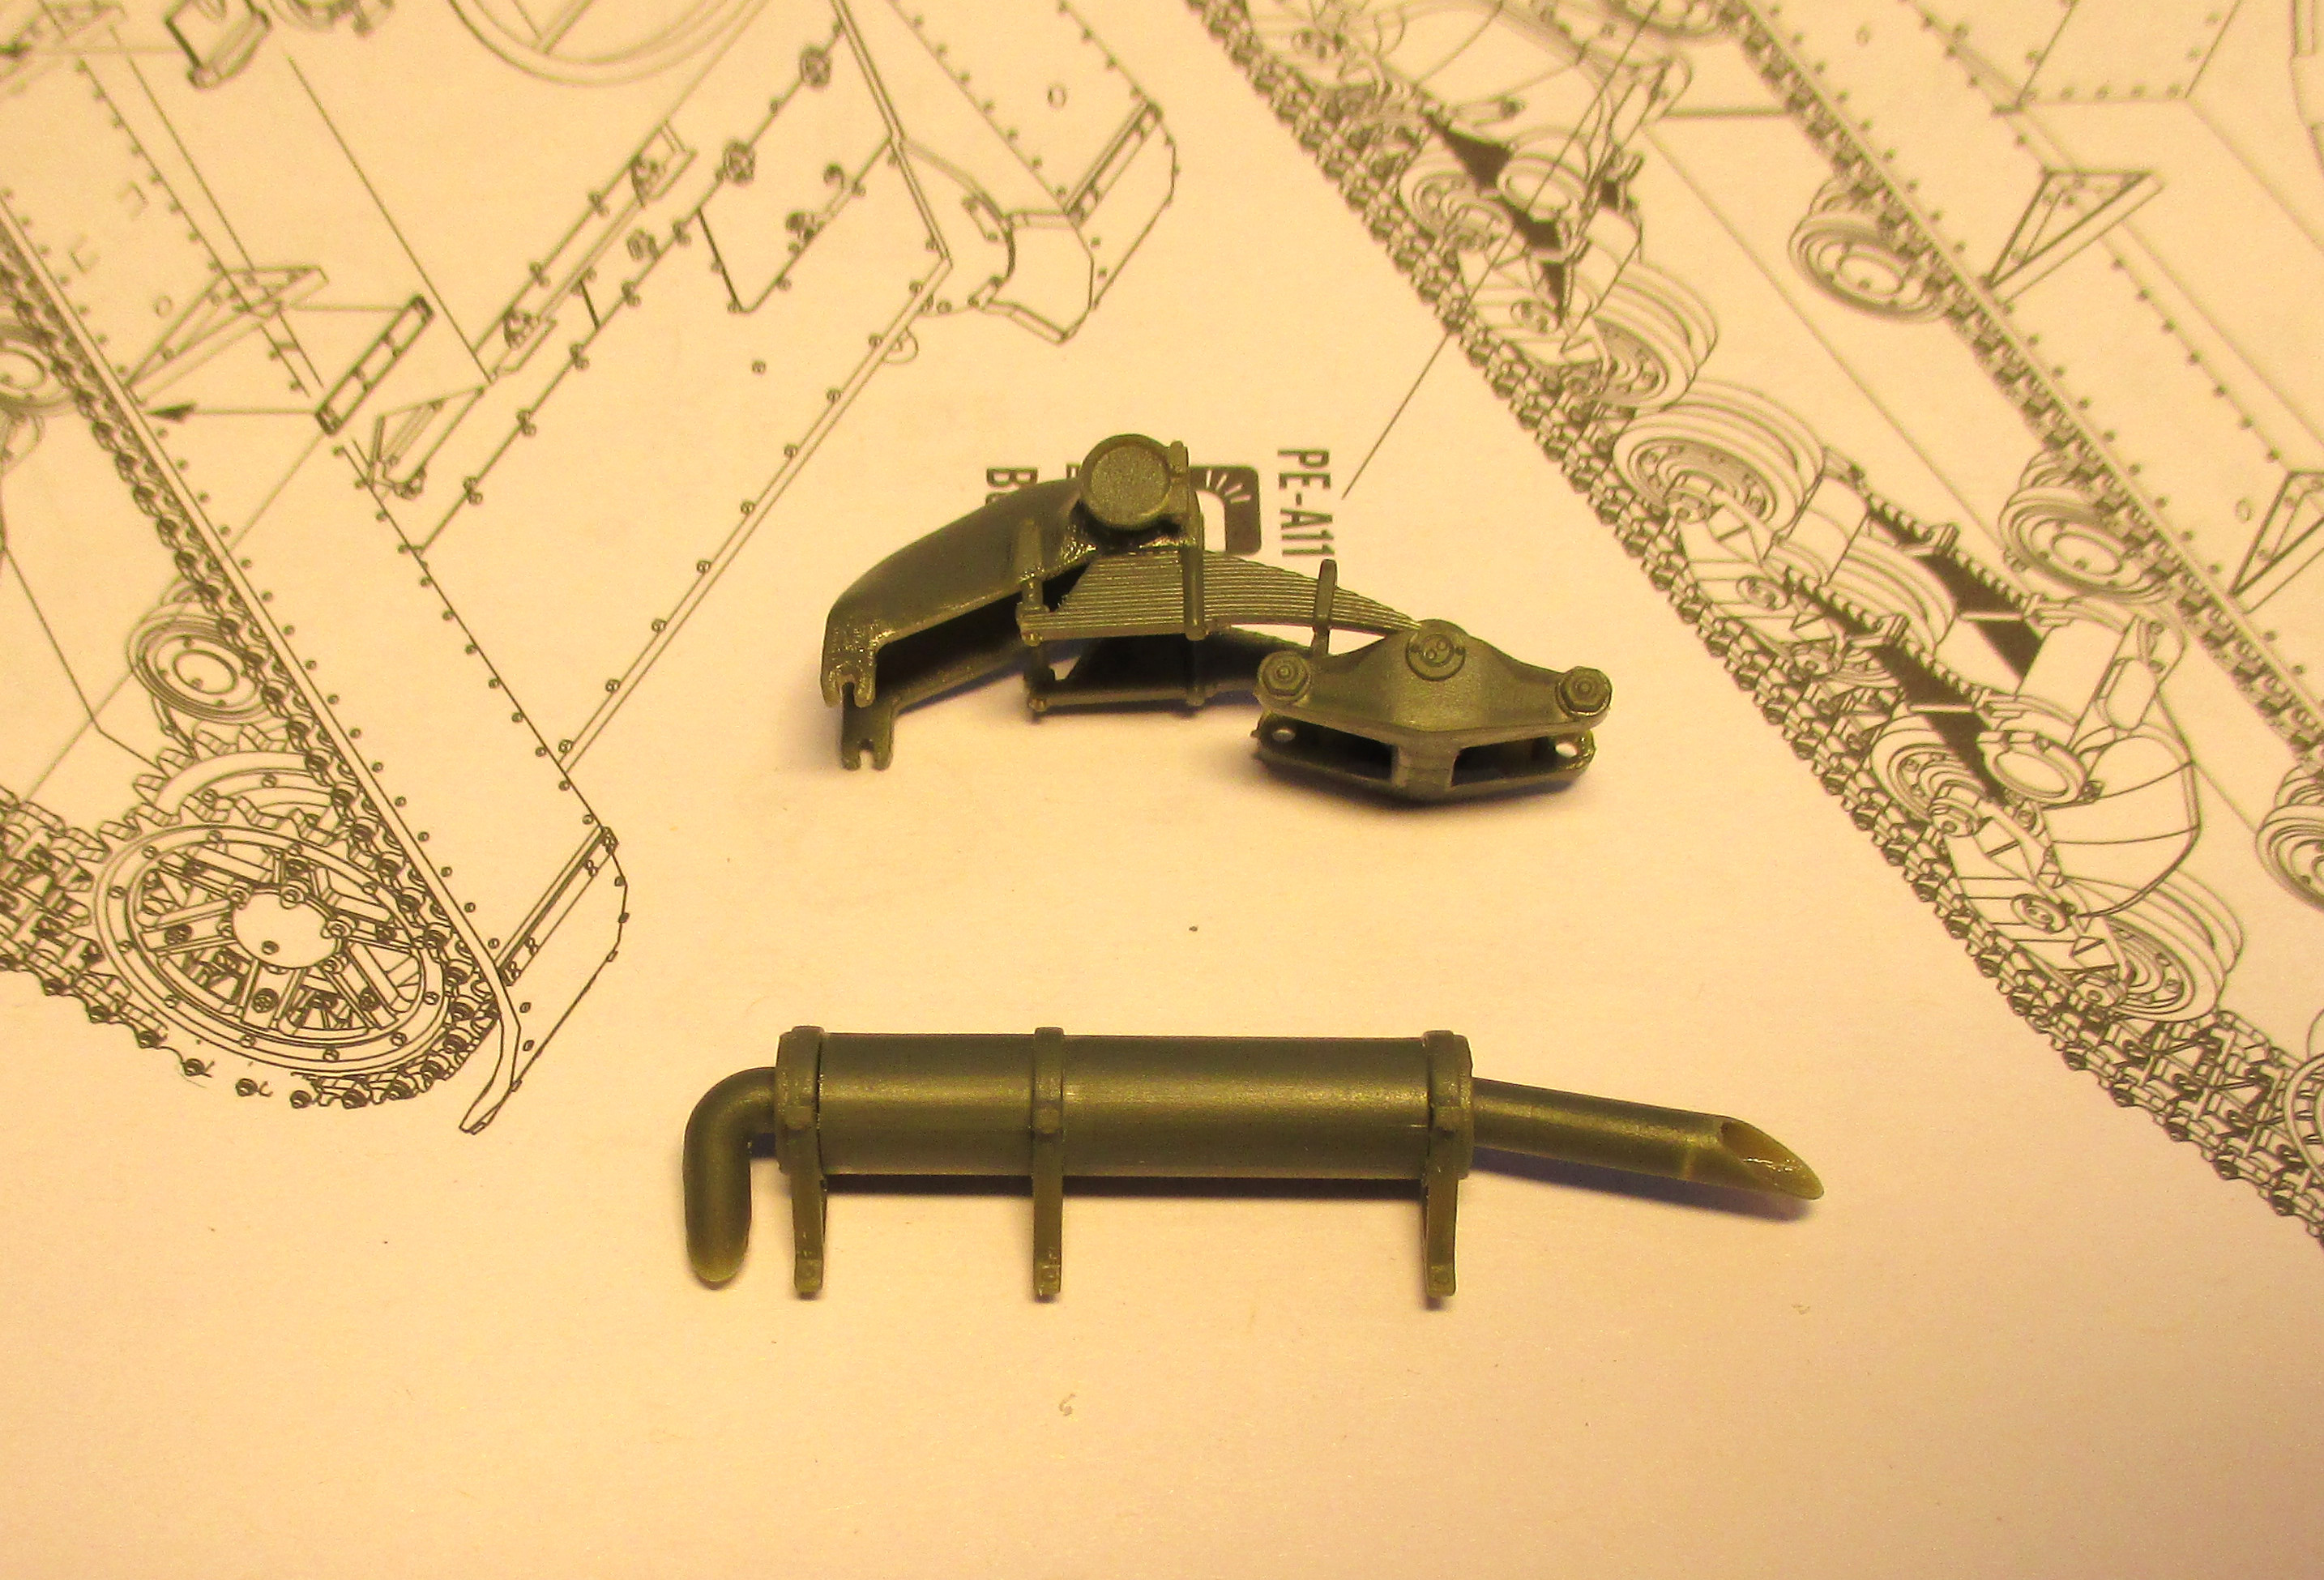
The suspension got half glued, I'll paint the units separately and then glue everything up. The exhaust was done up after thinning the pipe and the horn at the front needed thinning as well. The tabs on the exhaust bracket don't really want to fit with the holes in the hull so I trimmed them off. I think I'll get one more session tomorrow, still no replacement part.


Kimmo
Bushioka
_VISITCOMMUNITY
Oregon, United States
Joined: January 13, 2014
KitMaker: 107 posts
AeroScale: 105 posts
Posted: Monday, January 12, 2015 - 02:54 AM UTC

Quoted Text

So here's my entry for the campaign, KP Models' 1/72 Avia B.35 'Advanced Czechoslovak Fighter'. Since it was a prototype at the time of the German annexation, it'll be what if no matter what. As such this is a good opportunity to use my Slovak Air Force markings from Blue Rider.


Scratch that, I think I'm going to make my YAK-9 for this campaign (the Avia has been requested for another campaign). I'll post pictures as soon as it arrives in the mail - I'm hearing Wednesday as an ETA.
Thudius
_VISITCOMMUNITY
Uusimaa, Finland
Joined: October 22, 2012
KitMaker: 1,194 posts
AeroScale: 19 posts
Posted: Monday, January 12, 2015 - 10:52 PM UTC
That much closer to the main business at hand. Pretty much everything except the tracks and a couple of bits to be added after painting is done. The last of the etch is on, some of it was a right pain to deal with. I ended up having to glue the tools in place as it would be tricky to get them in after painting. A spot of primer to check seams and if I get another session in tomorrow, hopefully a proper base coat. Quite frankly, I'm glad the build stage is just about over. The kit is a bit of a disappointment in many ways and I'm really glad I got it at a hefty discount. So much potential, so many things that just sucked the joy out of it.


Kimmo
Thudius
_VISITCOMMUNITY
Uusimaa, Finland
Joined: October 22, 2012
KitMaker: 1,194 posts
AeroScale: 19 posts
Posted: Tuesday, January 13, 2015 - 11:54 PM UTC
We've gone green. Managed a couple of coats of primer today, Bronze Green with some Dark Yellow. I also did a 3 segment run of track to make sure it fits the sprocket. It does, but there may be an issue with the whole assembly process, more on that once I get it figured out and get the tracks done. My long awaited replacement part arrived so that means this is probably the last update for a couple of weeks. At least I'll be sure the primer has cured the next time I dig the kit out.


Kimmo
Bushioka
_VISITCOMMUNITY
Oregon, United States
Joined: January 13, 2014
KitMaker: 107 posts
AeroScale: 105 posts
Posted: Thursday, January 15, 2015 - 11:39 AM UTC
My new entry for the campaign is this LTD Models 1/48 scale Yak 9. It's my first time working with a vacu-formed canopy, so we'll see how this goes.


DaveCox
_VISITCOMMUNITY
England - South East, United Kingdom
Joined: January 11, 2003
KitMaker: 4,307 posts
AeroScale: 272 posts
Posted: Friday, January 16, 2015 - 03:33 PM UTC
1st entry completed - Tamiya 1/12 McLaren M23, and unboxing the 2nd - ESCI 1/24 Ferrari 250SWB. The 250 will be a challenge, brush-painted metallic finish. (PS- the M23s rear wing is actually straight, it's distorted by the close-up wideangle lens)


PeeDee
_VISITCOMMUNITY
England - North West, United Kingdom
Joined: September 03, 2011
KitMaker: 608 posts
AeroScale: 31 posts
Posted: Friday, January 16, 2015 - 03:45 PM UTC
Lovely lovely lovely dave,
I'm really impressed.
I'm struggling a bit for time, and have to finish a couple of things for other folk before I can start what I wish to enter.
Happy Ferrari !
Paul
DaveCox
_VISITCOMMUNITY
England - South East, United Kingdom
Joined: January 11, 2003
KitMaker: 4,307 posts
AeroScale: 272 posts
Posted: Friday, January 16, 2015 - 09:04 PM UTC
1st days progress on the 250SWB. Body colour is only the first coat - Humbrol silver. The second coat will have a little blue mixed in, then when it's dry it'll get buffed with a facial tissue (helps to flatten brushstokes). Finally it will have a coat of Klear after the car is assembled

DaveCox
_VISITCOMMUNITY
England - South East, United Kingdom
Joined: January 11, 2003
KitMaker: 4,307 posts
AeroScale: 272 posts
Posted: Saturday, January 17, 2015 - 08:27 PM UTC
9 hour over two days and entry 2 is finished. These Esci kits were the best around when they were first released (when the Japanese manufacturers were making odd-scale motorised toys); but it does look very dated now! Overscale parts (especially the wheels and knock-offs), flash and bad fit - the glazing is held in with double-sided tape!.

And yes, I know that the off-side decals have slipped, but I only noticed it in the photo and they're sealed under a coat of acrylic floor polish so they're staying that way!


PeeDee
_VISITCOMMUNITY
England - North West, United Kingdom
Joined: September 03, 2011
KitMaker: 608 posts
AeroScale: 31 posts
Posted: Saturday, January 17, 2015 - 09:13 PM UTC
Nice one Dave,

Not every car race no was as perfect as a decal sheet anyway in reality.

I like it, decent reward for a quick build.

I bet you canKt get through the rest of your stash this quick though eh !
Regards paul
DaveCox
_VISITCOMMUNITY
England - South East, United Kingdom
Joined: January 11, 2003
KitMaker: 4,307 posts
AeroScale: 272 posts
Posted: Saturday, January 17, 2015 - 09:23 PM UTC
Thanks Paul

This one was really an exercise in showing that metallic can be brush-painted and look reasonably good. Next up is either Tamiya's 1/24 Escort Cossie or 1/12 Lotus 49. Don't know if I'll do either for this campaign though.
tinbanger
_VISITCOMMUNITY
Ontario, Canada
Joined: February 04, 2008
KitMaker: 2,507 posts
AeroScale: 1,814 posts
Posted: Sunday, January 18, 2015 - 02:18 AM UTC

Quoted Text

Thanks Paul

This one was really an exercise in showing that metallic can be brush-painted and look reasonably good. Next up is either Tamiya's 1/24 Escort Cossie or 1/12 Lotus 49. Don't know if I'll do either for this campaign though.


Good work Dave!
I'd like to see the Escort Cossie!
PeeDee
_VISITCOMMUNITY
England - North West, United Kingdom
Joined: September 03, 2011
KitMaker: 608 posts
AeroScale: 31 posts
Posted: Sunday, January 18, 2015 - 02:34 AM UTC
Cosworth schmosworth

hahaha

Escort Mexico, (a real man's car),

not a boy racer tin bucket

pleeeeeeez

Paul.