

Air Campaigns
Want to start or join a group build? This is where to start.
Want to start or join a group build? This is where to start.
Hosted by Frederick Boucher, Michael Satin
OFFICIAL:1st Generation Jet Fighters Campaign

Torpon

Joined: February 28, 2012
KitMaker: 103 posts
AeroScale: 102 posts
Posted: Friday, March 06, 2015 - 12:41 AM UTC
Wow Daniel, that is looking great. I was going to ask you the same as Michael.

dcandal

Joined: September 07, 2006
KitMaker: 918 posts
AeroScale: 688 posts

Posted: Friday, March 06, 2015 - 01:38 AM UTC
Hi Michael
Hola Carlos,
For the panles I´d used Mig Dark Wash.
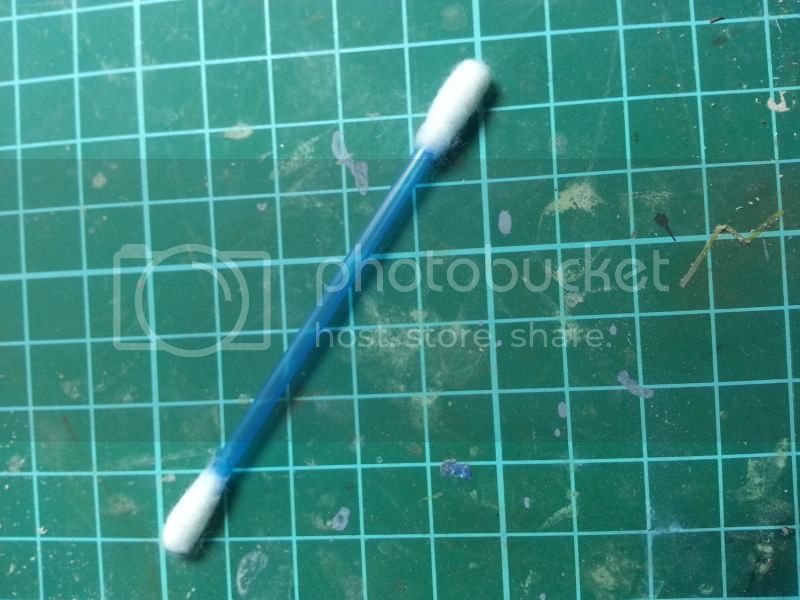
Before it was completely dry I clean it with this. I put a photo because I don´t know how do you call in english,
Hola Carlos,
For the panles I´d used Mig Dark Wash.
Before it was completely dry I clean it with this. I put a photo because I don´t know how do you call in english,

MichaelSatin


Joined: January 19, 2008
KitMaker: 3,909 posts
AeroScale: 2,904 posts
Posted: Friday, March 06, 2015 - 01:47 AM UTC
Thanks! Is MiG an oil based or water based product (if you know)?
BTW, those are generically called cotton swabs. In America they're generally known as Q-Tips as that was the brand that made them popular.
Michael
BTW, those are generically called cotton swabs. In America they're generally known as Q-Tips as that was the brand that made them popular.
Michael
dcandal
Joined: September 07, 2006
KitMaker: 918 posts
AeroScale: 688 posts
Posted: Saturday, March 07, 2015 - 03:24 AM UTC
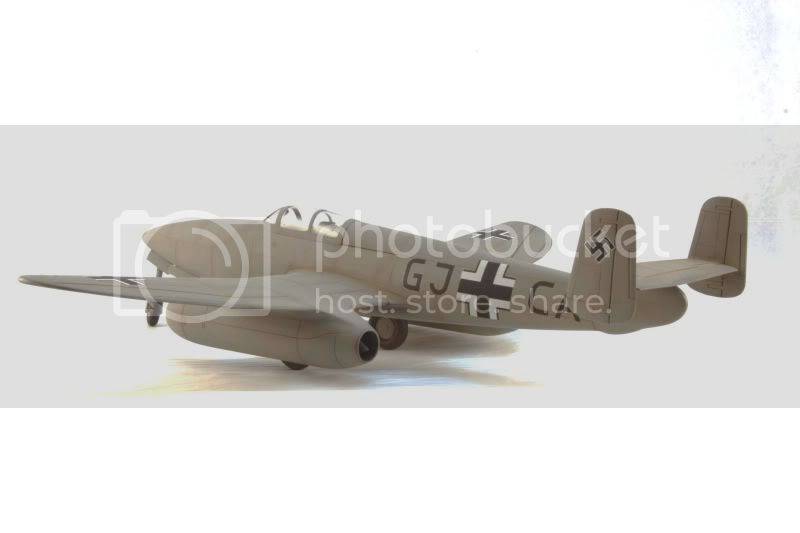
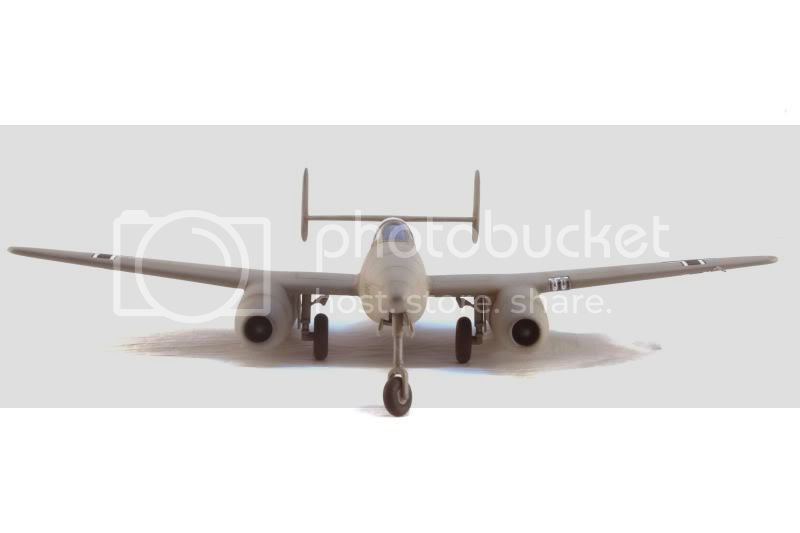
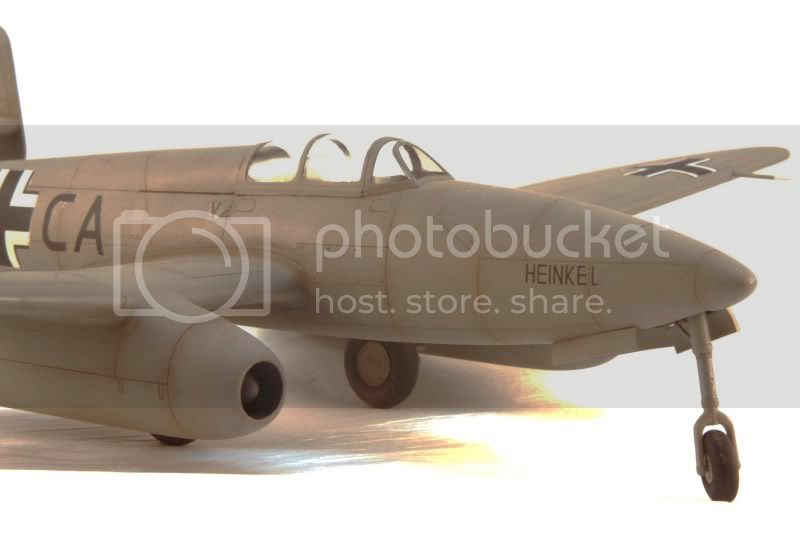
Here you can see the model finished, after this I´m going to prepared a base,


md72

#439
Joined: November 05, 2005
KitMaker: 4,950 posts
AeroScale: 3,192 posts

Posted: Saturday, March 07, 2015 - 07:00 AM UTC
@Carlos, officially they're called cotton swabs. Unofficially they're called Q - tips, after the type manufactured by Johnson & Johnson. HTH 


PeeJay74
#363
Joined: January 08, 2014
KitMaker: 425 posts
AeroScale: 401 posts

Posted: Sunday, March 08, 2015 - 04:55 AM UTC
1/48 Hobby Boss F-80A as Project Extraversion
Man that Heinkel is looking nice, Daniel!
I closed up my P-80 and started working on converting the nose to a landing light. I kept it pretty simple, using a dress maker's pin for the lens and making a very simple housing. I boxed it in with some .005 sheet painted YZC, but I did go a little overboard with the thin CA and got a bit inside the glass. Oh well, no way to fix that now.

(Above) The fuselage all closed up with the nose light roughly constructed. (Below) My basic landing light, I kept it simple since there will only be a very small section left clear.
I filled the gaps at the corners with thick CA and sanded all of the detail on the clear section off to make it flush with the surrounding nose, then hit it with Mr. Surfacer to blend in any tiny imperfections left over. Once that cures and I sand again, add the correct panel lines around the light, and finish it off with some Novus to clear it up again.
It isn't going to be anything super special, but considering Hobby Boss didn't mold the proper nose for an -A model it will do.
Man that Heinkel is looking nice, Daniel!
I closed up my P-80 and started working on converting the nose to a landing light. I kept it pretty simple, using a dress maker's pin for the lens and making a very simple housing. I boxed it in with some .005 sheet painted YZC, but I did go a little overboard with the thin CA and got a bit inside the glass. Oh well, no way to fix that now.
(Above) The fuselage all closed up with the nose light roughly constructed. (Below) My basic landing light, I kept it simple since there will only be a very small section left clear.
I filled the gaps at the corners with thick CA and sanded all of the detail on the clear section off to make it flush with the surrounding nose, then hit it with Mr. Surfacer to blend in any tiny imperfections left over. Once that cures and I sand again, add the correct panel lines around the light, and finish it off with some Novus to clear it up again.
It isn't going to be anything super special, but considering Hobby Boss didn't mold the proper nose for an -A model it will do.

Bushioka
Joined: January 13, 2014
KitMaker: 107 posts
AeroScale: 105 posts
Posted: Monday, March 09, 2015 - 06:13 AM UTC
I've got a couple of extra kits that might fit the campaign, assuming I can get around to them before June:
md72
#439
Joined: November 05, 2005
KitMaker: 4,950 posts
AeroScale: 3,192 posts
Posted: Monday, March 09, 2015 - 09:23 AM UTC
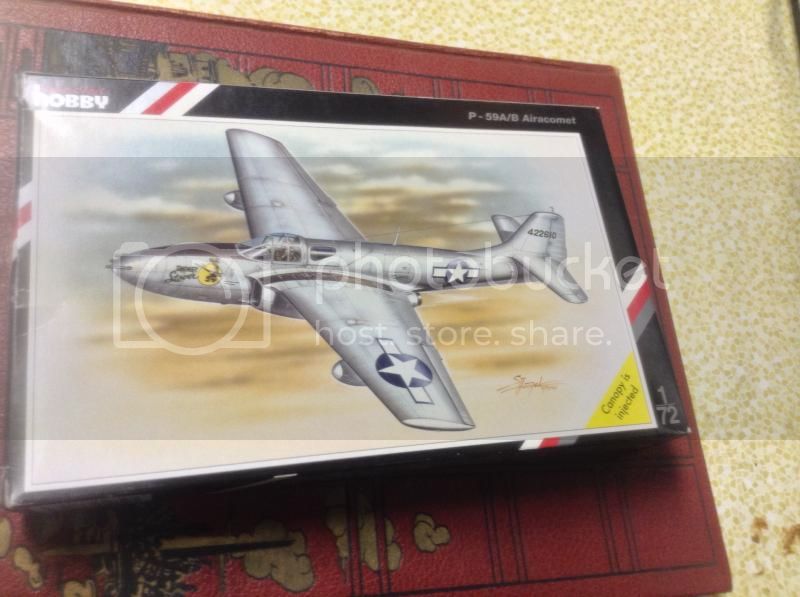
I passed up a chance to pick up the SH P-59B(?) kit a few shows back. I'm beginning to regret it. How does it look? 
SGTJKJ

#041

Joined: July 20, 2006
KitMaker: 10,069 posts
AeroScale: 3,788 posts

Posted: Monday, March 09, 2015 - 07:38 PM UTC
Nice build, Daniel. Very good subtle weathering of the grey panels.

Torpon
Joined: February 28, 2012
KitMaker: 103 posts
AeroScale: 102 posts
Posted: Wednesday, March 11, 2015 - 02:37 AM UTC
Daniel, great model.
Paul, I really like what you are doing. I don't know what Novus is but I am looking forward to see the progress in that landing light.
I am going quite slowly lately, I have finish the interior. So far I am pleased but I next time I am doing it so much better...

Paul, I really like what you are doing. I don't know what Novus is but I am looking forward to see the progress in that landing light.
I am going quite slowly lately, I have finish the interior. So far I am pleased but I next time I am doing it so much better...
dcandal
Joined: September 07, 2006
KitMaker: 918 posts
AeroScale: 688 posts
Posted: Thursday, March 12, 2015 - 05:01 PM UTC
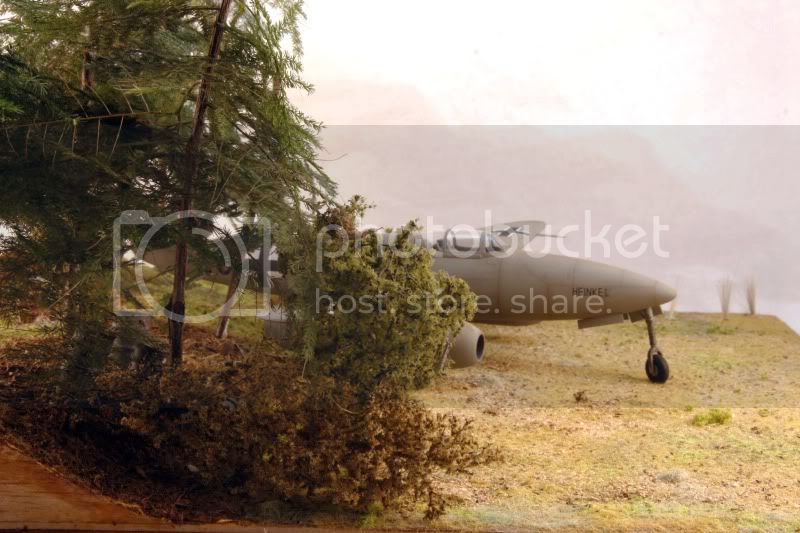
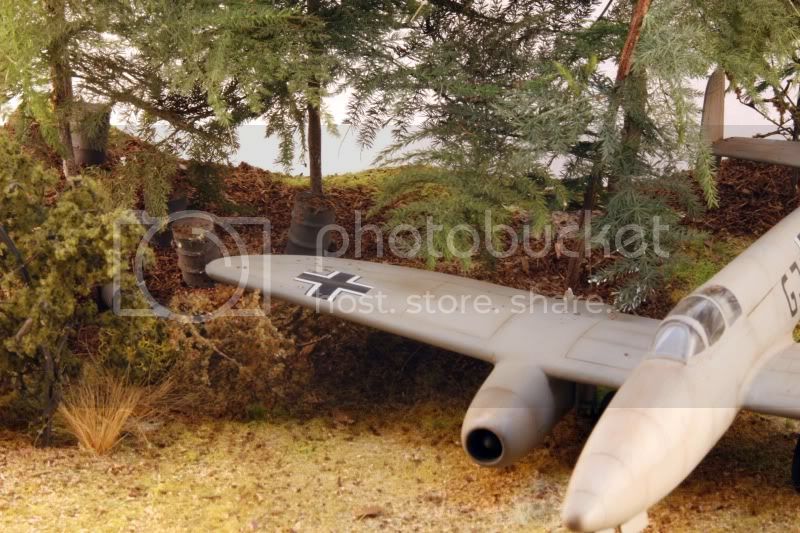
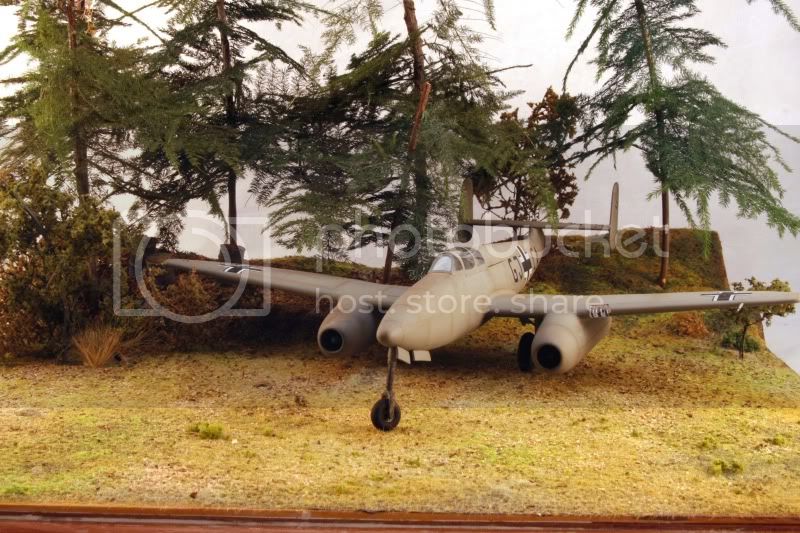
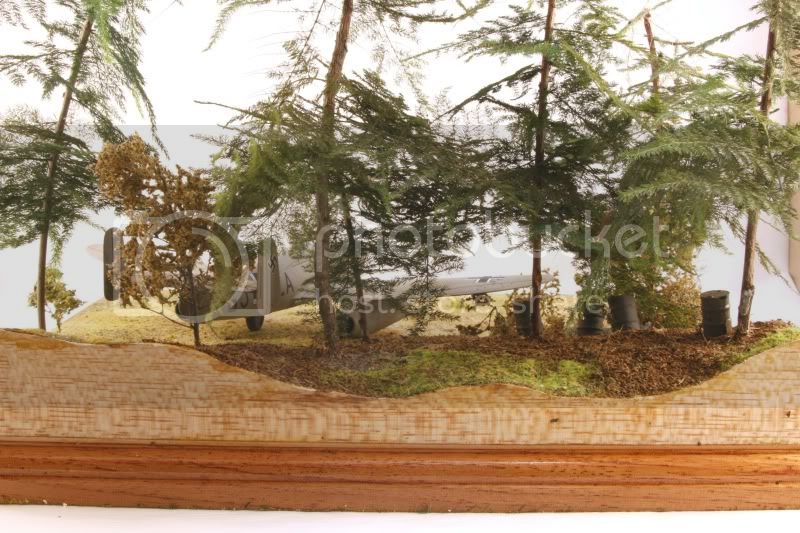
I had finished the base for the He-280. Some photos,


alpha_tango

Joined: September 07, 2005
KitMaker: 5,609 posts
AeroScale: 5,231 posts
Posted: Saturday, March 14, 2015 - 01:30 PM UTC
Very Nice Daniel!!
I guess I am in, as the Korean War Jets are allowed I will do a MiG-15bis in Korean markings (actually I build two as I restarted a very old Tamiya project and began with a Trumpeter Kit on Monday).... we'll see if I can finish one
all the best
Steffen
I guess I am in, as the Korean War Jets are allowed I will do a MiG-15bis in Korean markings (actually I build two as I restarted a very old Tamiya project and began with a Trumpeter Kit on Monday).... we'll see if I can finish one
all the best
Steffen

PeeJay74
#363
Joined: January 08, 2014
KitMaker: 425 posts
AeroScale: 401 posts
Posted: Saturday, March 21, 2015 - 11:05 PM UTC
1/48 Hobby Boss F-80A as Project Extraversion
Rather than sit around and watch the Future on my P-39 dry, I decided to get a little work done on the YP-80. I spent about 90min masking off the tail planes and painting the livery stripes. I had previously coated the tail in Tamiya fine primer and then a base coat of Tamiya white. I used Tamiya XF-7 flat red for the red portion. I debated using TS-49 bright red but this was quicker. I will mask all of this off once it has a few days to cure, then assemble and prime the main components.
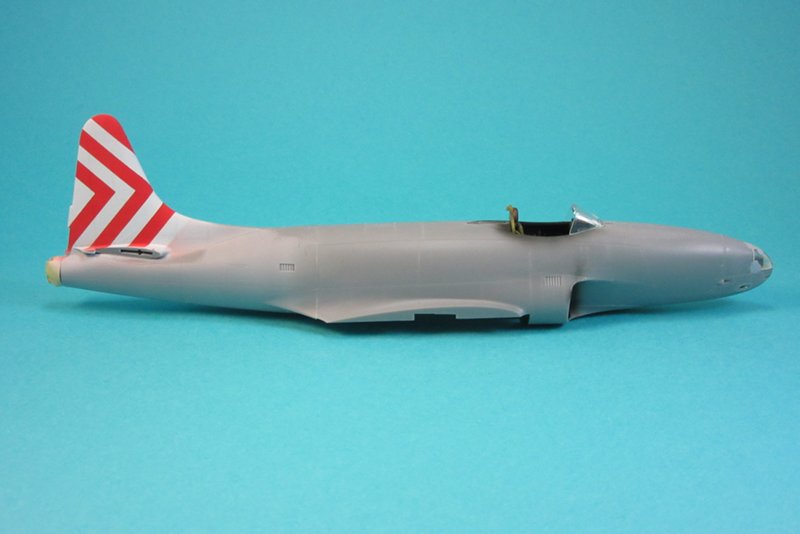
No decals exist that I know of for this aircraft so I had to hand mask and paint the livery stripes.
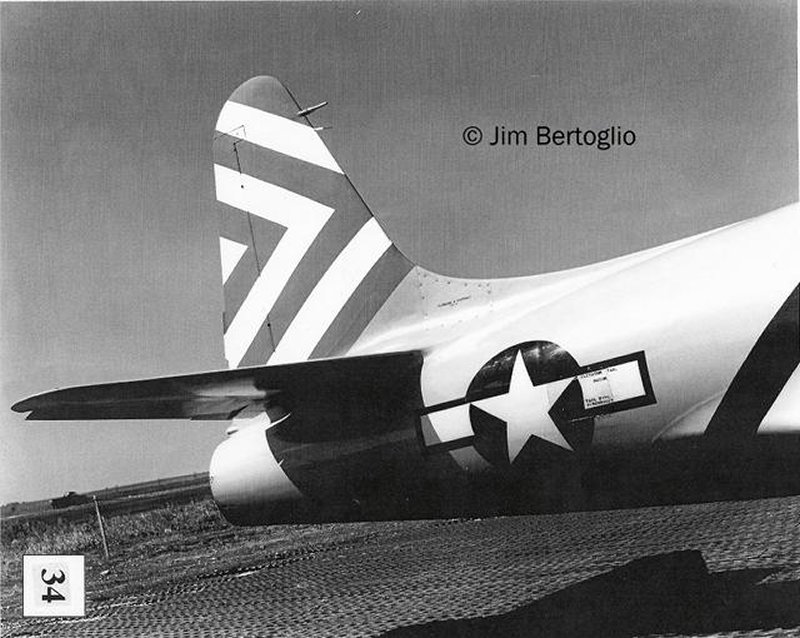
Above: Photo of the tail of one of the original aircraft sent to Italy. Below: My handiwork, as close as I could get it to match. Its not perfect but I am very pleased.
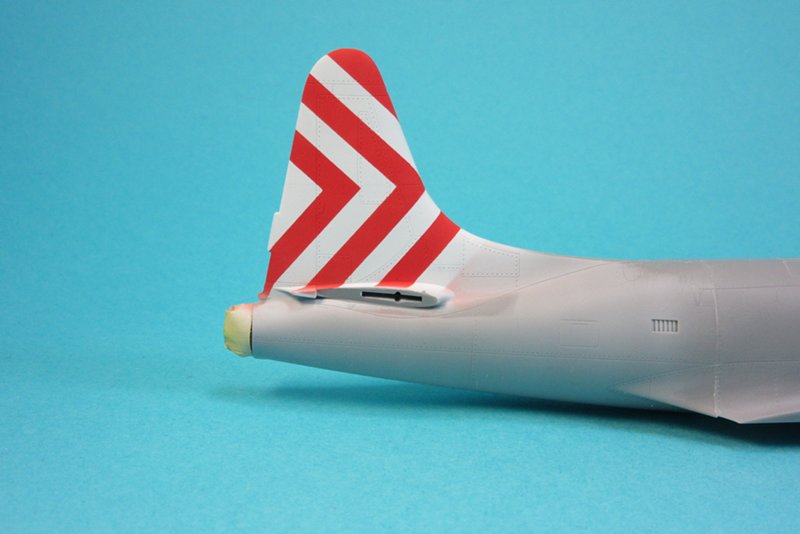
Rather than sit around and watch the Future on my P-39 dry, I decided to get a little work done on the YP-80. I spent about 90min masking off the tail planes and painting the livery stripes. I had previously coated the tail in Tamiya fine primer and then a base coat of Tamiya white. I used Tamiya XF-7 flat red for the red portion. I debated using TS-49 bright red but this was quicker. I will mask all of this off once it has a few days to cure, then assemble and prime the main components.
No decals exist that I know of for this aircraft so I had to hand mask and paint the livery stripes.
Above: Photo of the tail of one of the original aircraft sent to Italy. Below: My handiwork, as close as I could get it to match. Its not perfect but I am very pleased.
SGTJKJ
#041
Joined: July 20, 2006
KitMaker: 10,069 posts
AeroScale: 3,788 posts
Posted: Thursday, March 26, 2015 - 04:59 PM UTC
Beautiful base, Daniel! really sets the scene of a hidden prototype in the forest. Well done.
Nice masking job, Paul. Looking forward to see more.
Steffen, what camouflage and markings will you be using for the MiGs? All NMF for both?
Nice masking job, Paul. Looking forward to see more.
Steffen, what camouflage and markings will you be using for the MiGs? All NMF for both?
Torpon
Joined: February 28, 2012
KitMaker: 103 posts
AeroScale: 102 posts
Posted: Thursday, March 26, 2015 - 05:49 PM UTC
Paul, that looks amazing. Looking forward to the rest of the build.
Torpon
Joined: February 28, 2012
KitMaker: 103 posts
AeroScale: 102 posts
Posted: Thursday, March 26, 2015 - 07:00 PM UTC
An update on the He 162.
I have finished now the main paint job and I have added a gloss coat. I can't wait to put the decals this weekend and maybe start with the panel lines.
Model was very easy to build but I kept making stupid mistakes and it took me ages to start with the painting. In the next model I am going to take more seriously the dry fit and checking the seams before applying the primer.
Photos are no good but I will try to improve them for the next update. (I think I will take the model to the balcony during the day.)

shorty53
#330

Joined: July 15, 2011
KitMaker: 175 posts
AeroScale: 103 posts

Posted: Sunday, April 05, 2015 - 04:34 PM UTC
Time to add some paint to the Vampire.


air-aset

Joined: March 25, 2004
KitMaker: 84 posts
AeroScale: 42 posts

Posted: Sunday, April 05, 2015 - 08:47 PM UTC
Some progress pictures


@Daniel and @Martyn Nice Heinkels!!
@Daniel and @Martyn Nice Heinkels!!
Torpon
Joined: February 28, 2012
KitMaker: 103 posts
AeroScale: 102 posts
Posted: Monday, April 06, 2015 - 11:42 PM UTC
John, that is a great metallic shine. What colours are you using?
Gonzalo, I see that you also have two builds on the go. Great progress so far.
Gonzalo, I see that you also have two builds on the go. Great progress so far.
shorty53
#330
Joined: July 15, 2011
KitMaker: 175 posts
AeroScale: 103 posts
Posted: Tuesday, April 07, 2015 - 12:08 PM UTC
Quoted Text
John, that is a great metallic shine. What colours are you using?
Carlos I used Model Master Aluminium and Tamyia X5 (green) on the tail.
shorty53
#330
Joined: July 15, 2011
KitMaker: 175 posts
AeroScale: 103 posts
Posted: Friday, April 10, 2015 - 06:20 PM UTC
My Vampire is done. The pre shaded panel lines came through a bit too much when I applied the spray can gloss coat, but I wasnt going to respray the aluminium again. I enjoyed this kit a lot, easy to build and decals were good. The only thing I didnt like was the canopy fit.


Dragon164
#226

Joined: February 20, 2012
KitMaker: 1,909 posts
AeroScale: 508 posts

Posted: Saturday, April 11, 2015 - 10:10 AM UTC
Well Done! 
Cheers Rob.
Cheers Rob.


TankSGT
Joined: July 25, 2006
KitMaker: 1,139 posts
AeroScale: 53 posts

Posted: Saturday, April 11, 2015 - 02:02 PM UTC
Very nice Vampire.
Everyone is doing great work.
Tom
Everyone is doing great work.
Tom


Bigrip74
Joined: February 22, 2008
KitMaker: 5,026 posts
AeroScale: 2,811 posts

Posted: Saturday, April 11, 2015 - 11:26 PM UTC
@John: the Vampire came out nice, I now need to change my color scheme to the camo upper since you've done such a good job with this scheme. I just ordered a rattle of silver spray for the bottom of my vampire and will use the airbrush to finish it off.
@Daniel: I like the forest photo of your He280.
@Paul: how did you keep everything lined up?
@Gonzalo: The Grumman kit color is different!
Bob
@Daniel: I like the forest photo of your He280.
@Paul: how did you keep everything lined up?
@Gonzalo: The Grumman kit color is different!
Bob
SGTJKJ
#041
Joined: July 20, 2006
KitMaker: 10,069 posts
AeroScale: 3,788 posts
Posted: Sunday, April 12, 2015 - 03:56 PM UTC
Beautiful Vampire, John. Really nice metal finish.
Congrats on finishing.
Congrats on finishing.
 |

WEB HOSTING BY


Copyright ©2021 AeroScale and Kitmaker Network, a subsidiary of Silver Star Enterprises
All Rights Reserved. Please read our Conditions of Use and Privacy Policy.
All Rights Reserved. Please read our Conditions of Use and Privacy Policy.