Air Campaigns
Want to start or join a group build? This is where to start.
OFFICIAL: Overshadowed Fighters of WWII
scribbles101
_VISITCOMMUNITY
United Kingdom
Joined: May 25, 2013
KitMaker: 137 posts
AeroScale: 103 posts
Posted: Tuesday, December 09, 2014 - 10:10 PM UTC

Quoted Text

Wow that is one thick assed canopy.


yeah, this is a very old kit now, so the parts are far from perfect, also, it was never intended to be displayed like that, but ootb, this would not look good in the cockpit department. Anyway, I know I will not get an amazing result out of this build, I just thought I would give it a try and roll with it even if it went a bit wrong. Ether way, I should end up with something that looks recognisably like a sea gladiator at the end of the build
Bink123
_VISITCOMMUNITY
Quebec, Canada
Joined: June 23, 2008
KitMaker: 414 posts
AeroScale: 364 posts
Posted: Wednesday, December 10, 2014 - 07:36 PM UTC
Here is my build of Eduard's 1/48 Avia B.534.

First off I have to say that I built this over a short period while getting ready to convert my workshop/modelling space back into a bedroom. I should have taken more care. Even so, I like the result. The B.534 is a very handsome aircraft.

Here is a picture of the box art. It shows a B.534 series III aircraft, and above it the Series IV, which had an enclosed cockpit.


Next is a photo of the box contents. The wing ribbing detail is the best I've seen. The decals were thin, and needed to be handled carefully.


I started with the cockpit, painting the walls aluminum - the aircraft had a metal framework with removable metal sheets, aft of the cockpit, was covered in fabric, like the Hawker Hurricane. Four .303 machine guns were mounted in the fuselage, right in the cockpit.


Next, I glued the fuselage halves together, primed the fore part of the fuselage with metallic paint (so i could weather it later, and primed the rest.


Bink123
_VISITCOMMUNITY
Quebec, Canada
Joined: June 23, 2008
KitMaker: 414 posts
AeroScale: 364 posts
Posted: Wednesday, December 10, 2014 - 07:55 PM UTC
Carrying on, I assembled the4 fuselage and lower wing, painted the khaki finish colour, did a little weathering on the metal forward part of fuselage.


Picture of underside. Series III and IV undersides were light grey. The bronze colour is the radiator.


As I mentioned, I worked on this quickly, an I didn't take as many photos as I should have. Here is a photo of with the top wing on. I always have trouble with this part. it didn't help that the struts attachment poits were so small, but that is because the struts were molded so accurately that they were very thin. I must get a jig.


I had been putting off painting the wooden propeller. I have build many biplanes and I always managed the wood grain well, but in this case, the Avia propeller wood laminations are very obvious. I tried several times, but finally gave in a installed the metal one instead. The aircraft was built in 1936, so I reasoned by 1939 it might have had a metal one installed, as were the Series IV.


Below is a near final photo of the finished model sans rigging, but with decals. The markings are for a Slovak craft with German crosses added - Slovakia participated in the invasion of Poland in September of 1939 to regain territory lost to Poland in 1938.


Finally, here are some photos of the finished model -


Bink123
_VISITCOMMUNITY
Quebec, Canada
Joined: June 23, 2008
KitMaker: 414 posts
AeroScale: 364 posts
Posted: Wednesday, December 10, 2014 - 08:04 PM UTC
Below are two photos of Avia B.534's. The first shows the framework of an early series aircraft, a Series II, I think. Next a photo from the Prague Museum, of a replica of a Series IV with a wooden propeller.

On page 2 of this thead is a description of the aircraft and its service.


Bink123
_VISITCOMMUNITY
Quebec, Canada
Joined: June 23, 2008
KitMaker: 414 posts
AeroScale: 364 posts
Posted: Wednesday, December 10, 2014 - 11:23 PM UTC
Open Cockpit Flying.

Many aircraft of the 1930's were built with open cockpits, right up to the beginning of WW2.Why? I looked into this because the subject of my build for this GB was the open cockpit Avia B.534 Series III.

Some of the B.534's were made with open cockpits (only 25 - all Series III B.534's were open cockpit). Apparently the first 25 of the final order of B.534's had open cockpits, but the remainder of the run had closed. Perhaps the first 25 were made with experienced, seasoned pilots in mind. So, I looked into why many pilots of the era preferred open cockpit flying. Often I found pictures of Gloster Gladiators, Spitfires, Hurricanes and even P-51's flying with the canopy open. The Polikarpov I-16 was designed with a closed sliding canopy, but most of the time it was removed in service, or if equipped, it was slid back.


Advantages of Open Cockpit Flying


Pilots felt that they could bail out at any time if needed. Pilots also claimed that they could be more ‘in tune’ with the aircraft because they could ‘feel’ the airstream; Goring, based on his experience as a pilot in WW1 is reportedly to have told Willy Messerschmidt that ..”a pilot needs to feel the wind on his face.” It has been said that given the state of instrumentation of the time (1920’s and 1930’s), looking over the side of an open cockpit was still a pretty critical element of navigation.

So in point form, here are the main reasons pilots of the time preferred open cockpit flying.

1 Better Visibility, especially already restricted by the two sets of wings, and much easier escape.

2 Lighter than enclosed cockpit, less drag if windscreen is properly designed.

3 Simpler (no hinges, locks etc.), also early cockpit canopies were made of a plastic which lost transparency over time.

4 Pilots of the era said that with open cockpit they had better control of the aircraft; they could feel the wind - side winds and turbulence, they could also look over the side for improved visibility, and enhance control in a difficult situation, or when taxiing.

5 All pilots of the era learned on open cockpit craft, they felt uncomfortable closed in, even claustrophobic, like sitting in a kayak for the first time having ones feet ‘held’ while losing your balance just freaks some people out.

6 In the case of a catastrophic engine failure when oil shoots everywhere, in a closed cockpit the pilot may not be able to see out, whereas in an open cockpit, even though the windscreen may be coated, the pilot can see around it, and the oil can be cleaned off goggles.


As aircraft became more sophisticated and faster, engines became more reliable, and operating altitudes became higher, some of the advantages of open cockpits became liabilities. So there you have it.


BoiseBlade
#523
_VISITCOMMUNITY
Idaho, United States
Joined: February 28, 2014
KitMaker: 342 posts
AeroScale: 250 posts
Posted: Monday, December 15, 2014 - 06:40 AM UTC
Here are the latest from My Tauro Macchi 205....
The fit has not been very good and I have had to really torque and glue some parts to get this thing together without some major rebuilds....
Bushioka
_VISITCOMMUNITY
Oregon, United States
Joined: January 13, 2014
KitMaker: 107 posts
AeroScale: 105 posts
Posted: Tuesday, December 16, 2014 - 05:32 AM UTC
Minor progress on the Falco now that the Messerschmitt is done.


This being a bit of a budget kit, the cockpit's really rudimentary; still I'm doing a build straight from the box on this bird so it shouldn't take too long to finish. A lot of trimming to do on excess plastic though! Well, back to work!

Arizonakid
_VISITCOMMUNITY
Arizona, United States
Joined: October 03, 2012
KitMaker: 89 posts
AeroScale: 33 posts
Posted: Tuesday, December 16, 2014 - 07:46 AM UTC

Hi Yall:

I just signed up, and will be building the almost antique Tamiya Brewster Buffalo. I just ordered it tonight, so I should probably get it in a week or two, and plan to start probably the last week of December.

Gary
Bink123
_VISITCOMMUNITY
Quebec, Canada
Joined: June 23, 2008
KitMaker: 414 posts
AeroScale: 364 posts
Posted: Tuesday, December 16, 2014 - 10:27 AM UTC
Welcome to the GB, Arizonakid.

I've been to Arizona many times, my inlaws used to live in Casa Grande, south of Phoenix. Been to Tombstone too!
scribbles101
_VISITCOMMUNITY
United Kingdom
Joined: May 25, 2013
KitMaker: 137 posts
AeroScale: 103 posts
Posted: Wednesday, December 17, 2014 - 02:55 AM UTC
I know this has taken a while, but here is some progress on the Malta Glad. This is going to be quits a jump from the previous set of progress photos because forgot to take photos of the rest of the assembly and had already started painting by the time I remembered to take more


I use some reference pictures I found through numerous google searches for the camouflage pattern, and used James' photo of his fantastic looking glad for a colour match, and this is what I came up with


The underside, will weather this after I have applied decals


and here is what the camo pattern looks like on top. I still need to do the rigging on this little bird as well, there will be pics of that to come!
Bink123
_VISITCOMMUNITY
Quebec, Canada
Joined: June 23, 2008
KitMaker: 414 posts
AeroScale: 364 posts
Posted: Wednesday, December 17, 2014 - 04:17 AM UTC
It was hard for me to get the FAA colour scheme for a Gladiator I did a while back. I wanted to mix my own colours using Games Workshop acrylic paints, my favourites for brush painting When I mixed the colours sometimes they looked too much alike, then the grey was too dark....and so on.

This may sound heretical, but I have a two tone sweater that looked pretty close to the slate grey and sea greys required, so I match the colours of my sweater! It looked pretty convincing to me, anyway.

Coming along nicely.
Bushioka
_VISITCOMMUNITY
Oregon, United States
Joined: January 13, 2014
KitMaker: 107 posts
AeroScale: 105 posts
Posted: Monday, December 22, 2014 - 07:42 AM UTC
Made some progress on the Re. 2000 over the weekend. Finished painting the base of the cockpit, engine and cockpit itself. I had to kind of fudge painting the pilot since he's not equipped as an RAF pilot would be - cue strategic implementation of yellow!


Then I applied a coat of flat white primer to the bird before getting it to look more like an airplane.


Post-assembly it's clear there's some nasty little gaps that I'm going to need to fill in before painting. What else to expect from a pretty cheap kit?


From here it's off to filling in gaps, marking and painting! The landing gears look a tad complicated, but we'll see.

Bushioka
_VISITCOMMUNITY
Oregon, United States
Joined: January 13, 2014
KitMaker: 107 posts
AeroScale: 105 posts
Posted: Thursday, December 25, 2014 - 01:15 PM UTC
Christmas progress on the Falco! Used my Tamiya RAF Mustang painting instructions as a guide for the camo pattern on it.


My skills aren't the best, exactly, but doing what I can. I applied some decals salvaged from other kits.


raypalmer
_VISITCOMMUNITY
Ontario, Canada
Joined: March 29, 2010
KitMaker: 1,151 posts
AeroScale: 985 posts
Posted: Monday, December 29, 2014 - 10:28 AM UTC
Ok in with the Heinkel. I must say off the bat that this kit is pretty much what one would expect of a five dollar kit. So I will finish or get fed up and bin it. Only time will tell!
Bink123
_VISITCOMMUNITY
Quebec, Canada
Joined: June 23, 2008
KitMaker: 414 posts
AeroScale: 364 posts
Posted: Monday, December 29, 2014 - 09:47 PM UTC
Martyn - The Falco looks pretty good in RAF markings.

Richard - The He 112 is not seen often due to the lack of kits. Stick with it, this will be a nice addition to the GB.

raypalmer
_VISITCOMMUNITY
Ontario, Canada
Joined: March 29, 2010
KitMaker: 1,151 posts
AeroScale: 985 posts
Posted: Thursday, January 01, 2015 - 12:22 AM UTC
The kit is... Well it did go together. Unfortunately since all reviewers everywhere covet dainty panel lines RS gave it very fine panel lines. Something of a liability on a kit that demands major sanding. It's basically smooth now!

Anyway I think it will work. Check out the deets in those wheel bays.


Scrodes
_VISITCOMMUNITY
Ontario, Canada
Joined: July 22, 2012
KitMaker: 771 posts
AeroScale: 763 posts
Posted: Thursday, January 01, 2015 - 09:55 AM UTC

Quoted Text


Hi Yall:

I just signed up, and will be building the almost antique Tamiya Brewster Buffalo. I just ordered it tonight, so I should probably get it in a week or two, and plan to start probably the last week of December.

Gary


That's actually a decent kit, I didn't have any Issues with mine and it certainly looks the part. Plus it's a far more recent kit than what I'm potentially going to jump in with
Bink123
_VISITCOMMUNITY
Quebec, Canada
Joined: June 23, 2008
KitMaker: 414 posts
AeroScale: 364 posts
Posted: Thursday, January 01, 2015 - 07:20 PM UTC
Recessed panel lines are overated anywho.

Bushioka
_VISITCOMMUNITY
Oregon, United States
Joined: January 13, 2014
KitMaker: 107 posts
AeroScale: 105 posts
Posted: Friday, January 02, 2015 - 09:17 AM UTC
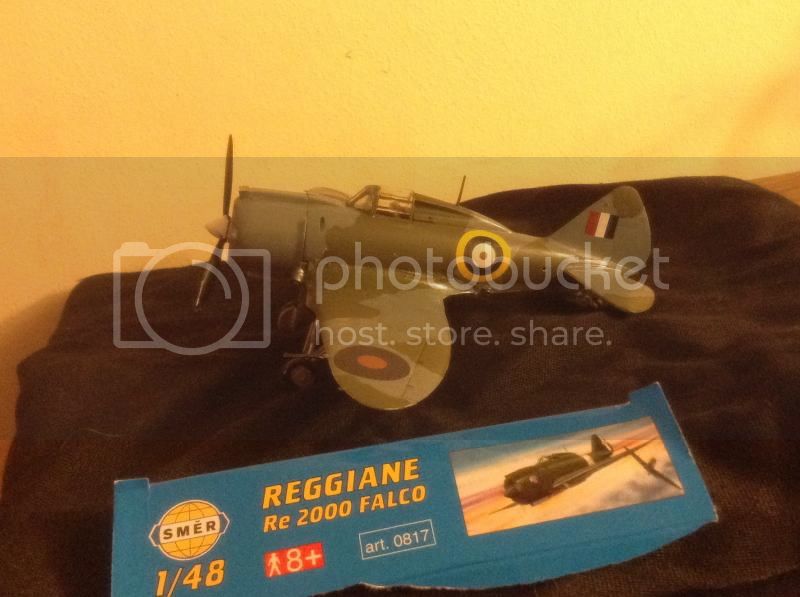
Time for the write-up on the Falco. From the Wikipedia entry:

"The Reggiane Re.2000 was designed by Roberto Longhi and Antonio Alessio in 1938. They took inspiration from the contemporary Seversky P-35 which it superficially resembled.[4] The Re.2000 was the first aircraft designed by Reggiane that employed aluminum stressed skin rather than the wooden or mixed wood and metal structures normally used in contemporary Italian aircraft such as the Savoia-Marchetti SM.79 built by Reggiane under license. Reggiane introduced several advanced features: a modern structure, well more advanced than the ones used in Macchi's and other Italian fighters of the time; an elliptical wing, with five spars and integral fuel tanks. Reggiane Re.2000 had no fuselage tanks, but nevertheless, with the entire wing volume devoted to fuel, it had up to 460 kg (640 lt) gasoline, with a 900 1,100 km endurance, far better than Macchis and Fiats. The armament was still two 12.7 mm Breda's (300 rounds each), plus the provision for bomblet-dispensers (spezzoniera).

The Re.2000 prototype's first flight was on 24 May 1939 at Reggio Emilia, flown by Mario De Bernardi,.[5] The Re.2000, with 260 kg fuel (the maximum was 460 kg/640 lt, but RA did not needed it) was quite light: 2,059 kg empty, 2,529 kg loaded. It reached 518 km/h at 5,250 m and 506 km/h/6,000 m, climbed to 6,000 m in 6,5 min, and had 11,500 m ceiling.[6] During test flights the aircraft gave an excellent performance, and on several occasions, it performed better than other fighters then in production.[2] In mock dogfights, it could successfully fight not only the slower Fiat CR.42 biplane,[7] but even the more modern Macchi C.200 and the German Bf 109E.

The Re.2000GA (Grande Autonomia) version, added extra 340 liters fuel tanks. This version should have been used to reach Eastern Africa, but it wasn't ready before the Italian defeat; the only fighter sent to reinforce Regia Aeronautica units were 51 C.R.42s disassembled and transported by the large Savoia-Marchetti SM.82s. Re.2000GAs were heavier and significantly slower than the standard production Re.2000s. At an empty weight was 2,190 kg compared to the Re.2000's 2,080 kg, maximum speed was 520 km/h at 5,300 m. Armament was two 12.7 mm SAFAT with 600 rounds, and provisions for a Nardi dispenser with 88 2 kg bomblets (a typical 'special armament' for Re.2000s). The Re.2000GA was never really reliable (even for Re.2000 standards), especially its troublesome engine."

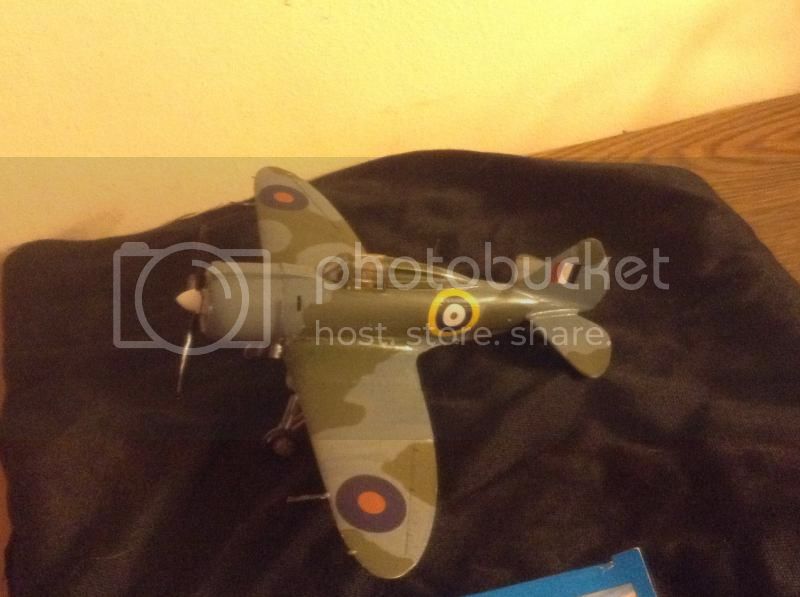
Interestingly the British government had interest in the Re.2000 and placed an order for 300. In January 1940 the RAF order was confirmed, but the Germans withdrew approval in April 1940; the order was cancelled in June when Italy joined the war on the Axis side. Few numbers actually served in the Regia Aeronautica, and the Regia Marina experimented with a carrier based version. However the plane was largely in an experimental role for the Italian armed forces - the last 2 were demolished by the Germans, with a third captured at an air base in Furbara.

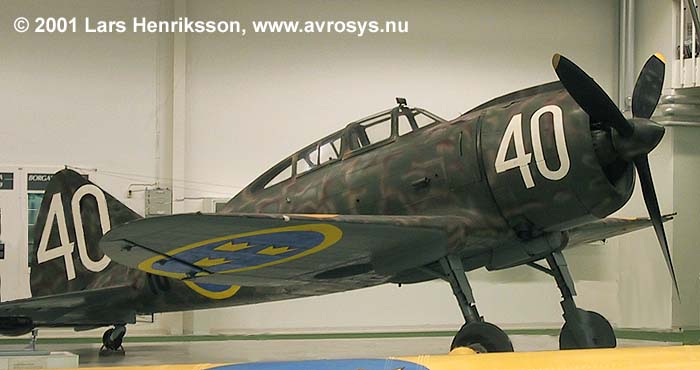
With the outbreak of the war Sweden had a difficult time finding a country willing to supply it with aircraft. As such filling the ranks with Italian aircraft was an emergency measure to help ensure Swedish neutrality. The Falco served as the J 20 in Swedish service, and one was lost intercepting a Dornier Do 24. While Swedish pilots appreciated its ability to perform in harsh conditions, its mechanical reliability didn't meet standards. It spent a lot of time in repair and the last remaining ones got scrapped in 1945 with just one being kept for display purposes.

The Falco made its biggest impact serving with the Hungarian air force. Hungary's first ace of the war, Imre Pŕnczél, scored three victories in one sortie in 1942 in one. But reliability in engineering was once again a fatal flaw. From Wikipedia:

"he Re.2000 was much more prone to handling difficulties, especially stalls and spins, as well as reliability issues. All of the 24 Re.2000s had suffered accidents (minor and major) within a month of combat deployment. Landing and takeoff accidents were common on the rudimentary Russian airfields and due to the Re.2000 not having a rugged landing gear, compared to that of the CR.32. After a steel plate was added behind the cockpit to protect pilots, the shift in the aircraft's center of gravity led to more frequent accidents. In a much publicized accident, István Horthy (the son of the Hungarian regent Miklós Horthy), serving as a fighter pilot with the Hungarian Second Army died flying a Re.2000 V-421 with 1/III Fighter Squadron on 20 August 1943, on his 25th operational sortie. After a pilot flying above asked Horthy to increase height, he pulled up rapidly, stalled and crashed."

The Falco is overshadowed firstly on account of being an Italian fighter, and a minor one at that. Since it never served in large numbers with its home country, it never gained the notoriety of the MC 205 Folgore and others. Mechanical reliability was its Achilles' Heel, though it was popular with Swedish pilots.

An Re.2000 in Swedish markings:

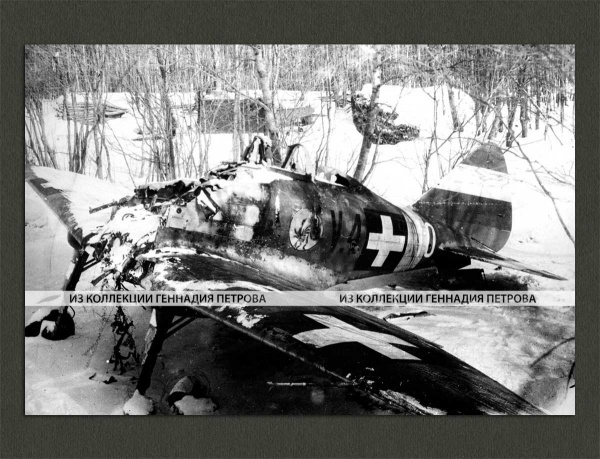
A demolished Hungarian Falco:
Bushioka
_VISITCOMMUNITY
Oregon, United States
Joined: January 13, 2014
KitMaker: 107 posts
AeroScale: 105 posts
Posted: Friday, January 02, 2015 - 09:19 AM UTC
And here is my completed Falco, in what if (of course) markings representing one of 300 Re.2000s ordered by the RAF:


Scrodes
_VISITCOMMUNITY
Ontario, Canada
Joined: July 22, 2012
KitMaker: 771 posts
AeroScale: 763 posts
Posted: Saturday, January 03, 2015 - 12:48 AM UTC
I'm in on this - need something simple after my Airfix Mosquito

Tamiya 1/48 J2M Jack.

Overshadowed because it was ordered just before the Zero, and unlike other Japanese fighters - maneuverability was not even listed in the spec. Instead an emphasis was placed on speed and rate of climb. The Jack would have posed a problem for the large American bombers if Mitsubishi hadn't concentrated entirely on the A6M and if it's engine didn't have so many teething problems to start. Ordered in 1938 by the Navy the Raiden (translates into 'Thunderbolt' IIRC) was intended for home defense and didn't even have a tail hook.


Look at all of those glorious 1970s parts. Fit is still immaculate.
Bink123
_VISITCOMMUNITY
Quebec, Canada
Joined: June 23, 2008
KitMaker: 414 posts
AeroScale: 364 posts
Posted: Saturday, January 03, 2015 - 02:06 AM UTC
Regarding the RE. 2000, it almost seems that it was a case of "If only"

With the prototype flying first in 1939, what chance did it have for refinement and working out the bugs?

A fine addition to the Group Build. Thank- you, Martyn.
Bushioka
_VISITCOMMUNITY
Oregon, United States
Joined: January 13, 2014
KitMaker: 107 posts
AeroScale: 105 posts
Posted: Saturday, January 03, 2015 - 12:13 PM UTC
Definitely more of an 'if only' than anything with the Falco. The expediency of Italy's entry into the war probably put even more limits on the likelihood of working the bugs out. Considering Italy's limited resources and industrial capacity, this would probably be the case. Still a nice build overall even if it required some extra stuff to look spruced up.

On a related note this marks my first completed campaign build! How do the campaign ribbons work? As in, how do I see mine/get mine?
c4willy
#305
_VISITCOMMUNITY
Christchurch, New Zealand
Joined: February 01, 2006
KitMaker: 1,673 posts
AeroScale: 1,517 posts
Posted: Saturday, January 03, 2015 - 03:02 PM UTC
Hi Martin medals are awarded at the close of the campaign and require at least one pic of the completed model in the campaign gallery. Which if I remember correctly the link for the gallery is supplied in the first post of this campaign.

Well it's time for a progress report on the P39! I've got the camo on and I've started decaling the kit. This kit has stencils a plenty! I've found that the easiest way to do this is to cross out the number of each decal as I place it, this means that I can systematically go through them all and ensure I use the right decals and not miss any of them. Kind of essential when you have this many of them. They are all legible so I made sure they were placed correctly really only visible under a magnifying glass but I'LL know they are correct.


As you can see the mask has lifted away from the canopy, I've found myself continuously rubbing down the corners in an effort to keep them adhered but they keep popping up. Gotta say love the precut masks not to keen on their sticking ability.


SGTJKJ
#041
_VISITCOMMUNITY
Kobenhavn, Denmark
Joined: July 20, 2006
KitMaker: 10,069 posts
AeroScale: 3,788 posts
Posted: Wednesday, January 07, 2015 - 12:26 PM UTC
I am on for this campaign. I am going for the I-16 fighther. A type that was used for many years and especially in the early year of fighting on the Eastern front took a heavy load of the fighting.

This will be a strait from the box build. More to follow.