Georgia, United States
Joined: February 17, 2013
KitMaker: 173 posts
AeroScale: 108 posts
Posted: Saturday, September 20, 2014 - 01:37 PM UTC
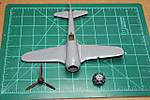
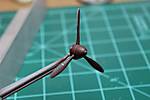
Well this is as far as I got with my KI-44 in the land of the rising sun campaign. I have got most of the body work done and next its off to the paint shop. I did experiment with the hairspray method on the propeller. I thought the prop turned out pretty good and I think I will try it on the whole airframe. I will continue to post progress in a separate build log.
On the bench, Blue Max, Mustang Funny car.
Airfix Hotspur glinder.
Georgia, United States
Joined: February 17, 2013
KitMaker: 173 posts
AeroScale: 108 posts
Posted: Saturday, September 20, 2014 - 11:49 PM UTC
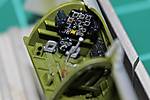
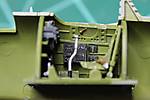
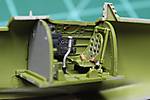
Here are the cockpit photos. I did not try to do too much to it, as the opining to the cockpit is small and you cant see much anyway. I did use a true details seat.
url=http://gallery3.kitmaker.net/showphoto.php/photo/419302]
[/url]
On the bench, Blue Max, Mustang Funny car.
Airfix Hotspur glinder.
Joel_W
 Associate Editor
New York, United States
Joined: December 04, 2010
KitMaker: 11,666 posts
AeroScale: 7,410 posts
Posted: Sunday, September 21, 2014 - 04:15 AM UTC
Bill,
Sure looks like you're making steady progress, and you're just about ready for paint. The only thing that looks a little weird is the white around the instruments on the IP.
Joel
On my Workbench:
Monogram 1/24 scale 427 Shelby Cobra
Just Completed:
Beemax 1/24 scale BMW M3 E30 1992 Evolution II
Georgia, United States
Joined: February 17, 2013
KitMaker: 173 posts
AeroScale: 108 posts
Posted: Sunday, September 21, 2014 - 12:34 PM UTC
Quoted Text
Bill,
Sure looks like you're making steady progress, and you're just about ready for paint. The only thing that looks a little weird is the white around the instruments on the IP.
Joel
Joel, I used the kit decal for the instrument panel. I will have the canopy closed on this one. I dont do a lot to the area that you cant see much of.
On the bench, Blue Max, Mustang Funny car.
Airfix Hotspur glinder.
Removed by original poster on 11/10/14 - 23:33:32 (GMT).
Georgia, United States
Joined: February 17, 2013
KitMaker: 173 posts
AeroScale: 108 posts
Posted: Monday, November 10, 2014 - 04:39 AM UTC
On the bench, Blue Max, Mustang Funny car.
Airfix Hotspur glinder.
Niedersachsen, Germany
Joined: March 26, 2014
KitMaker: 844 posts
AeroScale: 630 posts
Posted: Monday, November 10, 2014 - 12:35 PM UTC
Looking good Bill, nice work on the details as well !
Joel_W
Associate Editor New York, United States
Joined: December 04, 2010
KitMaker: 11,666 posts
AeroScale: 7,410 posts
Posted: Monday, November 10, 2014 - 07:05 PM UTC
Bill,
Your camo paint scheme is looking quite good. Looking forward to seeing the paint scheme finish, as well as the decals applied.
And thank you for posting larger pictures rather then the thumbnails to your gallery.
Joel
On my Workbench:
Monogram 1/24 scale 427 Shelby Cobra
Just Completed:
Beemax 1/24 scale BMW M3 E30 1992 Evolution II

#522
New Jersey, United States
Joined: January 20, 2013
KitMaker: 1,460 posts
AeroScale: 1,443 posts
Posted: Monday, November 10, 2014 - 10:33 PM UTC
Just caught this thread. Can you explain the whole "hairspray" thing, please? I am "mystified" [pun intended].
On my Workbench: 1/48 B-17F Luscious Lady (with H.G. Barnes and Karl Hauffe - Research) and with Contributions from the late Arthur T. Babiarz, Jr.
Two Special Hobby AF-2 Guardians, one AF-2W, and one AS-2S
Georgia, United States
Joined: February 17, 2013
KitMaker: 173 posts
AeroScale: 108 posts
Posted: Tuesday, November 11, 2014 - 05:57 AM UTC
Quoted Text
Just caught this thread. Can you explain the whole "hairspray" thing, please? I am "mystified" [pun intended].
I am not much of an authority on the hairspray method as this is the first time I have every tried it. I experimented on the prop and spinner and it seemed to work good so I thought I would use it on the whole aircraft. Basically it is a method of simulating peeling and chipped paint. You paint the plane silver and then you put hair spray over it, and then spray a top coat over that. The color coat is usually acrylic. Hair spray is water soluble, so you take a moistened toothpick or stiff brush and start scratching the paint. The water gets under the top coat and the paint starts to flake off. Its pretty simple and looks very realistic.
On the bench, Blue Max, Mustang Funny car.
Airfix Hotspur glinder.
Georgia, United States
Joined: February 17, 2013
KitMaker: 173 posts
AeroScale: 108 posts
Posted: Thursday, November 27, 2014 - 05:08 AM UTC
On the bench, Blue Max, Mustang Funny car.
Airfix Hotspur glinder.
Georgia, United States
Joined: February 17, 2013
KitMaker: 173 posts
AeroScale: 108 posts
Posted: Sunday, February 15, 2015 - 06:39 PM UTC
I have included my Ki-44 in the Hanger Queen campaign. I will continue posting build updates on this blog.
On the bench, Blue Max, Mustang Funny car.
Airfix Hotspur glinder.
Joel_W
Associate Editor New York, United States
Joined: December 04, 2010
KitMaker: 11,666 posts
AeroScale: 7,410 posts
Posted: Sunday, February 15, 2015 - 07:50 PM UTC
Bill,
You might want to consider running a duel build blog. For those of us following your build, but not any others in the Hanger Queen campaign. It just becomes some what more difficult to follow your posts without having to wade through other builds. Even with using the subscribe feature, it only brings you to the current page.
Joel
On my Workbench:
Monogram 1/24 scale 427 Shelby Cobra
Just Completed:
Beemax 1/24 scale BMW M3 E30 1992 Evolution II
Georgia, United States
Joined: February 17, 2013
KitMaker: 173 posts
AeroScale: 108 posts
Posted: Sunday, February 15, 2015 - 10:05 PM UTC
Quoted Text
Bill,
You might want to consider running a duel build blog. For those of us following your build, but not any others in the Hanger Queen campaign. It just becomes some what more difficult to follow your posts without having to wade through other builds. Even with using the subscribe feature, it only brings you to the current page.
Joel
OK I will do that, thanks.
On the bench, Blue Max, Mustang Funny car.
Airfix Hotspur glinder.
Georgia, United States
Joined: February 17, 2013
KitMaker: 173 posts
AeroScale: 108 posts
Posted: Monday, February 16, 2015 - 02:22 AM UTC
On the bench, Blue Max, Mustang Funny car.
Airfix Hotspur glinder.
Georgia, United States
Joined: February 17, 2013
KitMaker: 173 posts
AeroScale: 108 posts
Posted: Friday, August 07, 2015 - 07:04 AM UTC
On the bench, Blue Max, Mustang Funny car.
Airfix Hotspur glinder.
JPTRR
Managing Editor #051
Tennessee, United States
Joined: December 21, 2002
KitMaker: 7,772 posts
AeroScale: 3,175 posts
Posted: Friday, August 07, 2015 - 08:02 AM UTC
Bill,
Your
Shoki is looking good!


If they demand your loyalty, give them integrity; if they demand integrity, give them your loyalty.--Col John Boyd, USAF
Any plan where you lose your hat is a bad plan.
#424
Queensland, Australia
Joined: April 23, 2015
KitMaker: 4,648 posts
AeroScale: 1,938 posts
Posted: Friday, August 07, 2015 - 08:10 AM UTC
Hi Bill,
Beautiful work so far! I have the Arii Ki-44 in 1/48 scale waiting to be built. I find your hairspray technique very interesting.
Gary
"Artillery adds dignity, to what would otherwise be an ugly brawl."
Frederick The Great
Georgia, United States
Joined: February 17, 2013
KitMaker: 173 posts
AeroScale: 108 posts
Posted: Friday, August 07, 2015 - 05:42 PM UTC
On the bench, Blue Max, Mustang Funny car.
Airfix Hotspur glinder.
Joel_W
Associate Editor New York, United States
Joined: December 04, 2010
KitMaker: 11,666 posts
AeroScale: 7,410 posts
Posted: Friday, August 07, 2015 - 07:29 PM UTC
Bill,
Glad to see that the build is still alive and well. Your paint camo scheme and decals look well done.
Joel
On my Workbench:
Monogram 1/24 scale 427 Shelby Cobra
Just Completed:
Beemax 1/24 scale BMW M3 E30 1992 Evolution II
Georgia, United States
Joined: February 17, 2013
KitMaker: 173 posts
AeroScale: 108 posts
Posted: Tuesday, September 01, 2015 - 04:01 AM UTC
I highlighted the panel lines with AK interactive panel liner. The AK products are easy to use but the underside seems overstated. The top side is not very noticeable but may look better once I spray clear flat over it. I have not tried highlighting this extensively before. What do you think is it over done?

On the bench, Blue Max, Mustang Funny car.
Airfix Hotspur glinder.
Niedersachsen, Germany
Joined: March 26, 2014
KitMaker: 844 posts
AeroScale: 630 posts
Posted: Wednesday, September 02, 2015 - 10:53 AM UTC
Great paint job, Bill. Will try out this way of painting by my self.
#424
Queensland, Australia
Joined: April 23, 2015
KitMaker: 4,648 posts
AeroScale: 1,938 posts
Posted: Wednesday, September 02, 2015 - 02:35 PM UTC
Hi Bill,
It is definitely not overdone. Looks great!
Gary
"Artillery adds dignity, to what would otherwise be an ugly brawl."
Frederick The Great
New Jersey, United States
Joined: February 02, 2015
KitMaker: 330 posts
AeroScale: 286 posts
Posted: Wednesday, September 02, 2015 - 05:36 PM UTC
not at all looks great. subtle weathering is the best way to go. where did you get the decals? I like the skull on the rudder, would like to get a set.
joe
Georgia, United States
Joined: February 17, 2013
KitMaker: 173 posts
AeroScale: 108 posts
Posted: Wednesday, September 09, 2015 - 05:59 AM UTC
Bernd, Gary and Joe, thank you. Joe, the decals are by Revi, set # 48005. Air craft depicted is from 29th Sentai, 2nd Chutai, Anchang AB, China, August 1944. This aircraft is depicted in profile in two books.
On the bench, Blue Max, Mustang Funny car.
Airfix Hotspur glinder.