

Ben
The engines will look more then fine once enclosed and with the cowlings on in 1/72 scale.
I can't imagine how you can even work with PE parts that small, and no less solder them. I've really been thinking of trying to sell of my small 1/48 scale stash (all of 11 kits), and moving up to 1/32 scale.
Joel
Cold War (1950-1974)
Discuss the aircraft modeling subjects during the Cold War period.
Discuss the aircraft modeling subjects during the Cold War period.
Hosted by Tim Hatton
Roden's Fairchild C-123B
Joel_W

Joined: December 04, 2010
KitMaker: 11,666 posts
AeroScale: 7,410 posts
Posted: Monday, October 06, 2014 - 01:47 AM UTC


Mcleod

Joined: April 07, 2010
KitMaker: 1,028 posts
AeroScale: 939 posts
Posted: Friday, October 10, 2014 - 12:22 PM UTC
Posting with few words:


I'm painting some NH parts while on the fret. More importantly, I'm showing the progression of messing up the kit console:


I admit, this is going really slow. Still, there is only one direction to go; or drown.
I'm painting some NH parts while on the fret. More importantly, I'm showing the progression of messing up the kit console:
I admit, this is going really slow. Still, there is only one direction to go; or drown.
Joel_W
Joined: December 04, 2010
KitMaker: 11,666 posts
AeroScale: 7,410 posts
Posted: Monday, October 13, 2014 - 01:12 PM UTC
Ben,
I'd definitely think that you'd be much better off with the NH seats and IP.
Joel
I'd definitely think that you'd be much better off with the NH seats and IP.
Joel

JPTRR

#051

Joined: December 21, 2002
KitMaker: 7,772 posts
AeroScale: 3,175 posts
Posted: Tuesday, October 21, 2014 - 03:47 PM UTC
Hi Ben,
Something I have had success with when painting panels with good raised detail is to flood the low areas with diluted panel color. It can take a few applications but with capillary effect the diluted paint gets around the raised detail well.
Something I have had success with when painting panels with good raised detail is to flood the low areas with diluted panel color. It can take a few applications but with capillary effect the diluted paint gets around the raised detail well.

Mcleod
Joined: April 07, 2010
KitMaker: 1,028 posts
AeroScale: 939 posts
Posted: Wednesday, November 05, 2014 - 11:11 AM UTC
Quoted Text
Something I have had success with when painting panels with good raised detail is to flood the low areas with diluted panel color. It can take a few applications but with capillary effect the diluted paint gets around the raised detail well.
I saw this awhile back, Fred, and I did make note of it. Thank-you for the tip.
Further evolution of the cockpit. I decided to use the kit console, even though I managed to make quite a mess of it. The NH Detail console is much nicer, however, NH's location instructions are quite vague. This is my duck and run excuse for soldering the console with a height issue. At least the kit console is the correct height, and that,s important considering its shroud.


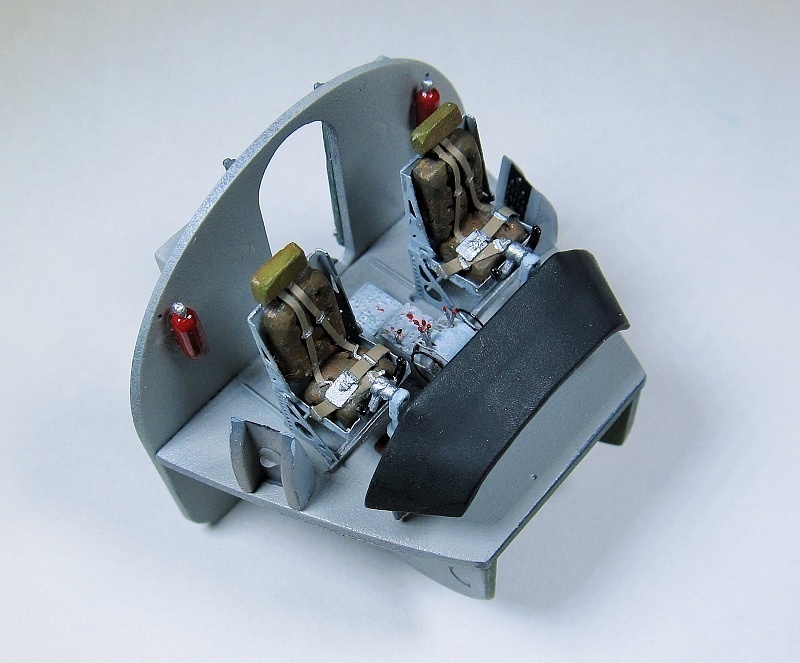

I know, that's alot of photos. Trying to show where I'm going with this.
As you can see, the pit is very busy, and once its closed up, what can be seen will certainly look that way. It's just not all that tragic that I messed up the console so badly.
Next step is that green window tint and the fuselage interior.
Joel_W
Joined: December 04, 2010
KitMaker: 11,666 posts
AeroScale: 7,410 posts
Posted: Wednesday, November 05, 2014 - 12:26 PM UTC
Ben,
The cockpit does look rather good. And like you said, once the fuselage is closed up, ones view of it will really be quite limited.
Joel
The cockpit does look rather good. And like you said, once the fuselage is closed up, ones view of it will really be quite limited.
Joel
Mcleod
Joined: April 07, 2010
KitMaker: 1,028 posts
AeroScale: 939 posts
Posted: Thursday, December 25, 2014 - 12:17 PM UTC
The engine cowlings on this kit proved to be somewhat of a challenge.
I found you can't build them one piece after another and expect it to be straight and flush. Rather, I had to fumble the pieces together as a whole along with an engine, holding it as best I could, and carefully apply some glue. One also has to worry about proper circumference, so the whole affair will fit onto the rear cowling body attached to the bottom of each wing.
Many words were spoken as I slithered through this process, and there is still no perfect fit. Sanding, filler and scribing are required on both cowlings. This will be done when each engine is attached to its respective wing halve.

And then there is the wings:


Little progress, I know. The kit is as difficult as I've ever seen though, and I don't look to rush. It's a fun kit of a worthy subject, and I'm looking to do an ok job with my limited modelling skills.
I found you can't build them one piece after another and expect it to be straight and flush. Rather, I had to fumble the pieces together as a whole along with an engine, holding it as best I could, and carefully apply some glue. One also has to worry about proper circumference, so the whole affair will fit onto the rear cowling body attached to the bottom of each wing.
Many words were spoken as I slithered through this process, and there is still no perfect fit. Sanding, filler and scribing are required on both cowlings. This will be done when each engine is attached to its respective wing halve.
And then there is the wings:
Little progress, I know. The kit is as difficult as I've ever seen though, and I don't look to rush. It's a fun kit of a worthy subject, and I'm looking to do an ok job with my limited modelling skills.

spaarndammer

Joined: January 28, 2007
KitMaker: 1,945 posts
AeroScale: 388 posts
Posted: Thursday, December 25, 2014 - 12:58 PM UTC
A most enjoyable build story thus far. Thanks for showing US in detail all the build steps.
Have you considered superglue for the PE instead of soldering? That seems to work more easy on the tiny parts and should provide a bond that is strong enough.
Great idea on the roller for painting raised detail. Thanks for sharing. Will try that for dure.
Jelger
Have you considered superglue for the PE instead of soldering? That seems to work more easy on the tiny parts and should provide a bond that is strong enough.
Great idea on the roller for painting raised detail. Thanks for sharing. Will try that for dure.
Jelger

hbratz

Joined: June 24, 2011
KitMaker: 15 posts
AeroScale: 14 posts
Posted: Thursday, December 25, 2014 - 03:01 PM UTC
Hi,
VERY interesting thread as I have two (unbuilt) of this kit including the NH Detail set. I will follow your build closely with GREAT interest!
Very good so far - and will undoubtedly look great when finished.
I have recently received the Caracal Models decal sheet #CD 72027 literally providing :-) three paint variants of USAF/MATS Provider schemes (all-metal + metal / white top + came). Personally I´ll finish one white top a/c and one in all-metal Air America markings.
Joel_W
Joined: December 04, 2010
KitMaker: 11,666 posts
AeroScale: 7,410 posts
Posted: Thursday, December 25, 2014 - 08:40 PM UTC
Ben,
Your making excellent progress on the engines, cowlings, and wings. The Roden kit certain seems to offer one set of challenges after another.
Joel
Your making excellent progress on the engines, cowlings, and wings. The Roden kit certain seems to offer one set of challenges after another.
Joel
Mcleod
Joined: April 07, 2010
KitMaker: 1,028 posts
AeroScale: 939 posts
Posted: Thursday, December 25, 2014 - 09:17 PM UTC
Thankyou for your kind comments guys. I'm really into this build and enjoying it immensely. My problem is that I recently became the primary caregiver for my young (16mos.) granddaughter. Raising a second family has really thrown a stump into my modelling habits, however, my priorities must be to the child.
Hi, Jelger. Yes, I have tried CA on PE. I have better luck with the solder, and prefer using that method.
I've learned that the best modelling slot is during the child's nap-time, so hopefully I can update soon.
Quoted Text
Have you considered superglue for the PE instead of soldering?
Hi, Jelger. Yes, I have tried CA on PE. I have better luck with the solder, and prefer using that method.
I've learned that the best modelling slot is during the child's nap-time, so hopefully I can update soon.
Mcleod
Joined: April 07, 2010
KitMaker: 1,028 posts
AeroScale: 939 posts
Posted: Saturday, December 27, 2014 - 11:36 AM UTC
Hmmm! The photo download doesn't seem to have worked properly. I'll edit this post and try to get the small photos fixed up, if I can.
Mcleod
Joined: April 07, 2010
KitMaker: 1,028 posts
AeroScale: 939 posts
Posted: Saturday, December 27, 2014 - 12:04 PM UTC
This is a post re-try.


Jessie_C
Joined: September 03, 2009
KitMaker: 6,965 posts
AeroScale: 6,247 posts

Posted: Saturday, December 27, 2014 - 12:18 PM UTC
I wonder whether instead of grinding the fairings on the wings down if it would be easier to take some material off the upper mating surfaces of the nacelles where they fit under the wings?
Mcleod
Joined: April 07, 2010
KitMaker: 1,028 posts
AeroScale: 939 posts
Posted: Saturday, December 27, 2014 - 12:48 PM UTC
Quoted Text
take some material off the upper mating surfaces of the nacelles where they fit under the wings?
Yup, that may have been the smart way. However, the lower cowlings already have slightly less curve than that molded on part, so removing material would make that worse. The difference in circumference is quite noticeable if you look at it straight on.
Its too late now anyways, as the lower cowls are now glued on.
Thanks for the great suggestion, Jessica.
Joel_W
Joined: December 04, 2010
KitMaker: 11,666 posts
AeroScale: 7,410 posts
Posted: Sunday, December 28, 2014 - 10:51 PM UTC
Ben,
Nice progress on those cowls/engines.
My rule of thumb for filler is that if I can see out the seam, I go with sheet plastic or stretched sprue, then blend in with my filler of choice.
Joel
Nice progress on those cowls/engines.
My rule of thumb for filler is that if I can see out the seam, I go with sheet plastic or stretched sprue, then blend in with my filler of choice.
Joel
Mcleod
Joined: April 07, 2010
KitMaker: 1,028 posts
AeroScale: 939 posts
Posted: Monday, December 29, 2014 - 04:12 AM UTC
I had 1/2hr free time today to get started on the fuselage interior:


I don't know about anyone else, but, that photobucket with all their pop-ups and advertising is starting to drive me nuts . I tried using SlickPic and started having other types of issues, so I'm on the hunt for another image hosting service. Perhaps I'll give Flikr a go.
I don't know about anyone else, but, that photobucket with all their pop-ups and advertising is starting to drive me nuts
. I tried using SlickPic and started having other types of issues, so I'm on the hunt for another image hosting service. Perhaps I'll give Flikr a go.raypalmer
Joined: March 29, 2010
KitMaker: 1,151 posts
AeroScale: 985 posts

Posted: Monday, December 29, 2014 - 04:29 AM UTC
If you use the photo bucket app on a phone or tablet it's smooth and easy. Web based is rubbish.
Joel_W
Joined: December 04, 2010
KitMaker: 11,666 posts
AeroScale: 7,410 posts
Posted: Monday, December 29, 2014 - 06:40 PM UTC
Ben,
Ejector pin marks are just one evil we have to live with, and remove the ones that will show. Sand, putty, and sand some more is my usual way. I've never tried anything like Blister packs. I've used punched out sheet plastic disks, but they take as much work as just good old thinned out putty.
While I do get some pop ups on Photobucket, it's a lot less since I signed up for the $2.99/month account, which solved all my bandwidth and storage issues. I've used Flickr, and a few others over the years, and they all have their pluses and minuses. Personally, I prefer Photobucket.
Joel

magnusf

Joined: May 02, 2006
KitMaker: 1,953 posts
AeroScale: 1,902 posts
Posted: Friday, January 09, 2015 - 03:28 PM UTC
Ben! Some seriously cool work going on around here, I'm along for the ride! Love the soldered seats, I have to learn that myself!
Magnus
Magnus
Mcleod
Joined: April 07, 2010
KitMaker: 1,028 posts
AeroScale: 939 posts
Posted: Friday, January 09, 2015 - 07:21 PM UTC
Quoted Text
Ben! Some seriously cool work going on around here, I'm along for the ride!
Thankyou for following, Magnus. Hope you have patience; the Roden kit itself is rather difficult and I look to try to do a nice job. Also, it came to be unexpectedly that I raise a second family of very young children, so bench time quickly became an issue. Hang in there, though, and it will be conquered.

JPTRR
#051
Joined: December 21, 2002
KitMaker: 7,772 posts
AeroScale: 3,175 posts
Posted: Friday, January 09, 2015 - 09:34 PM UTC
Ben,
This is a great thread of detailed assembly of this tricky model. It will succumb to the King of the Snowbank!
This is a great thread of detailed assembly of this tricky model. It will succumb to the King of the Snowbank!
Mcleod
Joined: April 07, 2010
KitMaker: 1,028 posts
AeroScale: 939 posts
Posted: Friday, January 09, 2015 - 09:58 PM UTC
Quoted Text
It will succumb to the King of the Snowbank!
Yes it will, Fred. And thanks for remembering that I hold ground in this winter wonderland surrounded by snowball throwing children.

Mcleod
Joined: April 07, 2010
KitMaker: 1,028 posts
AeroScale: 939 posts
Posted: Friday, January 23, 2015 - 07:44 AM UTC
Another small update


Until later
Until later
Joel_W
Joined: December 04, 2010
KitMaker: 11,666 posts
AeroScale: 7,410 posts
Posted: Sunday, January 25, 2015 - 05:40 AM UTC
Ben,
The finished cockpit is most impressive, especially those seats.
Joel
The finished cockpit is most impressive, especially those seats.
Joel
 |

WEB HOSTING BY


Copyright ©2021 AeroScale and Kitmaker Network, a subsidiary of Silver Star Enterprises
All Rights Reserved. Please read our Conditions of Use and Privacy Policy.
All Rights Reserved. Please read our Conditions of Use and Privacy Policy.