

Hi Joel, good work on the decals and the details, it is coming very much together, Congratulations.
The aftermarked decals are in the wrong size......:-/
Cold War (1950-1974)
Discuss the aircraft modeling subjects during the Cold War period.
Discuss the aircraft modeling subjects during the Cold War period.
Hosted by Tim Hatton
A-6E Intruder

berndm

Joined: March 26, 2014
KitMaker: 844 posts
AeroScale: 630 posts
Posted: Sunday, September 28, 2014 - 06:25 PM UTC
Joel_W

Joined: December 04, 2010
KitMaker: 11,666 posts
AeroScale: 7,410 posts
Posted: Monday, September 29, 2014 - 12:24 AM UTC
Quoted Text
A thing of beauty is a joy forever. Great work Joel. You're inspiring me. I might get back to my Bearcat this week.
Mark,
Thanks for those most inspiring words. Looking forward to seeing your next update on the Bearcat.
Joel

Joel_W
Joined: December 04, 2010
KitMaker: 11,666 posts
AeroScale: 7,410 posts
Posted: Monday, September 29, 2014 - 12:27 AM UTC
Quoted Text
Joel----Those MERS are a real treat. Used them on my F-111. I was tearing my hair out with the sway braces. I can see your "one piece of ordnance on the pylon" perspective. Looking forward to the rest of your build. No plane like the Iron Tadpole.
Best wishes,
Ian
Ian,
Yep, those Mers were rather interesting to deal with. My new procedure with all ordinance and even pylon stations is to use stainless steel pins. Works great as those plastic nubs don't hold anything, and then you have to rely on the Extra thin to eat through multiple layers of paint and sealers.
Joel
Joel_W
Joined: December 04, 2010
KitMaker: 11,666 posts
AeroScale: 7,410 posts
Posted: Monday, September 29, 2014 - 12:36 AM UTC
Quoted Text
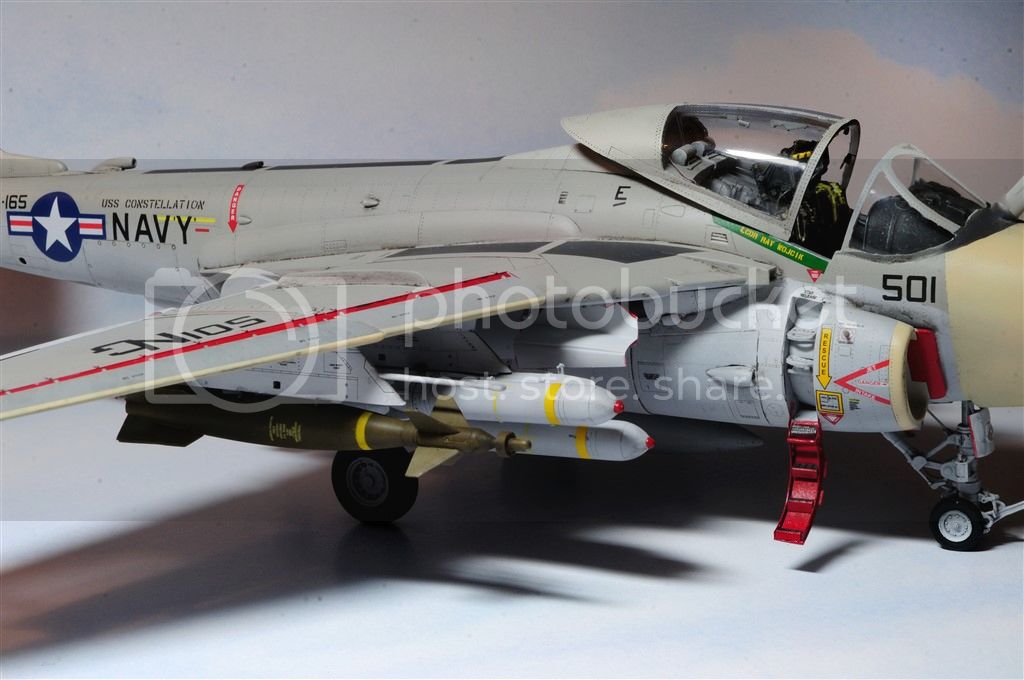
Hi Joel, good work on the decals and the details, it is coming very much together, Congratulations.
The aftermarked decals are in the wrong size......:-/
Bernd,
Hard to believe but true.
I had several exchanged emails about this with the owner of Fightertown decals over on ARC. The danger triangles were under sized but corrected on updated sheets.
The Stars and Bars were a completely different matter. I used the larger ones for the fuselage and the smaller ones for the wings as per kit instructions. They're almost the same size on the kit decal sheet. ON the figthertown decals the smaller decals were for the fuselage. The only problem was that there is no mention of that in his instructions. He has corrected that on his instruction sheet moving forward.
And he was more then nice enough to have offered me a full replacement sheet of decals. Can't beat that for personal service.
Fortunately, the kit decals work and look perfectly.
Joel
Joel_W
Joined: December 04, 2010
KitMaker: 11,666 posts
AeroScale: 7,410 posts
Posted: Monday, September 29, 2014 - 01:45 AM UTC
Pure stupidity on my part 
I wanted to Dullcoat the A-6E yesterday. So I get out my trusty Paasche H air brush, and the trigger button is somewhat sticky. Odd, as I've never had that issue with this gun or my 35 year old one that now resides in the town land fill, as some replacement parts don't fit, even though they should.
I removed the button, then the air hose. I carefully removed the retaining nut and pushed the shaft and spring assembly out the bottom. Using Lacquer Thinner, I cleaned the old lube out of the the slot, as well as off the shaft. For lubrication I just used some 5-30 motor oil rubbed on with a Q-tip, then slid the assembly back into the gun. Smooth as silk So I position the nut and start to tighten it, when the screwdriver slips and the spring launches the nut into outer space. I hear it hit the wall, so I have a basic idea of where to look. Well, nearly a hour of searching was basically a waste of time. No nut
Now I have the basic spare parts, but never bothered with a spare nut as I've never needed one before. So now it's Google time. I find the Paasche site, and it's in Chicago. I'm impressed as something of quality is actually made in the USA. Their site is extensive, user friendly, and most important of all customer friendly. So I order two nuts. Each cost $1.20. Next day Fed EX shipping was $40!, 2nd day Fed Ex shipping was nearly $20. I ended up with USPS 1st class mail for $4.40.
I figured I continue to look for art supply stores that carry Paasche air brushes locally. Found two. One 5 min from my house, which is where I bought my current air brush, but they went out of business thanks to Michaels, Walmart, etc. Found a chain called Blinks, with a store about a hour away. I called and went through my tale of woe. Naturally, they didn't have the part in stock, and wasn't expecting a restock til 10/27, just outstanding customer service, but they have new guns to sell me. They did offer to check their other stores in New York City. For me to drive into the city, would cost me a 1/2 tank of gas and nearly a full day of round trip travel, so that option was out.
So now I'm at a stand still. I do have the option of trying Model Master's Dullcoat in a rattle can, but I'm concerned of uneven coverage, runs, and hard to reach areas not getting any coverage.
Joel
I wanted to Dullcoat the A-6E yesterday. So I get out my trusty Paasche H air brush, and the trigger button is somewhat sticky. Odd, as I've never had that issue with this gun or my 35 year old one that now resides in the town land fill, as some replacement parts don't fit, even though they should.
I removed the button, then the air hose. I carefully removed the retaining nut and pushed the shaft and spring assembly out the bottom. Using Lacquer Thinner, I cleaned the old lube out of the the slot, as well as off the shaft. For lubrication I just used some 5-30 motor oil rubbed on with a Q-tip, then slid the assembly back into the gun. Smooth as silk
So I position the nut and start to tighten it, when the screwdriver slips and the spring launches the nut into outer space. I hear it hit the wall, so I have a basic idea of where to look. Well, nearly a hour of searching was basically a waste of time. No nut Now I have the basic spare parts, but never bothered with a spare nut as I've never needed one before. So now it's Google time. I find the Paasche site, and it's in Chicago. I'm impressed as something of quality is actually made in the USA. Their site is extensive, user friendly, and most important of all customer friendly. So I order two nuts. Each cost $1.20. Next day Fed EX shipping was $40!, 2nd day Fed Ex shipping was nearly $20. I ended up with USPS 1st class mail for $4.40.
I figured I continue to look for art supply stores that carry Paasche air brushes locally. Found two. One 5 min from my house, which is where I bought my current air brush, but they went out of business thanks to Michaels, Walmart, etc. Found a chain called Blinks, with a store about a hour away. I called and went through my tale of woe. Naturally, they didn't have the part in stock, and wasn't expecting a restock til 10/27, just outstanding customer service, but they have new guns to sell me. They did offer to check their other stores in New York City. For me to drive into the city, would cost me a 1/2 tank of gas and nearly a full day of round trip travel, so that option was out.
So now I'm at a stand still. I do have the option of trying Model Master's Dullcoat in a rattle can, but I'm concerned of uneven coverage, runs, and hard to reach areas not getting any coverage.
Joel
berndm
Joined: March 26, 2014
KitMaker: 844 posts
AeroScale: 630 posts
Posted: Monday, September 29, 2014 - 03:26 AM UTC
.....sounds like a really relaxing afternoon for modelling
pleasure
My airbrush is needing spare parts too, it is more "magic"
to use it.
I hope you get your parts soon, the A-6 looks very nice and
the decals looks like painted on !
From time to time some of my decals start to silver, while applying a matt varnish.
pleasure
My airbrush is needing spare parts too, it is more "magic"
to use it.
I hope you get your parts soon, the A-6 looks very nice and
the decals looks like painted on !
From time to time some of my decals start to silver, while applying a matt varnish.
Joel_W
Joined: December 04, 2010
KitMaker: 11,666 posts
AeroScale: 7,410 posts
Posted: Monday, September 29, 2014 - 03:54 AM UTC
Quoted Text
.....sounds like a really relaxing afternoon for modelling
pleasure
My airbrush is needing spare parts too, it is more "magic"
to use it.
I hope you get your parts soon, the A-6 looks very nice and
the decals looks like painted on !
From time to time some of my decals start to silver, while applying a matt varnish.
Brend,
The parts will be shipped today.
The silver issue when applying the mate finish is from trapped air under the decals. If you decaled on a surface that wasn't smooth enough, there is always the likelihood that in some of those depressions you will trap some air as you press down the decal during the application process. That's why I use both the Micro set and sol no matter how small the decals including stenciling. Truthfully, my surfaces aren't always perfectly smooth, which is a rather laborious process. When you seal the decals, the light reflecting back through the clear part of the decal is opaque not clear, as it's being reflected back from the trapped air pocket, while clear decal that is flush to a gloss surface reflects just the color right below it. So you see what we call silvering.
There really isn't a fix for it other then stripping off the decal, and re-glossing, polishing, and re-glossing till the surface is silky smooth. The only other thing you can do (which I do at times as well) as part of the weathering process, is a airbrush on a diluted wash of the base color a few shades lighter for a fading effect, or colors for sand or earth effect. It will subdue the silvering quite nicely.
Judging from your decaling on the Ju 88 A, I say you have a near perfect decaling procedure, as they look painted on.
Joel
berndm
Joined: March 26, 2014
KitMaker: 844 posts
AeroScale: 630 posts
Posted: Monday, September 29, 2014 - 08:48 PM UTC
Hi Joel, i am improving my surfaces currently, last sunday i
sprayed some flat varnish, to finish a small Airfix kit, the
surfaces and the decals were on the same level as on the Ju, but the walkways silvered after the session a bit, visible at certain angles
Before the Ju will finished i will spray some clear again, to
seal the decals.
Beside that problem and airbrush problems, i spend lots of hobby time UNDER the bench :-/
Happy modelling
Bernd
Joel_W
Joined: December 04, 2010
KitMaker: 11,666 posts
AeroScale: 7,410 posts
Posted: Tuesday, September 30, 2014 - 01:14 AM UTC
Quoted Text
Hi Joel, i am improving my surfaces currently, last sunday i
sprayed some flat varnish, to finish a small Airfix kit, the
surfaces and the decals were on the same level as on the Ju, but the walkways silvered after the session a bit, visible at certain angles
Before the Ju will finished i will spray some clear again, to
seal the decals.
Beside that problem and airbrush problems, i spend lots of hobby time UNDER the bench :-/
Happy modelling
Bernd
Bernd,
Lately I've been spending way too much time under the bench looking for all sorts of missing pieces. The latest is the set screw for the trigger button from my Paasche airbrush. Needed to take it apart and clean it as it was starting to stick. That's one of the few parts I don't have any spares for. So now I'm waiting for parts from Paasche to arrive this week. Still have plenty to do on the A-6E, so I'm not a complete standstill.
Like you, I'm working perfecting my surface for decaling. I use to just airbrush on a few coats of Glosscoat or Future, and go with that, but the silvering issues pops up every so often. Now I polish the painted surface with Micro Mesh pads, then seal with a mist coat, two wet coats, then when dry polish with the Micro Mesh pads.
Joel
berndm
Joined: March 26, 2014
KitMaker: 844 posts
AeroScale: 630 posts
Posted: Tuesday, September 30, 2014 - 02:12 AM UTC
Hi Joel, i guess the appearance will stand or fall first with
the overall look, i have coming a long way with that.
Your technique sounds good, worth a try.
You said it will be the last one in 1/48, than 1/32.Any plans ?
Bernd
the overall look, i have coming a long way with that.
Your technique sounds good, worth a try.
You said it will be the last one in 1/48, than 1/32.Any plans ?
Bernd
Joel_W
Joined: December 04, 2010
KitMaker: 11,666 posts
AeroScale: 7,410 posts
Posted: Tuesday, September 30, 2014 - 03:05 AM UTC
Quoted Text
Hi Joel, i guess the appearance will stand or fall first with
the overall look, i have coming a long way with that.
Your technique sounds good, worth a try.
You said it will be the last one in 1/48, than 1/32.Any plans ?
Bernd
Bernd,
Not sure what I really meant. I've been looking at moving to 1/32 scale for sometime, but I have a 1/48 stash that beckons me. Most likely will continue on my present course.
Joel
berndm
Joined: March 26, 2014
KitMaker: 844 posts
AeroScale: 630 posts
Posted: Tuesday, September 30, 2014 - 04:03 AM UTC
....we should blame this to my faulty english :-)
For myself, i have no special scale, a new interesting kit comes
out, in any scale, i will try to get them.
I am looking forward to your next post on this one
For myself, i have no special scale, a new interesting kit comes
out, in any scale, i will try to get them.
I am looking forward to your next post on this one
Joel_W
Joined: December 04, 2010
KitMaker: 11,666 posts
AeroScale: 7,410 posts
Posted: Tuesday, October 07, 2014 - 01:47 AM UTC
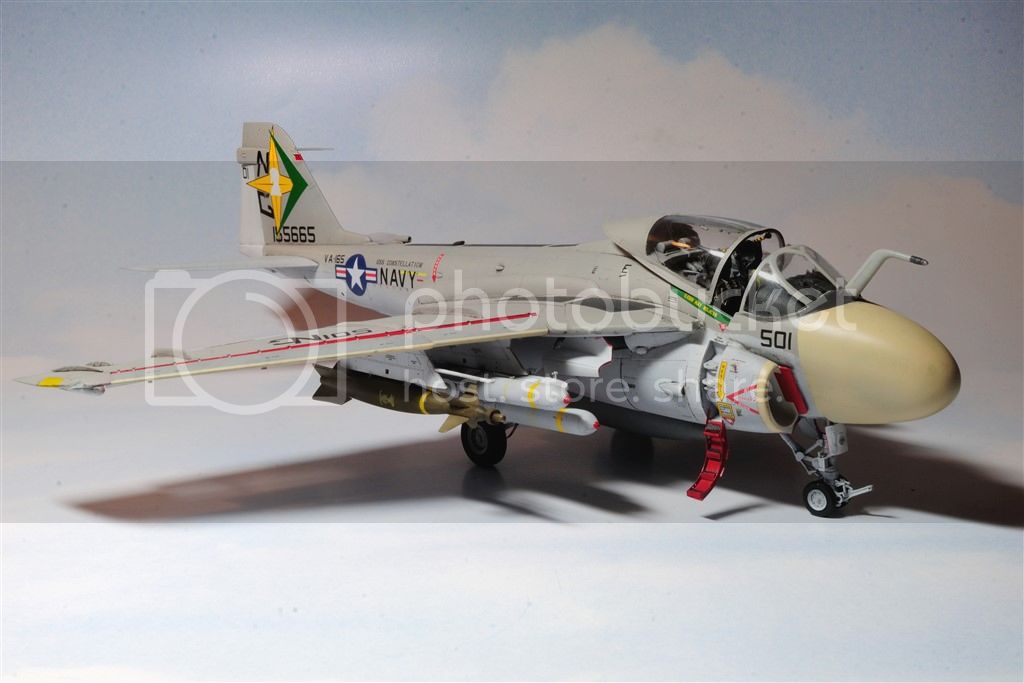
Time for another small update.
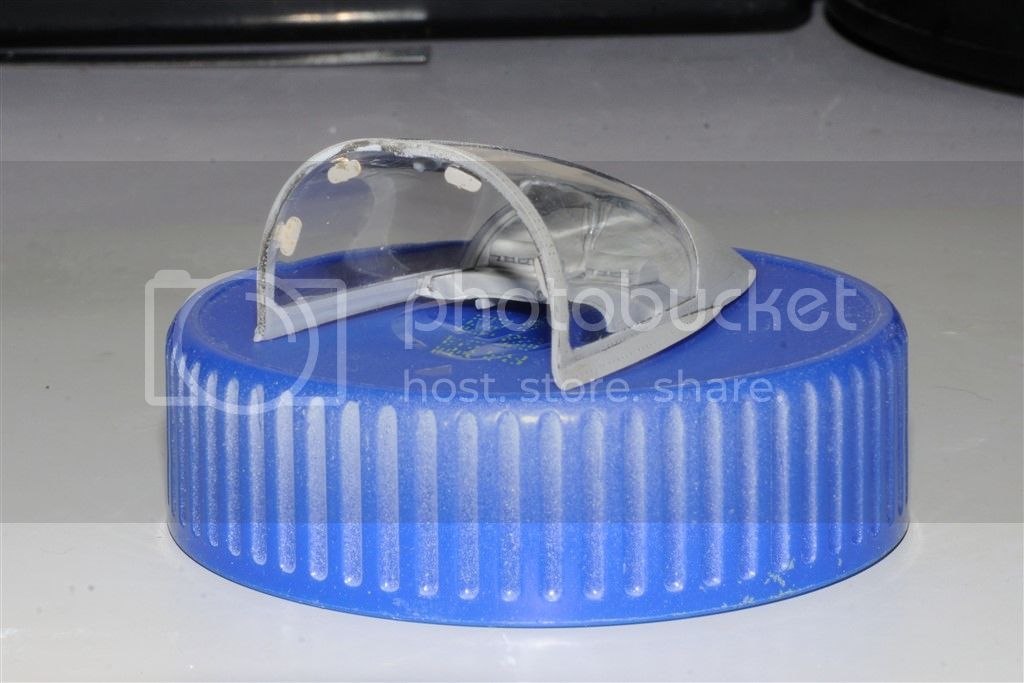
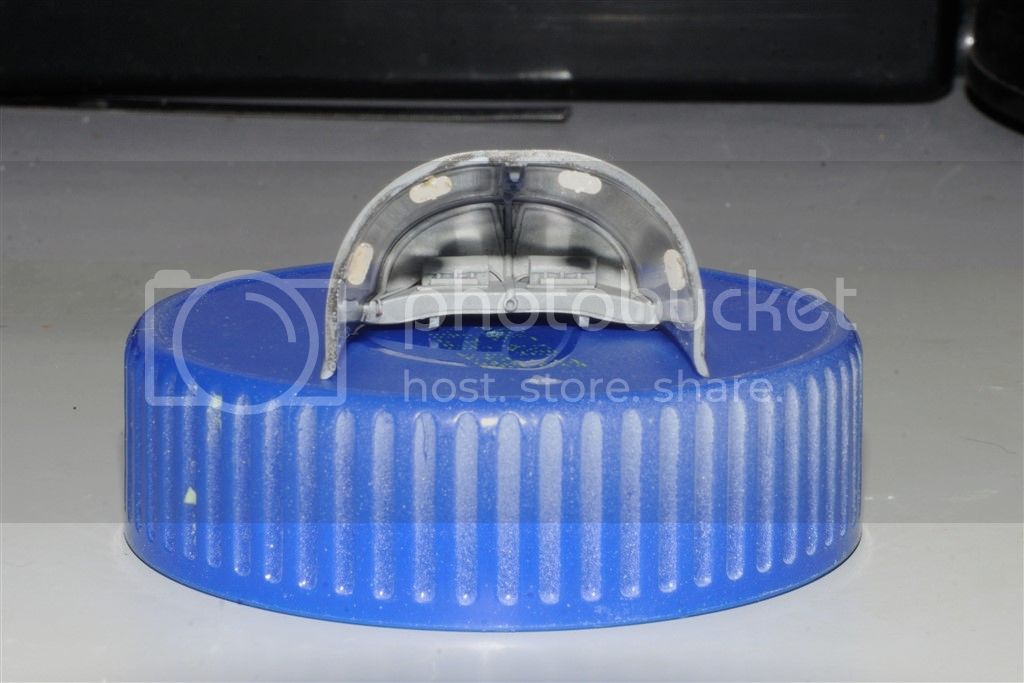
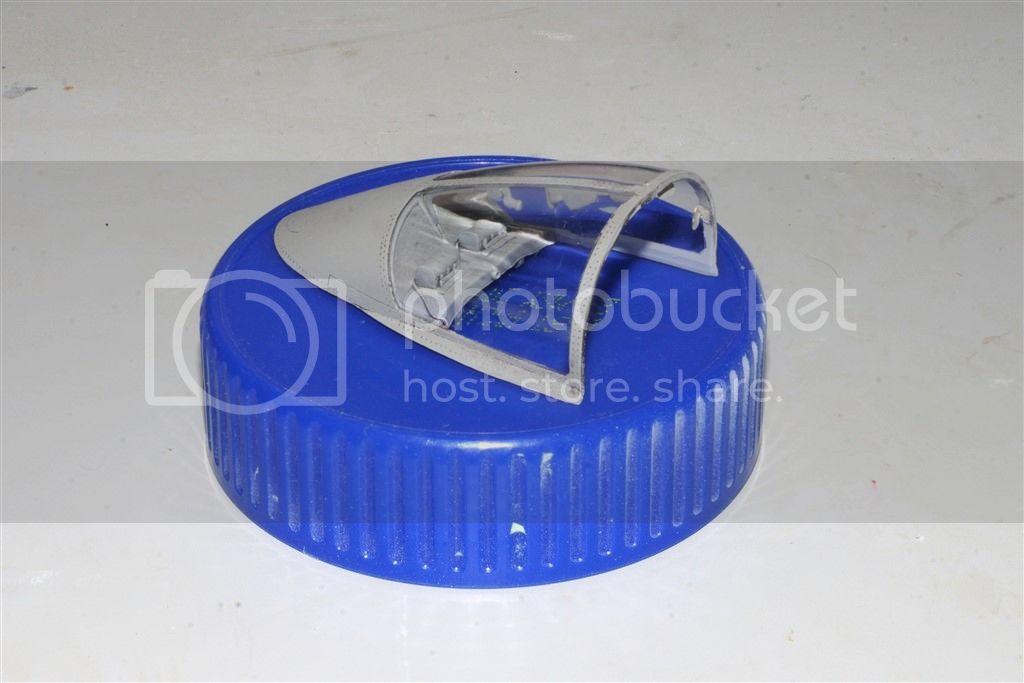
I finished weathering the canopy with just a dark gray sludge wash. I then unmasked the clear glass and assembled the interior back electronics shelf, open/closing latch assembly, and then the 4 PE mirrors. The trick to them was to bend the mounting plates so that you had a nice gluing surface. And yes, I also noticed from looking at the pictures that I have to touch of the canopy front face, as the tape pulled off some of the paint.
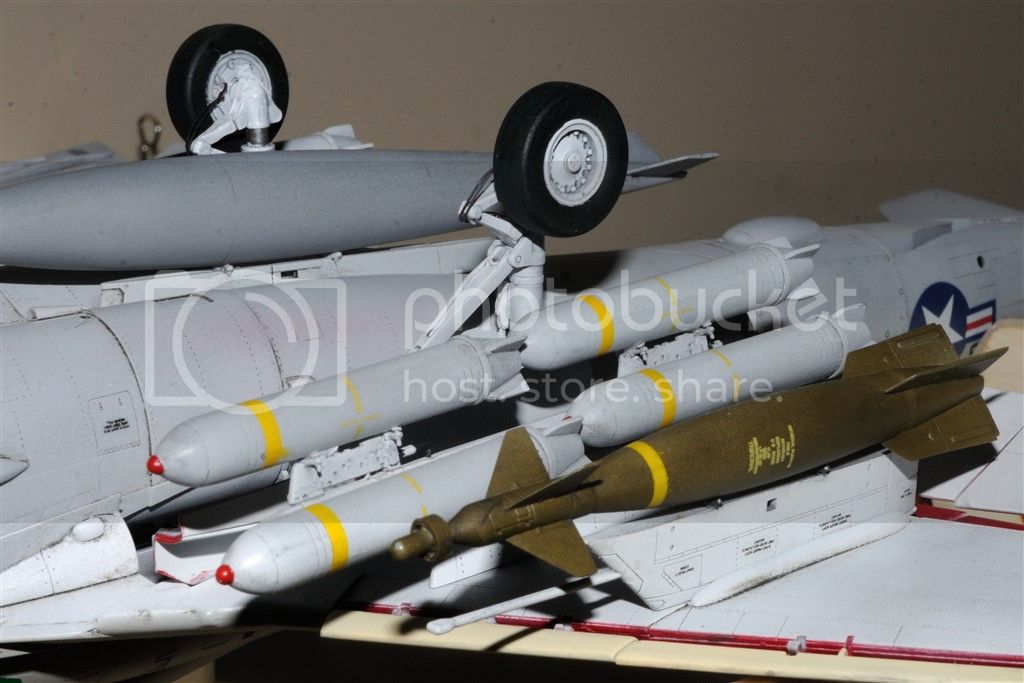
Next was the switch to MK20s and GBU-10s for the out-loads. From a few posts I received, it was pointed out to me that on pylons 2 & 4, the inside mounting stations weren't used for the MK20s, as the gear doors hit them. I'm sure that's not a good thing. So I only constructed 8 MK20s. As I mentioned in my reply to Andrew the locating holes in the MK20s are to mount them to the pylons, not the MERs. So I plugged them, and drilled new holes. Not difficult, just time consuming. One thing you need to keep in mind is to plug both holes, not just one. Then center the new mounting holes so that the MK20s seat correctly. They're just in raw white paint at this point.
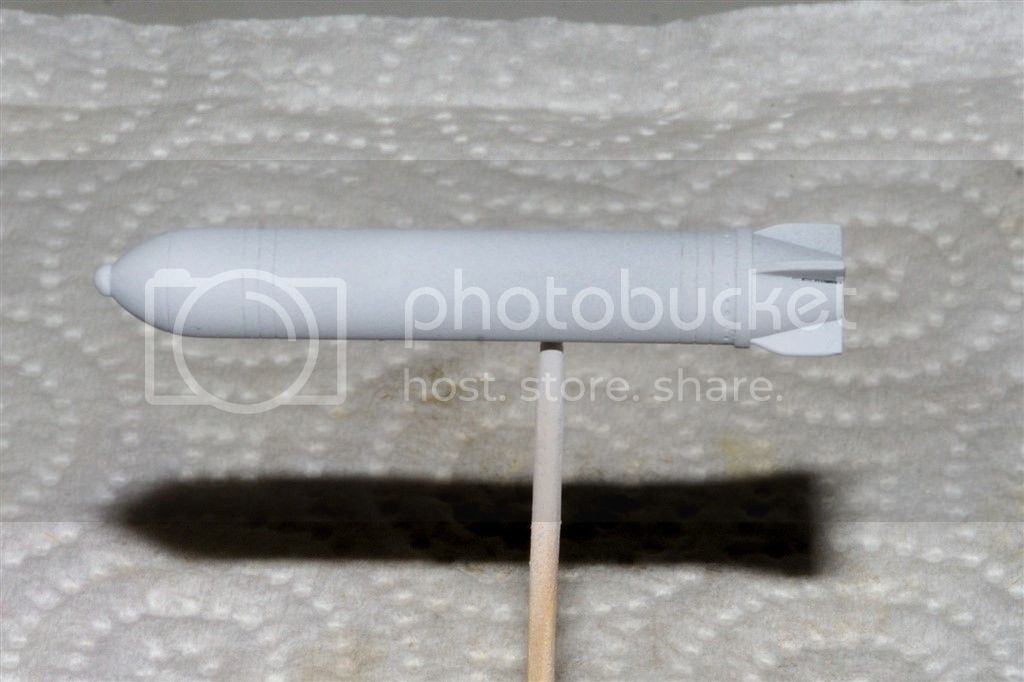
Next up was what I think are GBU-10s. There is no mention of them in the kit instructions, and try as I might, I can't figure out exactly which GBU they are.
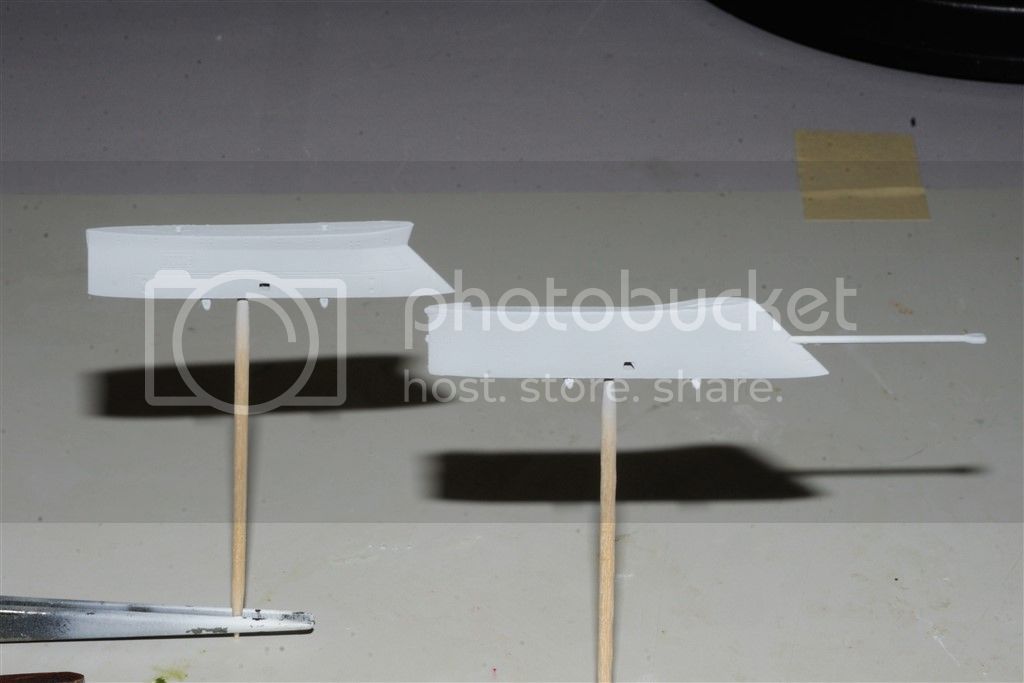
I painted the pylons and will be glossing, decaling, and weathering them. Again, they're just painted basic white.
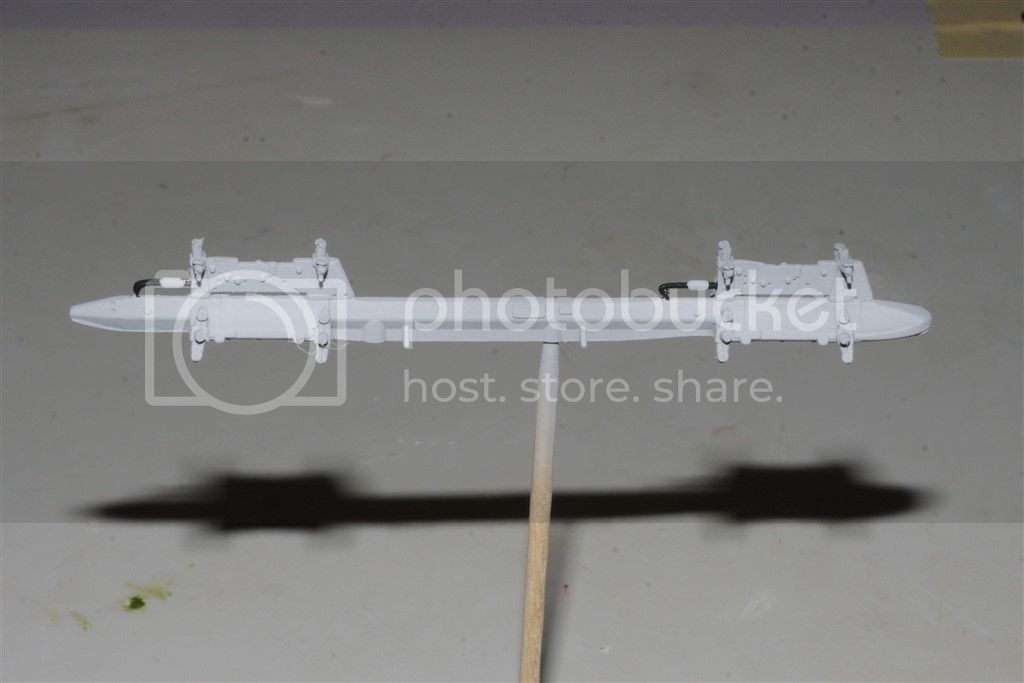
And finally the MERs in basic white.
Hopefully, by the end of the week I'll have a follow up post with the pylons, MERs and loads, finished, weathered, and assemblied.
Thanks for taking the time to look.
Joel
I finished weathering the canopy with just a dark gray sludge wash. I then unmasked the clear glass and assembled the interior back electronics shelf, open/closing latch assembly, and then the 4 PE mirrors. The trick to them was to bend the mounting plates so that you had a nice gluing surface. And yes, I also noticed from looking at the pictures that I have to touch of the canopy front face, as the tape pulled off some of the paint.


Next was the switch to MK20s and GBU-10s for the out-loads. From a few posts I received, it was pointed out to me that on pylons 2 & 4, the inside mounting stations weren't used for the MK20s, as the gear doors hit them. I'm sure that's not a good thing. So I only constructed 8 MK20s. As I mentioned in my reply to Andrew the locating holes in the MK20s are to mount them to the pylons, not the MERs. So I plugged them, and drilled new holes. Not difficult, just time consuming. One thing you need to keep in mind is to plug both holes, not just one. Then center the new mounting holes so that the MK20s seat correctly. They're just in raw white paint at this point.

Next up was what I think are GBU-10s. There is no mention of them in the kit instructions, and try as I might, I can't figure out exactly which GBU they are.

I painted the pylons and will be glossing, decaling, and weathering them. Again, they're just painted basic white.

And finally the MERs in basic white.

Hopefully, by the end of the week I'll have a follow up post with the pylons, MERs and loads, finished, weathered, and assemblied.
Thanks for taking the time to look.
Joel
berndm
Joined: March 26, 2014
KitMaker: 844 posts
AeroScale: 630 posts
Posted: Tuesday, October 07, 2014 - 02:28 AM UTC
....taking some time to comment.....The canopy has come out very clean, looking good with the mirrors.
Good start on the ordnance !
Bernd
Good start on the ordnance !
Bernd

Mcleod

Joined: April 07, 2010
KitMaker: 1,028 posts
AeroScale: 939 posts
Posted: Tuesday, October 07, 2014 - 02:58 AM UTC
I really do enjoy your build threads, Joel. Scrolling through this during morning coffee is truly an educational experience.
Very well done
Very well done
Joel_W
Joined: December 04, 2010
KitMaker: 11,666 posts
AeroScale: 7,410 posts
Posted: Tuesday, October 07, 2014 - 04:22 AM UTC
Bernd & Ben,
Thank you both for stopping bye and having a look. So glad that you like my work to date.
Joel
Thank you both for stopping bye and having a look. So glad that you like my work to date.
Joel
Joel_W
Joined: December 04, 2010
KitMaker: 11,666 posts
AeroScale: 7,410 posts
Posted: Thursday, October 09, 2014 - 08:19 AM UTC
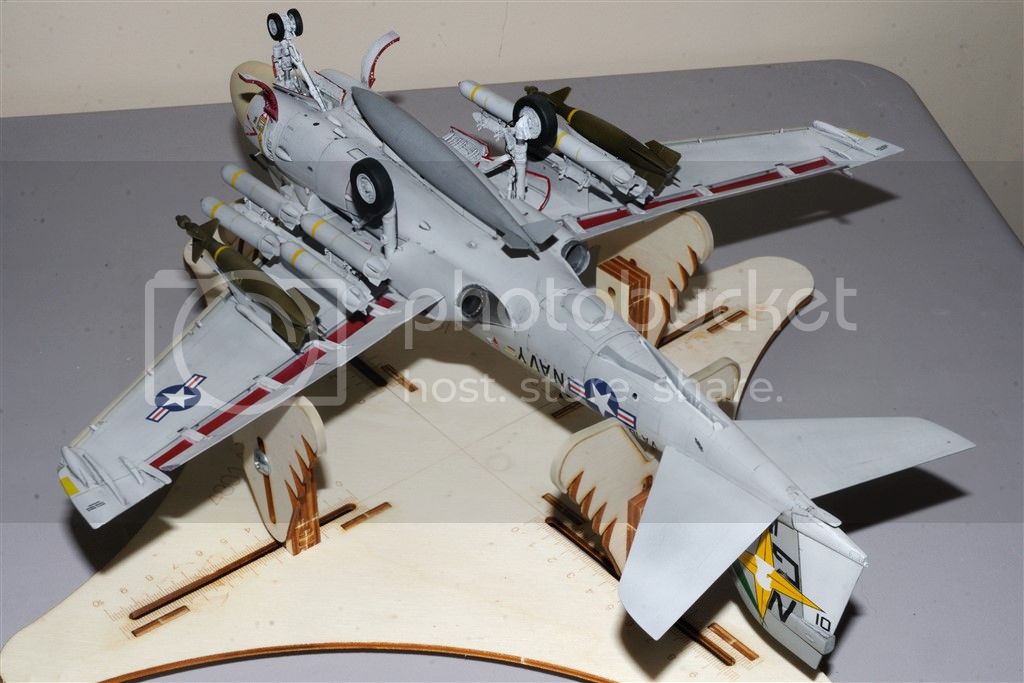
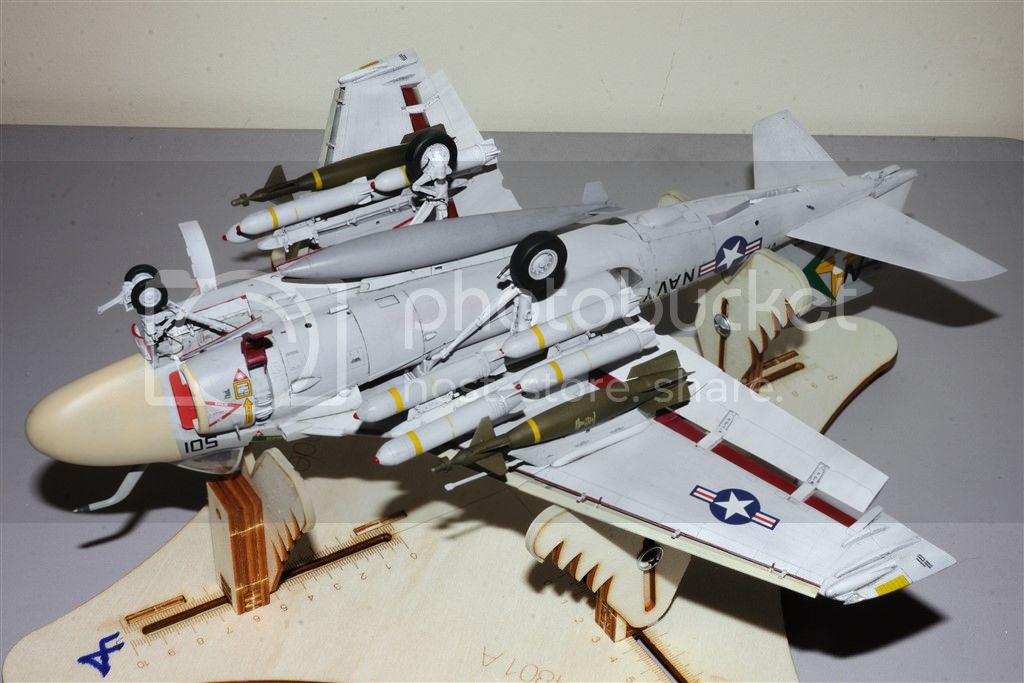
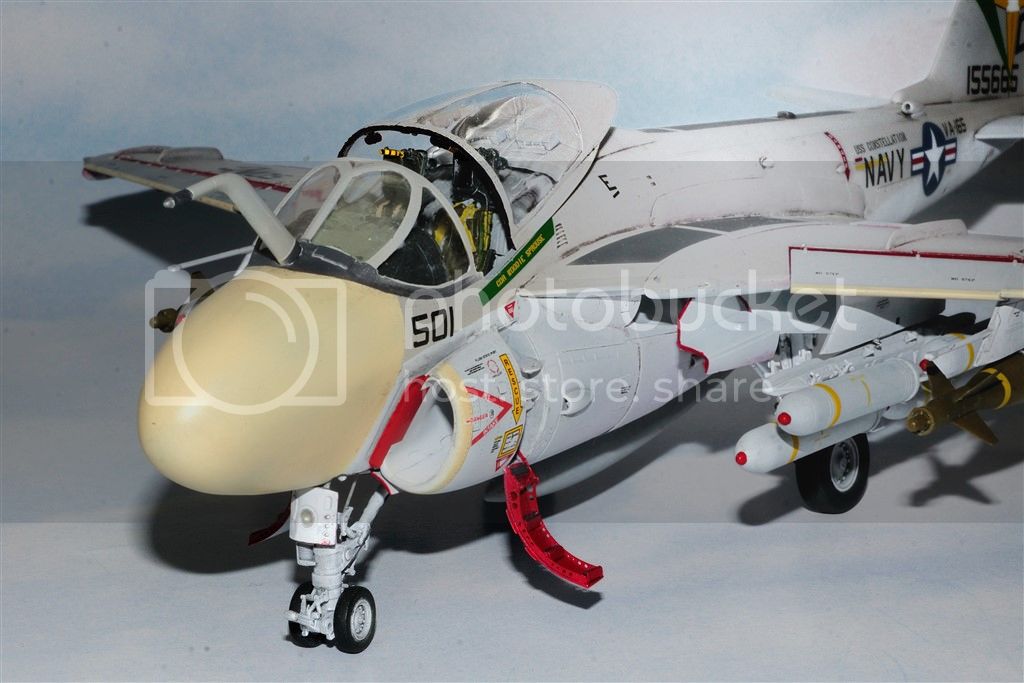
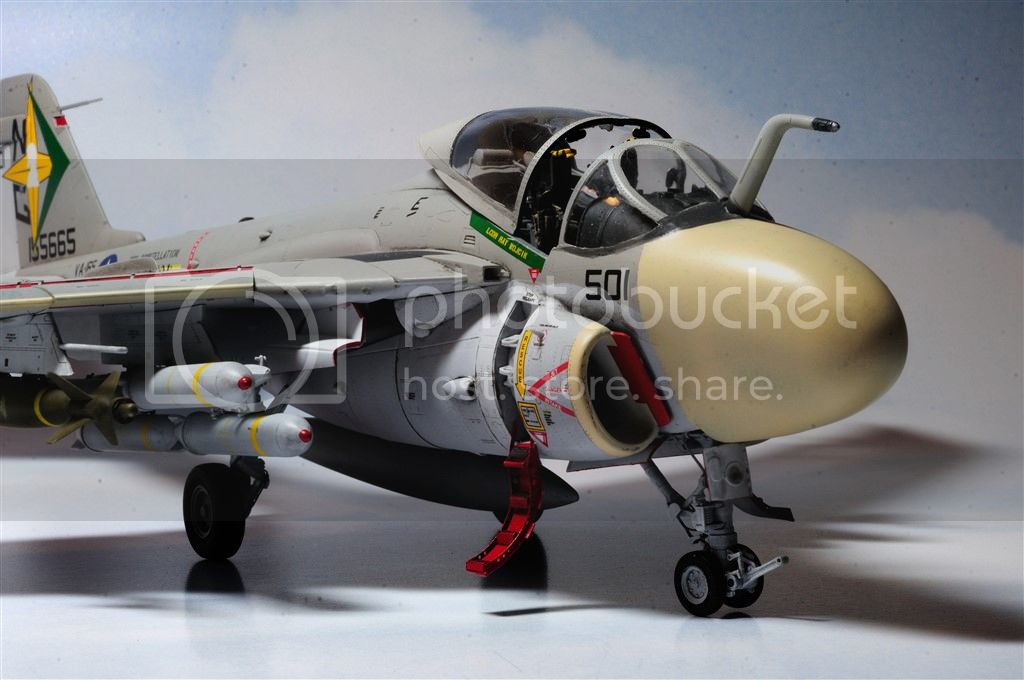
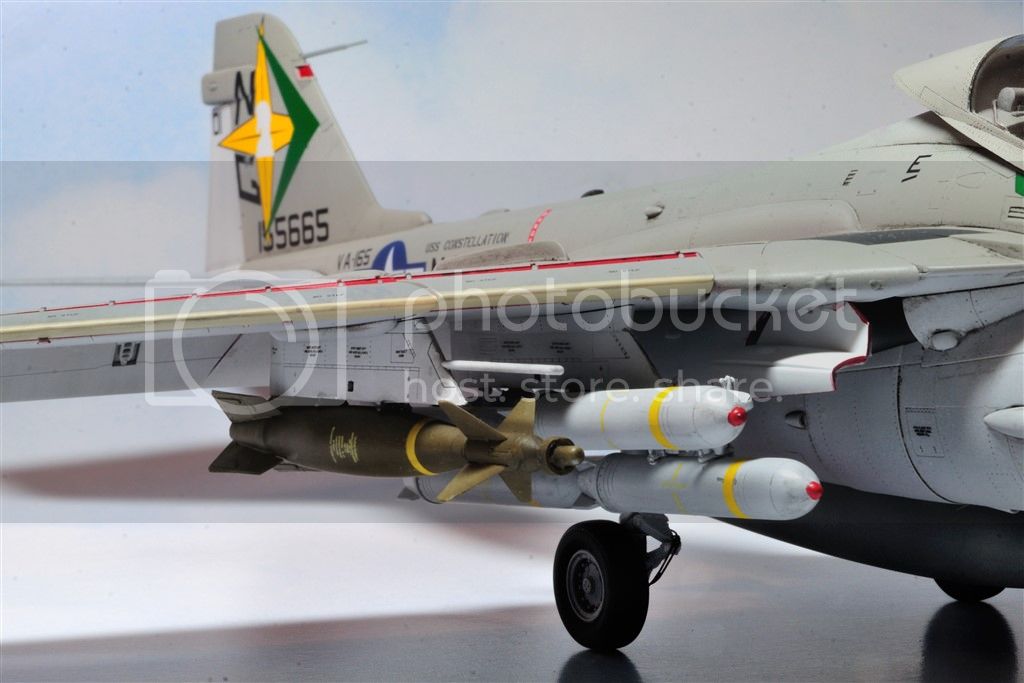
Finally finished all the loads out.
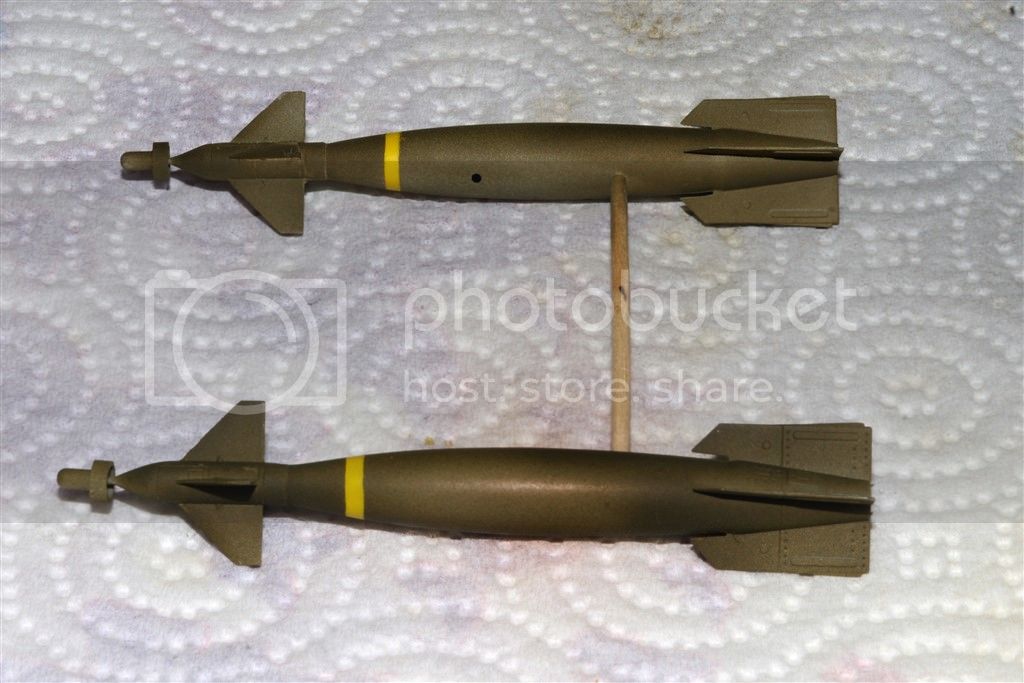
Stations: #1 & #5 each have a GBU-10. After a base coat of Tamiya Olive Drab, I added some Yellow to it, and randomly applied a blotchy pattern. Personally, I think I didn't go far enough with it, as GBU-10s still look to new.
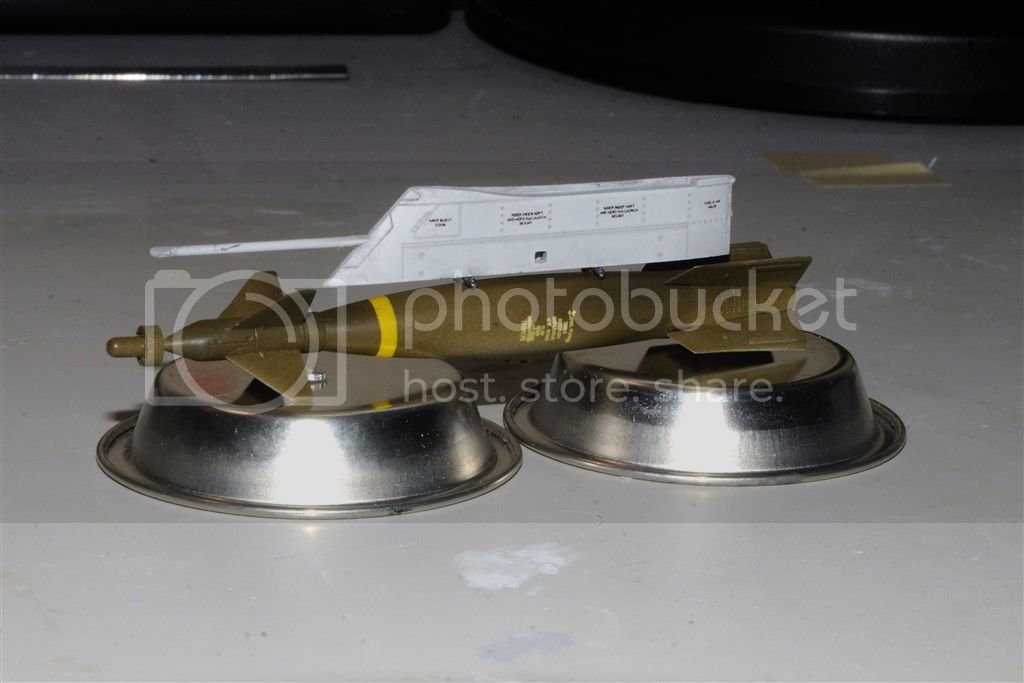
Stations #2 & #4 each have a MER rack with 4 MK20 Rockeyes. As was pointed out to me by a former crew chief, the inboard racks aren't used, as the gear doors have a nasty habit of hitting them. Rather then just weathering the MK20s with washes, I wanted to show a little rough handling wear and tear, so I lightly sanded parts of the bombs with a #4,000 Micro Mesh pad.
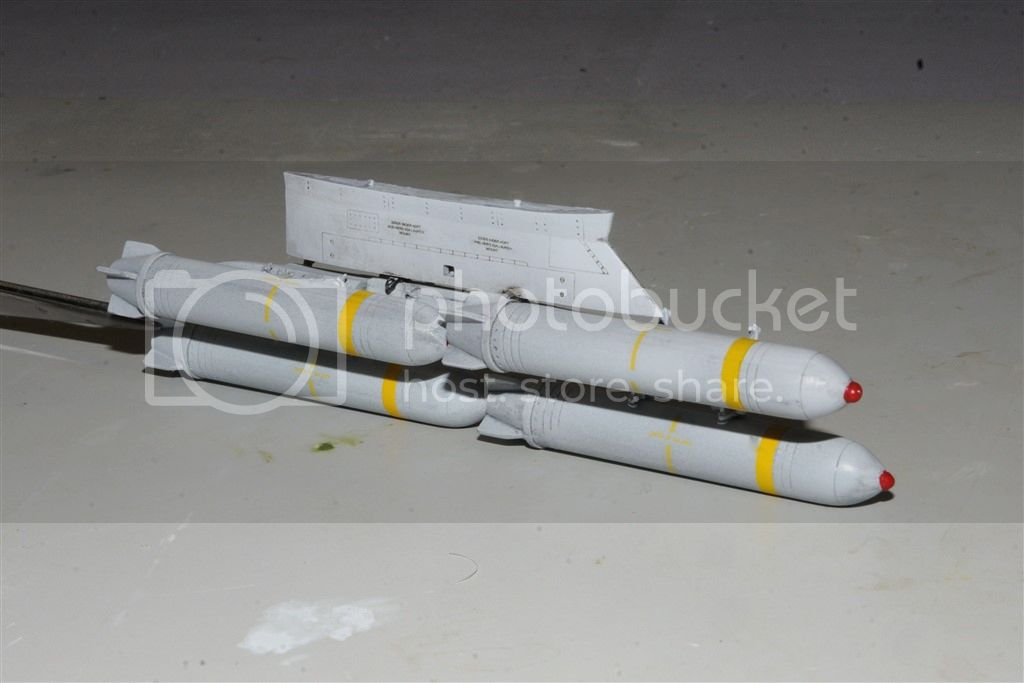
Joel
berndm
Joined: March 26, 2014
KitMaker: 844 posts
AeroScale: 630 posts
Posted: Thursday, October 09, 2014 - 07:34 PM UTC
Looking good Joel, no silvering on the stencils, some weathering touch ups will be "the edge"
Those valuable informations from your fellow crew chief are great, did you have an crew chief for Nany F-4 at hand?
Bernd
Those valuable informations from your fellow crew chief are great, did you have an crew chief for Nany F-4 at hand?
Bernd
Joel_W
Joined: December 04, 2010
KitMaker: 11,666 posts
AeroScale: 7,410 posts
Posted: Friday, October 10, 2014 - 03:43 AM UTC
Quoted Text
Looking good Joel, no silvering on the stencils, some weathering touch ups will be "the edge"
Those valuable informations from your fellow crew chief are great, did you have an crew chief for Nany F-4 at hand?
Bernd
Bernd,
Thanks for your most positive comment. Unfortunately, I didn't have a Nanny for my F-4B build, but I do know a dozen or so modelers with an expertise in the 'Toon.
Joel
berndm
Joined: March 26, 2014
KitMaker: 844 posts
AeroScale: 630 posts
Posted: Friday, October 10, 2014 - 06:50 AM UTC
This can be helpful too at some time,Joel. Academys F-4B/N is still waiting.
Joel_W
Joined: December 04, 2010
KitMaker: 11,666 posts
AeroScale: 7,410 posts
Posted: Friday, October 10, 2014 - 07:24 AM UTC
I guess you can call yesterday's update part 1, and today's update as part 2, as the pylons and bomb loads have been installed. Of course I just noticed that I forgot to paint the tail end of the GBU-10s, so there's one more task added to my list.
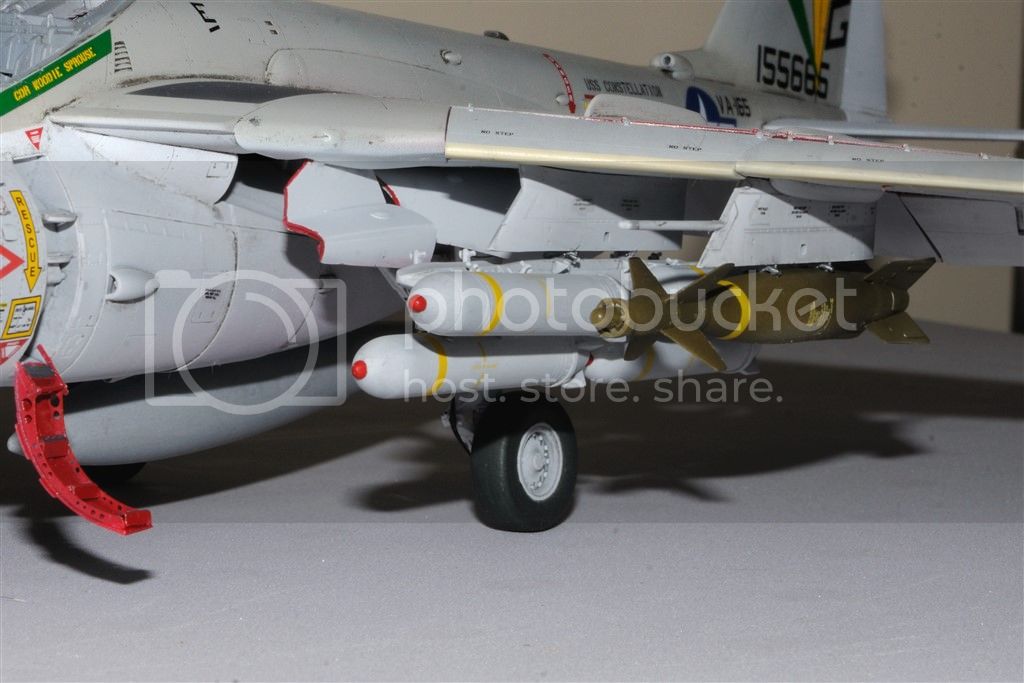
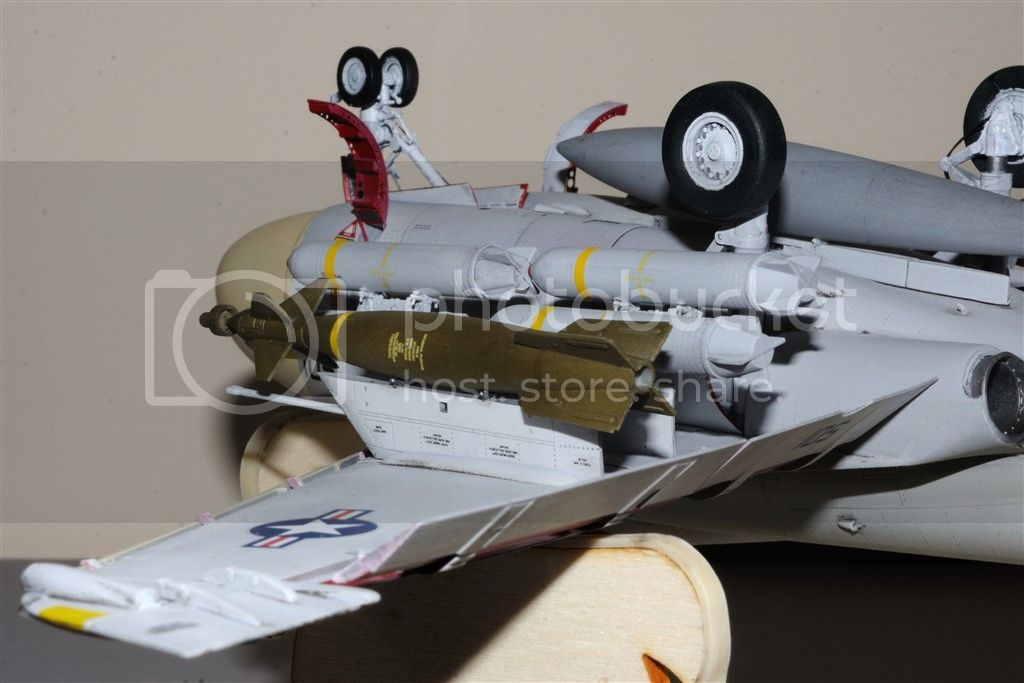
I'm getting close to the end of my A-6E Intruder build as I can finally see the finish line. Not much left to do. I just have one ejection seat to paint, both seats ejections grabs, and both sticks. Install the canopy, and a few odds and ends. Should be done by early next week.
Joel


I'm getting close to the end of my A-6E Intruder build as I can finally see the finish line. Not much left to do. I just have one ejection seat to paint, both seats ejections grabs, and both sticks. Install the canopy, and a few odds and ends. Should be done by early next week.
Joel
berndm
Joined: March 26, 2014
KitMaker: 844 posts
AeroScale: 630 posts
Posted: Friday, October 10, 2014 - 07:32 AM UTC
Looking good, Joel!
BTW nice stand
BTW nice stand
Joel_W
Joined: December 04, 2010
KitMaker: 11,666 posts
AeroScale: 7,410 posts
Posted: Friday, October 10, 2014 - 07:59 AM UTC
Quoted Text
Looking good, Joel!
BTW nice stand
Bernd,
Thanks for stopping by. Glad you like how the loads turned out.
As for the stand, I needed an adjustable, and safe stand to hold a model of various scales and sizes over a long period of time. I'm still not overly thrilled with this stand, but there just doesn't seem to be anything else out there.
Joel
Joel_W
Joined: December 04, 2010
KitMaker: 11,666 posts
AeroScale: 7,410 posts
Posted: Sunday, October 12, 2014 - 06:51 AM UTC
Well, after 3 1/2 months of working on the Hobby Boss 1/48 scale A-6E Intruder, I finally finished it this morning. It certainly hasn't been the easiest of kits to build, and at times has fought me tooth and nail. Still, the finished results were well worth my efforts. While not a perfect build by any means, it has to be the most challenging build I've had since coming back into the hobby, and thus the most satisfying.
Here's a bakers dozen of the finished A-6E.
Joel


Here's a bakers dozen of the finished A-6E.
Joel


SiStorey

Joined: March 14, 2014
KitMaker: 242 posts
AeroScale: 65 posts

Posted: Sunday, October 12, 2014 - 07:10 AM UTC
I have to say the A6 is one of my favourite aircraft for all time, just one big bad ass bomb truck, and your model has defiantly done it justice. well done Joel!!
 |

WEB HOSTING BY


Copyright ©2021 AeroScale and Kitmaker Network, a subsidiary of Silver Star Enterprises
All Rights Reserved. Please read our Conditions of Use and Privacy Policy.
All Rights Reserved. Please read our Conditions of Use and Privacy Policy.