

FirstSargeant, good pick on the kit! I've been wanting to do that one for a while. I think those Academy 1:72 kits in that line are really nice and turn out well. Plus, you can't beat the price! I'm looking forward to see what you can do with it.
Thanks, Hellbent
Air Campaigns
Want to start or join a group build? This is where to start.
Want to start or join a group build? This is where to start.
Hosted by Frederick Boucher, Michael Satin
OFFICIAL: Grumman Campaign

hellbent11

Joined: August 17, 2005
KitMaker: 725 posts
AeroScale: 55 posts

Posted: Thursday, July 03, 2014 - 03:54 PM UTC
M-123driver
Joined: December 19, 2012
KitMaker: 24 posts
AeroScale: 4 posts
Posted: Thursday, July 03, 2014 - 09:13 PM UTC
Hi all. So far I am 0 for 5 campaigns I have signed up for. If I don't finish this one I apologize right up front. It's not that I am a campaign troll, just that life has had a way of interfering with my return to model building after a 35+ year absence. I have been collecting all that time so I have a stash that I think would satisfy most builders for years. I have been collecting each version of every aircraft ever flown by and fought against the USMC (277 so far) I could find in 1/72 scale including no fewer than 32 examples from the Iron Works. This in addition to numerous 1/32 scale aircraft, 1/700 scale ships and 1/35 scale military vehicles. I thought that when I retired I would have time to enjoy model building again but that has not worked out so far since I took on another full time job in addition to staying at the place I retired from part time. Throw in family obligations and I have little leisure time. That being said, I will try really hard to finish this one. It's not quite "Deadliest Catch with grain" (loved that description) so Hopefully I can get it done. The other problem is that my ambition and desire for perfection far outstrips my talent, particularly when compared to some of the works of art I have seen on this site.

Mcleod

Joined: April 07, 2010
KitMaker: 1,028 posts
AeroScale: 939 posts
Posted: Friday, July 04, 2014 - 12:33 AM UTC
Quoted Text
description)The other problem is that my ambition and desire for perfection far outstrips my talent
I have that same issue. I have the picture in my mind, however, I'm simply not the artist.


Tomcat31

#042

Joined: November 18, 2006
KitMaker: 2,828 posts
AeroScale: 1,720 posts

Posted: Friday, July 04, 2014 - 01:25 AM UTC
Quoted Text
Allen welcome,
Just finish up your current projects, "then come on down" and join the group campaign. I'm looking forward to your F-14 Tomcat build. If I remember correctly, you're doing one of the Academy 1/48 scale versions. I believe it's the F-14A, with plenty of AM stuff. I'll be following along closely as I plan on more then one Academy F-14 over the next few years.
Close but no cigar
 i'm actually planning on converting the Hasegawa F-14A kit i have in the stash into a F-14D
 Heres all the parts and my primary reference book which i always seem to go to now.
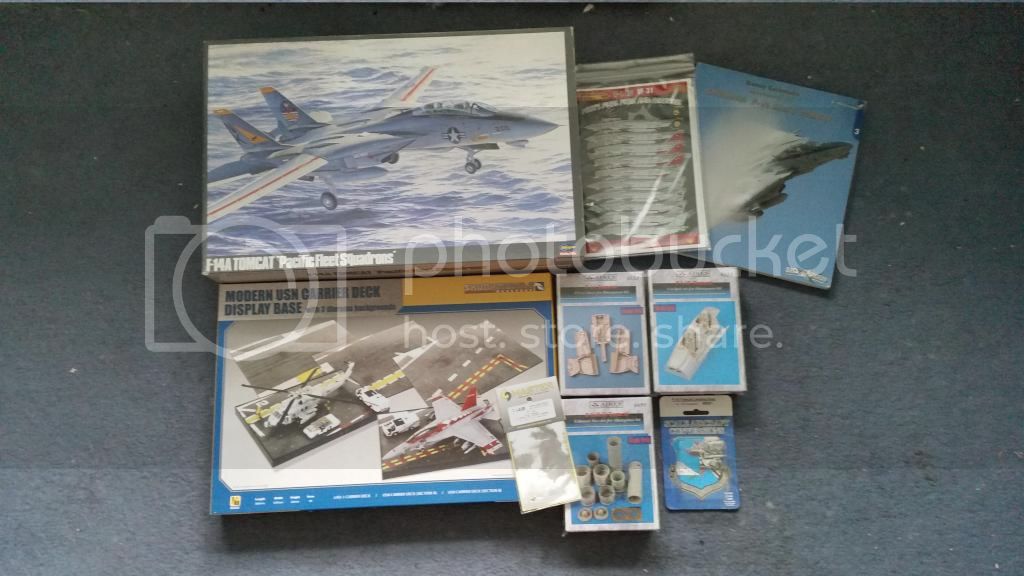
thanks to a kind person on the F-14 lovers facebook page i've also managed to track down an aftermarket 'D' chinpod and a Lantrin by a company called Steel Beach. Spruebrothers stock them but i'm finding it hard at the moment to justify the high postage cost to the UK (and also risk custom charges) for such small items (unless i can find something else I would like).

Joel_W
Joined: December 04, 2010
KitMaker: 11,666 posts
AeroScale: 7,410 posts
Posted: Friday, July 04, 2014 - 05:05 AM UTC
Quoted Text
Whew, caught a break... I'll get my pics up one of these days but I plan on building the Eduard F6F-3 kit # 8221 in 1:48. It is from a few years ago and doesn't say but I would call it a profipack. I'm pretty excited as it's my first Eduard in 1:48 and my first real PE. I've done a bit before just not this much on 1 kit.
I am planning on doing the markings of Lt. Alexander Vraciu of VF-6 from the kit decals. I am having a hard time finding out if this plane had the centerline fuel tank. Anybody know?
Thanks, Andy
Andy,
As for the Eduard kit, I've read several build reviews, and none found and major issues. The kit does have the option of 3 different engine cowlings, having the cowling designed as a 3 piece assembly. The only real issue seems to be that the tires/wheels are too narrow. AM replacements are easily attainable, and are relatively inexpensive, if they really bother you.
I'm pretty sure that most F6F-3's of VF-6 used a belly tank most of the time, but there are always exceptions. I've located a few color pictures of VF-6's F6F-3, both from 1943. One has a belly tank, and the other one doesn't.
Note the USN Star & Bars have the Red outline in this picture, so it's the earlier of the two pictures. The 2nd picture doesn't seem to have the red outlines.


And here's a picture of Lt. Alexander Vraciu in his Hellcat.

Joel

Joel_W
Joined: December 04, 2010
KitMaker: 11,666 posts
AeroScale: 7,410 posts
Posted: Friday, July 04, 2014 - 05:17 AM UTC
Welcome frank to our Grumman Campaign.
Like you, I'm a 30 year returnee, enjoying modeling to a much greater level. This time no contests, no clubs, no pressure. Just building what and how I like for my own enjoyment. I remember your intro post, as your stash is a lot different that what the rest of us seem to collect.
Unlike you, I've semi retired, have no plans to do anything but fish, build models, and enjoy life when I fully retire give or take in 2 years. Looking forward to selling our home and buying a Condo in North Carolina on a Bass lake and golf course. You're working more now then before. I just don't know where you get all that energy.
I've got complete faith in you (and I'll be there urging you on) to complete one Grumman build within the 5 month time frame. Just pick a kit in the scale you want to build, go for a perfect OOB, and relax and have some fun doing it. Stop by our campaign thread to post your progress, and see what everyone else is up to.
Joel
Joel_W
Joined: December 04, 2010
KitMaker: 11,666 posts
AeroScale: 7,410 posts
Posted: Friday, July 04, 2014 - 05:25 AM UTC
Quoted Text
Quoted TextAllen welcome,
Just finish up your current projects, "then come on down" and join the group campaign. I'm looking forward to your F-14 Tomcat build. If I remember correctly, you're doing one of the Academy 1/48 scale versions. I believe it's the F-14A, with plenty of AM stuff. I'll be following along closely as I plan on more then one Academy F-14 over the next few years.
Close but no cigar
Heres all the parts and my primary reference book which i always seem to go to now.
thanks to a kind person on the F-14 lovers facebook page i've also managed to track down an aftermarket 'D' chinpod and a Lantrin by a company called Steel Beach. Spruebrothers stock them but i'm finding it hard at the moment to justify the high postage cost to the UK (and also risk custom charges) for such small items (unless i can find something else I would like).
Allen,
Sorry for my screw up, but I tend these days to get things somewhat mixed up.
 I"m really looking forward to your conversion. I shy away from a lot of resin AM parts, so I'll be following your build with special interest, looking for tips, etc.
 I keep on forgetting that across pond has rather high postage costs associated with it. It cost me $16 for a package that Rowan shipped with the Eduard Spit IX in it, and no taxes.
Joel
MichaelSatin

Joined: January 19, 2008
KitMaker: 3,909 posts
AeroScale: 2,904 posts
Posted: Friday, July 04, 2014 - 05:55 AM UTC
I'd really like to build my Trumpeter 1/32 F8F-1 for this but I'm really behind on my modeling projects right now. It's still first on the list for this campaign if I can get to it, so we'll see...
Michael
Michael
Joel_W
Joined: December 04, 2010
KitMaker: 11,666 posts
AeroScale: 7,410 posts
Posted: Friday, July 04, 2014 - 07:59 AM UTC
Quoted Text
I'd really like to build my Trumpeter 1/32 F8F-1 for this but I'm really behind on my modeling projects right now. It's still first on the list for this campaign if I can get to it, so we'll see...
Michael
Michael,
Welcome to the Grumman campaign.
Just a great choice of kits, and scale. Peter built a spectacular F8F-1 Bearcat several years ago with a museum gloss finish. Are you planning on a operationally weathered finish, or a similar museum finish? Maybe I can talk Pete into posting a few pictures of his finished Bearcat.
Joel

Bigrip74
Joined: February 22, 2008
KitMaker: 5,026 posts
AeroScale: 2,811 posts

Posted: Saturday, July 05, 2014 - 04:57 AM UTC
my entry:
EDUARD HELLCAT MK.II

EDUARD HELLCAT MK.II

Joel_W
Joined: December 04, 2010
KitMaker: 11,666 posts
AeroScale: 7,410 posts
Posted: Saturday, July 05, 2014 - 10:17 AM UTC
Bob,
Welcome to our Grumman Campaign.
The Eduard 1/48 scale Hellcat Mk 11, which was the British designation for the F6F-5, builds up as an excellent model with plenty of detail right out of the box.
I'm really looking forward to seeing some non-US Navy paint schemes. I'll be following your build for sure.
Joel
Bigrip74
Joined: February 22, 2008
KitMaker: 5,026 posts
AeroScale: 2,811 posts
Posted: Saturday, July 05, 2014 - 10:57 AM UTC
I some how either lost or did not receive the aileron for the right wing and will need to scratch it.  .
.
Bob
.Bob
Joel_W
Joined: December 04, 2010
KitMaker: 11,666 posts
AeroScale: 7,410 posts
Posted: Saturday, July 05, 2014 - 01:46 PM UTC
Quoted Text
I some how either lost or did not receive the aileron for the right wing and will need to scratch it.
Bob
Bob,
Hopefully the aileron will turn up. Scratching building one out of sheet plastic shouldn't be that hard to duplicate the shape. It's the molded in details that will require a little more TLC. Looking forward to seeing your scratched replacement.
Joel
Bigrip74
Joined: February 22, 2008
KitMaker: 5,026 posts
AeroScale: 2,811 posts
Posted: Saturday, July 05, 2014 - 08:02 PM UTC
A little progress on the Hellcat and that scratched aileron:


we will see if the scratched aileron is up to standard.
Bob


we will see if the scratched aileron is up to standard.
Bob

Peterpools
Joined: June 08, 2013
KitMaker: 197 posts
AeroScale: 193 posts
Posted: Sunday, July 06, 2014 - 01:49 AM UTC
UPDATE: 7/6/14 GETTING GOING
The Hasagewa S2F Tracker has turned into a time machine, taking me back nearly 40 years; to the state of the hobby of the early 1970's. Back then the hobby was a lot simpler; most panel lines were raised, there was no resin, no PE, no washes to speak of, paints were enamels or Polly S for acrylics and the emphasis was on the basics seams, paint, no decal flash and the all important finish. The vision for the build became clear; build the Tracker as I would have done back in the day: no upgrades, no PE, leave the raised panel lines, add simple home made seat belts and harnesses and go for the finish.
I'll be putting my faith in a 40 year old decal sheet but I'll cross that bridge when I come to it. The plastic, classic Hasegawa, crisp, light gray smooth as silk and one reason why Hasegawa was always my favorite brand decades ago. Going through the parts, the molding are very good and the expected flash would need to be cleaned off some of the parts, nothing major, as the kit is 40 years old but not 40 year old molds.
The build started with the simple front office; easily done. Seat belts and harnesses were added from masking tape, the center console painted black and the instrument panel was part of the fuselage halves. Lead weight was added to insure the Tracker wouldn't be a tail sitter, the sonar pod built up and modified a bit so it could be glued into place later on and then the two fuselage halves were glued up with Testor's Liquid Cement (No Tamiya Extra Thin back in the day). Once dry, I painted the IP black and followed up with the instrument panel decal; 5 plus minutes soaking in warm water, with a drop of dishwasher detergent, a few drops of Micro Set and the decals final came free from the backing so far so good.
After a careful examination of the decal sheet, the stars and bars, US Navy, numbers and letters would need to be replaced as the clear carrier film and white colors had yellowed badly. As long as I could use the walk way, engine danger and tail decals, I could find my way.
The wings and tail feathers were glued up, taped tightly and left to dry overnight. Disaster struck as I dropped the left hand portion of the split canopy and for the life of me, I couldnt find it. I spent two days looking for it, moving every box, cabinet in the model room, crawling on my hands and knees, did little and went through every draw and the garbage can and still NO go.. Last night at 11:59, the light bulb went off and I checked one last draw which I was sure wasn't open and low and behold: the lost canopy .. I was back in business. Wings, tail feathers and canopy are just being test fit and no doubt about it, lots of sanding and filler will be needed.
Next up: attaching all the fling surfaces, engine assemblies and canopy
Thanks for checking in
Peter


The old guard, masking tape, Testor's Liquid cement and CCA


Joel_W
Joined: December 04, 2010
KitMaker: 11,666 posts
AeroScale: 7,410 posts
Posted: Sunday, July 06, 2014 - 01:53 AM UTC
Bob,
Nice start to your Mk 11. Some misconceptions about the interior colors of Naval aircraft during the war. Unfortunately they seemed to have been in a rather constant flux. In the case of the F6F-5/Mk11's with serial numbers starting around 8,000 or so, the cockpit sidewalls above the consuls were painted flat black. This was done to cut down on the glare issue the pilots were having. The rest of the cockpit was painted what we now refer to as FS 34151 interior green.
The interior of the cowl varied literally from aircraft batch to aircraft batch depending where they were made. Grumman built F6F-5/M11's generally were painted in Grumman Grey, other plants used Yellow Zinc Chromate or in some cases Interior Green (also known as Bronze Green). No Green Zinc Chromate was ever used.
Wheel wells, struts, wheels, and gear doors were always painted the same color as the exterior color. Any exterior surface including extended flaps were never painted in IG, YZC, or GZC per Navy regulations at the time.
Your replacement flap is coming along quite nicely. The fit is perfect. How are you planning on replicating the fabric over the ribbing?
Joel
Joel_W
Joined: December 04, 2010
KitMaker: 11,666 posts
AeroScale: 7,410 posts
Posted: Sunday, July 06, 2014 - 02:08 AM UTC
Pete,
Outside of you, no one happier that you found that canopy section. Must have exchanged a min of 2 dozen emails. But as I told you, according the Mr. Sherlock Holmes, no matter how improbable it may be, whatever places are left unchecked, is where the part will be. And of course I was right.
the S2F-1 Tracker really looks good. Even the wing fit looks much better then I thought it would be. Hard to tell how the cockpit glass fits, but from the pictures, it looks pretty good. Don't sweat the decals as there are dozens and dozens of AM sheets to make everything work.
As for the top wing walkway, many builds I've read for both scales, the easiest way to apply that huge decal was to cut it in half. Makes alignment so much easier.
Joel
Bigrip74
Joined: February 22, 2008
KitMaker: 5,026 posts
AeroScale: 2,811 posts
Posted: Sunday, July 06, 2014 - 02:12 AM UTC
Joel: I had been given a tip while in the 109 campaign some time ago. I will use stretched sprue to similate the raised area of the rib area after roughing up the surface of the aileron.
Bob
Bob
Peterpools
Joined: June 08, 2013
KitMaker: 197 posts
AeroScale: 193 posts
Posted: Sunday, July 06, 2014 - 02:24 AM UTC
JA
Canopy fit is only fair and I've already done a ton of sanding and test fitting to get the wings to sit as they should. Just glad I have both halves of the canopy to work with.
Bro
Canopy fit is only fair and I've already done a ton of sanding and test fitting to get the wings to sit as they should. Just glad I have both halves of the canopy to work with.
Bro
Joel_W
Joined: December 04, 2010
KitMaker: 11,666 posts
AeroScale: 7,410 posts
Posted: Sunday, July 06, 2014 - 02:40 AM UTC
Quoted Text
Joel: I had been given a tip while in the 109 campaign some time ago. I will use stretched sprue to similate the raised area of the rib area after roughing up the surface of the aileron.
Bob
Bob,
Thought that you would go that way. I've used that technique a few times and it does work well. Just use enough liquid glue so that that sprue melts down to the sheet, eliminating that rolled look. I carefully ran my finger along the sprue to do that.
Joel
Joel_W
Joined: December 04, 2010
KitMaker: 11,666 posts
AeroScale: 7,410 posts
Posted: Sunday, July 06, 2014 - 02:43 AM UTC
Quoted Text
JA
Canopy fit is only far and I;ve already done a ton of sanding and test fitting to get the wings to sit as they should. Just glad I have both halves of the canopy to work with.
Bro
Pete,
The fit really looks pretty good now. Just don't loose both halves now.

Joel
Peterpools
Joined: June 08, 2013
KitMaker: 197 posts
AeroScale: 193 posts
Posted: Sunday, July 06, 2014 - 03:20 AM UTC
JA
I glues them to the wall so as to keep them in sight at all times
Bro
I glues them to the wall so as to keep them in sight at all times
Bro
Joel_W
Joined: December 04, 2010
KitMaker: 11,666 posts
AeroScale: 7,410 posts
Posted: Sunday, July 06, 2014 - 04:07 AM UTC
Quoted Text
JA
I glues them to the wall so as to keep them in sight at all times
Bro
Pete,
Smart move.
Joel

Nito74

Joined: March 04, 2008
KitMaker: 5,386 posts
AeroScale: 635 posts
Posted: Sunday, July 06, 2014 - 06:30 AM UTC
Ok !
Starting this one !!!!
Starting this one !!!!

rochaped
Joined: August 27, 2010
KitMaker: 679 posts
AeroScale: 669 posts

Posted: Sunday, July 06, 2014 - 06:30 AM UTC
Hello,
here is my entry for the Grumman Campaign, Tamiya's F4F-4, going in as a Operation Torch machine.
These are the stuff I'm using for the project, though I won't be able to start it until August.
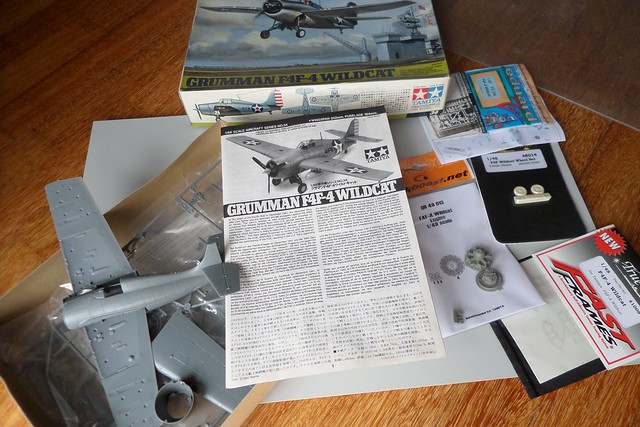
I know I have this kit for a long time, perhaps bought it the year it was first released (any idea ??). As you can see some tape residues are seen, will have to clean the plastic before all.
Anyone can recommend paints for the top side blue and lower side grey? I'm a noob when it comes to US colors
Thanks
Pedro
here is my entry for the Grumman Campaign, Tamiya's F4F-4, going in as a Operation Torch machine.
These are the stuff I'm using for the project, though I won't be able to start it until August.
I know I have this kit for a long time, perhaps bought it the year it was first released (any idea ??). As you can see some tape residues are seen, will have to clean the plastic before all.
Anyone can recommend paints for the top side blue and lower side grey? I'm a noob when it comes to US colors
Thanks
Pedro
 |

WEB HOSTING BY


Copyright ©2021 AeroScale and Kitmaker Network, a subsidiary of Silver Star Enterprises
All Rights Reserved. Please read our Conditions of Use and Privacy Policy.
All Rights Reserved. Please read our Conditions of Use and Privacy Policy.