

Cold War (1950-1974)
Discuss the aircraft modeling subjects during the Cold War period.
Discuss the aircraft modeling subjects during the Cold War period.
Hosted by Tim Hatton
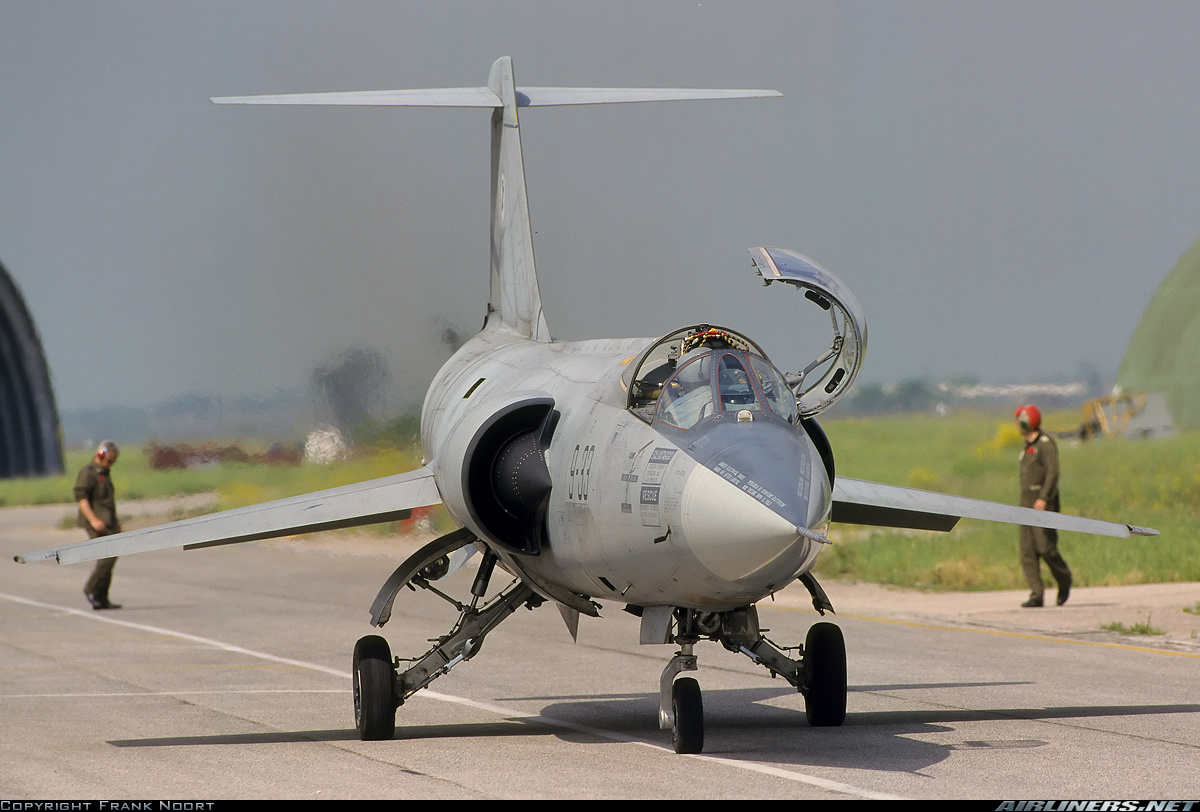
Italieri 1/32 F-104G
Removed by original poster on 09/03/14 - 03:17:09 (GMT).
Removed by original poster on 09/03/14 - 03:25:37 (GMT).
WoodshedWings

Joined: October 11, 2012
KitMaker: 141 posts
AeroScale: 139 posts

Posted: Tuesday, September 02, 2014 - 03:34 PM UTC
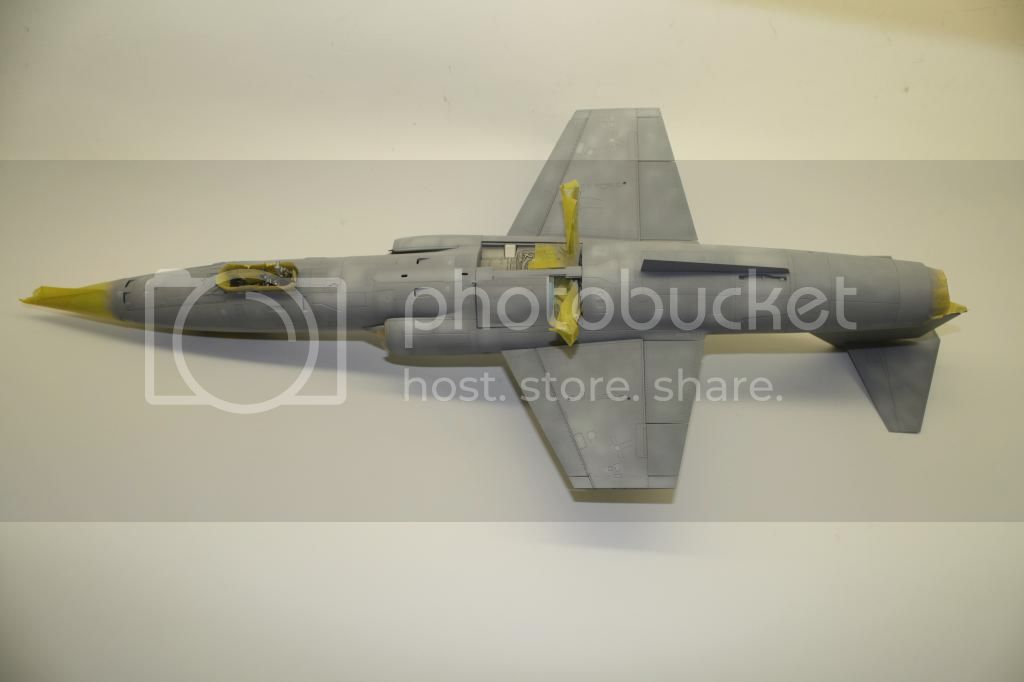
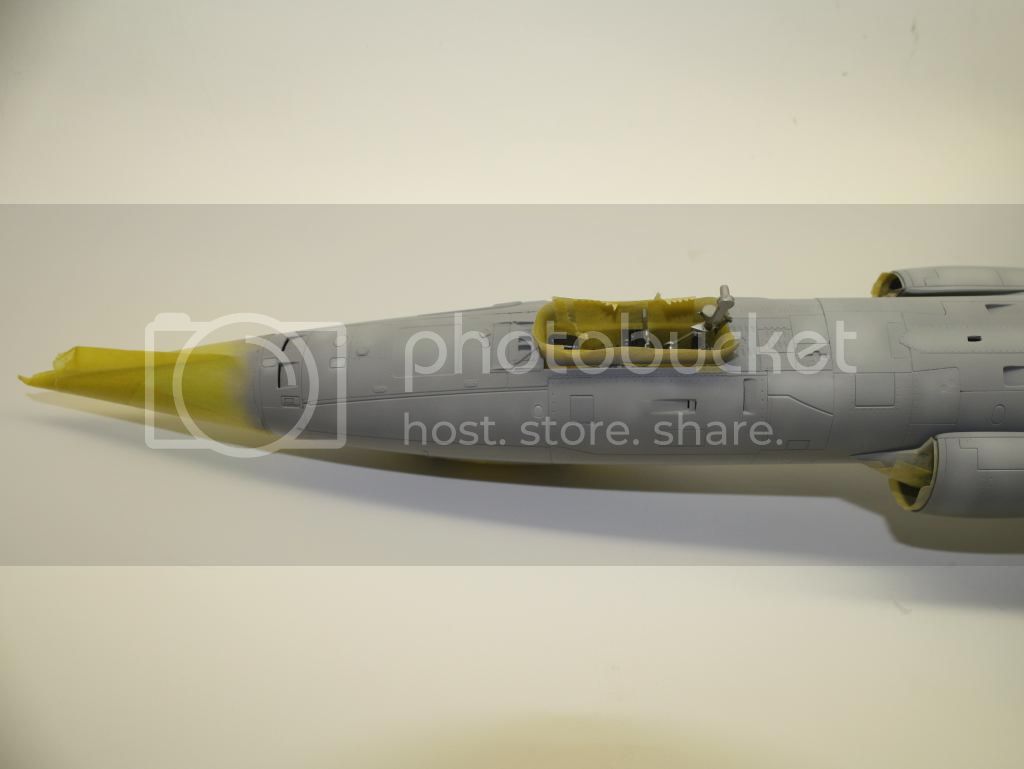
So, after spending a week away with the family, i have tried to intersperse some modeling with some grueling 8 day shifts at work and some 1/1 building (2 raised decks at the house) and finally have some progress to report.
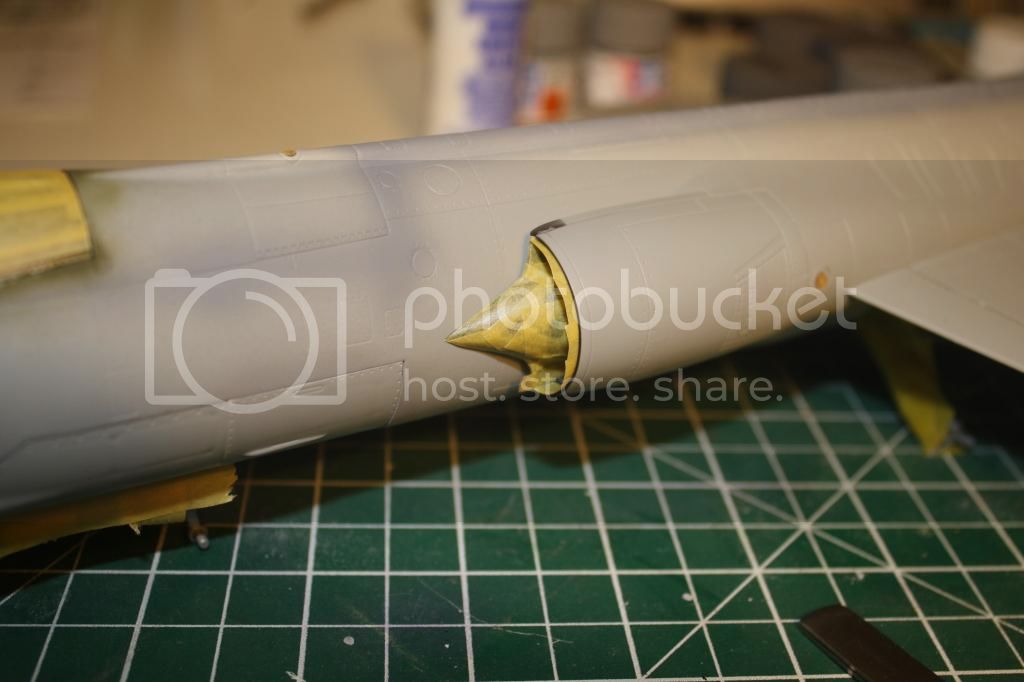
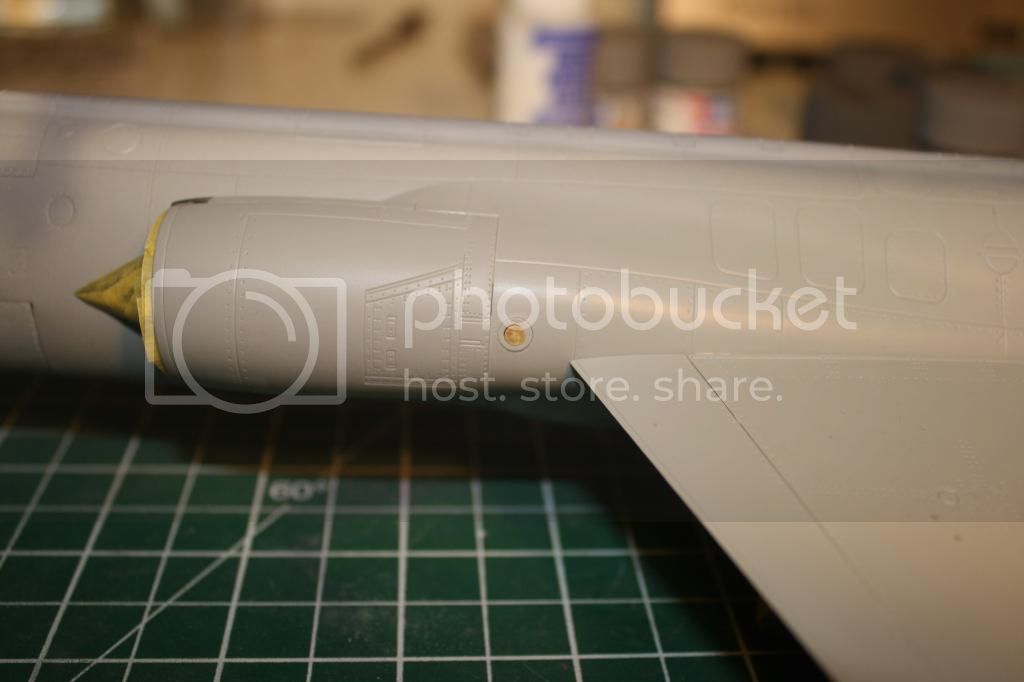
I painted the inside of the intakes and the shock cones before assembling and attaching the intakes. I figured this would be easier than painting after assembly.
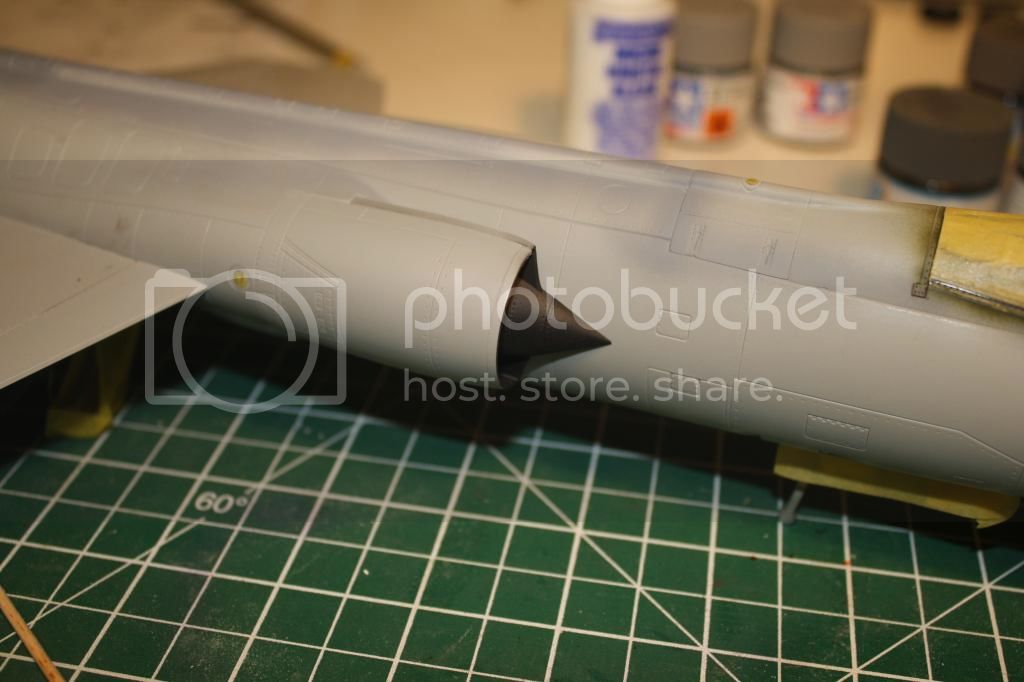
These were then masked.
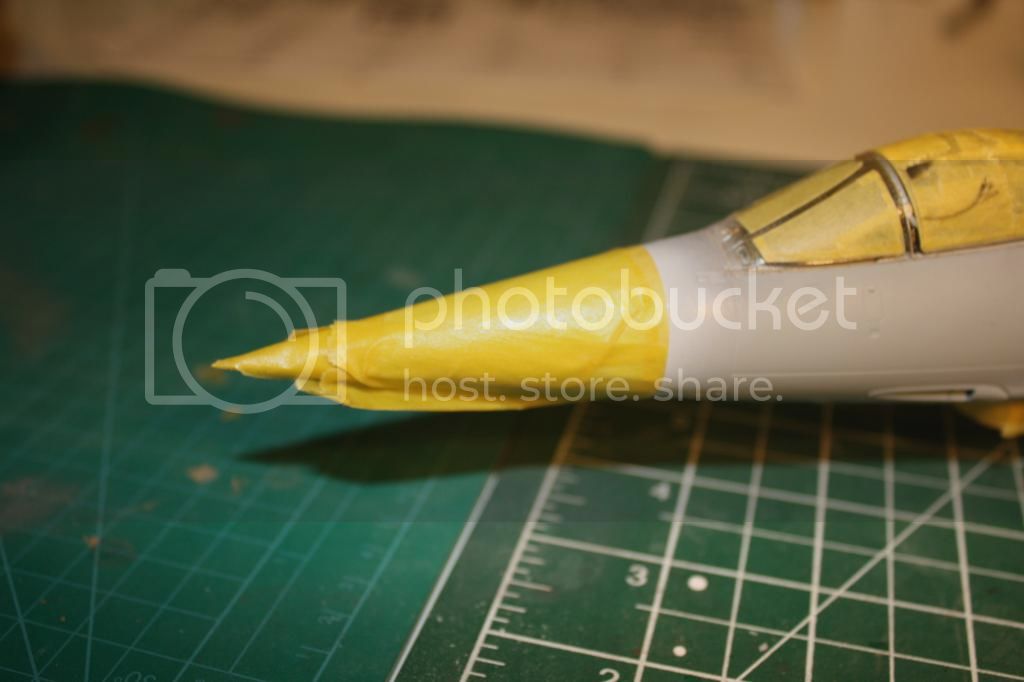
The nose cone was given a thin coat of white paint which looks light grey as the grey plastic shows through.
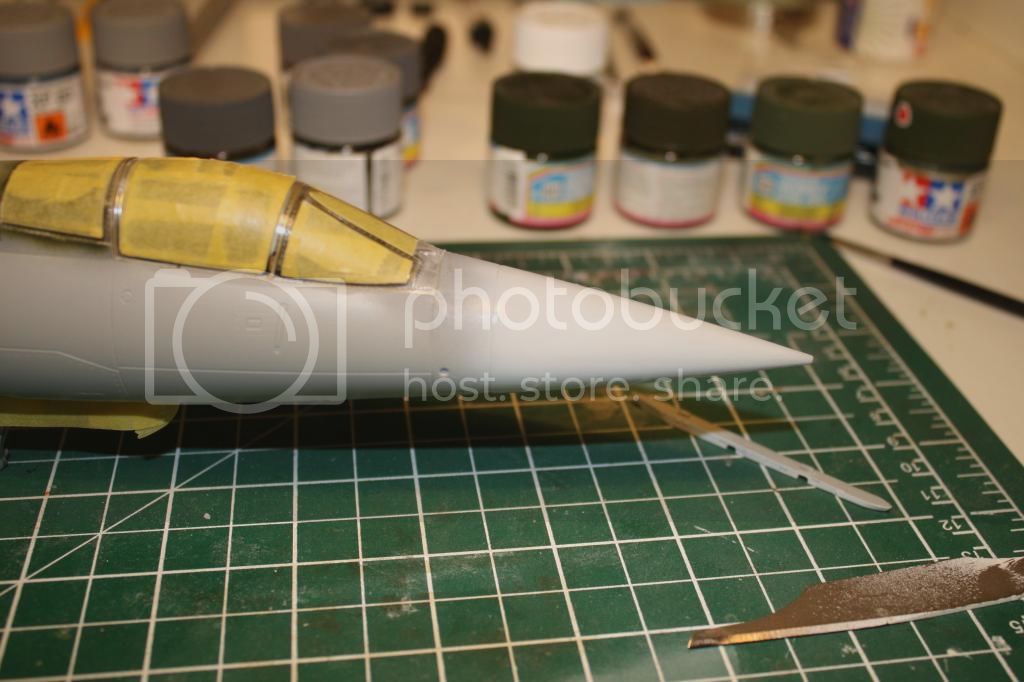
This was also masked.
The opening part of the canopy has some rounded corners and to mask these, I stuck some Tamiya tape onto thin card and then punched out small circles before removing the tape and attaching it to the corners. I used thin strips to join the dots and filled in the centre with some scrap tape from the cutting mat. The windscreen was masked by pressing tape into the frames, a bit like brass rubbing, and then following the contours with a sharp blade. The frames are well defined here so this method worked well.
I also punched out small discs of tape to mask the various inspection windows and lights.
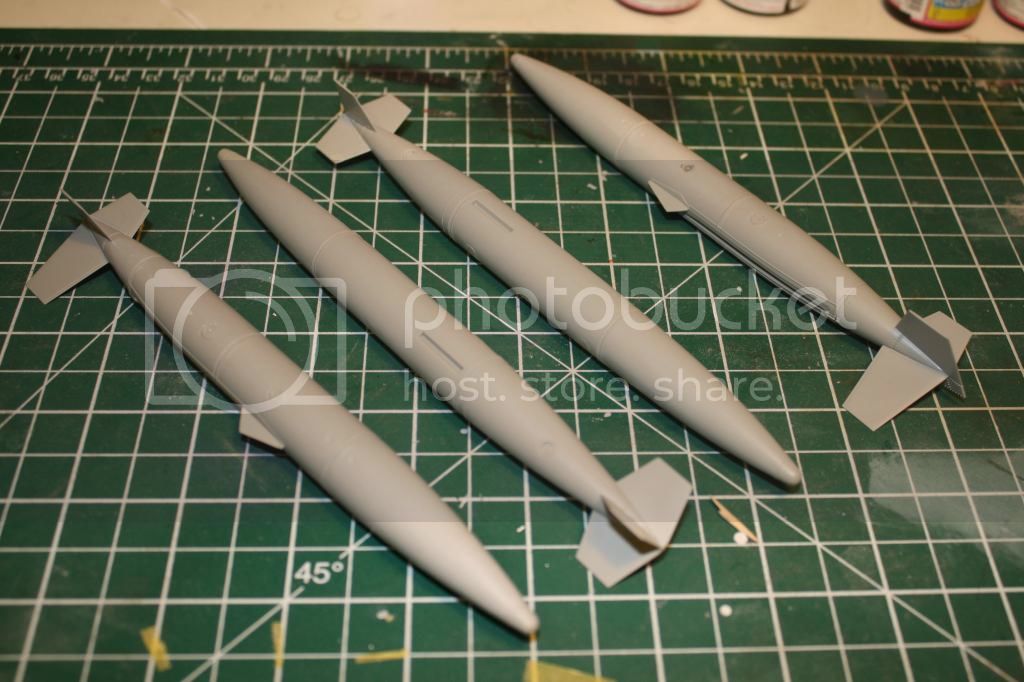
The under wing and tip tanks were assembled and many a happy hour was spent sanding and polishing the seams.
Having the gear legs in situ, makes the job of masking the bays quite tricky. I used a combination of tape and blu tack and the gear doors to do this but will still need some deft work with the airbrush to get round these areas.
After all this sanding, polishing and masking, it felt good to get some exterior paint on the airframe. The painting guide calls for the underside to be painted bare alluminium but this finish was actually painted on and faded to a dull grey after some time. I used Sky Grey as a base coat and will follow up with some fading and shading to break up the monotone finish.
More soon (honest!).
I painted the inside of the intakes and the shock cones before assembling and attaching the intakes. I figured this would be easier than painting after assembly.

These were then masked.

The nose cone was given a thin coat of white paint which looks light grey as the grey plastic shows through.

This was also masked.

The opening part of the canopy has some rounded corners and to mask these, I stuck some Tamiya tape onto thin card and then punched out small circles before removing the tape and attaching it to the corners. I used thin strips to join the dots and filled in the centre with some scrap tape from the cutting mat. The windscreen was masked by pressing tape into the frames, a bit like brass rubbing, and then following the contours with a sharp blade. The frames are well defined here so this method worked well.

I also punched out small discs of tape to mask the various inspection windows and lights.

The under wing and tip tanks were assembled and many a happy hour
was spent sanding and polishing the seams.
Having the gear legs in situ, makes the job of masking the bays quite tricky. I used a combination of tape and blu tack and the gear doors to do this but will still need some deft work with the airbrush to get round these areas.
After all this sanding, polishing and masking, it felt good to get some exterior paint on the airframe. The painting guide calls for the underside to be painted bare alluminium but this finish was actually painted on and faded to a dull grey after some time. I used Sky Grey as a base coat and will follow up with some fading and shading to break up the monotone finish.
More soon (honest!).
WoodshedWings
Joined: October 11, 2012
KitMaker: 141 posts
AeroScale: 139 posts
Posted: Tuesday, September 02, 2014 - 03:41 PM UTC
I have just spent the best part of 2 hours simply trying to update this thread. The combination of Kitmakers appalling user interface and the vagiaries of photobucket have resulted in the above. There are pictures, honest, but I am too frustrated and knackered to carry on trying to sort this out tonight! 

Emeritus

Joined: March 30, 2004
KitMaker: 2,845 posts
AeroScale: 1,564 posts

Posted: Tuesday, September 02, 2014 - 06:33 PM UTC
Hmm, what exactly didn't go as it should have? Did you try using the "IMG" links offered by Photobucket? With those, you don't have to do anything but simply copy-paste those into your post.
WoodshedWings
Joined: October 11, 2012
KitMaker: 141 posts
AeroScale: 139 posts
Posted: Wednesday, September 03, 2014 - 12:47 AM UTC
Ladies and Gentlemen, we now have pictures  It's amazing what a good nights sleep and some friendly advice (thanks Emeritus) can do.
It's amazing what a good nights sleep and some friendly advice (thanks Emeritus) can do.
berndm

Joined: March 26, 2014
KitMaker: 844 posts
AeroScale: 630 posts
Posted: Wednesday, September 03, 2014 - 05:07 AM UTC
Hi Mike, it is great to see, your pictures are back, this reminded me much on the first steps here,it is still very time consuming.Will watch out for your further progress

Bernd
Bernd
Emeritus
Joined: March 30, 2004
KitMaker: 2,845 posts
AeroScale: 1,564 posts
Posted: Wednesday, September 03, 2014 - 07:13 AM UTC
It's coming along really nicely!  Good work on the subassemblies; I've read mentions that they require care to get lined up properly to minimize seam work.
Good work on the subassemblies; I've read mentions that they require care to get lined up properly to minimize seam work.Joel_W

Joined: December 04, 2010
KitMaker: 11,666 posts
AeroScale: 7,410 posts
Posted: Wednesday, September 03, 2014 - 10:33 AM UTC
Mike,
It's really good to see your latest update. I'll be using your punch set method for masking those tricky curved corners. Just about every idea I've tried has been less then satisfactory.
With white, no matter the color of the plastic, I always prime using either Tamiya or Gunze Sangyo Gray primer. While the white isn't brilliant white, it covers well and consistently.
Glad to see that you just walked away and gave it a night's sleep to sort it out. I long ago stopped using the Aeroscale interface to post pictures, and just the IMG box on Photobucket which I copy then paste here. Works perfectly every time.
Joel

WoodshedWings
Joined: October 11, 2012
KitMaker: 141 posts
AeroScale: 139 posts
Posted: Thursday, September 04, 2014 - 12:39 AM UTC
Hi Joel. The nose cone of these Italian 104s was a very pale grey, almost white. The intention with the white paint on the nose, was to let the underlying plastic colour bleed through to try and achieve this.
Joel_W
Joined: December 04, 2010
KitMaker: 11,666 posts
AeroScale: 7,410 posts
Posted: Thursday, September 04, 2014 - 07:58 AM UTC
Mike,
Thanks for the info. It makes sense now.
Joel
Thanks for the info. It makes sense now.
Joel
WoodshedWings
Joined: October 11, 2012
KitMaker: 141 posts
AeroScale: 139 posts
Posted: Sunday, September 14, 2014 - 02:07 PM UTC
Following the application of Sky Grey, I began the weathering on the underside by masking of several panels and spraying a darkened shade of the base colour.
After removing the masking, the base colour was lightened and applied in random mottles and also on select panels.

This lightened grey was then misted over the underside to pull things together.
Looking forward to doing the topside camo. I'm using a photo of a heavily weathered Italian bird as reference.

After removing the masking, the base colour was lightened and applied in random mottles and also on select panels.

This lightened grey was then misted over the underside to pull things together.

Looking forward to doing the topside camo. I'm using a photo of a heavily weathered Italian bird as reference.
berndm
Joined: March 26, 2014
KitMaker: 844 posts
AeroScale: 630 posts
Posted: Sunday, September 14, 2014 - 07:43 PM UTC
Great paint job, Mike.I ever thought italian 104s had silver
undersides.
May it is a bit late, but you may find this interesting:
http://imodeler.com/groups/airshows-museums/forum/topic/lockheed-f-104-g-starfighter/
All the best Bernd
undersides.
May it is a bit late, but you may find this interesting:
http://imodeler.com/groups/airshows-museums/forum/topic/lockheed-f-104-g-starfighter/
All the best Bernd
Joel_W
Joined: December 04, 2010
KitMaker: 11,666 posts
AeroScale: 7,410 posts
Posted: Monday, September 15, 2014 - 01:15 AM UTC
Mike,
excellent job of randomly fading the paint on the bottom of the F-104, I use the same exact technique, and it works every time I'm looking for that very effect.
Joel
excellent job of randomly fading the paint on the bottom of the F-104, I use the same exact technique, and it works every time I'm looking for that very effect.
Joel
F-104nut
Joined: July 02, 2010
KitMaker: 37 posts
AeroScale: 35 posts
Posted: Friday, September 19, 2014 - 10:37 AM UTC
Mike two things first your my new best friend for building my favorite aircraft the awesome 104 . second your build is looking kick ass 
Cheers Brian
Cheers Brian
WoodshedWings
Joined: October 11, 2012
KitMaker: 141 posts
AeroScale: 139 posts
Posted: Saturday, September 20, 2014 - 02:37 PM UTC
Hi Berndt, the 104 was painted silver and not bare metal underneath and this paint quickly faded to a dull grey. This is the effect I was going for. Hi joel and Brian,thanks for the nice comments, the 104 definitely has a commanding presence in 1/32.
WoodshedWings
Joined: October 11, 2012
KitMaker: 141 posts
AeroScale: 139 posts
Posted: Wednesday, October 01, 2014 - 01:45 PM UTC
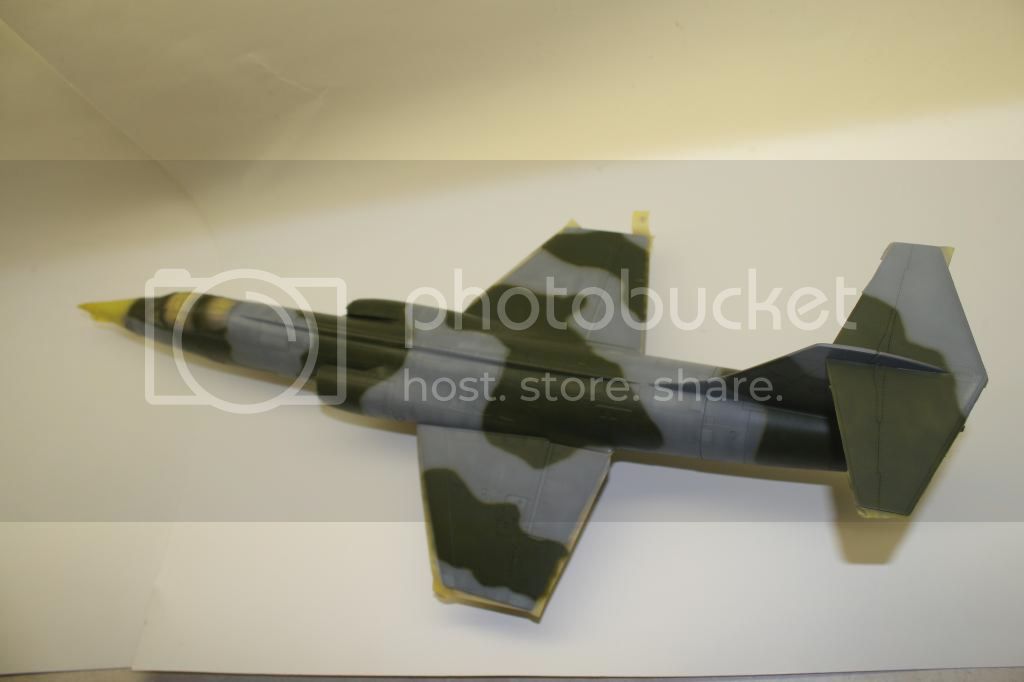
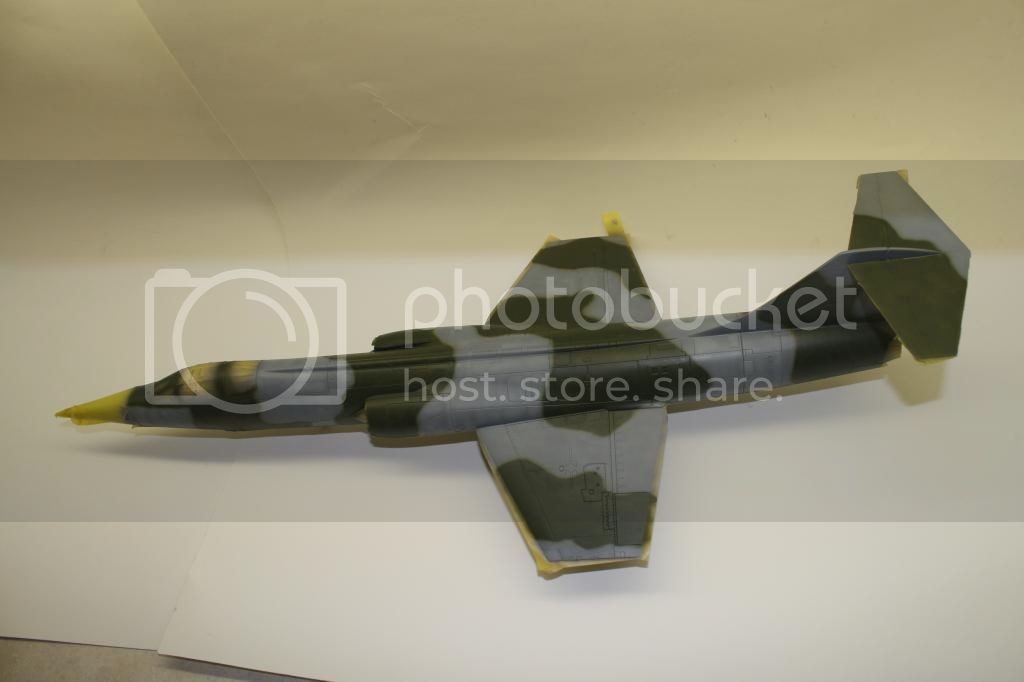
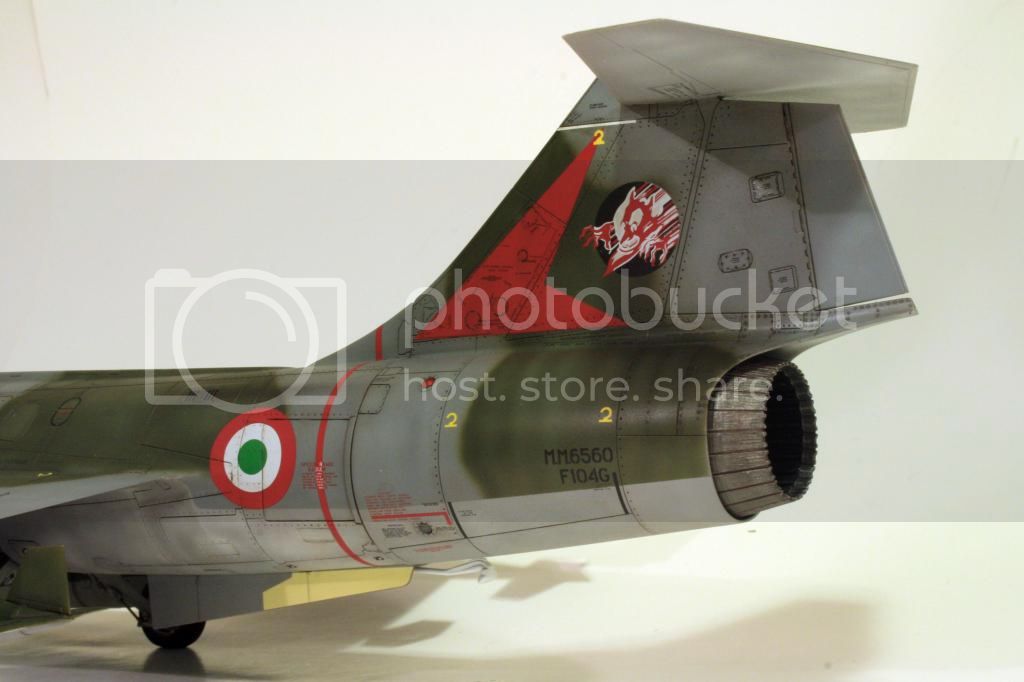
I have begun work on the upper camo of the 104. My reference photo shows lots of fading and staining on the upper surfaces so I sprayed a base coat of Tamiya neutral grey followed by a heavily thinned mottle of sky grey. This was applied in random blotches, on certain panels and along select rivet and panel lines. I also randomly streaked the lighter grey. I decided it was time to try some freehand airbrushing so I loaded up with Gunze khaki green and set to work, keeping the nozzle close up and drawing in the green. I am pleased with how this has turned out and this has given me the confidence to do this more often. Several areas will need tightening up but overall the effect looks good. The paint was applied unevenly to simulate wear and fading and I will follow up with a lighter shade of green and apply the mottles and streaks similar to the grey.


berndm
Joined: March 26, 2014
KitMaker: 844 posts
AeroScale: 630 posts
Posted: Wednesday, October 01, 2014 - 05:53 PM UTC
Nice paintjob, Mike ! Looking very good.
Joel_W
Joined: December 04, 2010
KitMaker: 11,666 posts
AeroScale: 7,410 posts
Posted: Thursday, October 02, 2014 - 06:04 AM UTC
Mike,
Excellent job on the free hand camo paint scheme. In all the years I've done them, I have a 100% touch up needed rate. It's just the nature of the beast.
Joel
Excellent job on the free hand camo paint scheme. In all the years I've done them, I have a 100% touch up needed rate. It's just the nature of the beast.
Joel
WoodshedWings
Joined: October 11, 2012
KitMaker: 141 posts
AeroScale: 139 posts
Posted: Sunday, October 26, 2014 - 01:30 PM UTC
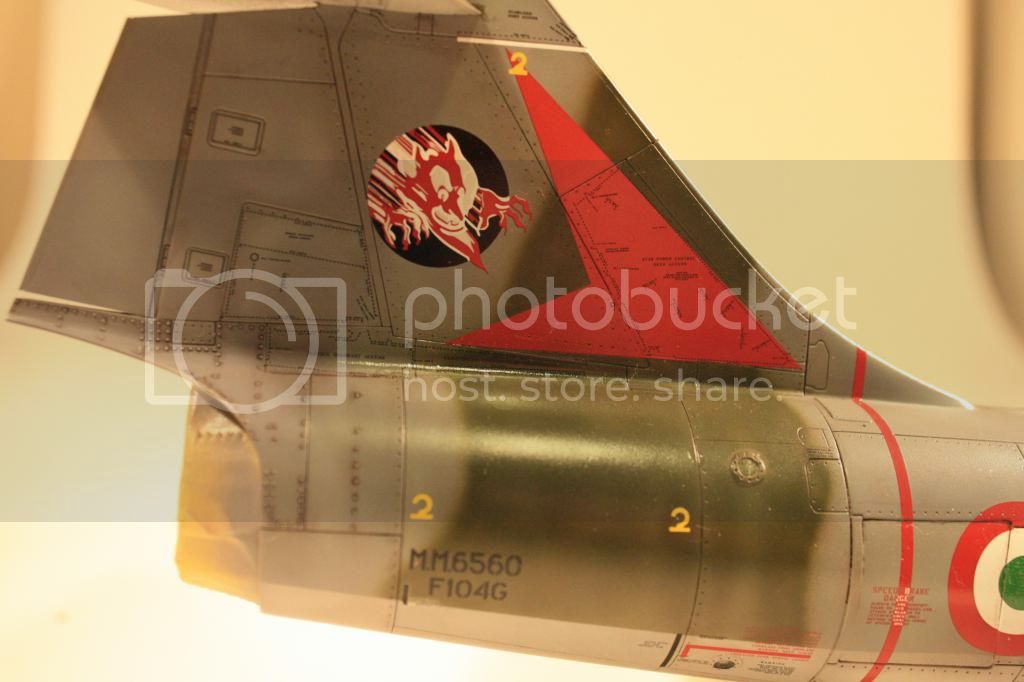
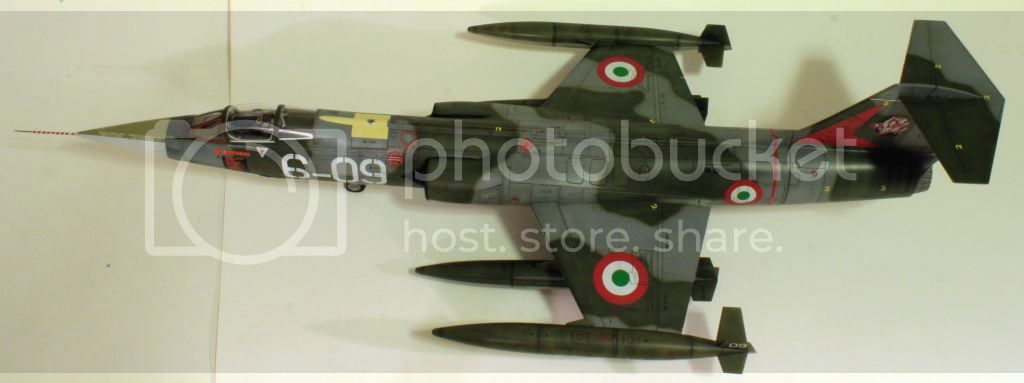
I followed up the green with a mottle of a lighter shade and then removed the masking. I was happy to see nice clean demarcation lines between upper and lower colours. For the gloss coat, I used Klear, cut with Simple Green as I heard this gives a good shine and this certainly proved to be the case. I commenced decalling with the national insignia. The Cartograph decals are a thing of beauty, being accurately printed and opaque with very little carrier film. They are also very thin, but with care, go down very nicely. If only all decals could be like this. I almost managed, by sheer cack-handedness, to screw up one of the stencil decals on the wing tank pylons as they folded up on me while trying to reposition them. I had to carefully cut it into sections while it was off the backing paper and then manouever into place. I used Micro Set / Sol to bed them down. Only about eight million stencils to go.


Joel_W
Joined: December 04, 2010
KitMaker: 11,666 posts
AeroScale: 7,410 posts
Posted: Monday, October 27, 2014 - 03:48 AM UTC
Mike,
The F-104G is really looking quite good. Outstanding job on the decals. I feel your "pain" with those million of stencils. The 1/48 scale F-4B had a full sheet of stencils. Took me 2 weeks to apply them all. But the finished results sure looks like it was well worth the time and effort.
Joel
The F-104G is really looking quite good. Outstanding job on the decals. I feel your "pain" with those million of stencils. The 1/48 scale F-4B had a full sheet of stencils. Took me 2 weeks to apply them all. But the finished results sure looks like it was well worth the time and effort.
Joel
WoodshedWings
Joined: October 11, 2012
KitMaker: 141 posts
AeroScale: 139 posts
Posted: Wednesday, December 03, 2014 - 07:56 AM UTC
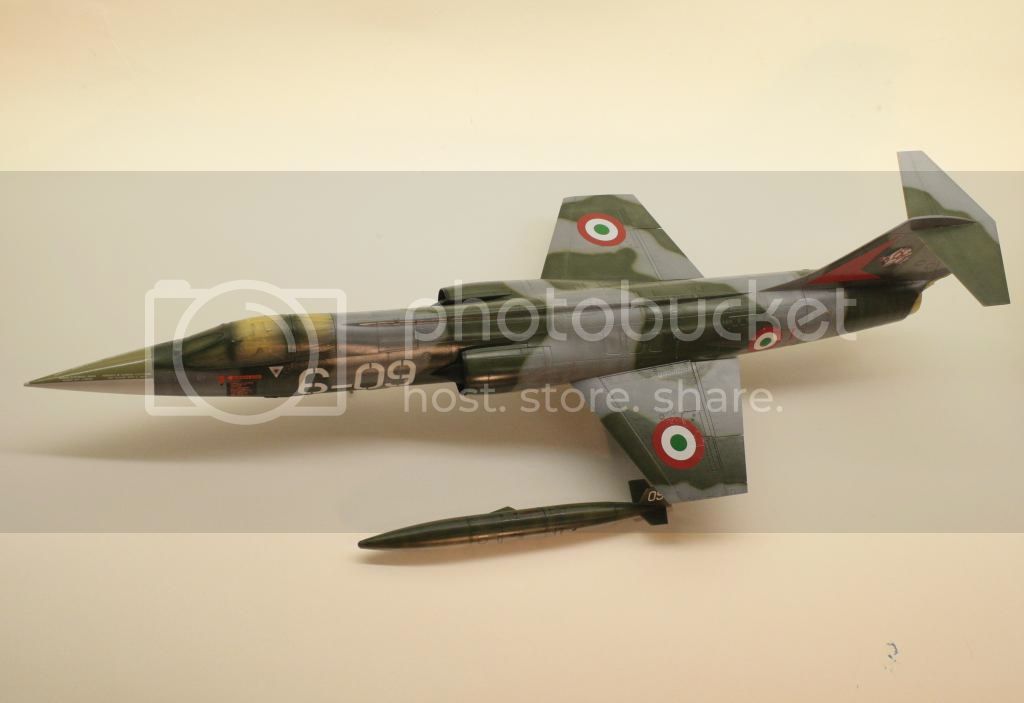
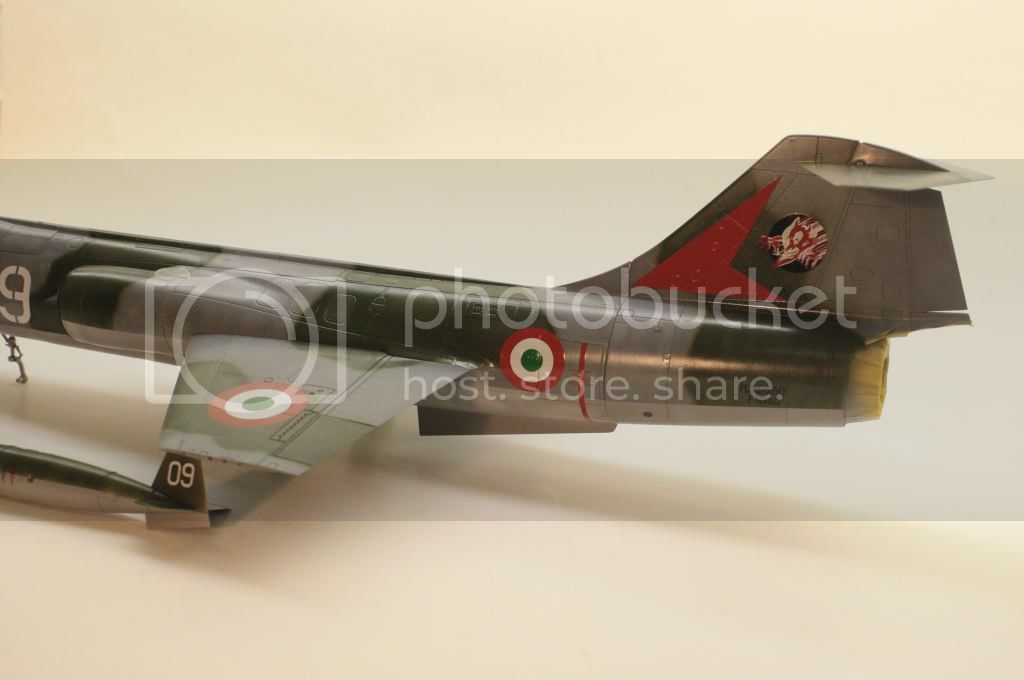
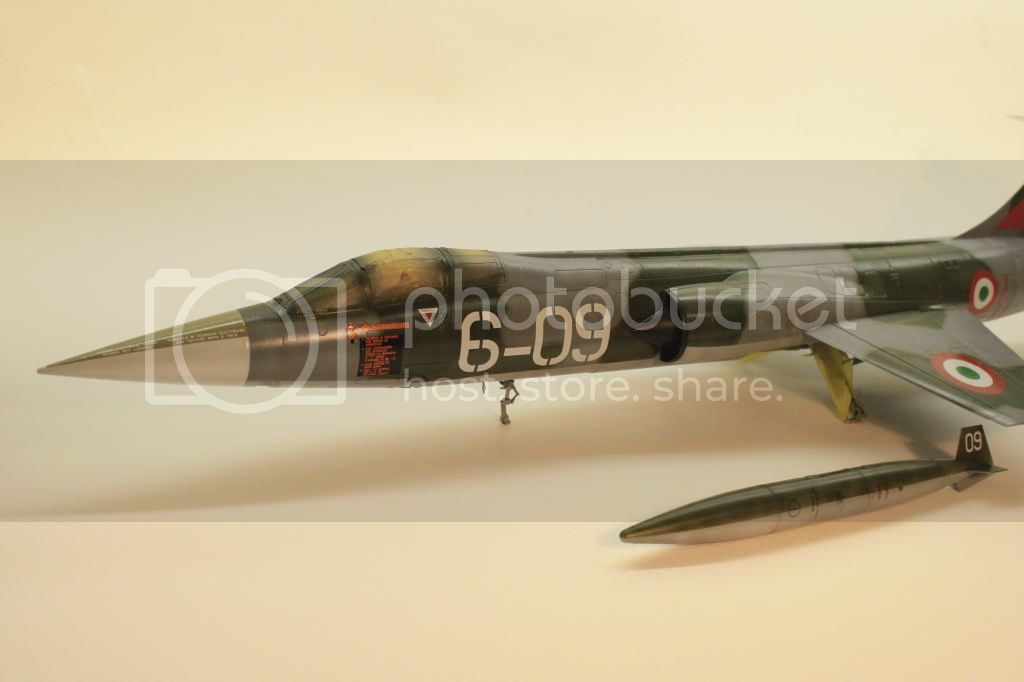
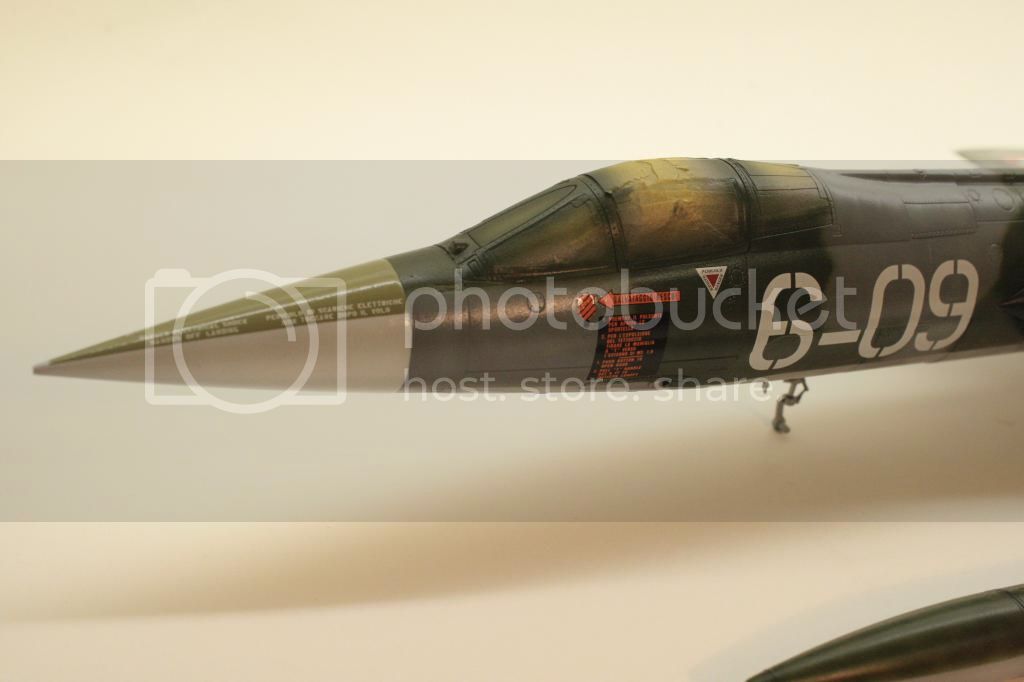
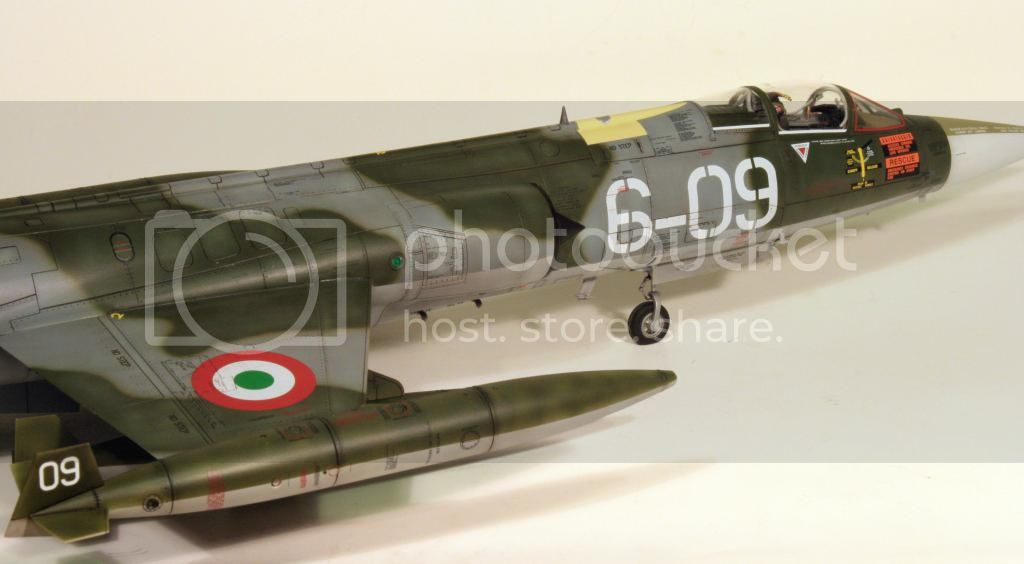
Yes Joel, the stenciling has certainly been time consuming and I'm not 100% sure how many of the stencils found their way onto the Italian 104s, but I think that they really add some character and realism to the model. And so with all the stencils applied, it was time for a wash to enhance panels and raised detail.
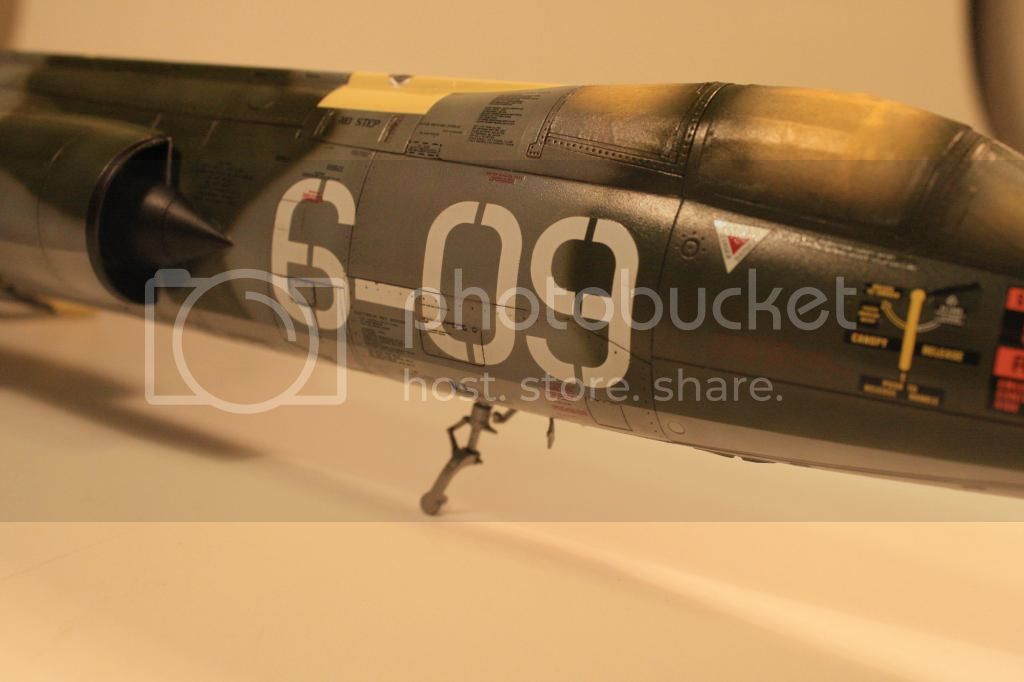
As I was going for a grubby bird, I sloshed Mig dark wash quite liberally onto the model and let it dry over night. The next day, I went over the airframe with a Q-tip and half rubbed off, half worked in the semi dried wash. I spent a fair bit of time on this, using mineral spirit to remove the more stubborn areas, until a kind of dirty filter was left as well as defined panel lines. my reference photo shows a good deal of grime toward the rear of the aircraft and so this filter was more concentrated in this area as well as around the raised rivet detail.
Next up will be to spray the flat coat and attach all the antennae, probes and fuel tanks etc. Wish I had more time to model!

As I was going for a grubby bird, I sloshed Mig dark wash quite liberally onto the model and let it dry over night. The next day, I went over the airframe with a Q-tip and half rubbed off, half worked in the semi dried wash. I spent a fair bit of time on this, using mineral spirit to remove the more stubborn areas, until a kind of dirty filter was left as well as defined panel lines. my reference photo shows a good deal of grime toward the rear of the aircraft and so this filter was more concentrated in this area as well as around the raised rivet detail.

Next up will be to spray the flat coat and attach all the antennae, probes and fuel tanks etc. Wish I had more time to model!
Joel_W
Joined: December 04, 2010
KitMaker: 11,666 posts
AeroScale: 7,410 posts
Posted: Wednesday, December 03, 2014 - 11:39 PM UTC
Mike,
Time well spent on those washes, as they really made the panel lines and small details just pop.
Joel
Time well spent on those washes, as they really made the panel lines and small details just pop.
Joel

JPTRR

#051

Joined: December 21, 2002
KitMaker: 7,772 posts
AeroScale: 3,175 posts
Posted: Wednesday, December 10, 2014 - 07:28 AM UTC
That is some fine surface detail. Mike, you are working this model out great!

WoodshedWings
Joined: October 11, 2012
KitMaker: 141 posts
AeroScale: 139 posts
Posted: Tuesday, December 16, 2014 - 02:57 AM UTC
Once the wash was dry, I flat coated with Testors Dullcote. All the remaining masking was then removed.
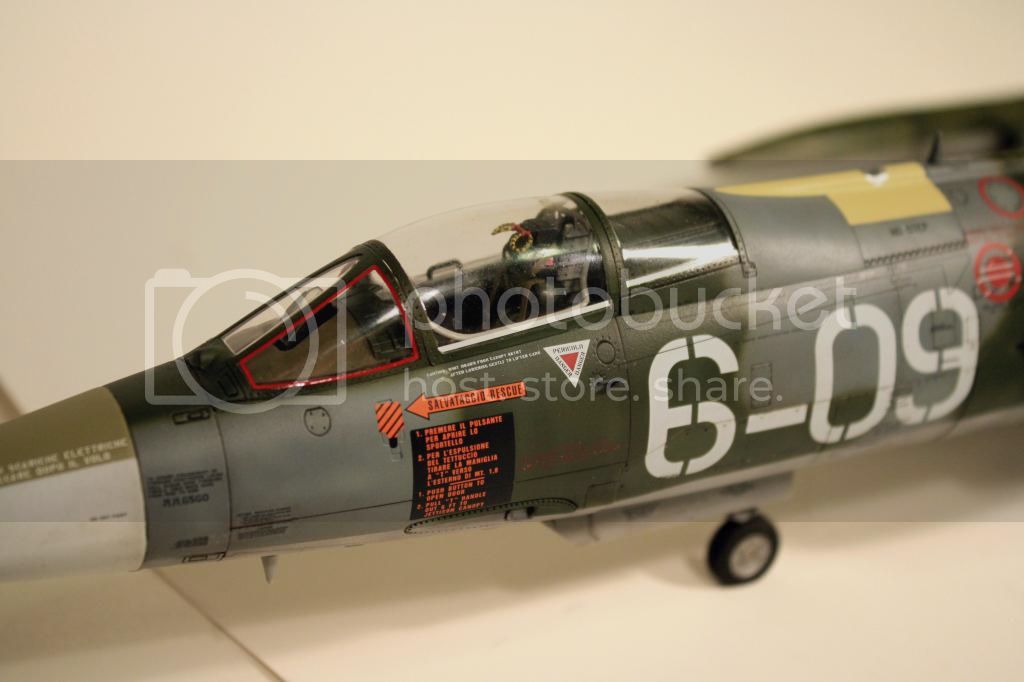
I applied the decals for the canopy glass seals but was concerned about how the 2 side windscreens would turn out as the centre is filled with carrier film. As it turned out, these settled down nicely over the clear part and the carrier film is now invisible, so I needn't have worried.
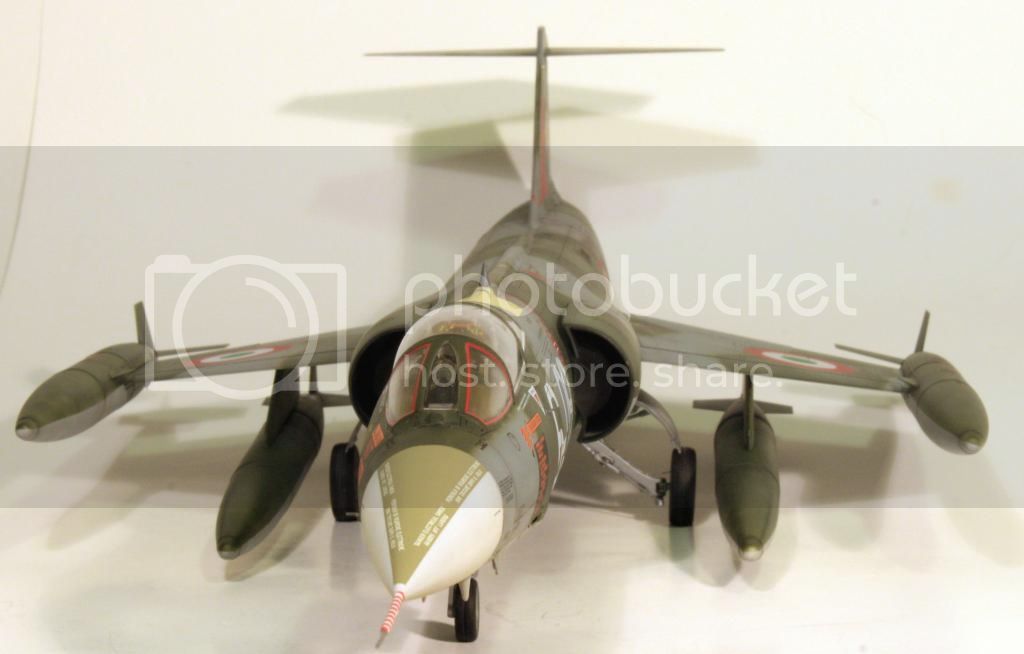
Having previously finished and weathered the gear doors, these were now attached. The attachment point for these is a bit tenuous so care must be taken aligning and tweaking them into place.
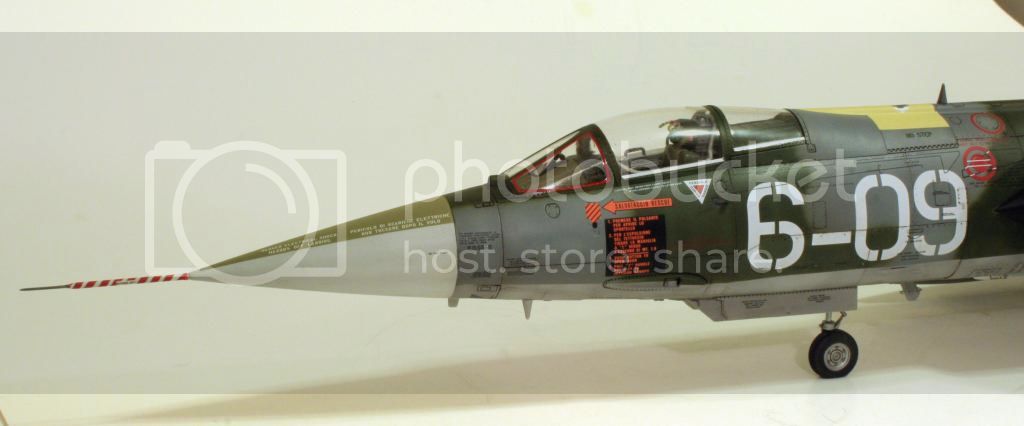
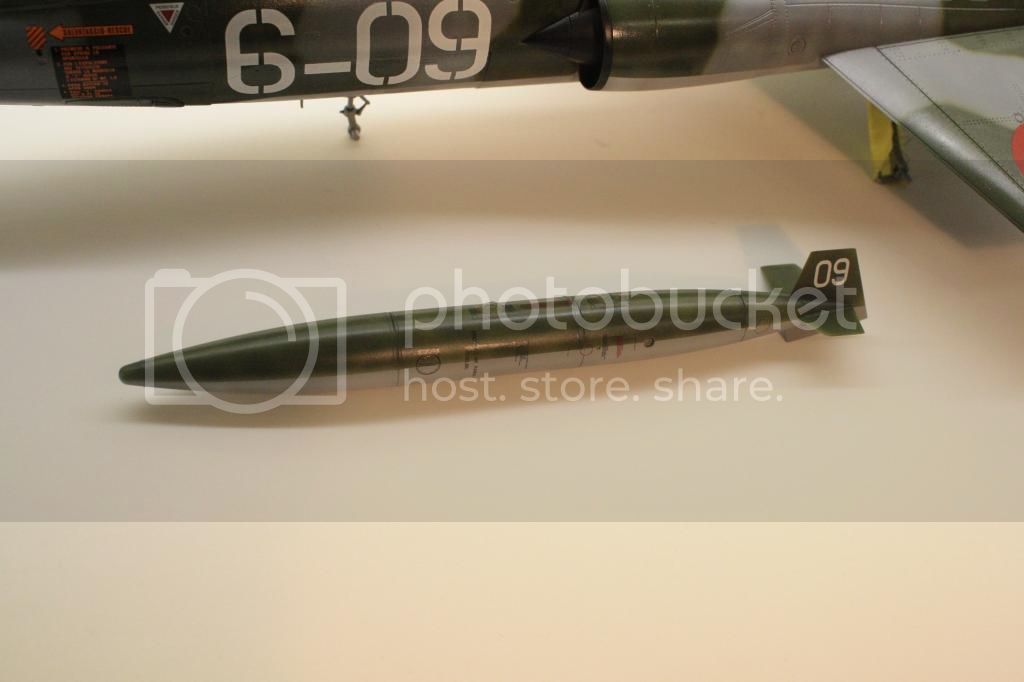
The wing tip tanks were then attached followed by the underwing tanks. I then attached and painted all the many antennae. The pitot tube was painted white and dipped in Future ready for applying the spiral red stripe decal. This was a bit fiddly but was helped along with Microset / sol. I touched up either end with red paint. And with that, the build is done.
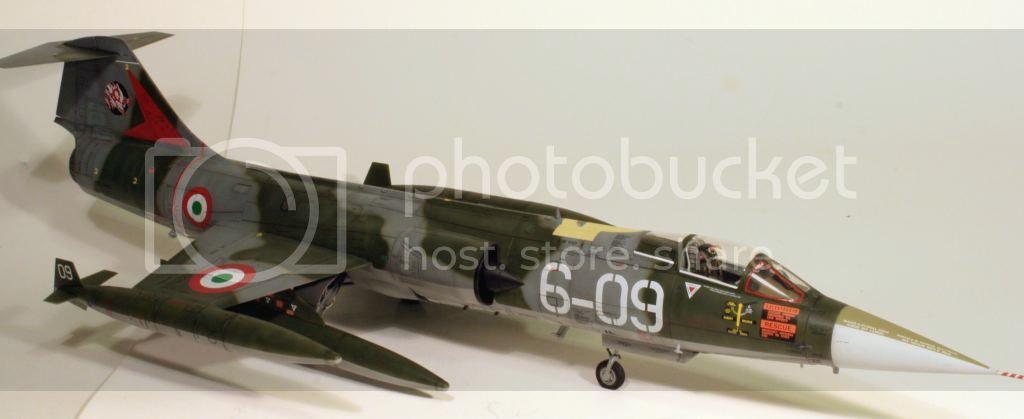
I think that this kit builds into a nice model despite the fairly minor niggles mentioned earlier. For the money, I would have expected sharper detail for this scale but the decals and marking options are pretty awesome. All in all, an enjoyable build which has resulted in a pretty spectacular model.

I applied the decals for the canopy glass seals but was concerned about how the 2 side windscreens would turn out as the centre is filled with carrier film. As it turned out, these settled down nicely over the clear part and the carrier film is now invisible, so I needn't have worried.

Having previously finished and weathered the gear doors, these were now attached. The attachment point for these is a bit tenuous so care must be taken aligning and tweaking them into place.

The wing tip tanks were then attached followed by the underwing tanks. I then attached and painted all the many antennae. The pitot tube was painted white and dipped in Future ready for applying the spiral red stripe decal. This was a bit fiddly but was helped along with Microset / sol. I touched up either end with red paint. And with that, the build is done.


I think that this kit builds into a nice model despite the fairly minor niggles mentioned earlier. For the money, I would have expected sharper detail for this scale but the decals and marking options are pretty awesome. All in all, an enjoyable build which has resulted in a pretty spectacular model.
 |

WEB HOSTING BY


Copyright ©2021 AeroScale and Kitmaker Network, a subsidiary of Silver Star Enterprises
All Rights Reserved. Please read our Conditions of Use and Privacy Policy.
All Rights Reserved. Please read our Conditions of Use and Privacy Policy.